

Enjoy the benefits of a premium membership!
Upgrade Account
-
TalkBass has been independent since 1998. Add your voice.
Create a free account to reply to discussions, view embedded media, and browse with fewer display ads.
Join free Log in
Want zero display ads or expanded classifieds tools? Compare plans.
You are using an out of date browser. It may not display this or other websites correctly.
You should upgrade or use an alternative browser.
You should upgrade or use an alternative browser.
Sponsored Lowe Custom Guitars Shop Notes
- Thread starter BTL
- Start date
More options
Who Replied?

More of Jim Jaeger's paint work:
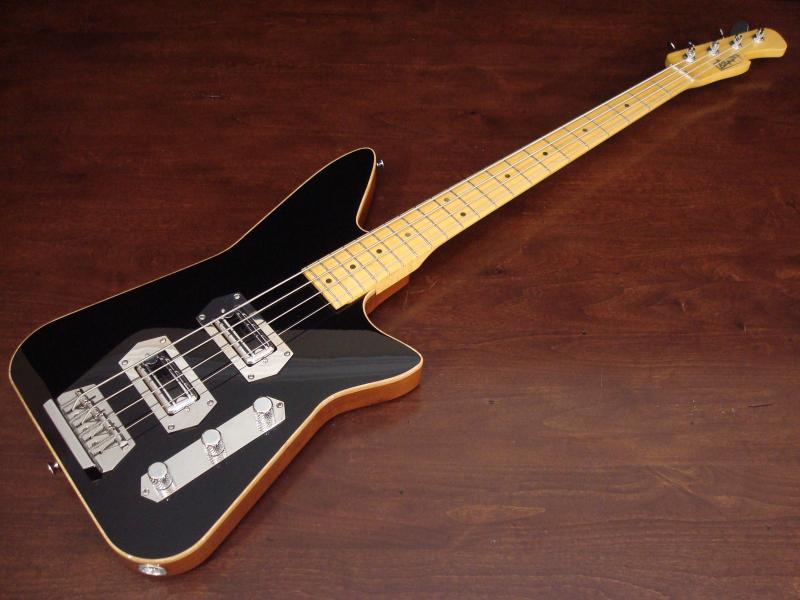
Those all look amazing and are these TV Jones pickups?
Yes, those are TV Jones Thunder'Blades in a DeArmond style shell with an "English" mount.Those all look amazing and are these TV Jones pickups?
They are also available in a Filter'Tron style shell:
There are a lot of approaches to attaching a “bolt-on” neck to a guitar or bass body, and the traditional method involves using #8 wood screws.
While that method isn’t bad, I have found it to be somewhat lacking over the years as the neck mounting holes can become stripped over time.
When I went looking for a better solution I found a number of different approaches to solving the problem, most of which involved various types of EZ-LOK inserts for wood or metal.
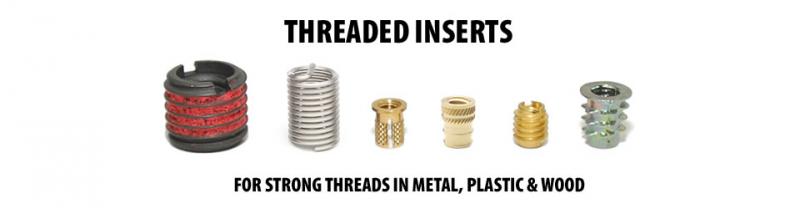
After reviewing the merits each, I decided to go with Chet Johnson’s system because it blends a variety of simple tools, supplies and materials into an elegantly simple solution that most players and builders can perfect easily on the first try with just a little skill and patience.
I also added one little “twist” to Chet’s approach because my bodies have sculpted heels and each bolt will vary from the next as far as how deeply it penetrates into the neck.
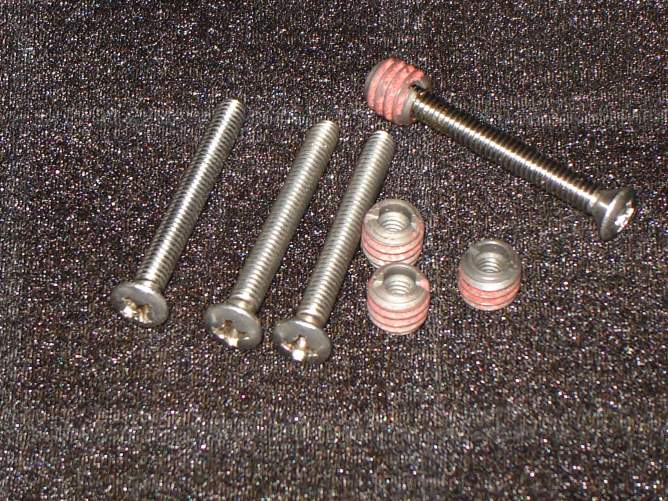
Here are the supplies I use, including the instructions as provided by Chet in his kits:
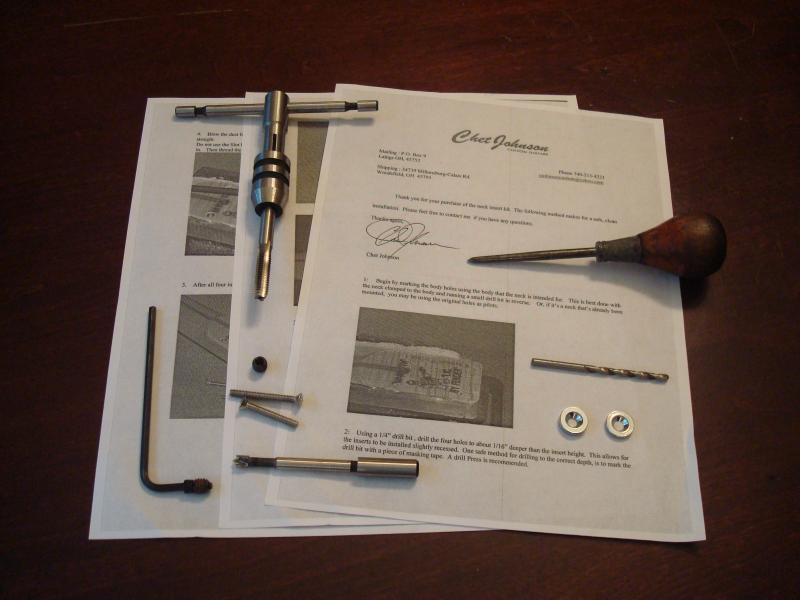
- 5/16-18 Tap (kit)
- 8-32 socket head bolt (kit)
- 9/64" Allen wrench (kit)
- 8-32 oval-head stainless steel bolts, 1.25” and 1.5” (kit)
- EZ Lock inserts, 4 (kit)
- 1/8” twist drill (mine)
- 1/4" Forstner bit (mine)
- Harbor Freight Tap Handle (mine)
- Wood handled awl for marking the neck bolt holes (mine)
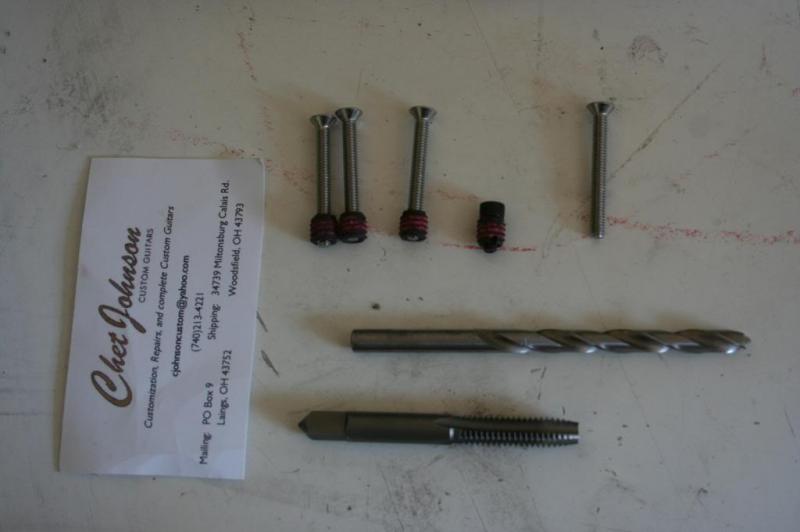
The kit Chet offers comes as shown (bit and tap optional if needed):
I mark each bolt hole on the back of the neck with the awl while the neck is clamped in place.
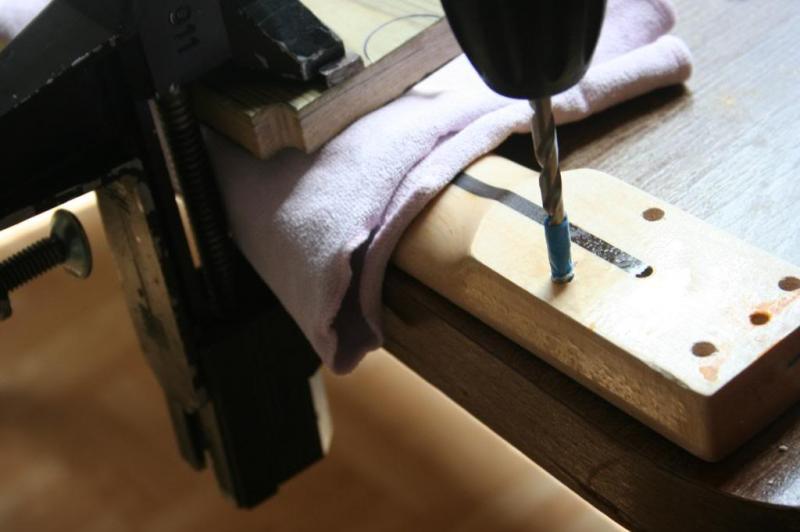
Next, I mark the 1/8” bit with blue tape to the maximum depth the neck will safely allow and drill a pilot hole.
This will allow the bolts to extend past the insert and “self-tap” into the neck wood, eliminating any potential "back pressure" a bolt could apply on the insert if it bottoms out within the neck.
This is likely not a concern for a standard neck with a plate and uniform heel, but I use bushing inserts and have sculpted heels on my builds, so the bolt depths are not uniform.
This is my “little twist” on Chet’s system.
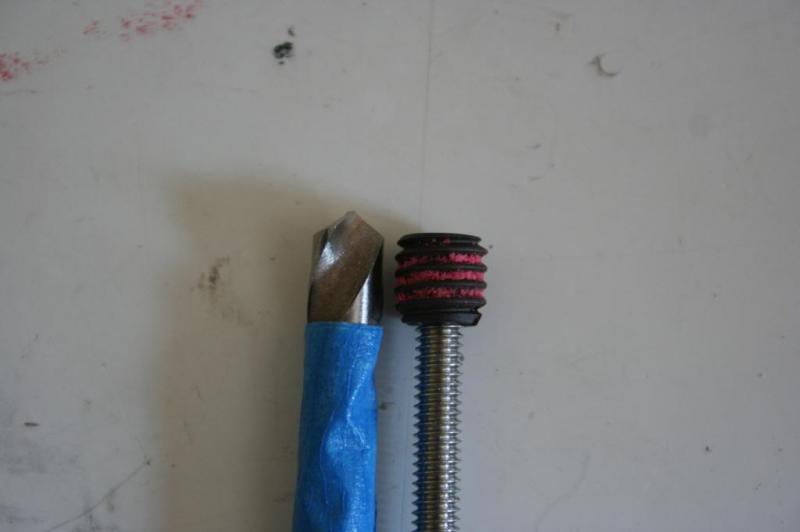
Next, I use the 1/4" Forstner bit marked with blue tape to allow the insert to sit just below the surface of the neck.
A standard twist drill bit is shown here:
I use a drill press, but a steady-handed person could get away using a hand drill with a twist bit:
Once the 1/4" holes are drilled and the sawdust is blown out, the holes are TAPPED with the 5/16-18 tap.
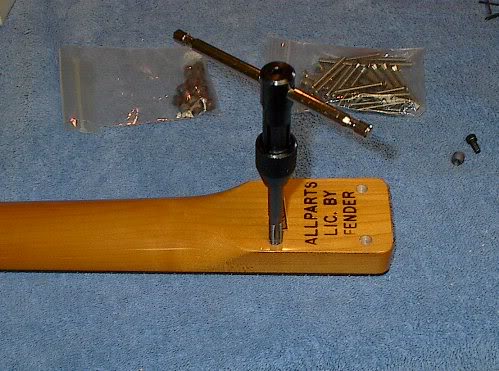
Tapping the hard maple neck and using hardened steel inserts designed for metal vs. brass inserts for wood is unique to Chet’s approach.
Everything I’ve read and experienced firsthand leads me to believe this results in a more consistent and predictable result compared to the “knife-thread” brass inserts designed for softer woods.
Another of Chet’s innovations is to use a hex bolt to drive the insert into the tapped hole.
This results in a clean and consistent installation vs. using a flat-head screwdrived as many would be inclined to do.
The installed inserts look like this:
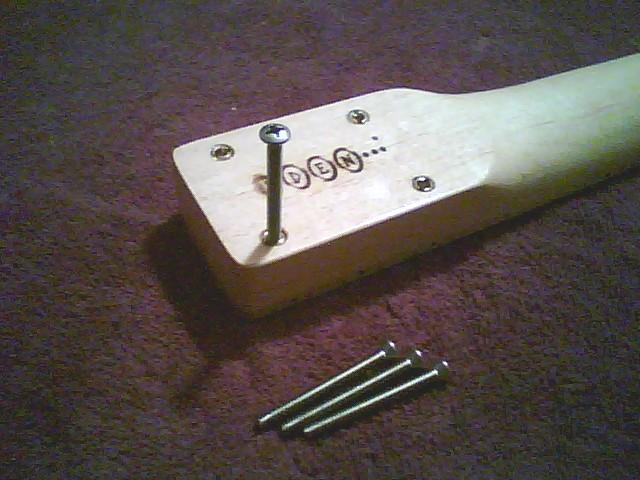
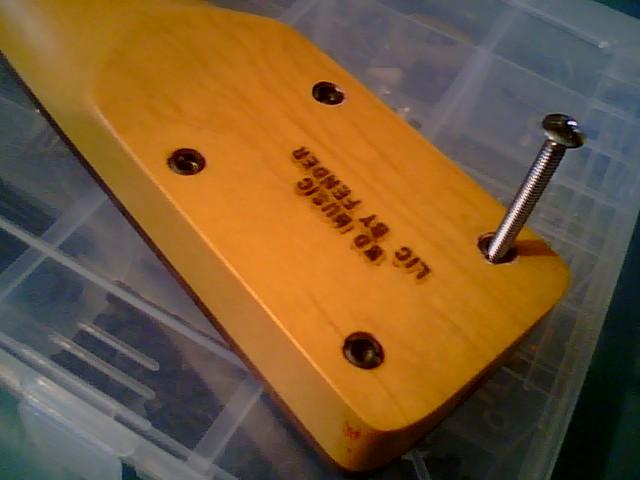
The finished result looks completely "stock", but is significantly more durable and serviceable over the life of the instrument:

While that method isn’t bad, I have found it to be somewhat lacking over the years as the neck mounting holes can become stripped over time.
When I went looking for a better solution I found a number of different approaches to solving the problem, most of which involved various types of EZ-LOK inserts for wood or metal.
After reviewing the merits each, I decided to go with Chet Johnson’s system because it blends a variety of simple tools, supplies and materials into an elegantly simple solution that most players and builders can perfect easily on the first try with just a little skill and patience.
I also added one little “twist” to Chet’s approach because my bodies have sculpted heels and each bolt will vary from the next as far as how deeply it penetrates into the neck.
Here are the supplies I use, including the instructions as provided by Chet in his kits:
- 5/16-18 Tap (kit)
- 8-32 socket head bolt (kit)
- 9/64" Allen wrench (kit)
- 8-32 oval-head stainless steel bolts, 1.25” and 1.5” (kit)
- EZ Lock inserts, 4 (kit)
- 1/8” twist drill (mine)
- 1/4" Forstner bit (mine)
- Harbor Freight Tap Handle (mine)
- Wood handled awl for marking the neck bolt holes (mine)
The kit Chet offers comes as shown (bit and tap optional if needed):
I mark each bolt hole on the back of the neck with the awl while the neck is clamped in place.
Next, I mark the 1/8” bit with blue tape to the maximum depth the neck will safely allow and drill a pilot hole.
This will allow the bolts to extend past the insert and “self-tap” into the neck wood, eliminating any potential "back pressure" a bolt could apply on the insert if it bottoms out within the neck.
This is likely not a concern for a standard neck with a plate and uniform heel, but I use bushing inserts and have sculpted heels on my builds, so the bolt depths are not uniform.
This is my “little twist” on Chet’s system.
Next, I use the 1/4" Forstner bit marked with blue tape to allow the insert to sit just below the surface of the neck.
A standard twist drill bit is shown here:
I use a drill press, but a steady-handed person could get away using a hand drill with a twist bit:
Once the 1/4" holes are drilled and the sawdust is blown out, the holes are TAPPED with the 5/16-18 tap.
Tapping the hard maple neck and using hardened steel inserts designed for metal vs. brass inserts for wood is unique to Chet’s approach.
Everything I’ve read and experienced firsthand leads me to believe this results in a more consistent and predictable result compared to the “knife-thread” brass inserts designed for softer woods.
Another of Chet’s innovations is to use a hex bolt to drive the insert into the tapped hole.
This results in a clean and consistent installation vs. using a flat-head screwdrived as many would be inclined to do.
The installed inserts look like this:
The finished result looks completely "stock", but is significantly more durable and serviceable over the life of the instrument:
Last edited:

When I chose to use Chet's system, I decided to share and pass it along.
It's just a clever application of several different ideas and materials.
It's just a clever application of several different ideas and materials.
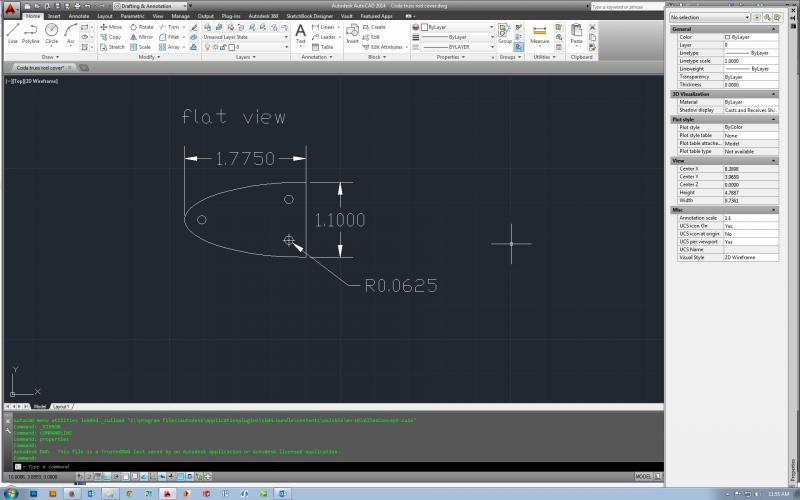
My necks with tiltback headstocks have a groove for access to the truss rod.
I have always felt that while tidy, it seemed a little unfinished leaving the hex-head visible.
With that in mind, I'm having Hipshot products fabricate a cover in shiny stainless steel to match the other hardware pieces they do for me.
Here is the CAD drawing, and I should have parts in hand late next week:
I have always felt that while tidy, it seemed a little unfinished leaving the hex-head visible.
With that in mind, I'm having Hipshot products fabricate a cover in shiny stainless steel to match the other hardware pieces they do for me.
Here is the CAD drawing, and I should have parts in hand late next week:
Thanks to the members of this forum, I've had an epiphany!
It appears as though no one makes a a 34" to 32" scale "conversion" neck that fits a standard 2 1/2" neck pocket.
Warmoth's 32" neck fits its 30" bodies, and Fender's 32" necks only fit the bodies they are built for.
It's and easy enough problem to solve.
Just shorten the truss rod and move the nut and headstock to the first fret...DONE!
I'm going to do this with my standard 21 fret neck with overhang, so the resulting "conversion" neck is still 20 frets.
Here's an example where Plug&Play had a luthier build a 32" neck for a Lakland.
http://www.talkbass.com/threads/lakland-converted-to-32-medium-scale.1107348/

It appears as though no one makes a a 34" to 32" scale "conversion" neck that fits a standard 2 1/2" neck pocket.
Warmoth's 32" neck fits its 30" bodies, and Fender's 32" necks only fit the bodies they are built for.
It's and easy enough problem to solve.
Just shorten the truss rod and move the nut and headstock to the first fret...DONE!
I'm going to do this with my standard 21 fret neck with overhang, so the resulting "conversion" neck is still 20 frets.
Here's an example where Plug&Play had a luthier build a 32" neck for a Lakland.
http://www.talkbass.com/threads/lakland-converted-to-32-medium-scale.1107348/


Not literally...my necks are all CAD designed and CNC machined.Wait.
So you cut the first fret out, and reattach the headstock?
However, because of this, it's a lot easier than having to start a design completely from scratch.

Last edited:
So, the latest...Ridler #1 in Dakota Red, mocked up prior to PLEK:
...and the new polished stainless truss rod cover by Hipshot:

The like button does not sufficiently express how awesome that is. I had no idea the lollipop tuners would work so well with that.
Thanks!
You know, as distinctive as both headstock shapes are, the shiny black and chrome combined with the tiltback almost makes them seem camouflaged.
It's like they kind of disappear or blend in with the background...it's an interesting effect in person.
You know, as distinctive as both headstock shapes are, the shiny black and chrome combined with the tiltback almost makes them seem camouflaged.
It's like they kind of disappear or blend in with the background...it's an interesting effect in person.

Thanks!Wow, that design is a winner. Wish I had the extra scratch laying around for one...
I think I may sell a few unfinished bodies in 2015 so the project guys can tinker.
My designs use standard "F" neck pockets, so I think it could be a good way to give back to the forum communities I participate in.
It also might help to get the word out on what I'm doing a little more.
Thanks!
2014 has been a year of quantum leaps for Lowe Custom Guitars, and 2015 looks even more promising.
In 2014 we introduced several new models, the Chromasonic V, the Thund-R-Luxe, the Thund-R-Luxe NR, and now the Ridler.
We also refined several design elements including adding a TV Jones hex-plate pickup ring and adding a polished stainless steel truss rod cover.
In 2015 we expect to offer a 5-string bass option for all of our existing body shapes, and we will add a few more 6-string guitar options.
Continuing our drive to innovate and refine existing designs, we are developing a 32” scale 4-string bass “conversion neck” that will fit standard 2.5” x 3.875” neck pockets.
Finally, we plan on offering unfinished “project” bodies in select shapes for DIY builders who want to do their own finishing, and in a nod to our origins, we may even offer a few of these with “art” finishes.
Thank you for helping to make 2014 such a success, and HAPPY NEW YEAR!!!
2014 has been a year of quantum leaps for Lowe Custom Guitars, and 2015 looks even more promising.
In 2014 we introduced several new models, the Chromasonic V, the Thund-R-Luxe, the Thund-R-Luxe NR, and now the Ridler.
We also refined several design elements including adding a TV Jones hex-plate pickup ring and adding a polished stainless steel truss rod cover.
In 2015 we expect to offer a 5-string bass option for all of our existing body shapes, and we will add a few more 6-string guitar options.
Continuing our drive to innovate and refine existing designs, we are developing a 32” scale 4-string bass “conversion neck” that will fit standard 2.5” x 3.875” neck pockets.
Finally, we plan on offering unfinished “project” bodies in select shapes for DIY builders who want to do their own finishing, and in a nod to our origins, we may even offer a few of these with “art” finishes.
Thank you for helping to make 2014 such a success, and HAPPY NEW YEAR!!!

I'd be super interested in a Ridler body should they come available...


