
• TalkBass has been independent since 1998. Add your voice.
    Create a free account to reply to discussions, view embedded media, and browse with fewer display ads.
    Join freeLog in
    Want zero display ads or expanded classifieds tools? Compare plans.

Mayones Gothic Finishes

Sure!!

I bought some brush drill bits. I forget the manufacturer, but it was a 3 pack with 80, around 150 and around 220 grit.

I brushed the whole body, trying to minimize scratches on the surface with all three. After that I sanded the surface up to 320 to get rid of whatever scratches were there.

A step I think I'd like to take if I do this again would be to use a thin grain filler on the harder grain to get rid of the tiny pores and create a more uniform surface outside of the soft grain.

I probably should have spent more time sanding and prepping, but I was trying to not let this project sit forever.

After that I intended to use Rubio Monocat for the whole thing. I used the raw wood cleaner after taking a vacuum to the body. I used their intense black precolor treatment. I did a few coats on the body.

It didn't seem black enough, so I used their charcoil oil finish with accelerator. It went on very easy and came out pretty nice. I tried to get a blue hue with some of their products, but I just could not get it to stick inside of the grain.

So after wiping it clean, the next day I decided I would just try to paint the thing with regular paint. I bought the cheapest oil paint that Michael's had, mixed a color I liked and went to town. It actually worked fairly well. I'm a sucker for shiny, and since this whole thing is an experiment I went in with the Unicorn Spit stuff.

The blue is still fairly subtle, but I like the effect. Especially on the back.

In the future I would spend more time on prep and also letting the finish dry/cure before taking the next steps.

Here's some shots of the back
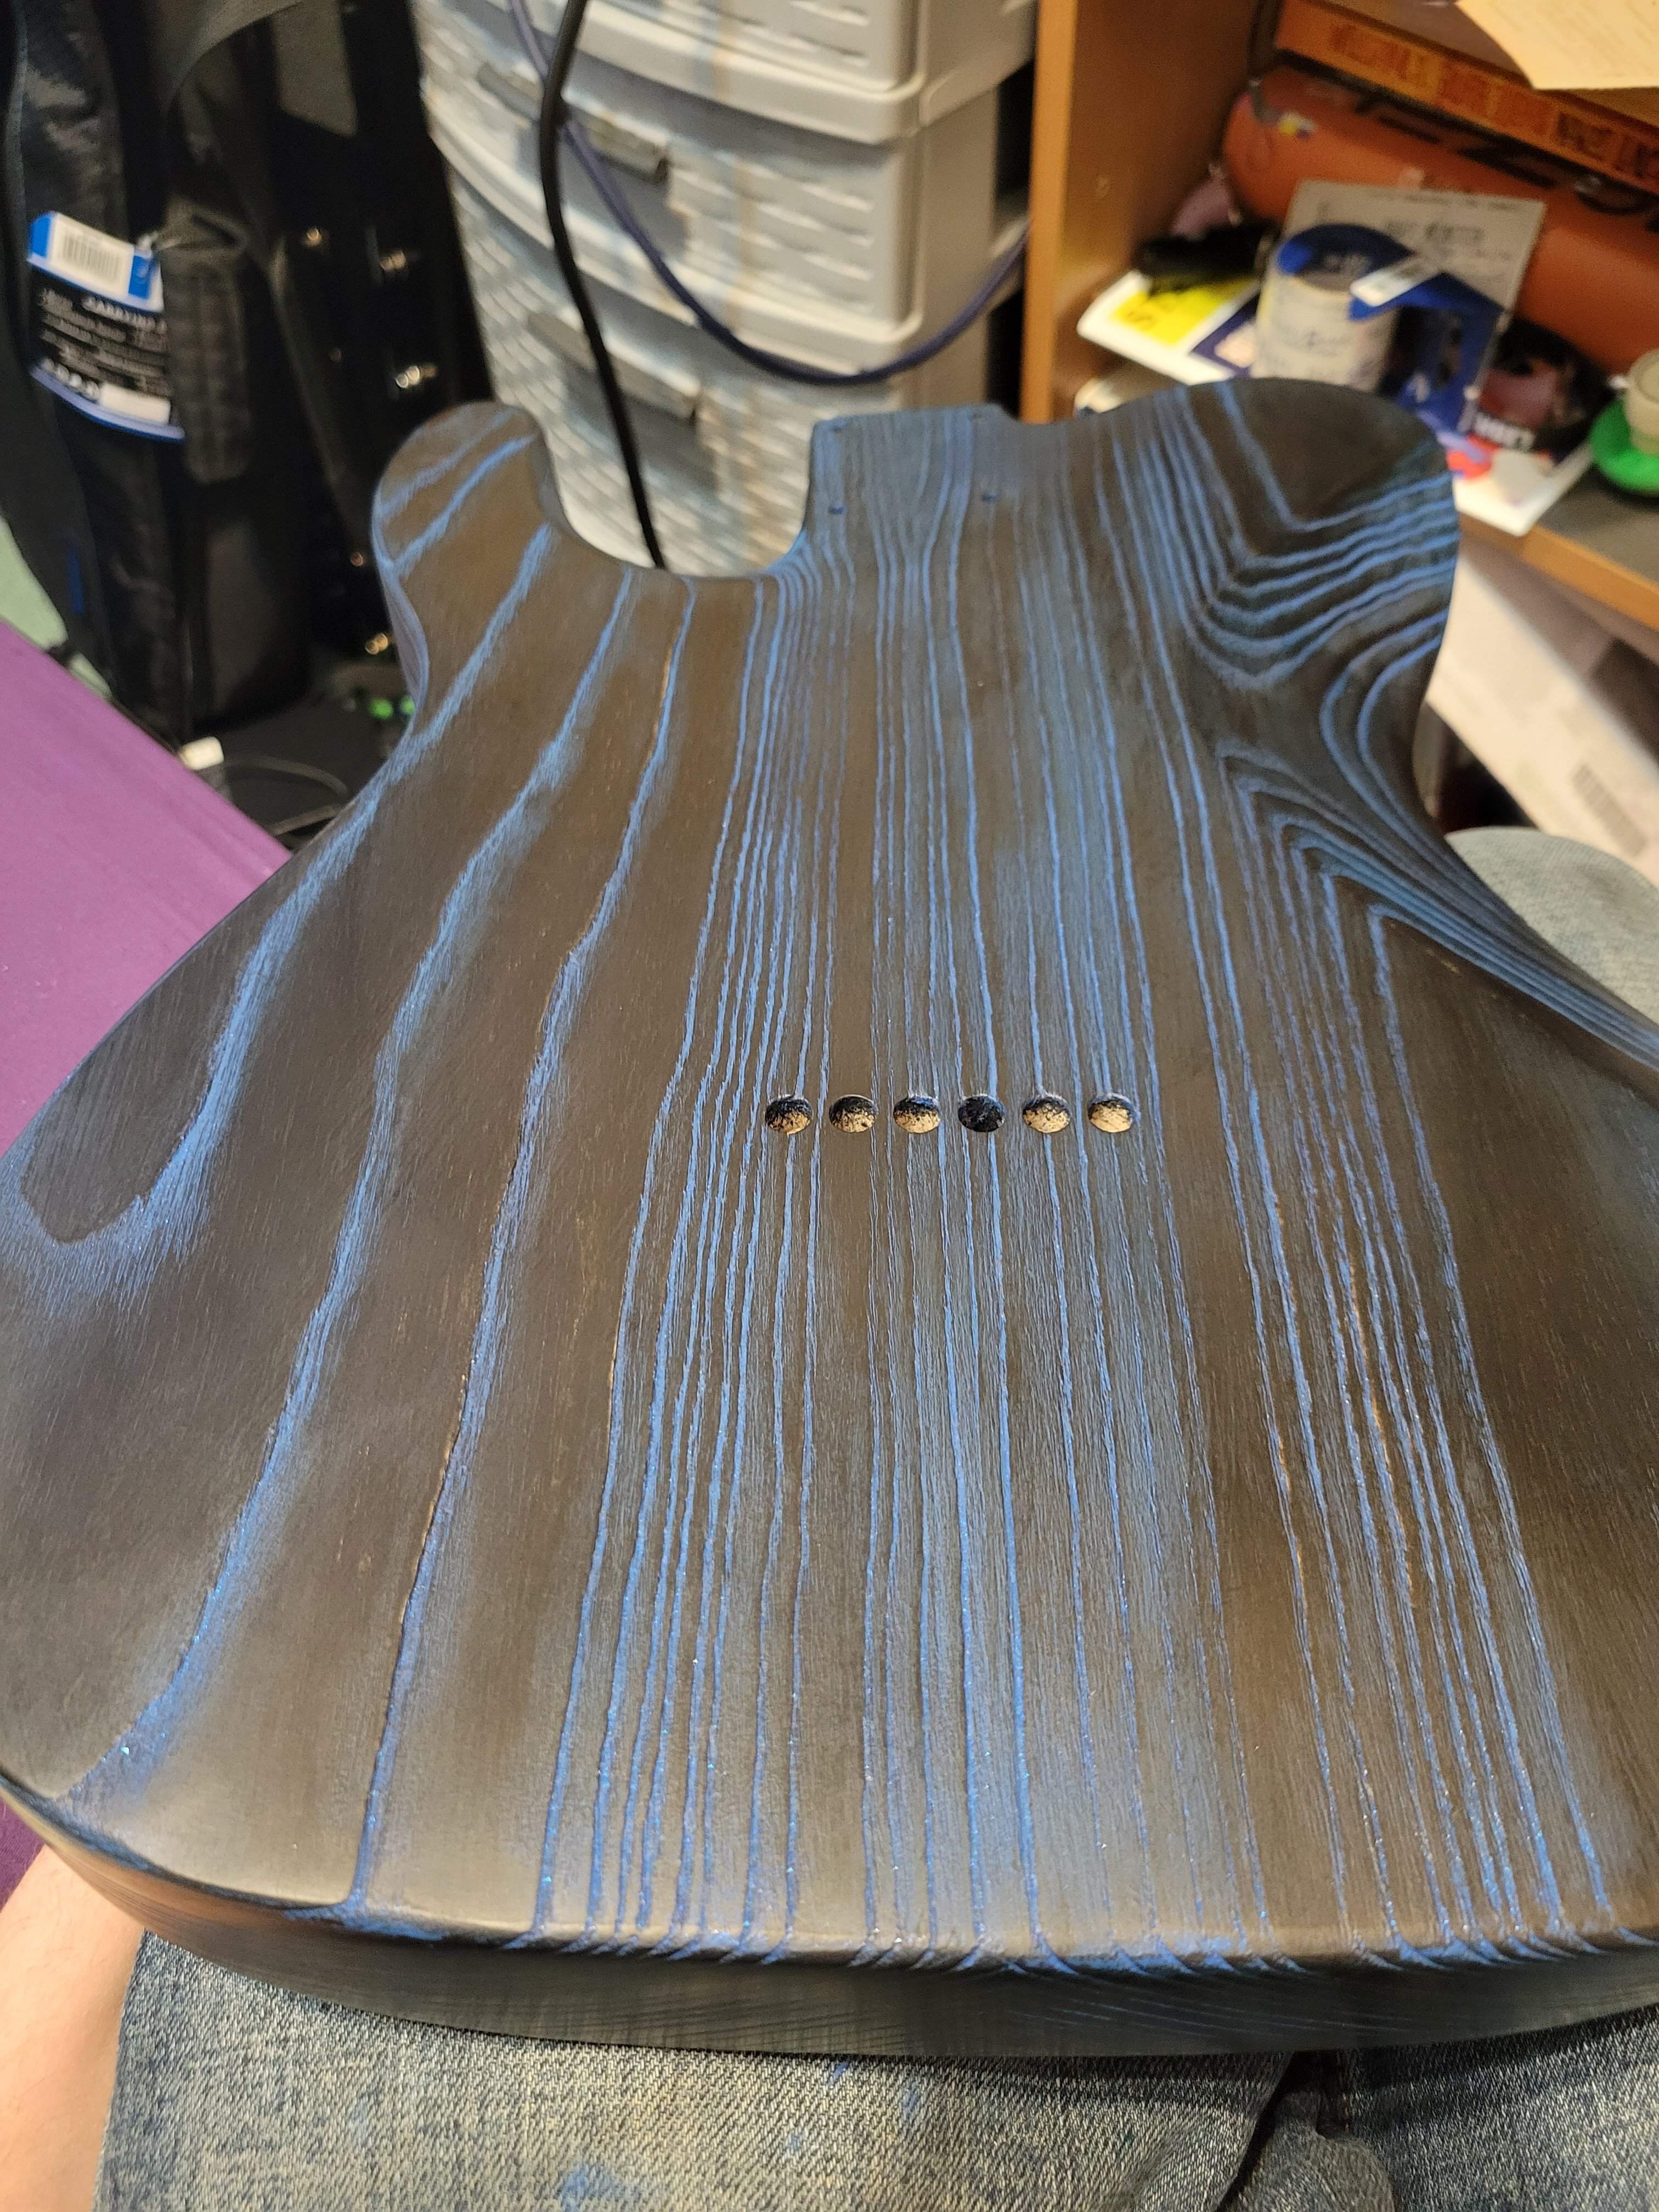
20220420_161840.jpg

20220420_162332.jpg
 
Last edited:
First of all, to the OP, I think you did a great job and I tend to agree with those who have said "your grain just isn't as wide or flamboyant". But you're on the right track.

Now to this -


I'm going to assume it's this -
[Invalid or Expired Link Removed]
but in a much smaller container. So if I'm understanding Barticus, he is mixing the transtint with that stuff and then applying it. The next trick is figuring out the ratio of sealer to transtint. But I'm sure Richter can spend untold hours toiling over the mix and report back his findings. ;)

Edit to add - Here's an Amazonian link for a much more reasonable container size -
https://www.amazon.com/M-MOHAWK-Mohawk-Instrument-Sealer/dp/B07X2ZBYTQ
Yes that's the one, I buy it by the quart from Hartville Hardware off of Amazon.

I'm doing a custom faceplate for my son's Mesa Mark V with flamed maple (looks killer with 3D figuring) and will be tinting in purple to aqua Burst to match his PRS 10-top.

I'd post a thread here but it's for guitar and don't want to get yelled at by TB/LC folks for being off topic :) or not for bass.
 
As an Amazon Associate, TalkBass may receive commissions from qualifying purchases made via links on this site.
  • Like
Reactions: TerribleTim68
Yes that's the one, I buy it by the quart from Hartville Hardware off of Amazon.

I'm doing a custom faceplate for my son's Mesa Mark V with flamed maple (looks killer with 3D figuring) and will be tinting in purple to aqua Burst to match his PRS 10-top.

I'd post a thread here but it's for guitar and don't want to get yelled at by TB/LC folks for being off topic :) or not for bass.
That didn't stop me!

I'd be interested in your prep before you started applying the finish, if you feel like detailing that.

I found the packaging! These were the brush bits I got:
https://www.farmandfleet.com/produc...4RCb2PBnsN9sOqzmQ6SiKX9FlrZCIYBxKpMj-rhybFSYA
 
Thanks! I had definitely considered that. This is my first attempt at this so I'm just wondering if there are any other tricks to it.


A lighter color is definitely a good idea. I may go in with some more blue after all this dries. I hadn't thought of a sealer coat! Anything in particular that you'd suggest?


That's a cool color! Would that work over something already dyed black?


Yeah, I'm not sure either. The matte black is the base Gothic finish. I think it's just that black=metal/goth. Like when Epiphone came out with the goth Thunderbirds.

GOTHIC FINISHES • Mayones Guitars & Basses


I've been using water based finishes which you can check out in the water based finishes thread. Basically Varathane Ultimate. This is an ash body. I sanded and prepped as usual. Then I used a brass wire wheel on the drill and probably a wire brush by hand (it was about a year and a half ago) then touched up any scratches by hand. I applied Feibings black leather dye to the body and let that dry overnight. I sprayed, I think, 2 light coats of Varathane as a sealer and let that dry overnight. Then I tinted some white wood filler with green TransTint and worked it into the grain a section at a time. When the filler was mostly dry I scraped and 3M padded what was on the body off until it was only in the grain. Then clear with Varathane as usual. I also experimented on oak pieces (didn't have any scrap ash) until I felt pretty good about committing to the body. Similar to yours, I think the back came out better. Oh well.

E1A1C7EE-84A8-4A55-9D89-0FCBE986FF3F.jpeg
AE853161-47FD-4D00-ABAE-C6358667F329.jpeg
 
I applied Feibings black leather dye to the body and let that dry overnight. I sprayed, I think, 2 light coats of Varathane as a sealer and let that dry overnight. Then I tinted some white wood filler with green TransTint and worked it into the grain a section at a time. When the filler was mostly dry I scraped and 3M padded what was on the body off until it was only in the grain. Then clear with Varathane as usual
I've never researched a ceruse finish, but this is exactly how I imagined the process would go, verbatim.
That turned out awesome btw.
 
  • Like
Reactions: Barticus
I've never researched a ceruse finish, but this is exactly how I imagined the process would go, verbatim.
That turned out awesome btw.


Thanks. I think I could have a bit more grain showing if I would have brushed a little more before the dye or used less sealer in between but I do like it and play it pretty regularly. As regularly as I play anything… :rolleyes:
 
  • Like
Reactions: RichterScale
So most of the research I found on "the tubes" said you could sandblast it to get the grain "deeper". I've seen it done that way with varying degrees of success. Just throwing that out there, in case anyone has a sand blasting cabinet.
I do have access to one at our race shop, so there's that.
Yes, these types of finishes often get advertised as being sandblasted. I wish I had access to that, but the brush bits were able to get pretty deep on their own.


here's the update on the amp faceplate that I mentioned above, it's getting clear tomorrow
New headless build… might be a long thread :-)

Dude, that looks awesome! Both the amp and the bass.

I bought my clear coat. Waiting for it to get warm enough to spray outside. I'll post pics when I'm all done!
 
  • Like
Reactions: Barticus
I bought my clear coat. Waiting for it to get warm enough to spray outside. I'll post pics when I'm all done!
Is Rubio Monocoat clear coat friendly? My understanding (limited as it is) is that it's a wax of some sort. Also, the name Monocoat sort of indicates it's meant to operate on it's own without a clear coat, right?
 
  • Like
Reactions: Beej
Is Rubio Monocoat clear coat friendly? My understanding (limited as it is) is that it's a wax of some sort. Also, the name Monocoat sort of indicates it's meant to operate on it's own without a clear coat, right?

I don't know to be honest. I started following their instructions but once I couldn't get their other color to stick in the grain, I moved on to something else out of frustration.

They do make a clear protective coat, if I read their site right. I think their product is linseed oil based, so I'm just gonna try another oil based clear and hope for the best.

The other paint I used for the blue has been playing nice with it. I'll post my results with the clear here after I give it a try.
 
There's a LOT of woodworkers on YouTube who use Monocoat for resin river tables. Look up "Blacktail Studio". Cam used it exclusively for a very long time, but has recently moved to something else. But he has some videos on how he applies it and so on.
What I can tell you is, none of them put anything other than another coat of Monocoat over the top of it. So yeah, mono.....coat.
 
Is Rubio Monocoat clear coat friendly? My understanding (limited as it is) is that it's a wax of some sort. Also, the name Monocoat sort of indicates it's meant to operate on it's own without a clear coat, right?
In my test pieces, I would say no, not easily and reliably. I sanded back, cleaned with acetone and applied a shellac layer before spraying oil based and water based polyurethane. Oil was minwax, water was Saman. Both examples debonded from the monocoat at the shellac level. I presumed it was the wax, but not sure. I have successfully sprayed both varieties over osmo polyx applying shellac in the same way. I'll clarify that the Rubio I used did not use the accelerator.