• TalkBass has been independent since 1998. Add your voice.
    Create a free account to reply to discussions, view embedded media, and browse with fewer display ads.
    Join freeLog in
    Want zero display ads or expanded classifieds tools? Compare plans.

Musicman USA Sub refinish- Questions

View attachment 3474254

Good call, I will look into that. The primer I am using is a scratch filler primer which I thought might fill some of the grain if there was any noticeable. This is the stuff I have

Yeah you might be in luck. I've used the 'Halfords' brand filler primer over here in Scotland. It works well enough, but it isn't a miracle worker and it doesn't make up for a half-assed sanding job. Ask me how I know!
 
  • Like
Reactions: JRA
D0CBB35A-5E97-4396-866D-27908C2A41E6.jpeg
031D0FE8-9B9C-4FD1-9B1D-B6BE83387C16.jpeg
BD74B153-E907-4020-9098-0C3DE8F8A6E5.jpeg
Day 4

I managed to get some work done and I am about 95% finished with my contours. They look like turned out really well, I still have a bit of contouring left and just general smoothing but I think it looks and feels great. I flowed a bit more superglue into any small gaps I found and sanded them in again and the lines look perfect now.

Tomorrow my plan is to finish my shaping and get everything smooth and perfect and then start going up in sand paper grits to get a nice smooth finish prior to my base coat. I still have some of that gross undercoat in the bottom of the horns which I will need to sand out which will probably be time consuming as that stuff is terrible. So far going well and excited to start painting.

I attached some pictures from earlier, I have since taken a bit more material to get them closer to the fender curves,
 
Was about to say much the same... files and rasps are what I'd use there, with sanding more to the end of the process, for smoothing and details.

The files I use would sneer at that undercoat. :D

I used my rasp file on it and that stuff is nasty, just gummed up the file. I have gotten through most of it and will need to clean it up with sand paper to get it perfectly smooth.
 
  • Like
Reactions: wraub
26BA11DC-89E0-4831-9DEC-813BAF8D531C.jpeg
E547F576-AF6B-45F4-A286-DF4222FC05CE.jpeg
Got my three base coats of primer on and now to let it sit overnight. I followed a finishing video on you tube and applied 2 light coats followed by a third thicker coat to finish it off. There are a few small drips which will be removed tomorrow when I do a 600 grit sand before coats 4-6. I think tomorrow I am going to go for two light coats and a more medium coat so I don’t get any drips. It’s a learning process and at least I can correct it tomorrow, it will just be a bit more work sanding. With the paint it’s also a lot easier to see any scratches/imperfections so I will try to fill those tomorrow morning so I can get a perfectly flat base coat. I have both grey and black primer and I am starting with the grey and am going to finish with the black. I will likely try to do 9-12 coats of primer or until I get a perfect base to work off of for my green. I found my olive green and tried a tester with both the grey and black undercoat. I attached a pic above and the grey is on the bottom and the black is at the top, it may not make a huge difference at the end of the day but the black undercoated one seems a little bit richer a green colour to me.

With the green, it is a flat green colour, not sure how I want to go. Do I want to aim for a more satin finish on my clear or go for a gloss. I got prob a 5-6 days to think about what I want to do.
 
Last edited:
I have my first 6 base coats on and am starting to see minor imperfections in the wood, stuff that was hard to see or feel when the wood was bare. Any suggestions of what to do with these? Will the paint and clear coats smoothen these out or should I use some sort of filler? They look like little tool indentations, probably from when the body was stripped. I can live with them if need be, but would like to get as close to a perfect finish as I can. Any suggestions?
 
  • Like
Reactions: CatchaCuda and Beej
I have my first 6 base coats on and am starting to see minor imperfections in the wood, stuff that was hard to see or feel when the wood was bare. Any suggestions of what to do with these? Will the paint and clear coats smoothen these out or should I use some sort of filler? They look like little tool indentations, probably from when the body was stripped. I can live with them if need be, but would like to get as close to a perfect finish as I can. Any suggestions?
Any imperfections will typically telegraph forward into the final coats - you basically need to block sand it perfectly level, drop fill any of the problems/imperfections/dents and then sand them perfectly smooth. After that you can hit it with primer again and then address any other little things that rear their heads. This is typically 2-3 times even with a scratch build to get things flawless. :)
 
73CAAE0A-ED9F-405C-9315-30DDD4864638.jpeg
C14375BD-656B-46E6-B636-B398700AA68A.jpeg
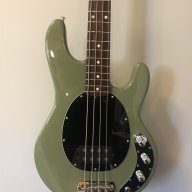
I am still not quite happy with the colours I have found. I want to get a as close as I can to an olive colour, the first is too light, second is too dark. I went into Lordco the local auto parts place and they were able to give me a look at the custom colours they can put in a rattle can for me. I found one called jungle green metallic which looks really close and is a metallic finish which is a bonus. It looks to be a colour that mini used. I have attached a pic, it looks to be a nice middle ground that is much closer to the Gibson green which was my Inspiration colour. It’s not quite as olive but it’s a cool green. I have a few more days before I am going to start spraying colour so I am going to think on it a bit.
 
  • Like
Reactions: Beej and wraub
View attachment 3476807 View attachment 3476806 I am still not quite happy with the colours I have found. I want to get a as close as I can to an olive colour, the first is too light, second is too dark. I went into Lordco the local auto parts place and they were able to give me a look at the custom colours they can put in a rattle can for me. I found one called jungle green metallic which looks really close and is a metallic finish which is a bonus. It looks to be a colour that mini used. I have attached a pic, it looks to be a nice middle ground that is much closer to the Gibson green which was my Inspiration colour. It’s not quite as olive but it’s a cool green. I have a few more days before I am going to start spraying colour so I am going to think on it a bit.

I'm assuming you're aware of the "Dargie Delight" limited editions that Music Man put out as part of their Ball Family Reserve scheme.

Olive green sparkle, with Martini glass fret markers.

Probably a useful reference point.
 
  • Like
Reactions: monsterfiddle
That Dargie delight is sweet, maybe a little more lime than I am looking. I started sanding back the layers and noticed that in the light I have lots of little grain marks, and tool marks. I don’t think I was careful enough when handing and on the back they are everywhere. I have elected to knock the finish back to the bare wood and start again. This time I am going to make sure the body is 100% perfect before spraying. I kinda naively thought that the paint would flow into some of these imperfections and fix them, but that’s not the case. I think I will use a grain filler after I am done getting everything sander. One upside of starting fresh is my spraying technique has improved dramatically, so next time I shouldn’t have to deal with the runs I got the first time around.
 
Last edited:
  • Like
Reactions: wraub
If you are using a compressor and gun, depending on the finish you use, it can fill some amount of grain or marks. The Varathane finish from the water based finish thread, for example, won’t fill, say, ash without a lot of coats but I’ve used it on fine pored mahogany or something similar and it has filled the pores adequately in 6-8 coats with sanding back. Almost anything out of an aerosol can won’t fill much.
 
  • Like
Reactions: wraub
That Dargie delight is sweet, maybe a little more lime than I am looking.


I think they've done 3 different runs over the years - the original was pretty "key lime pie" under some lighting conditions.

The current one, for the Stingray Specials, looks much closer to your Olive Drab examples (maybe some army surplus store has a supply of Huey / Jeep paint).

Good luck.
 

Latest posts