
Enjoy the benefits of a premium membership!
Upgrade Account
-
TalkBass has been independent since 1998. Add your voice.
Create a free account to reply to discussions, view embedded media, and browse with fewer display ads.
Join free Log in
Want zero display ads or expanded classifieds tools? Compare plans.
You are using an out of date browser. It may not display this or other websites correctly.
You should upgrade or use an alternative browser.
You should upgrade or use an alternative browser.
Musicman USA Sub refinish- Questions
- Thread starter Chaser1
- Start date
More options
Who Replied?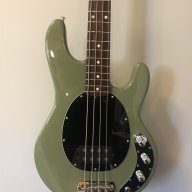


Aaaaannnnnnnddddddd....the addiction takes hold... 

Nice work!
Nice work!
One tip to get imperfections to pop during prep is to put on a white/light primer, and then mist over that with black. Sand off the black with a (semi) rigid block and fine grit paper (wet) and all imperfections will show because the block doesn't reach down into the dimples and cracks... Rinse and repeat.View attachment 3480240 View attachment 3480241 I am now done my second day of priming. I began by doing a 600grit wetsand of the previous days work and my finish is smooth as can be. I sprayed 4 light coats tonight all 10 minutes apart. I noticed as I was spraying that the pesky lines were showing up where the body separated. They are less than a sheet of paper thin maybe half a sheet and only in a few spots on one side (you can see in the image of the front if you zoom in). I grabbed some spackle and worked it into the cracks. They are so minuscule but I want the finish perfect. Tomorrow I will wet sand again with 600 and do another 3-4 coats. I am avoiding the pitfalls of last time and doing light coats, so far I have no drips or imperfections! I plan on priming tomorrow and possibly Friday, then I am away for the weekend. Sunday I will wet sand and Monday I will start with the colour.
Yesterday I picked up my custom colour from the auto parts place. It is Jungle green metallic. I really like the way it looks. I did a tester on a piece of scrap wood which I attached above. It’s hard to get a good sense of the colour with my camera. It’s a little darker than it shows up in the picture I attached. Well here is my final primed body (taken prior to my wet sand) and ready for paint!
I was frustrated because there is a spot where you can see the split in the wood, I was super irritated by it until I noticed that it will be under the pick guard!
I am toying with what colour pickguard I am going to go with, I have a black and a white pearloid, but I am thinking a brown tortoiseshell might look cool as well. What do you think?
Last edited:

I really like the white pearloid on that green! It's looking really great!
Thanks, I initially was leaning towards the black but every time I see the pic of the green/pearloid I think they look perfect together.
Last edited:
Take those photos to the guys who mixed your custom paint.
They may have recommendations for the most suitable clear coat (for both that paint, and for use on a musical instrument).
Who knows, if they sold you the clear coat, they may feel they should cut you a deal on mixing up a new batch of colour, and the correct clear coat.
They may have recommendations for the most suitable clear coat (for both that paint, and for use on a musical instrument).
Who knows, if they sold you the clear coat, they may feel they should cut you a deal on mixing up a new batch of colour, and the correct clear coat.
Well long time no update. I went back to the paint place and the clear I am using is what they recommend, they had no idea what would have cause the issue. So I knocked back the finish a second time bought another can of colour and sprayed it. Waited close to 48 hours to spray the clear again and decided I would spray in the morning when it would be cooler (my spray area even in the evening is below the max spray temp, but I didn’t want to take any chances. I tried a new clear coat brand that was also recommended and this time it was 99% perfect except for a small wrinkle right at the upper horn about half the size of a dime. I was furious! So as a last ditch effort I tried sanding back just that spot as I didn’t have much paint in my can and try to spot fill it. Sadly this didn’t work and the spot is a darker colour than the rest of the bass so I have now sanded it back again and am back at the drawing board. I am thinking at this point I am going to try my original flat green colour. I did a test run and with the clear on and it shifts the paint to be closer to the colour I originally wanted, maybe a bit lighter but still workable. I don’t want to drop another $40 on a can of the green to be in the same spot. I will take a pic later of my new(old) colour once I have applied it.
Last edited:
Weird it would happen again, and how frustrating - might want to evaluate your process near the end, perhaps there is something contaminating the surface? What were you using to clean it before paint?
It is strange. I have been using a microfibre cloth to polish and remove any dust and such, then right before painting I have been hitting it with a tack cloth to make sure there is no dust left over after the microfibre. That’s the same process I have used all the other paint layers as well.

It is strange. I have been using a microfibre cloth to polish and remove any dust and such, then right before painting I have been hitting it with a tack cloth to make sure there is no dust left over after the microfibre. That’s the same process I have used all the other paint layers as well.
That may well be your problem. Never, ever, use a tack cloth before shooting a finish. Press too hard and you've just left a gummy adhesive that finish will not stick to. Blow the piece off with compressed air and then wipe with naptha, acetone, or similar... then shoot your finish.
That may well be your problem. Never, ever, use a tack cloth before shooting a finish. Press too hard and you've just left a gummy adhesive that finish will not stick to. Blow the piece off with compressed air and then wipe with naptha, acetone, or similar... then shoot your finish.
This is very good info and does make perfect sense. I did only lightly wipe with the tack cloth but I very well could have pressed too hard in one of those spots and done that. There is so much conflicting info out there, because another paint thread had said that You should always use a tack cloth to remove any dust as that will mess up your paint.


