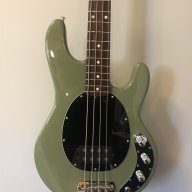
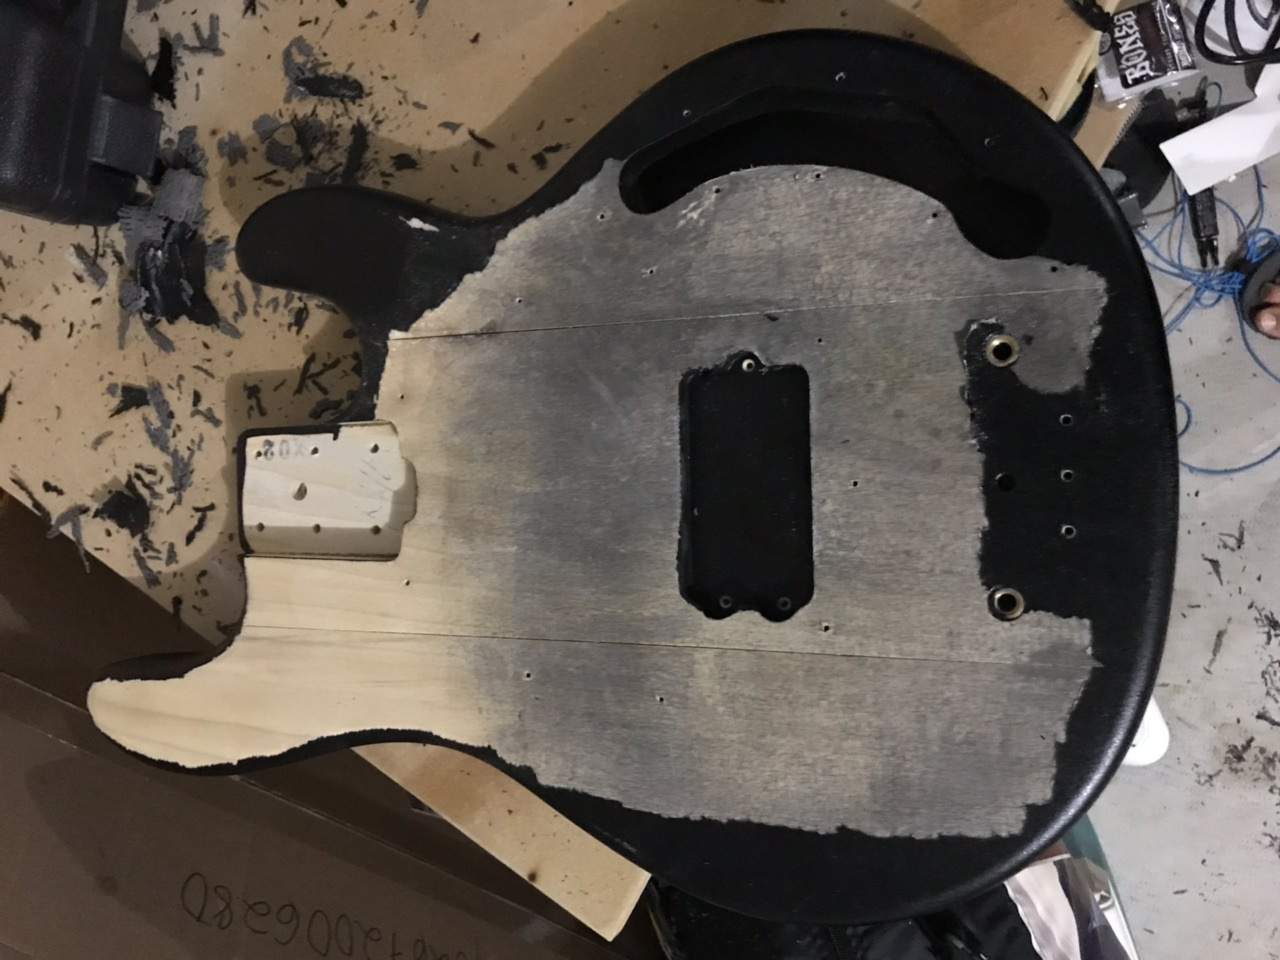
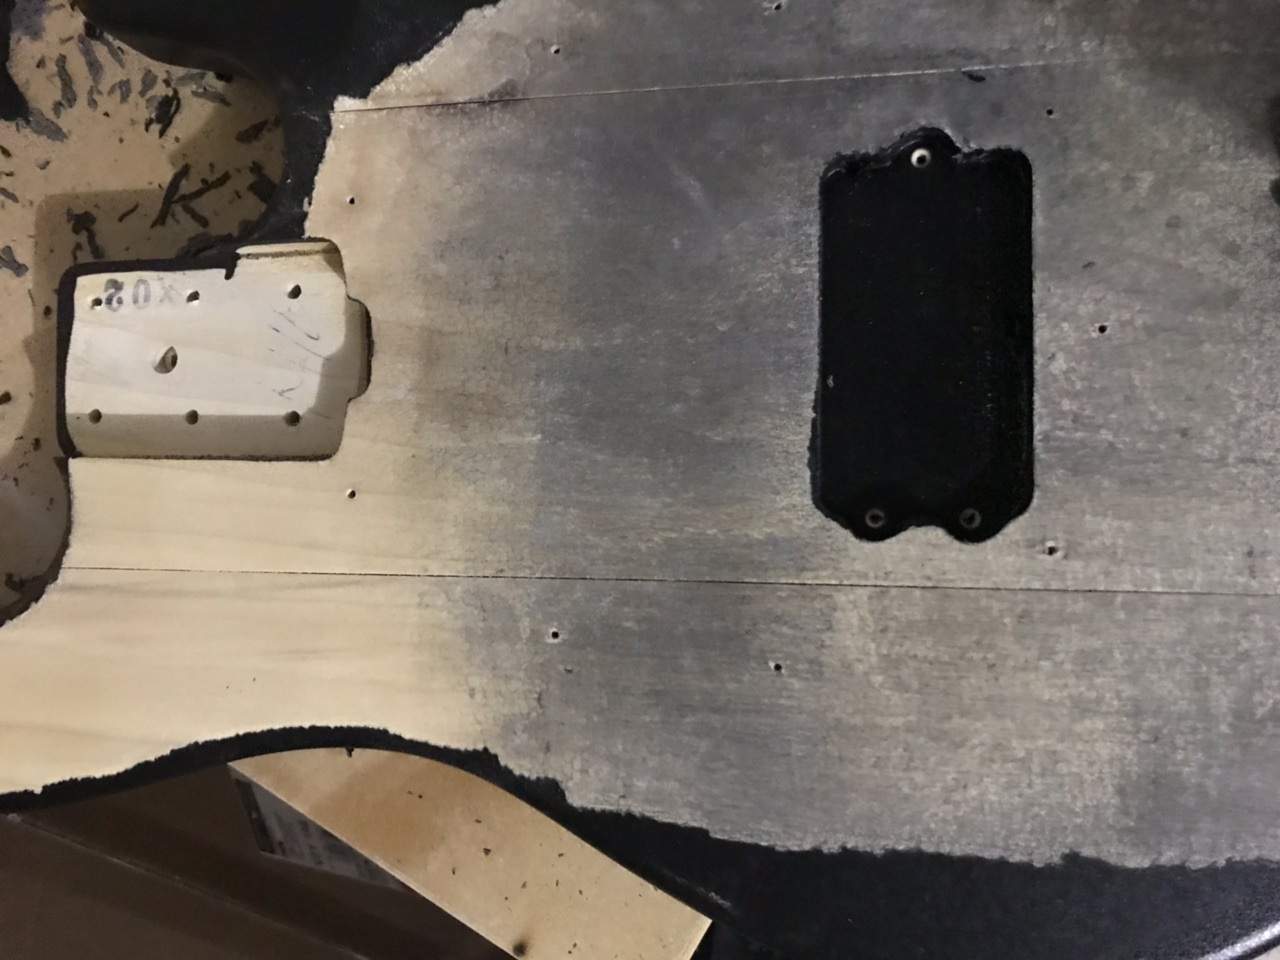
Hey I got a new to me 2004 Musicman sub last week and decided I love this bass, but to make it perfect I want to remove the truck bed liner finish and spray my own colour. I am still in the process of deciding what I want to do. I have always loved the olive drab colour, almost a flat army green. I have also toyed with a silver or a grey colour, maybe a Pelham blue, so many options! I have been using a heat gun to strip the finish and I noticed that heat looks to be splitting slightly where the three pieces are attached. Is this normal? What will I need to do, just fill the cracks and sand prior to my sanding primer coat? I have attached some pics below, before, current state and a closer look at the separation.


Enjoy the benefits of a premium membership!
Upgrade Account
-
TalkBass has been independent since 1998. Add your voice.
Create a free account to reply to discussions, view embedded media, and browse with fewer display ads.
Join free Log in
Want zero display ads or expanded classifieds tools? Compare plans.
You are using an out of date browser. It may not display this or other websites correctly.
You should upgrade or use an alternative browser.
You should upgrade or use an alternative browser.
Musicman USA Sub refinish- Questions
- Thread starter Chaser1
- Start date
More options
Who Replied?

No need to remove the existing finish if you're spraying a solid colour - I'd personally stop there, scuff sand the whole thing and work on resealing where you removed the colour and/or sealcoat on the top. You can spray right over it once it's sealed, as they new colour will cover the old if it's opaque... 
The problem with the old finish is that It is a plasticky truck bed finish, it is not a flat finish it is thick and is rough to the touch. I am also going to be cutting in a belly cut and forearm contour as it’s a slab body so it makes sense to strip it to bare wood first. I am thinking I am going to get a super glue syringe and flow some into the crack to seal it then sand. The body feels solid and there is no movement in the “wings” it’s just subtly cracked.

Saw someone, Carl Thompson iirc, who has a method of sanding with superglue to make tight, almost imperceptible lines. Might be useful. 
Also...what Beej said.
Also...what Beej said.
The problem with the old finish is that It is a plasticky truck bed finish, it is not a flat finish it is thick and is rough to the touch. I am also going to be cutting in a belly cut and forearm contour as it’s a slab body so it makes sense to strip it to bare wood first. I am thinking I am going to get a super glue syringe and flow some into the crack to seal it then sand. The body feels solid and there is no movement in the “wings” it’s just subtly cracked.
I thought about it and I am going to keep stripping it using the heat gun as I want to get the best possible finish on this bass and I think if I leave the finish and sand the result will be poor. I am going to keep the heat gun away from the joints when I do the back and sand that section down instead. It will suck to sand it flat but the result will prob be better. I watched the Carl Thompson video on YouTube and am going to follow what he did. As I am spraying a solid colour it should be pretty imperceptible when I am done.
Almost have the whole body stripped. There is no splitting on the back of the body which is great. Looking at the edge I can see there is a mitre or dovetail type joint which seems solid, so I am going to flow some super glue into the gap to close it up. Super happy to be almost done stripping this thing cause it was way too much work. Still not sure on the colour but I have a bit of time before I can start painting. I am hoping I can start laying down my my primer coats this weekend.
Last edited:
Tonight I am going to see about finishing up the last of the paint removal and sanding and maybe getting the belly cut and forearm contour cut, but that might have to wait until this weekend.
I am also thinking about adding some weight relief under the pickguard by doing the Swiss cheese hole method. The bass weighs about 10.5lbs, I am hoping that with the belly cut and forearm contour and some Swiss cheese holes I could get it into the mid to high 9 lbs range.
Hopefully I can start laying down the primer on Saturday morning and build up a decent base over the weekend and start laying colour next week.
I am also thinking about adding some weight relief under the pickguard by doing the Swiss cheese hole method. The bass weighs about 10.5lbs, I am hoping that with the belly cut and forearm contour and some Swiss cheese holes I could get it into the mid to high 9 lbs range.
Hopefully I can start laying down the primer on Saturday morning and build up a decent base over the weekend and start laying colour next week.

It would be real cool to add some chambers, Ala Roger Sadowsky, and then add a nice top to the body. You would, of course, have to plane the body down by the thickness of the chosen top.weight relief under the pickguard by doing the Swiss cheese hole method
I guess then it would more sense to go with a transparent finish.
Invalid Link Removed
It would be real cool to add some chambers, Ala Roger Sadowsky,
That would be cool. I wonder how much it changes the overall tone of the instrument and how much total loss of weight you could get. I think for this I am going to just Swiss cheese it a bit under the pickguard should knock off enough to get it down to a comfy weight.
Along with the holes under the PG, for a little more weight loss (depending on how much effort you want to put into it), you can also plane a little off the back, reshape the roundovers (and possibly deepen the battery box) and then go from there. There's a good thread around here on making a router planing fixture to accomplish this. How thick is the body, and how deep is the control rout?


I thought about it and I am going to keep stripping it using the heat gun as I want to get the best possible finish on this bass and I think if I leave the finish and sand the result will be poor. I am going to keep the heat gun away from the joints when I do the back and sand that section down instead. It will suck to sand it flat but the result will prob be better. I watched the Carl Thompson video on YouTube and am going to follow what he did. As I am spraying a solid colour it should be pretty imperceptible when I am done.
Good lord stop with heat gun, already! it's doing enough damage. use a chemical stripper, it ain't environmentally safe, but it won't warp out your "F"ing guitar. just make sure to wear gloves!
Done stripping the finish off. Had no other issues with stripping the finish and any splits. With the ones that I had I flowed in some super glue and sanded to get some dust in the cracks like Carl Thompson did in his how to fix cracks Video. Looks to have completely fixed the issues. I started cutting in The belly cut. I have access to a belt sander which would prob be a quick job, but it’s a one hour drive away so I decided to just use a little elbow grease and a rasp file. Seems to be going well, after about 30 min in and half way done the job. I will see if I can finish the job tomorrow and then start the forearm contour and do all my final sanding and prep for my base coat this weekend.
Along with the holes under the PG, for a little more weight loss (depending on how much effort you want to put into it), you can also plane a little off the back, reshape the roundovers (and possibly deepen the battery box) and then go from there. There's a good thread around here on making a router planing fixture to accomplish this. How thick is the body, and how deep is the control rout?
I thought about doing this. The control route is pretty deep on these basses I will have to do some measurements and see if it is possible to plane off an 1/8th inch or so.
Good lord stop with heat gun, already! it's doing enough damage. use a chemical stripper, it ain't environmentally safe, but it won't warp out your "F"ing guitar. just make sure to wear gloves!
Not to worry, I am done and have not had any more separation, I have fixed the cracks and the body is very stable. Shouldn’t have any other issues going forward.

This is the problem with stripping modern poly finishes. Even if you shift the colour coat (which is no fun in tight cutaways) it can be tricky to remove the sealer coats underneath. One some instruments the wood is very much softer than the sealer, and the sealer sinks into the wood slightly as well. the glue joins are opening up under the heat, before the sealer can be removed.
Belt sander time!
That would probably work. Superglue makes for a tough, hard sealer. Throw in a bit of the relevant wood dust and you can hide nastiness to some degree.
Belt sander time!
Saw someone, Carl Thompson iirc, who has a method of sanding with superglue to make tight, almost imperceptible lines.
That would probably work. Superglue makes for a tough, hard sealer. Throw in a bit of the relevant wood dust and you can hide nastiness to some degree.
It's looking good so far.
Mr. Thompson's videos are a wealth of useful and interesting info. Glad they helped you.
Mr. Thompson's videos are a wealth of useful and interesting info. Glad they helped you.
View attachment 3473877 View attachment 3473878 Day 3
Done stripping the finish off. Had no other issues with stripping the finish and any splits. With the ones that I had I flowed in some super glue and sanded to get some dust in the cracks like Carl Thompson did in his how to fix cracks Video. Looks to have completely fixed the issues. I started cutting in The belly cut. I have access to a belt sander which would prob be a quick job, but it’s a one hour drive away so I decided to just use a little elbow grease and a rasp file. Seems to be going well, after about 30 min in and half way done the job. I will see if I can finish the job tomorrow and then start the forearm contour and do all my final sanding and prep for my base coat this weekend.
This is the problem with stripping modern poly finishes. Even if you shift the colour coat (which is no fun in tight cutaways) it can be tricky to remove the sealer coats underneath. One some instruments the wood is very much softer than the sealer, and the sealer sinks into the wood slightly as well. the glue joins are opening up under the heat, before the sealer can be removed.
Belt sander time!
That would probably work. Superglue makes for a tough, hard sealer. Throw in a bit of the relevant wood dust and you can hide nastiness to some degree.
I filled the cracks with superglue last night and sanded to get some sawdust in with the glue. Looking at it this morning the cracks are filled and hard to see. Using the heat gun I was able to remove the top coat and the gross undercoat and am now at bare wood underneath. Just roughing in my contours which I copied from my Precision bass, then final sand and any wood filling I may need to do and I will be ready to spray my primer coat.
I took some better pics of my belly cut in progress. I don’t think I will get much done on it tonight as I have another project on the go but tomorrow I will finish it.
Last edited:
You might need a grain filler before spraying any primer.
Good call, I will look into that. The primer I am using is a scratch filler primer which I thought might fill some of the grain if there was any noticeable. This is the stuff I have


