• TalkBass has been independent since 1998. Add your voice.
    Create a free account to reply to discussions, view embedded media, and browse with fewer display ads.
    Join freeLog in
    Want zero display ads or expanded classifieds tools? Compare plans.

My first bass resurrected (including back-story)

Agree. Almost template necks and bodies with variations in the pickups, pickguards, and hardware. I don't know why, when the Japanese hopped onto the guitar boom bandwagon of the sixties, they chose to flood us with so many models (compared to USA) with so many nuanced variations in the details.

But that's what made that decade so amazing. They produced over 30 different pu designs!
 
Agree. Almost template necks and bodies with variations in the pickups, pickguards, and hardware. I don't know why, when the Japanese hopped onto the guitar boom bandwagon of the sixties, they chose to flood us with so many models (compared to USA) with so many nuanced variations in the details.

Found it (on right) - St George JB-1, missing badge. I recall you have at least one like the one on the left.

upload_2023-6-20_18-54-22.jpeg
 
  • Like
Reactions: Paco Leon
Found it (on right) - St George JB-1, missing badge. I recall you have at least one like the one on the left.

View attachment 5100569

Correct, sir, on both counts. The JB-1 is, to all intents and purposes, my old bass. The EB-2 I have eight of, and only one of those is badged. It is a sunburst two-pickup, with an embossed stick-on "Encore" across the top cutaway horn.
 
  • Like
Reactions: JIO
Correct, sir, on both counts. The JB-1 is, to all intents and purposes, my old bass. The EB-2 I have eight of, and only one of those is badged. It is a sunburst two-pickup, with an embossed stick-on "Encore" across the top cutaway horn.

Here's a Crestwood from the late '60s that has what looks like the same neck that was on your bass. Same 10 screw bridge and Teisco V/T knobs w/pointers also.

upload_2023-6-22_14-19-8.jpeg
upload_2023-6-22_14-20-20.jpeg
upload_2023-6-22_14-20-43.jpeg
 
This is something I should have done before sending to Pat to finish, but... I didn't, and I am now addressing. The tr seemed to work, but I couldn't get the bow to straighten out. Action was a bit on the high side, but at the time I didn't want to fuss with it. (yah I know... shakes head) But every time I played it it annoyed me so yesterday I bit the bullet and removed the fb. I've removed fb's/replaced tr's before so my main concern was doing it as surgically as possible. I carefully scored the division of the neck binding/fb and neck and removed the fb. (I was 95% successful - more on that later) Here's what I found -

The metal 'stop' (governor?) that is supposed to act as a ground/stabilizer for the adjustment nut had shifted on the relatively soft mahogany neck route. Because of this shift, the south-side of the nut barrel had nowhere to go, so it couldn't fully straighten the bow even though there were more threads. (and rusted at that!

upload_2024-2-10_23-17-58.jpeg

I outlined where the stop was supposed to sit - a good 1/8"+ shift and the screw holes were completely distorted/rendered useless.
upload_2024-2-10_23-18-24.jpeg

JB Weld to the rescue! Stop shifted north and cemented in place. As you can see, tr threads are good - not stripped or broken.
upload_2024-2-10_23-19-1.jpeg

The stop cemented in, threads lubed, screws screwed in and filed flat. I now have a good 3/16" to play with to straighten the neck. This should be sufficient as the neck is relatively straight but I will sand it flat before gluing on the fb as the G side has a very slight bow. This will aid my 'less that perfect' removal of the fb/disruption of the finish. It'll be very close - and I'm confident I can make it a seamless fix and get the action into playable form.
upload_2024-2-10_23-19-23.jpeg

You know that familiar Teisco "Steel Reinforced Neck" neck plate? Well now I know what that was referring to! On either side of the central tr channel (with a nice central ceiling ) are two thin steel rods for neck stabilization. I literally had no idea that this is what was going on. Makes sense as mahogany is not as stable as maple - but I doubt very much that Gibson T-birds in the '60s had steel stabilizing rods for their mahogany necks! This is what I love about the Japanese basses in the '60s - once they took on the challenge, they wanted to make their product as good or better than the competition. You gotta admit that this is a pretty sophisticated design for the '60s.
upload_2024-2-10_23-44-27.jpeg

Hard to discern in this pic, but two 1/8" square rods paralleling the tr.
upload_2024-2-10_23-53-7.jpeg
 
Last edited:
Is the truss rod in a curved or straight channel in the neck? That strap that anchors the rod at the nut end is a fascinating bit of engineering.

Curved Matt - that glued-in center insert presses it downward against the back of the route tight, so when tightening the tr it has solid wood all around it and that 2.5" center block to push against the center of the fb. Yes, I'm not super versed in tr technology, but I found the way they did it very ingenious.

The tr & beams have a rusty patina but no need to be concerned.
upload_2024-2-11_9-46-21.jpeg
 
Last edited:
Curved Matt - that glued-in center insert presses it downward against the back of the route tight, so when tightening the tr it has solid wood all around it and that 2.5" center block to push against the center of the fb. Yes, I'm not super versed in tr technology, but I found the way they did it very ingenious.

The tr & beams have a rusty patina but no need to be concerned.
View attachment 5348714


Got it! The channel's curved but rather then make a full length curved filler they just filled the center section. Interesting. Sort of a minimal, skeletal truss rod installation.
 
  • Like
Reactions: JIO
That truss rod design appears to be both compression and tension, making it a double acting single rod? Am I seeing things incorrectly here?

I'm not certain the terminology, but the rod is closer to the surface on either end and because of the center block pushing it down - the center of the rod dips lower. So as the rod is tightened, it straightens pushing up on the center block. In its slack adjustment - the neck is relatively straight, so with tensioned strings it would bow/arch downward.

Got it! The channel's curved but rather then make a full length curved filler they just filled the center section. Interesting. Sort of a minimal, skeletal truss rod installation.

I don't know exactly if the channel is curved, (I didn't want to remove the tr) I think it's just deeper than the rod and the center block forces it to the bottom of the rout.

Once glued-up, I implemented the best way to compress the neck & fb together - bicycle inter-tubes! And specifically narrow 18X23 tubes which can be stretched really tight.
upload_2024-2-11_11-48-33.jpeg

Being a road cyclist helps! :) One goes thru many tubes - 2 for this 34" scale neck.


upload_2024-2-11_11-51-14.jpeg
 
Last edited:
Nice work! Did you get any pics of the fretboard removal process?

No, but it's very straight-forward, I think anyone with a bit of skill can easily do it. You use a cloths-iron set on high and place it on the frets at the nut area. Not very long, about a minute. Then you use a painter putty/spackling knife (2") and wedge it between the fb & neck at the center of the upper fb. The iron softens the glue holding the fb onto the neck platform enough to divide them. Work slowly and you will have a clean separation, moving a little further at a time. Rushing will pull wood from one or the other, so it's imperative to be patient and not push the knife down the neck if it resists. Once it resists, heat that area and continue. Once separated, remove all glue residue on both surfaces. I did that and did level sanding with a wooded block to get both surfaces as clean & level as possible. The neck had a very slight curve but within tolerance and once adjusting the tr under string tension - it shouldn't be an issue. You just want a neutral interface which should assure an even fb and frets under string tension. I'll most likely have to do a bit of fret leveling now that the bow has been minimized. (as in, necks normally have a bit of a bow - are not dead flat. You can get away with close to dead flat on a fretless neck. Glueing the fb back on is done using basic wood glue, so if for any reason the fb needs removing again, the hot iron will soften it and make it removable. (no epoxy!)

upload_2024-2-11_14-4-41.jpeg
 
I'm not certain the terminology, but the rod is closer to the surface on either end and because of the center block pushing it down - the center of the rod dips lower. So as the rod is tightened, it straightens pushing up on the center block. In its slack adjustment - the neck is relatively straight, so with tensioned strings it would bow/arch downward.


I don't know exactly if the channel is curved, (I didn't want to remove the tr) I think it's just deeper than the rod and the center block forces it to the bottom of the rout.

Once glued-up, I implemented the best way to compress the neck & fb together - bicycle inter-tubes! And specifically narrow 18X23 tubes which can be stretched really tight.
View attachment 5348896
Being a road cyclist helps! :) One goes thru many tubes - 2 for this 34" scale neck.
View attachment 5348899
The bike tube trick is so useful! I used it to fix a broken dining chair that couldn't be clamped owing to uneven surfaces. Worked like a charm.
 
  • Like
Reactions: JIO
The bike tube trick is so useful! I used it to fix a broken dining chair that couldn't be clamped owing to uneven surfaces. Worked like a charm.

Resourcefulness opens the door to simple & effective solutions! :thumbsup:
 
Last edited:
  • Like
Reactions: definenredefine
Best laid plans... fix #1 didn't hold. Removed the fb again and found out why. The combination of the governor plate anchored by the four original tiny screws and being recessed only 1/16" in the relatively soft mahogany neck couldn't hold when tightening the tr.
upload_2024-2-15_19-18-35.jpeg
upload_2024-2-15_19-18-47.jpeg

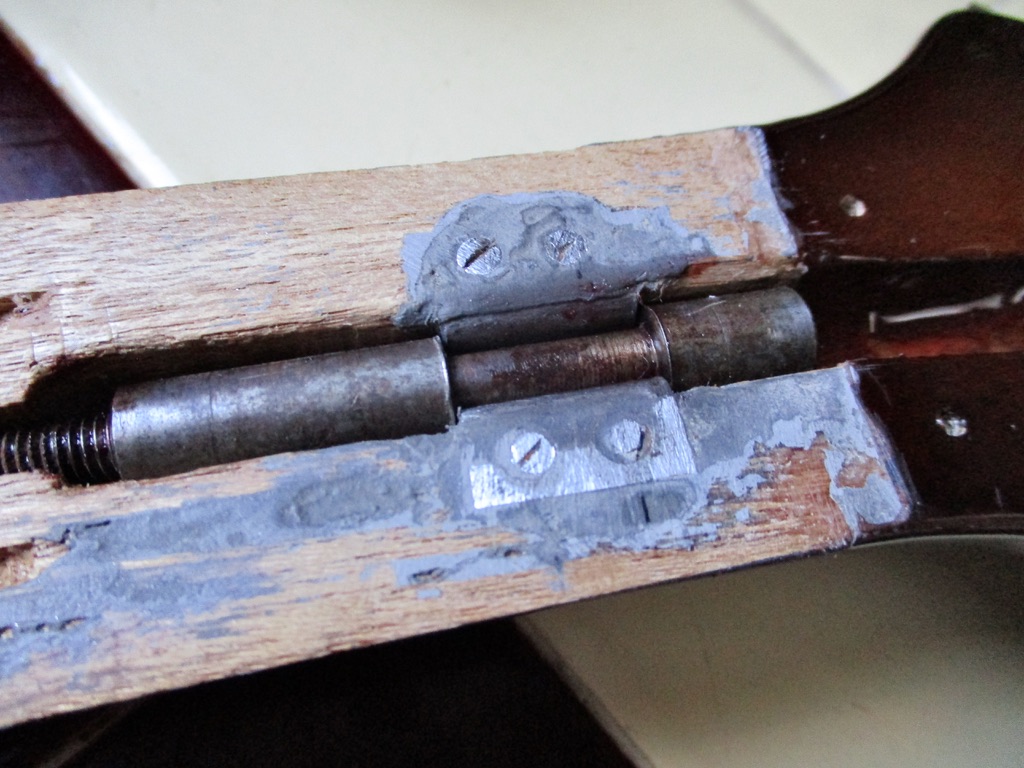
So... plan B - reinforcement. I cut two steel plates off of a sliding-barrel door-latch with two screw-holes in each and recessed them into the neck in front of the governor plate. I used beefy screws and loaded the screw holes with epoxy before screwing them down. I used bigger screws (bigger than the originals) on the governor plate also and flooded the underside with epoxy. I also flooded the T-stop channel/area with epoxy. WCS the rod being old could pull out of the T-plate being tightened, but I'll cross that bridge if and when it occurs. (and hope it stays put) Once the epoxy fully sets, the fb goes back on and I'll keep my fingers crossed while I straighten the neck.
upload_2024-2-16_13-16-8.jpeg

Loaded and lubed - ready to truss
upload_2024-2-16_13-16-53.jpeg
 
Last edited:
Nice fix! That should add some good resistance for the TR to work against. I'm sure that's a double-acting single-rod after staring at it for a while. It has that custom nut which allows the rod to either compress the neck or pull it into tension. Cool design :thumbsup: Unless I'm not seeing things correctly!
 
  • Like
Reactions: JIO
Nice fix! That should add some good resistance for the TR to work against. I'm sure that's a double-acting single-rod after staring at it for a while. It has that custom nut which allows the rod to either compress the neck or pull it into tension. Cool design :thumbsup: Unless I'm not seeing things correctly!

Thanks! Yes, kinda', and I know what you are saying... but I'm not certain how dynamic it would be the other direction. It might work like that but it I think it would be more limited backing off. Luckily the issue I need to address is getting that center section to rise up a bit which will make the needed 'bow' less impactful for comfortable no-buzz action.
 
  • Like
Reactions: Beej