• TalkBass has been independent since 1998. Add your voice.
    Create a free account to reply to discussions, view embedded media, and browse with fewer display ads.
    Join freeLog in
    Want zero display ads or expanded classifieds tools? Compare plans.

new build

I've started a new build, my second one from scratch but i have a few Warmoth assemblies under my belt. Just thought I'd share it after lurking here and watching all of the other builds going on.

Mahogany single piece body and neck, double P arrangement, EMG pups, headless set up, fretless with a stainless steel fret board in 30.5" scale. The inspiration is part Warwick Thumb, part Corvette custom (double P's) and part LeFay Pangton. My first ever build was a 6 string bubinga and wenge monster chasing the tone of a 90's Thumb bass because I couldn't afford one.

I don't have a workshop at home so I "attend" the Melbourne School of Guitar Making where David and Rob have set up a nice workshop and teach how to build an instrument from scratch. My first one with them was a fretless 5'er with triple jazz style pups, a few weeks back I finished a vintage style P bass (warmoth parts I had hanging around) that I learnt to spray paint on and now this one. I think I might be addicted, it's fun, rewarding and good therapy after a days work.

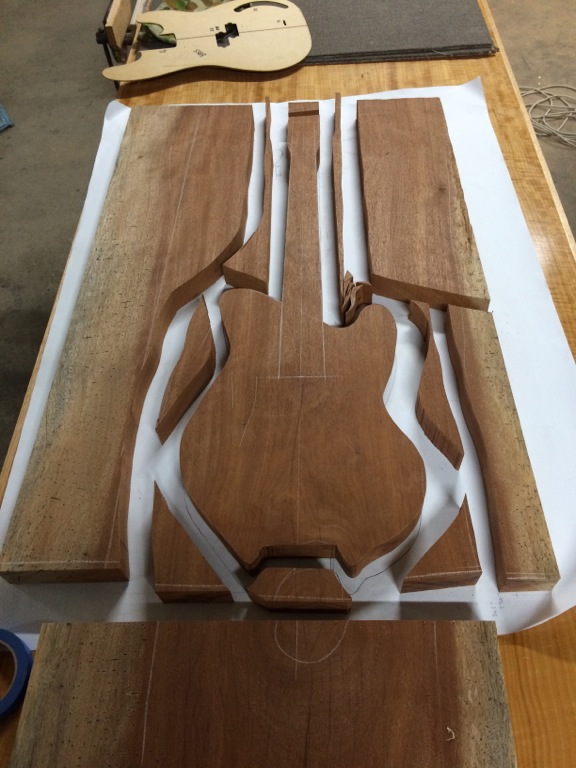
I think it'll be a slow build but we made a rocket start in last night. In the 3 hours so far we went from sketch to sanding out the saw marks on the body blank.

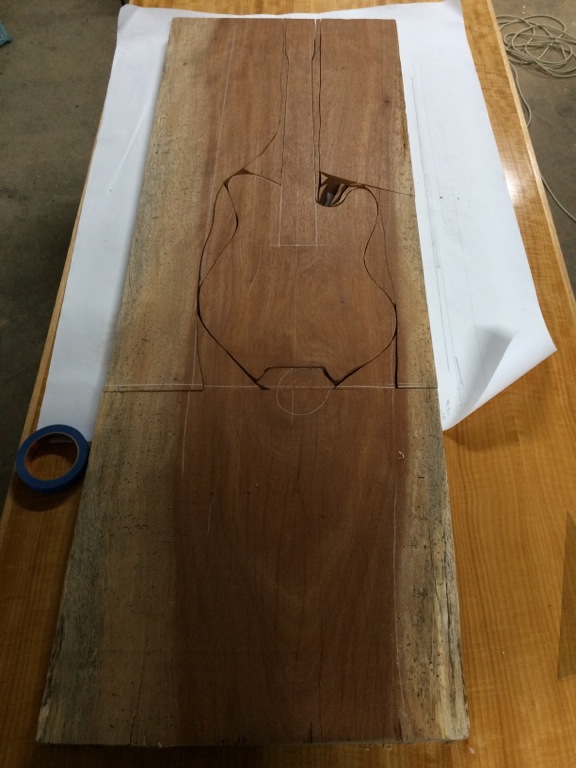
What I walked into discuss with David. (I got the scale length a bit wrong and went a bit wide on the fret board, but it took no time to fix that up and transpose the shape to the slab.)
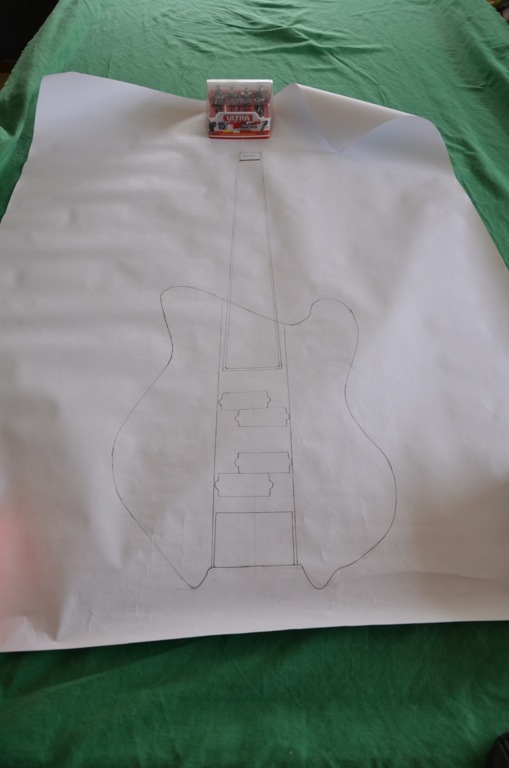
file_zpsmoychvu1.jpg


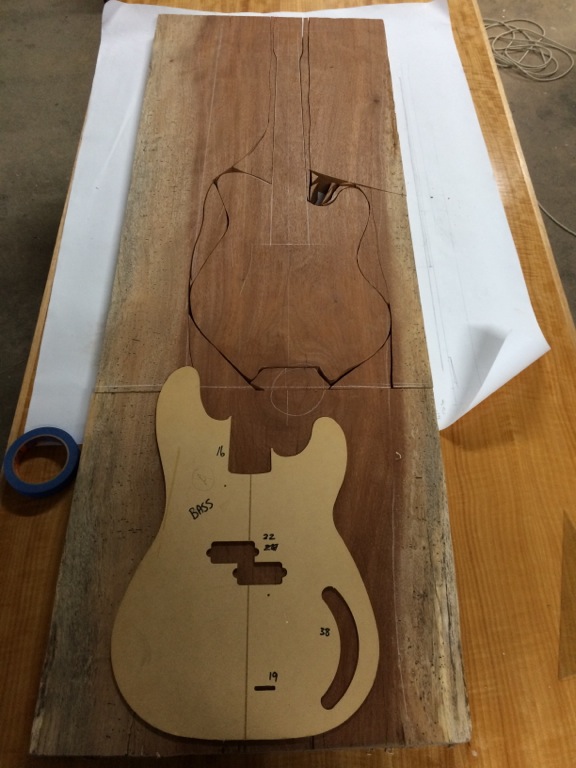
I forgot to take a picture of the slab we were working from but that allowed us to have a bit of fun putting the cut pieces back together.
file_zpsbfkvenmh.jpg


This shows more of what it looks like at the end of the evenings work.
file_zpsfxhvozj5.jpg


Sized up against a P bass template

file_zpsomuaimqo.jpg


If you like what I am doing then I'll keep the thread updated along the way.
 
Have a listen to the sound clip at Invalid Link Removed doesn't sound metallic to my ears which is why I am building one because it has me intrigued too.
Interesting - despite how much treble they have rolled off/mixed out, it still sounds very bright and trebly. Compare the open notes with the fingered ones and there is quite a contrast. I think this will be very bright - not a bad thing at all - intriguing... :)
 
We had a holiday last Friday so we could watch the national football teams parade down the centre of the city before the grand final the next day. I went to the workshop instead and then tonight was my "normal" Tuesday evening session. I've got a fair way in roughing out the shape of the neck to body transition and then started shaping the neck because it all has to come together at the same time. On Friday I also made the fretboard template for the machine shop to copy into the stainless version. I used ebony and did a proper job on it so that if necessary it can be the fretboard if things go pear shaped with the machining.

This is David Searle, one of the owners of Melbourne School of Guitar Making, where all the work is happening. This is where we left it last time I posted.

file_zpskrjk8oxl.jpg


And this is where we are at now at the end of tonight.

file_zpshjoshkoa.jpg


It's gone from this

file_zpsbjgrhfl0.jpg


To this

file_zpstjodsmrx.jpg


And finished off at this tonight but still a fair way to go.

file_zps5wxrwdvu.jpg
 
That's pretty cool, unusual to see a truly one piece neck/body. Did your instructor get into pros/cons of one piece construction? Nothing like a guitar making school in my area, I'm envious, all my learning through books, TB, and YouTube. What kind of trussrod you using?
 
  • Like
Reactions: Chris_Toot
That's pretty cool, unusual to see a truly one piece neck/body. Did your instructor get into pros/cons of one piece construction? Nothing like a guitar making school in my area, I'm envious, all my learning through books, TB, and YouTube. What kind of trussrod you using?

I was heading for a neck through but David suggested because we had a big enough slab we could do the one piece. So opportunity more than anything else. I don't believe that it'll be any different than a neck through in sound etc. As to a truss rod. None. Big 1/4" thick piece of stainless steel sitting on top of it should hold it rigid. At least that's the plan.
 
  • Like
Reactions: Gilmourisgod
I'd do it all day, every day if I could make a living at it. Hard to get paid for any craft, and lots of amazing competition, but even weekend woodworking is satisfying in ways I can't explain, sure it's the same for the OP.

Yeah me too. Maybe one day I'll get good enough at this to sell one or two for what they cost me in parts so I can build the next one but I don't think I'll be at that point in a long time and yes right now it's good therapy.
 
I'd do it all day, every day if I could make a living at it. Hard to get paid for any craft, and lots of amazing competition, but even weekend woodworking is satisfying in ways I can't explain, sure it's the same for the OP.

I'm going to the same workshop as Blaine, and we have a nice little community going, a variety of people with different approaches and skill levels. David really fosters the group and develops every "student" to the best of their abilities while emphasising the enjoyment of making something from a block of wood. And he never discourages different "out there" projects which I really appreciate.

Just like Blaine I'd love to be able to make this hobby at least cost-neutral, and circumstances have given me an opportunity to at least give it a shot. Going part-time next year will free up a couple of days a week, and fortunately I don't have to make a living. Let's see how it all works out.

And of course you're right, there are way too many amazing people out there but in a way I see that as an incentive and opportunity to up my game :).

I love what Blaine's doing here, almost looks like a clay artefact at this stage, and I can't wait to see what comes of it.

Regards,
Michael
 
  • Like
Reactions: Gilmourisgod
Little bit more shaping on the neck and neck-body transition tonight, much happier with how its looking now. I went shopping at Carbatec and brought a set of "micro planes" which are basically rasps but better. They don't leave the big gouges that your common rasp does and come in a few different sizes, coarseness and shapes. The "blades" snap into the handles so one handle fits all the different blades in that size.

file_zpsvvrhjazn.jpg


Then I got into routing the pickup "holes". Some kind person left a template for a Bartolini 5 String P Bass pickup behind. (Thanks Michael) It fitted my EMG 4 string ones perfectly with about 6" of masking tape wrapped around the collar on the router to make the cut smaller.

file_zpshefcefks.jpg


It's 3.6 Kg according to the bathroom scales too.

The SS fretboard is with a CNC machinist now, the guy I had lined up balked when he saw the template I made up and said it was too difficult to get done by hand with a turret mill. It's a pity I sold mine because I still think it could be done. Anyway, I had a lovely chat with the owner of the CNC shop I went to with the work. We threw around all sorts of ideas on how to get the radius done from bolting it to a 500mm round steel stock and spinning it on a lathe, to creating a die, like a router bit, to cut it. In the end his son, the CAD specialist and programmer, said the CNC would get it very very close. He said it'll be around 500 plus passes at 0.05mm increments to get the 20" radius in the 6mm by 60mm stock. It's about 5 hours of machine time! They'll get a bar wider than what they need and bolt it to a sacrificial piece to clamp it in the machine and then go to work. It'll have tool marks in it but hitting it with a bit of wet and dry should take them out. Depending on how they look I might leave them in too; they might be interesting given they'll be very uniform.

Next week I'll be routing the control cavity, routing the bridge into the body a little and start the rough in on the body shaping.
 
A little bit more done tonight. Not a lot because my mate Pete was down from Canberra, about 7 1/2 hours drive away, and we hadn't caught up for ages so had pizza, chatted a bit, talked about his upcoming builds, stirred up my other friend Ivan for not coming out and working on his new neck. You know had a good evening being guys in a shed.

David got into me for not doing anything but chatting so started on the top rounding and got myself into a bit of trouble on the linisher. Forgot I had a neck on the body and didn't remove the guard on the dust collecting bit so I wasn't straight down the belt. David to the rescue and you'd never know. At least I know when to stop trying to fix stuff and put my hand up I guess. :red face The back side with be a similar curve in reverse.

IMG_0848_zps9cxz9gzz.jpg


IMG_0847_zpsmm9nrndc.jpg


and a little flourish at the end of the night. It'll help with access to the upper "frets" but it's shaped for show.

file_zpshgn4ntqh.jpg
 
  • Like
Reactions: Will_White and GKon
So another evening in the shop and a little more progress but the last shop night for a few weeks as I'm interstate on a bit of a holiday.

Got into the back curve this evening. Routed a 12mm channel 30mm each side of the centre line, stepped it up to 8mm for 15mm further out and again 15mm further out to a depth of 4mm. This took out a large amount of timber ready for my new love; the Arbotech Turbo Shaft! This is a rotary plane attached to a 4" grinder and it eats wood. It's not very forgiving, so best left in the hands of a more experienced user, but it roughed that curve in about 30 minutes in David's hands. Yes I wasn't keen to have a shot, for fear of making a fatal error, but then I don't remember being offered either... I think he was having too much fun. The others in the shop all thought we were cheating but hey we got a long way in a very short time.

From there it was hand tool and orbital sander. My microplanes came into their own again smoothing out the lumps and bumps for the sander to finish off the smoothing.

file_zpscqkbtuox.jpg


file_zpszit1cdam.jpg


I'm still not sure whether to go solid colour or a transparent? Given the fret board will be metal I was thinking Cola Red but now, given the figure on the back, maybe transparent Cola Red.