• TalkBass has been independent since 1998. Add your voice.
    Create a free account to reply to discussions, view embedded media, and browse with fewer display ads.
    Join freeLog in
    Want zero display ads or expanded classifieds tools? Compare plans.

P-Bass build

Hi everyone,

I feel like it's a bit of a stretch to post here to Lutherie, but here it goes. I've decided to build out my own P-bass. Decisions are to be made.

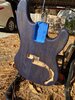
So far I've got a Fender MIM Jazz neck and a sketchy Alder body that will need a bit of work. Get a load of the holes for the bridge! What happened there?

I'm going to paint the body and have my daughter do some artwork on it. That will probably take a good while to get done.

In the meantime I'm thinking Hipshot lightweight tuners, and Fender '63 pickups. Haven't decided what to do for the bridge yet.

P.S. Eww. Carpet is overdue for some RugDoctor action.
 

Attachments

  • IMG_1302[1].JPG
    IMG_1302[1].JPG
    1.2 MB · Views: 220
Interestingly I've discovered that I really prefer the Fender Jazz neck over the Precision. I've had a mid-70's Ric and have an Alembic Epic which I'd suggest are Precision-like. My first bass was a Jazz and I also have a Yamaha BX-1 that is Jazz-like, and I really like it. I never really thought about it before, but it's a thing. Everyone has their preferences I guess.

Found a used Hipshot KA bridge, and I've got a black pearl pickguard on the way too. I'm thinking hipshot ultralite tuners?

Main thing is to get on the paint. I'm likely going to use an automotive primer (because I have it) and automotive pewter metallic for the color. Then I'll have my daughter do some custom art on it before doing a clear coat. I'll have to wait for good weather to do that part so it may take a while.
 
Nice weather today. Applied an oil based sanding sealer, sanded with 220 grit on the orbital and then oil-based navy blue. Came out much nicer than expected.
 

Attachments

  • 1C8E7ABF-4053-4FEB-832A-7B0EB9EF04F6.jpeg
    1C8E7ABF-4053-4FEB-832A-7B0EB9EF04F6.jpeg
    1.2 MB · Views: 175
  • AF05F8CD-0538-4907-9B43-87084426F214.jpeg
    AF05F8CD-0538-4907-9B43-87084426F214.jpeg
    1.2 MB · Views: 154
  • 2D6F71A9-0818-43EC-814A-9F487FBEDD54.jpeg
    2D6F71A9-0818-43EC-814A-9F487FBEDD54.jpeg
    1.2 MB · Views: 160
  • 5D4AB581-6D4F-4905-AC81-EFAC5BAFCFF1.jpeg
    5D4AB581-6D4F-4905-AC81-EFAC5BAFCFF1.jpeg
    1.3 MB · Views: 160
  • Like
Reactions: Matt Liebenau
A lot has been written about applying clear coat over artwork. I think @JIO did this recently. What I do know is the first two coats need to be very thin. This helps keep the paint from running.
Edit: and, as has already been said, try everything on scrap wood.
 
  • Like
Reactions: JIO
A lot has been written about applying clear coat over artwork. I think @JIO did this recently. What I do know is the first two coats need to be very thin. This helps keep the paint from running.
Edit: and, as has already been said, try everything on scrap wood.

Depends on what medium the artwork was applied with. Pastels (for example) for sure require very light coatings to start with. Clear lacquer works well if that critical first couple of coatings are light. Art stores sell specific clear acrylic sealers as well. The key is light and even. Same with the second coat. The third coat can start to be more saturated, but only if the prior coat is cured sufficiently. Gilding (silver/gold leaf) is a bit more 'hardy' and a clear acrylic sealer like LUX can be brushed on. It levels nicely and sets fairly quickly to a semi-gloss sheen. (labeled satin) Over time the semi-gloss sheen will reduce to satin. LUX is used to seal gilding and build a clear layer that can be level-sanded prior to applying the final clear-coat. (gloss or satin) With gilding - a gloss clear-coat will accentuate the gildings depth more.
 
I got two very light coats of the lacquer on. It's up to the artist to do her thing now. Then I figure I'll do a few coats on top of the art and then a fine sanding, a few more coats of lacquer, and and then polish polish polish.

Tuners are on their way, and I ordered an Entwistle PBXN pickup, which should be interesting.
 
I've gotten probably 6 layers of lacquer on now. I need to sand again, but getting a day warm enough is tricky now. Much more work needed on the finish. While it's cold, I've decided to do assembly to work out the issues.

The holes for the bridge are off by at bit, so I'll have to remedy that first. Then I'll mount the pickups. I'm guessing I have a blemished body where the control routing peeks out from the bottom of the pickguard. No worries cause I got it for a great price.

705F3F69-BB74-4C62-8DA4-B40BE8BB6A86.jpeg


Alembic for contrast. :)
 
  • Like
Reactions: Beej
An unsolicited thought: the neck might be cocked to the treble side in the pocket rather than the bridge being offset. I'd throw the pickups in place to see where the pole pieces line up. It would be easier to loosen the neck and a push it a little to the bass side. :thumbsup: The body is most likely CNC'd to be aligned between pocket, pickup rout and bridge holes. :)
 
@Beej, I took your advice and popped in the pickups and boy the strings were off! The strings passed straight over the poles, where it should sit in between them. About a quarter of an inch off. So I'll measure it all out, since I don't trust what is there. Should be an easy fix. :)

I should also mention I had to epoxy down the magnets on the pickups, where the neodymium bars were loose and the poles weren't correct on one of them. Boy these PBXN pickups have strong magnets!

Also found a .047uf orange drop in my stash for the tone pot.

Offtopic: I'm really impressed with some of the woodworking in this forum!
 
  • Like
Reactions: Beej
Thanks for asking. I've been holding off posting until I've made more progress on the finish, which is on hold due to the cold weather. Not sure if the custom art will happen either.

I was just thinking about this today. I should disassemble it to be ready for any surprise warm weather that pops up. I don't want to though because the bass sounds fantastic! Enough so that I barely use my other two basses now!

Some other posts relating to the build.

Entwistle PBXN pickup review
Show us your "parts basses"
 
  • Like
Reactions: instrumentalist
Oh I should mention that the bridge is a wee bit crooked. It doesn't seem to affect the sound or playability, but I do want to fix that. So once I disassemble the whole thing, I'll need to plug/glue the holes except for the one corner which I'll use as an anchor. I'm going to drill the holes with the bridge attached so I can get a good look at it first. I could be a lot more precise with a drill press, but I don't have one.

There is one other fiddly think I needed to correct but I don't remember.
 
  • Like
Reactions: 41hzthunder
Alright. The weather has improved and I've been able to resume work. I've got at least 10 coats of lacquer on, and I've gone over it with a 000 steel wool, as well as a polish compound. It's not the mirror finish I was going for, but it looks nice. I probably should go over it with a 800 grit to get the fine bumps out. I'll sleep on it and decide later.
 
  • Like
Reactions: instrumentalist
Alright. The weather has improved and I've been able to resume work. I've got at least 10 coats of lacquer on, and I've gone over it with a 000 steel wool, as well as a polish compound. It's not the mirror finish I was going for, but it looks nice. I probably should go over it with a 800 grit to get the fine bumps out. I'll sleep on it and decide later.


Indeed. Mirror gloss is going to take more than steel wool and polish. There’s definitely sanding and/or wet sanding involved before the buffer. Typically starting at 400 or 600 depending on where and how you’re starting and working in order through the grits to 1500 - 2500 depending on your process then buffing.