Before my trip to the Chicago Music Exchange, I was contemplating building a P bass from Warmoth parts. I've gotten comfortable over the past few years working on guitars, setting them up, and doing some light soldering work that I felt relatively comfortable building a bass from parts, but I wanted a test run, due to the high initial cost.
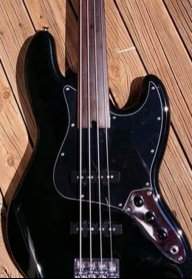
So, I decided to take a “dry run” on one of those DIY kits you see on Reverb/eBay/anywhere else. For the thrifty price of $100 plus shipping, I got my hands on this:

(Closest picture I could find, when I made the purchase it had a Fender shaped headstock)
Features:
Kit includes all parts to build a complete, playable electric bass.
The switch control plate is installed with metal knobs and pots and wires, no needing other installation.
The body is made of basswood, while the neck is constructed from maple, and the fingerboard is made of rosewood, exquisite workmanship.
The holes are delicately and perfectly cut, fits for the accessories well.
The wood with smooth surface for easy painting.
(direct copy + paste of the description given)
From there, things got… complicated. For one, the body came without any holes drilled for the pickguard, bridge, or neck. The neck itself had a paddle headstock instead of the fender shape the kit promised. I have no tools, and no knowledge of woodworking. And here's where it gets fun. With only my existing knowledge of maintaining my own instruments, my wits, and my wallet, I decided to put this baby together. No hands-on help allowed. Google, mercifully, is allowed, but every cut, twist, and chop would be by my own hand.
My Objectives:
1 - Shape the headstock
2 - Paint and finish the body/neck
3 - Correctly place the neck, pickguard, and bridge
4 - Wire electronics properly (no grounding/shielding issues)
5 - Play a gig with the bass.
What follows is meant to entertain you, not instruct. I will stress this over and over, I don't know what I'm doing. I am not going to (purposefully) ruin the kit, I aim to finish with a playable backup bass for my Nash.
Enjoy.
Update #1 - Looking back (and a little forward)
Update #2 - Paint that Body!
So, I decided to take a “dry run” on one of those DIY kits you see on Reverb/eBay/anywhere else. For the thrifty price of $100 plus shipping, I got my hands on this:
(Closest picture I could find, when I made the purchase it had a Fender shaped headstock)
Features:
Kit includes all parts to build a complete, playable electric bass.
The switch control plate is installed with metal knobs and pots and wires, no needing other installation.
The body is made of basswood, while the neck is constructed from maple, and the fingerboard is made of rosewood, exquisite workmanship.
The holes are delicately and perfectly cut, fits for the accessories well.
The wood with smooth surface for easy painting.
(direct copy + paste of the description given)
From there, things got… complicated. For one, the body came without any holes drilled for the pickguard, bridge, or neck. The neck itself had a paddle headstock instead of the fender shape the kit promised. I have no tools, and no knowledge of woodworking. And here's where it gets fun. With only my existing knowledge of maintaining my own instruments, my wits, and my wallet, I decided to put this baby together. No hands-on help allowed. Google, mercifully, is allowed, but every cut, twist, and chop would be by my own hand.
My Objectives:
1 - Shape the headstock
2 - Paint and finish the body/neck
3 - Correctly place the neck, pickguard, and bridge
4 - Wire electronics properly (no grounding/shielding issues)
5 - Play a gig with the bass.
What follows is meant to entertain you, not instruct. I will stress this over and over, I don't know what I'm doing. I am not going to (purposefully) ruin the kit, I aim to finish with a playable backup bass for my Nash.
Enjoy.
Update #1 - Looking back (and a little forward)
Update #2 - Paint that Body!
Attachments

Last edited: