• TalkBass has been independent since 1998. Add your voice.
    Create a free account to reply to discussions, view embedded media, and browse with fewer display ads.
    Join freeLog in
    Want zero display ads or expanded classifieds tools? Compare plans.

Rethinking neck design...with build content

JayGunn

Supporting Member
Jan 24, 2010
242
188
Chapel Hill NC
I have read many talkbass build threads in the last 4 years, and have found them extremely helpful. You guys got me thinking about this stuff and you also stimulated me to start 3 builds, the first one almost complete. This first a test bed for this idea I had about how to build a really stable neck. How stable is stable enough? and stiff enough?

Many experienced builders here say that if you make a laminated neck it's fine, no graphite is needed. And if you go to eBay and do a search on "bass neck project" (try it, you'll see a lot of necks!) most are not laminated; they are Leo-style single piece flat sawn maple. So I admit that this build is probably overkill, and just laminating might be fine. But I am planning to keep this bass in India, which is a true test of reliability, since it swings from 115F and less than 10% humidity to 90F and steady 75%+ humidity in the course of a month. So I want to make an indestructible neck.

I often think I have invented something, only to find that a dozen people have had the same thought way before me. So I am not claiming these ideas are unique, but they're new to me and I haven't seen them in TB builds so far. I hope you find them stimulating, at least, and maybe even useful.

Neck design #1 My first design idea was to use a relatively heavy neck wood, like wenge or canarywood, chosen for stiffness, beauty and stability, then to reduce the weight by inlaying a very light wood in what will turn out to be the middle of the neck, like this:

Plan1-inlayed-softer-wood.jpg


The idea here is that the heavy, dense wood is at the perimeter where it contributes most to strength and stiffness. The softer wood (e.g. white pine, obeche, butternut, sassafras, redwood or unusually light mahogany) gets routed out for the truss rod. Can't be too soft, like balsa, because the truss rod would just dent the balsa. If you think about square steel tubing you see the concept--that you want the stiff material on the outside, and it's stiff even if hollow.

How much weight could you save? I calculated the weight difference between a 57lb/cu ft neck wood and a 27/b/cu ft filler wood for a channel 1 1/4" wide, 3/8" thick and 27" long. The difference came to 3.5 oz or about 98gr. That's actually a decent weight savings, but not as dramatic as saving 98gr in your headstock. Still I imagine you could feel it in reduced neck dive. However, you're going to lose some of that savings by routing out a truss rod channel, so maybe it's not worth the work...

I have a piece of canarywood I'll try this with in an upcoming build. BUT this thread is about the second method I have 'invented,' described next.

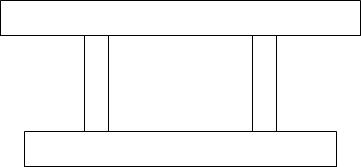
Neck design #2. I have already pursued this with a prototype (pictures below), and its build. You make the neck into what I have been thinking of as a "double web I-beam." That's a misnomer because it's the single web that gives an I-beam or H-beam its resemblence to a capital letter and hence its name. So let's just say a double web beam, like this:
Double%20web.jpg


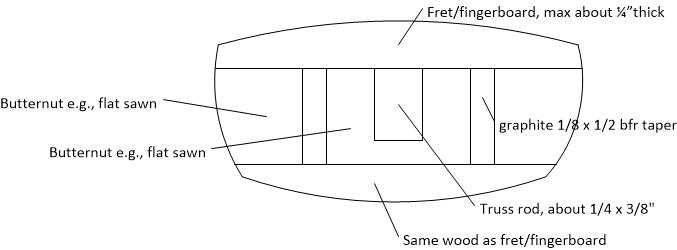
In an I-beam the top and bottom flanges give the beam most of its stiffness (according to Wikipedia a least). I reasoned that the fingerboard/fretboard serves as the top flange. Let's give the neck a bottom flange of the same very stiff wood. We provide two webs because we need to reserve the middle for the truss rod. (Of course you could do two truss rods in a wide neck and put one web in the center and really have an I-beam as well). For the web(s) we'll use graphite rectangles. Then we'll fill in the spaces between the webs and between the flanges with the lightest and most stable wood we can find. Here's how our neck turns out in cross section:
Neck%20crossection%201.jpg


As close as possible, the graphite web pieces run all the way from the top web (fretboard) to bottom web. In my first build, at the body end they're 1/8" wide x about 1/2" deep, tapering to about 3/8" deep at the nut.

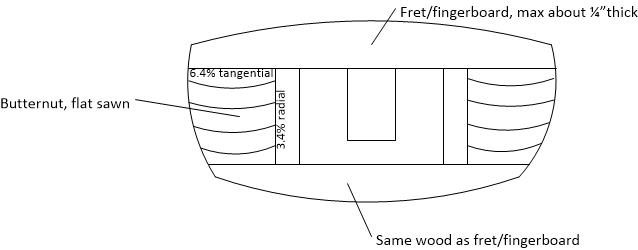
Now here's an important issue: the graphite webs will completely ignore changes in humidity. The wood filling in the middle of the neck will (if not hermetically sealed) try to move a little with the seasons. So we want to pick a wood with very little expansion/contraction in the dimension that will be epoxied to the graphite. We want to install it flat sawn. Why? because every wood has less movement in the radial direction than the tangential direction, and there will be less tension where the soft wood is glued to the graphite by making it flat sawn, like this:
Neck%20crossection%202.jpg


Note that I chose butternut, soft, light and stable, for the drawing but it is not optimal. Shrinkage against the graphite is decent, but against the fretboard wood it's more movement than most very hard woods (but it would work okay with maple). Mahogany is ideal as a filler wood (more like 2.9%r, 4.3%t) and though I feel guilty about buying it, I have snagged wood from an old dresser whose drawer fronts will make multiple necks for me. And actually it seems there is now farm raised mahogany for sale. If the fretboard is quartersawn wenge its 4.8%r would play very comfortably against the mahogony 4.3%t.

</disclaimer on> I urge people not to get too OCD about matching up movement rates of woods, but I try to take them into account, and not glue flat sawn hard maple (9.9%t) for example to quartersawn teak (2.6%r) and expect them to cooperate without tension and possible instability. Still we all know every board is different and you can only do so much with averages. </disclaimer off>

This neck design approach strongly suggests a flattish D profile rather than a C. For me this is fine because I don't wrap my thumb around the neck--I keep it pretty much centered on the middle of the back of the neck. So I don't mind a broad near-flat area on the back, which is what allows for the wide lower I-beam type of flange--the wenge on the back of the neck. The two flanges make the neck stiff. The graphite contributes to the stiffness as well, and it also really makes the neck stable (in theory).

Next, pictures of the actual neck build, then later the body, etc...
 
I have been thinking of this as a "three radius neck." On the first and only one I have built so far, which I'll show below, I used a 12" radius on the wenge fretboard, an 8" radius on the back wenge 'flange,' and roughly a 2-3" radius on the edges of the neck. I also made the neck unusually wide at the zero fret--about 1 11/16", a hair wider than a P-bass. I retain more bottom flange because of the extra width. This feels great to me but you might not like it.

The graphite bars I used were 24" and the neck core is longer than that, so here you can see the mahogany strips that fill in for the missing graphite. Hidden benefit--you can put the neck bolt inserts into wood instead of graphite. Also note that I foolishly already glued on the back 'web' of the neck before adding the 13deg headstock extension. (I did it 3 years ago). I'll show the effect of that below.
Neck%20core,%20glued%20not%20yet%20routed.jpg


Here we have the headstock extension glued on, wings added, truss rod routed.
Neck%20core,%20glued%20and%20routed-best.jpg


Here the headstock veneer and a spacer representing the nut are in place against the radiused and glued fretboard. Since there's a zero fret, the nut will just hold the strings gainst sideways movement. I'll use a very hard wood for this, like ebony, curupay, cumaru, or maybe I'll stick to wenge.
Neck%20with%20fingerboard%20glued,%20headstock%20veneer%20and%20nut%20roughed%20out.jpg


Here you can see the shaped neck, fitted to the body. The end grain of the mahogany filler strips are slightly visible here, but they don't bother me at all. Like Microsoft used to say to developers "It's a feature, not a bug."
In%20place,%20unfinished,%20bars%20barely%20visible.jpg


Here is another view of the mahogany strips after a few coats of low-gloss Formby's:
Neck%20end%20showing%20mahog%20bars.jpg
 
Hopkins, great! You're an automatic sub for me. Good that you're looking at this.

Naturally you can control the thickness and the taper by proper planning. On mine (I'll measure when I'm back in my 'shop') it has come out quite thin, under 13/16" at the first fret, by feel anyway. To get the bolt on part thick enough I'd start with the back web about 5/16" thick. Here's a diagram I created.

Neck%20taper%20planning.jpg


In the next post you'll see the back view of the actual neck. Frets in today I hope.
 
To me the big issue about this is whether there's such a thing as 'too stiff' in necks. There are aluminum necks, graphite necks. People say they have no dead spots. If the neck is super stiff, you'll have to induce neck relief, either by forming it into the neck during construction, forcing it with a double-action truss rod, or via fret filing, so maybe there is such a thing as too stiff a neck.

More pictures:

Here's the back side of the neck with at least 6 coats of Formby's. See how flat it is? That hump may not count as a volute, but it does strengthen the area behind the nut slot.
Finished%20neck%20back%20side.jpg


[Edit] when I posted this, the picture of the back of the neck came up as an [X]. But when I edit, it shows up fine. I'll add it again and it might be duplicated...]
FinishedNeckBackSide.jpg


This side view demonstrates something a bit unusual. Behind the zero fret slot I left about 3/16" of wenge for strength, and cut the fretboard at 13deg so the cut is square to the headstock. Then the headstock veneer is also cut square, so the nut will lean back at a 13deg angle. It needs glue and varnish cleanup.
Nut%20slot%20side%20view.jpg
 
Last edited:
  • Like
Reactions: -Boscoe-
If this design I have been thinking of as a "double web beam section three radius neck" is actually a new idea, then as originator I hereby put this concept into the public domain. Anyone is free to use and to further develop the original designs in this thread with no obligation to me, financial or otherwise, whatsoever. You can't patent it if I invented it because this paragraph gives it away...

Yes, it's silly to imagine this is patentable, except for that (IMHO) outrageous patent granted for a trapezoidal neck cross-section, which is what motivated me to put in the above paragraph...
 
  • Like
Reactions: ctmullins
#2 is similar to the necks I did, if you take away the CF webs. I did horizontal laminations with hard/heavy wood front and back, and softer/lighter wood between. The second build is kind of stalled, but the first has been playing nicely for years.


Re #1, Ken Parker makes necks with a maple shell and douglas fir core for his archtops.
 
Last edited:
I love your design and execution - very well done!

As long as we are talking about neck design... I have had a few ideas of hollowing out a neck and fit the inside with a different wood - call it an "interior laminate" design. Using a combination of round and round-over router bits you could get a tight fit and use a heavy stiff wood as the shell, and put a lighter wood inside to provide weight relief. You could also create a semi-hollow neck design using a hollowed out shell made from a stiff and stable wood, and either use cross braces or a center strip for a truss rod.

Interior laminate design:
neck.png


Semi-hollow neck designs:
semi-hollow-neck.png
 
  • Like
Reactions: Will_White
Hopkins, great! You're an automatic sub for me. Good that you're looking at this.

Naturally you can control the thickness and the taper by proper planning. On mine (I'll measure when I'm back in my 'shop') it has come out quite thin, under 13/16" at the first fret, by feel anyway. To get the bolt on part thick enough I'd start with the back web about 5/16" thick. Here's a diagram I created.

Neck%20taper%20planning.jpg


In the next post you'll see the back view of the actual neck. Frets in today I hope.

Ok, so its not all that thick. I was wondering how that was going to work. That thickness is right in my wheel house actually, I am not a fan of a razor thin neck. How does the square profile feel when playing?
 
I remember seeing a neck that's made of maple and had deep channel routed and filled with spruce or similar light wood. It also had cf between thespruce and maple. Maple was like skin and spruce was as core of the neck. I've made skinned necks with obeche or alder core and cf skin.
 
I love your design and execution - very well done!

As long as we are talking about neck design... I have had a few ideas of hollowing out a neck and fit the inside with a different wood - call it an "interior laminate" design. Using a combination of round and round-over router bits you could get a tight fit and use a heavy stiff wood as the shell, and put a lighter wood inside to provide weight relief. You could also create a semi-hollow neck design using a hollowed out shell made from a stiff and stable wood, and either use cross braces or a center strip for a truss rod.

Interior laminate design:
View attachment 856022

Semi-hollow neck designs:
View attachment 856036
If I was to do something like this I'd do a strong stiff wood and a combination of those two inner brace styles, crossbeams centered under frets (sort of like the gittler guitars), and just wrap the neck in a veneer, or fiberglass, or thin aluminum sheeting [not sure of the weight savings but it would look cool]
 
Nice to know that I'm not crazy, or to know that more people than I are crazy. I will definitely try the lightweight core in a neck in the next 2 or 3 builds.

As for Hopkins' concern about neck thickness, I don't think that using the graphite as webs inherently forces you to make the neck thicker. But it seems most suited to this flattish (not trapezoidal!) neck profile that I think I'm going to like, since you then get to have a reasonably wide back flange of stiff wood. Since the neck mow bolts on I can hold the bass and sort of air play it, and I like it a lot. But it'll take a few weeks before I can really play it.

I'm going to post some progress pix of the build thread next, which veteral builders may want to skip over, just to catch this project up to real time.

Current state of the bass is:
-- body has been sanded, ready for Z-poxy grain filler, planning on one mission brown tinted coat and one clear coat this weekend. We'll see.
-- neck has been shaped, many coats of Formby's, fret slots cleaned up and set to proper depth, just waiting for frets, also this weekend if I don't get too booked up with domestic stuff.
-- electronics are still up in the air. Some day there'll be a preamp for the P and MM pickups, but I was planning on making it myself, and I'm hoping to find a forum where a real EE person can review my schematic. Might be too naively homemade to work. Might put in an eBay cheapo preamp for now, or might just buffer the pickups and do on-off pickup switches and a volume control.
 
Last edited:
  • Like
Reactions: michaelwayneharwood
Nice to know that I'm not crazy, or to know that more people than I are crazy. I will definitely try the lightweight core in a neck in the next 2 or 3 builds.
I think that the fact that you are willing to break outside of the "standard" build mindset is refreshing. Your execution is excellent, and your ideas are well considered. There is nothing wrong with the traditional ways of thinking, but personally I am drawn to the possibilities inherent in considering ways of doing things that are not mainstream.
 
As promised, here is the accelerated build part of this thread. I'll bring you up to the present state, which is at the start of applying the finish.
Here are the specs for this bass:

4 strings, about 33 3/8" scale length. I intended it to be 860mm, which is about 33 7/8" and had to reduce it a little. A first-build adaptation. I find it MUCH easier to layout for the frets when I change to metric. I use fretcalculator.exe and lay out the fretboard with a metric ruler. Mark the lines with a sharp knife--a pencil line is way too thick. I used a cheap marking knife from Grizzly that I sharpened on granite with 600 and 1000 grit paper. Works great. I also sanded off the lacquer so the handle would feel good.

24 frets. I don't often play way up there, but this gives me the same top note as a normal 22 fret bass. I use a .112 'balanced' set of round wounds from Kalium/CircleK strings tuned to DGCF, IOW the whole bass is down a whole tone. I play with some songwriters who write in D, Eb and G, and I love having the low D and Eb for these songs. When you play everything up a whole tone on a 34" scale 4-string (because the bass is de-tuned a whole tone), it's like having a short scale bass, as if you had a capo on the second fret, except you can play that D when you want it.

Width is 1 11/16" at the nut. Several of my basses were wide (Gretsch L2202 short scale, Yamaha RBX260) and several narrow (MIM Fender Jazz, Peavey Millenium BXP, Aria Pro II Magna) at the nut, and I have gotten to like the wider nut, though ultimately both are fine for me.

Body lower bout is symmetrical like a P-bass. It has narrower horns than a P or J-bass, but not as narrow as Peavey, Yamaha and Ibanez. I saved body shapes I generally liked, then varied them using Gimp as a total newbie. I wanted the upper bout to reach a bit beyond the 12th fret to save me from any neck dive issues, because the body is chambered and pretty light. I like the horns less rounded than Fender-style, but not too pointy. So I drew and printed variations, then trimmed them until I was happy, then make a life-sized body paper template. Starting off like this:

TB1BodyShapePlanning.jpg


This bass has made progress in both countries I live in. I started with a piece of mango for the core, a piece of Ghana farm-raised teak for the top and some pieces of India teak from a demolished building for the back. The mango was freshly sawn. A year of air drying includes 3 months of over 100F/38C and around 10% humidity, so it's practically kiln dried after that. Teak is wonderful to work with. Odd smell, which I like, and it dulls your tools, but the oil makes it easy to plane. And it has a strong ring, but I'm not claiming that it has any effect on the sound(!) Here's the core work:

TB1BodyMangoCore1.jpg


TB1BodyMangoCore2.jpg


TB1BodyMangoCore4.jpg

(This picture shows the color of the mango wood a bit better).

Final dimensions: core about 7/8" thick, veneer about 1/16", back about 1/4", top about 7/16" thick. I made it thick so I could do some forearm tapering without cutting into the core. As you can see I created the control cavity and matching chamber in the core wood before gluing up the body layers.

Only one veneer layer. I wanted one on each side of the core, but didn't have enough. Here I am making a sort of veneer shooting board to support the veneer as I plane it straight.

TB1BodyVeneerPlaning2.jpg


To glue up the veneer to the core and the top I created this scheme with neem wood 3x5 beams and two bar clamps in my kitchen in India, tolerated with great patience from my sweetie. The concept is to start with pressure at the center of the body so glue squeezes outward and doesn't get trapped in the middle of the body. I have seen this happen this other builds on TB--you put clamps around the edges only and a week later there's still a puddle of Titebond in the center that will take months to dry. Andrew Drake (Drake Custom) shows his body gluing method in many of his build threads; this is a crude way to do what he does more elegantly. To prevent the glue center puddle we apply pressure, exerted by the clamps and beams onto a rectangle of plywood in the middle. Then we add clamps around the edges, like this:

TB1BodyLaminatingVeneer1.jpg


TB1BodyLaminatingVeneer2.jpg


Here's the odd way I chose to make the control cavity. I roughed out the opening in the back of the body before I glued it onto the top-plus-veneer-plus-core wood. I got a little wild with a rasp shaping the opening and I made the really unfortunate error of rasping from the inside toward the outside. I know better, but I never imagined that the outer wood would splinter like that! So I chiseled V-shapes in the surface a selected some same-color teak to make little triangles that fit really well. Once glued in and planed flat (sorry no picture) I was able to route away part of the repaired area while creating the finished opening. Net effect, it came out so invisible that I actually forgot that I had had the problem until I saw the pictures (I made the repairs in 2013--long build!)

TB1ChipRepairNeeded.jpg

!!!

TB1ChipRepair1.jpg


TB1ChipRepair2.jpg


Fast forward to last week. Here's a sneak peek of the back of the body after pore filling. I can only see the repair here because I know where to look for it. The dull look is Z-poxy, sanded level with 400 grit. It'll get one thin coat of SealCote shellac (today actually), then get sprayed with clear gloss.

TB1ControlCoverReadyForMagnets.jpg


These pictures show how I did the control cover. If the back of the bass looks 'wrong' it's because I did 2 bodies at the same time and this is actually a picture of the second body, teak top but black walnut back and butternut core. Process was the same. First make a paper template that fits really well.

TB1ControlCavityPaperTemplate.jpg


TB1ControlCOverPaperFit.jpg


Next cut the paper shape onto birch plywood, and fit it to the cavity, via belt sander, then a little hand sanding and/or filing.
TB1ControlCoverShaping.jpg


Once it fits, glue on wenge veneer to match the neck
TB1ControlCoverWengeVeneerGluing.jpg


Veneered cover ready for flush trimming the wenge--the plywood core already fits.
TB1ControlCoverOutOfClamps.jpg


Result--I don't dare push it in further; it would take a suction cup to remove it. Given some finish on the edges it'll really be too tight, but the fit is really close. After 3 years if sitting around it still fit tightly and without any warp. I have nw made it realistically looser, added the magnets, so it's done.
TB1ControlCoverInPlace.jpg


More later. Sorry for such a huge post.
 
  • Like
Reactions: bastav
One odd thing about mango wood, my choice for the core. Roger Sadowsky offers mango as an extra cost optional top wood for some of his models of basses. In India, mango is a really cheap wood, prized for being easy to work, but shunned because the white ants go for it (similar to termites on steroids). Wood is sold by the cubic foot in India and this was about $7/cu ft or about $0.60/board ft. I have great respect for Sadowsky and I just wonder what his mango wood looks like--some figure or burl must be the appeal. Otherwise he wouldn't offer it or find any takers, but I have yet to see an attractive piece. A mystery.

For shaping the body I used a Shinto rasp. Lovely tool! It has a rougher and a smoother side. I never felt tempted to use the rough side because the smoother side cuts very fast and leaves a nicer surface.

TB1BodyShaping2shinto.jpg


I made the top about 7/16" thick so I could make some forearm relief without exposing the core. I don't want any flat area on the entire body except under the bridge. Otherwise I want gentle organic curves. Teak is a joy to plane (just resharpen a little more often because of the silica in the wood).

This is early in the shaping process. It ended up a bit more curved. You can see the mango core here. Look ok with epoxy grain filler (you'll see in a day or so) but not a beautiful wood...

TB1BodyShaping1.jpg


Here's the finished body, filled with Timbermate and shellaced. I used walnut colored filler and added some Mission Brown Transtint to get as much contrast from the pores as I can.

TB1BodyFirstTryFilledShellac.jpg


In this TB post (Grain filling dilemma--what to do next?) I asked the experts here what to do about the following problem. After sanding the Timbermate level (I thought) and putting on one coat of shellac, it came out like this:

TB1BodyPoreProblem.jpg


Taking Manton's advice I sanded back to bare wood and tried filling operation #2. Filling with Z-poxy, also tinted brown with Timbermate:

TB1ZpoxyApplication1.jpg


I sanded it off and tried not to go to bare wood, but some places came out lighter than others. I wanted the pores dark, but I should have sanded it all back just to the bare wood point again. With the uneven color I felt I had to tint a second coat and even it out. That came out like this (before leveling):

TB1BodyFilledWithTintedZpoxy.jpg


It's getting really dark now. Can I live with it? No, because sanding this level also lead to some unevenness. You can see that I still have some shiny spots but an inch to the left of the spots I have hit bare wood--looks a bit grayer there. Aargh!

TB1SandedZpoxyWithBareWood.jpg


So I sanded it back to bare wood AGAIN and here's how it looked. Pores are nice and dark, wood is natural. So that left me free to do what I maybe should have done at first--put the Z-poxy on without any tint. Like this:

TB1BodyWithClearZpoxyFiller.jpg


...and after leveling, I think I'm ready for clear. A lot of work to learn something valuable--IMO it's hard to sand off tinted epoxy and keep a consistent color. So from now on I'll just apply the clear Z-poxy and not try to tint it. Final picture for this post is the body, filled and sanded with 400, ready for a light scuff with 600, then spraying with gloss.

By the way I think walnut, teak and other porous woods look great with an oil finish, not so shiny, but I want this one really protected from the elements, including UV, which bleaches a lot of the character out of teak, unfortunately.

TB1BodyFilledReadyForClear.jpg


Next--neck work.
 
Meanwhile I'm ready to put frets in the neck, which I am finishing with Formby's Low Gloss 'Tung Oil' Finish. I didn't go a great job of documenting the build process, which had some extra steps to accommodate the 'double web beam' concept that started off this thread. Here's what I am able to show about it:

In this picture you can see my home made taper jig for the table saw. It works but I'm not too fond of it because it requires concentration to keep it tight to the rip fence. But it works. Here you can see the two 1/8" x 1/2" x 24" graphite rectangles lying on the saw bed, next to the center part of the neck core--Honduras Mahogany pre-tapered in the jig. What are those 4 little notched pieces? They are the mahogany filler strips that match the thickness of the graphite so the neck blank can be longer than 24". They will go in the neck heel and you'll see them installed in the fourth picture below. The notch is a fat half inch deep so that when the end of the graphite rests in the notch it is about 1/32" low.

TB1NeckMahogFillersWithGraphite.jpg


Here the graphite is resting in the notched piece of mahogany. Both are resting (not glued yet) on the neck core.

TB1NeckCoreRawMaterials.jpg


First I glued the notched pieces to the center of the core

TB1GluingNotchedPieces.jpg


Now we see the results of the next two steps, an appropriate one and an inappropriate one. The first step was to glue in the graphite strips, using epoxy, with the strips resting comfortably in their mahogany notches and the outer pieces of mahogany bringing the neck blank up to about 2 3/4" width. So far so good. But then I tapered the neck blank for thickness (still okay) but impulsively glued on the bottom wenge flange. Not a disaster but it caused some issues later. I did this glue up about 3 years ago.

TB1NeckCoreGluedNotRouted.jpg


Jumping ahead to last month, after 3 years of sitting around this blank was still perfectly straight. How could it warp, when mahogany is famously stable, wenge is pretty darned stable too, and they're attached to two hunks of graphite? It resulted in this odd looking side view of the neck. This is a picture from a few weeks ago.

TB1HeadstockSideView.jpg


The bears some explaining, which I'll try to do tomorrow, else Monday. Coming up is fretboard work, including the 3 tools I made for this--fretwire radius bender, fret slot miter box(es) and fret tang removing tools.
 
  • Like
Reactions: bastav
If this design I have been thinking of as a "double web beam section three radius neck" is actually a new idea, then as originator I hereby put this concept into the public domain. Anyone is free to use and to further develop the original designs in this thread with no obligation to me, financial or otherwise, whatsoever. You can't patent it if I invented it because this paragraph gives it away...

Yes, it's silly to imagine this is patentable, except for that (IMHO) outrageous patent granted for a trapezoidal neck cross-section, which is what motivated me to put in the above paragraph...


It's not "first to invent" anymore under US Patent Law. It's the person who is "first inventor to file" who gets the patent. If the idea is sufficiently original, and somebody see this and files - and does get a patent - so much for your attempt to be generous. The way it now works, you get 1 year from the date of your first disclosure to file for a patent. After that, the rule is file for it - or forget it. Just sayin'.
 
Last edited:
  • Like
Reactions: Beej



