• TalkBass has been independent since 1998. Add your voice.
    Create a free account to reply to discussions, view embedded media, and browse with fewer display ads.
    Join freeLog in
    Want zero display ads or expanded classifieds tools? Compare plans.

Rethinking neck design...with build content

It's not "first to invent" anymore under US Patent Law. It's the person who is "first inventor to file" who gets the patent. If the idea is sufficiently original, and somebody see this and files - and does get a patent - so much for your attempt to be generous. The way it now works, you get 1 year from the date of your first disclosure to file for a patent. After that, the rule is file for it - or forget it. Just sayin'.

I'm surprised to hear this. I thought that if you could establish the existence of 'prior art,' you could defeat any patent that's not truly original. I never would have mentioned it if it hadn't been for that trapezoidal neck profile patent...

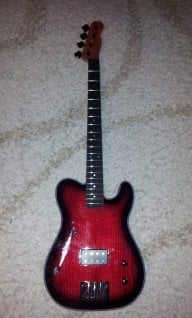
Wow! That body...I think I'm in love!

Thanks. Really as a shape it's really quite standard. The thing about it is, that I didn't want a flat-slab-with-roundover look. Not because that's bad or ugly, but I started out making furniture decades ago, and it seemed that everything I made was just flat panels of glued-up hardwoods with a routed round-over at every edge. At first I was amazed at how nice my stuff was turning out, simple, contemporary, clean lines, etc. but then I got tired of it and started feeling a bit embarrassed that everything was done that way. Seemed lazy and not very 'shapely.'

But when I started making furniture with legs that weren't just square cross-section and tops with a hand-planed edge profile I found yes I like it better but it takes a lot longer than jointer-router-sander-tung oil-done!

So this body I tried to give a little curve everywhere for a softer, more organic look. I really love the look of MapleGlo's walnut Rick. Everything she does is an automatic sub for me, but it's not the look I was going for. So that's what you're seeing in that picture, the non-flat rebellion against routed roundovers.

Tomorrow or Wednesday, fretboard pictures. Soon we'll be caught up to real time. Remaining are spraying the finish, making the preamp, and Bass Assembly Day.
 
Former promise from page 1: "Coming up is fretboard work, including the 3 tools I made for this--fretwire radius bender, fret slot miter box(es) and fret tang removing tools."
Those 3 tools are documented in this other Luthier' Corner post: Fretting Tools on the Cheap
The miter box is on page 3.

Here is the start of the fretboard work. The app running on my old tablet in the first picture below is Fretcalc. You can enter your scale in inches, then click 'metric'. I believe it's a lot easier to do the layout in mm(IMHO). That pointy thing is a Grizzly marking knife. I sharpened it with 600 grit wet or dry paper glued to a salvaged granite sink cutout. In the second picture, the ruler is lying flat on the fretboard, but for layout it's best to hold it on edge and make some kind of carpenter-style marks you can saw to. Note: if you don't mark on the center line of the board, you can make any kind of scratch you like and it'll be sanded off later when you radius the board.

TB1FretLayout1.jpg


TB1FretLayout2.jpg


Here's the board, freshly cut. It doesn't look like I hit the marks exactly from this camera angle but I really did. I found that it's better to make the edge of the cut follow the point of the mark than it is to try to center the cut on the point of the mark. Works for me anyway.

TB1FretsFreshlyCut.jpg


Here I'm drilling for the side markers, 2mm plastic from StewMac or LMII. I also bought the 2mm brad point bit--but it was bent! I figured 'If I try to bent it straight it might snap'...what to do? I found that between the bent bit and the deep pores it sometimes wouldn't self center. And the holes came out especially bad on the pair of dots for the 12th fret, or at least the error was more visible there. I filled one hole and redrilled it--no better. You can see that they're a bit off in this picture. I drilled all the other single holes first, in case I might break the bit. Then I flexed the bit gently to try to make it straight--success! It didn't snap. When I drilled the problem hole over again it aligned okay.

TB1HolesForSideMarkers1.jpg


This is a shot of leveling the side markers. The plastic is soft and without grain so it planes flush easily, at least if you plane in the right direction for the wenge's grain.

TB1SideDotPlaning.jpg


I didn't get a picture of drilling for the MOP dots. I used 6mm dots and a 6mm brad point bit with the drill press depth stop to manage the holes. I drilled the 12th fret pair a little deeper because the radiusing will remove more material at the outer part of the board. Then when I started radius sanding with a 12" radius block and 80 grit paper I discovered that the dots are a lot harder than the wenge. So I filed them flush before I finished the radius work. White powder everywhere, cleaned up fine. So did the residue of the CA glue.

TB1FretboardDotFiling.jpg


Now time to glue on the fretboard. The picture is taken in my bathroom because it was about 40 degrees outside (early April), maybe 55 degrees in my shop and I used epoxy, which wants to cure at more like 70.

TB1FretBoardGluing.jpg


After unclamping you can see the fretboard butted up to a piece that represents the nut. Since I'm using a zero fret the nut is just for limiting sideways movement of the strings--depth not critical. I did not cut a nut slot. The nut will just sit in the area between the end of the fretboard and the start of the headstock veneer. You can see (2) 1/8" dowels locating the headstock in areas that will be cut out on the bandsaw (in the picture above and below). There are two others under the fingerboard to dowel it into position. Learned this from Andrew Drake (Drake Custom on TB); he uses toothpicks as his dowels.

TB1NeckNutRoughedOut.jpg


Here is the neck with rough headstock bandsaw cutting completed and with fretboard sanded up to about 1000 grit. Looks varnished.

TB1NeckFingerboardSanded1000.jpg


Next up installing the frets...
 
  • Like
Reactions: Beej
Fret installation. I'm using jumbo EVO fret wire. The wire is 0.055" high. The zero fret is stainless fret wire. Why? Because I could buy it in 0.057" high, and I want the extra .002 at the zero fret. When I level the frets I'll leave the zero fret unleveled at least at first. Will the gold/silver thing be noticable? I'm not worried about it but you can judge for yourselves in the final pictures after Bass Assembly Day.

This is the first time ever doing fret installation so a test is called for. When you use fast glue like CA you need to have everything ready to go. First step in getting ready was to bend the fret wire radius and to file off the fret tangs. I did that with these 2 home made tools that are documented in this thread: Fretting Tools on the Cheap

FretRadiusBender1.jpg


FretWireTangFile4.jpg


Here's my plan:
- pre-cut the frets to length with a little extra
- put a bead of CA glue on a fret slot
- gently tap the fret into place
- press it to make sure it cures while it is well seated

For my trial run I radiused a piece of soft pine and cut a fret slot. Fret wire presses in without tapping. But into the wenge fretboard a hammer is necessary. I had stopped filing the tangs when I used the .022" feeler gauge and there's still a little triangular fat spot remaining for each tang.

TB1FretTestGluing.jpg


My test really saved me. The glue you see above came out so wet and thin that it ran everywhere, and it set up in a few seconds. I checked out the thick version of the same glue--it worked great! You can aim the glue so it stays in the groove and you have enough time to get the fret placed. I made a support for the neck and kept a rag on it, because the back of the neck is sanded to about 600 and I didn't want to rough it up. With the thick glue I didn't have any excess running out of the slot and gluing the rag to the neck.

TB1DrillPressReadyToPress.jpg


Here everything is set up for production and I have put in most of the frets. I bought that hammer from Lowes and I'm using the softer side to tap in the frets. Here's a mystery--in the picture below you see the last 4 EVO frets and then a piece of the stainless fretwire. Why does the stainless look so huge when it's only a hair higher and the same width? Must be the tang depth or some trick of the lighting. Did I remember the heights right?

TB1FretHammering.jpg


I'm using a StewMac caul to hold the fret tight in the slot for a slow count to 30.

TB1PressFrets.jpg


Finally dressing the fret ends with a triangular file I have previously used for sharpening a few hand saws; happens to be 6" double extra slim taper. I just ground one corner smooth and polished it up so it will glide on the masking tape and not dig in. That loupe was really cheap, bought from Grizzly a year ago in a set of 3. I use it a lot. Did I mention how inexpensive it was? Amazing.

TB1FretEndDressing.jpg


One thing I learned is that the stainless wire is harder to cut and slower to file, as expected, but it's not that much harder to work with than the EVO and I think I'll try it for all of my next build, not just for the zero fret.

So now, body is sanded, filled and ready for finish. On the neck, only the headstock will get a sprayed acrylic finish. The rest just gets a few more coats of Formby's Low Gloss 'Tung Oil,' i.e. wiping varnish. Next I'll do the fret leveling, then the body and headstock finishing, but it may take a few weeks since I have to learn how to do the leveling and how to spray. A first for everything!
 
  • Like
Reactions: Fat Freddy
I saved body shapes I generally liked, then varied them using Gimp as a total newbie. I wanted the upper bout to reach a bit beyond the 12th fret to save me from any neck dive issues, because the body is chambered and pretty light. I like the horns less rounded than Fender-style, but not too pointy. So I drew and printed variations, then trimmed them until I was happy, then make a life-sized body paper template. Starting off like this:

TB1BodyShapePlanning.jpg

Whoa! it's been years since I posted those images of the pink foam board proofing bodies I cut while working my M-Series design details. Looking at the carpet, I'd say those images were from somewhere around 2009 when I was building in the garage of the condo we were renting t the time.

Glad they were of inspiration for you!

all the best,

R
 
Rodent--Not busted, a great relief. Meaning you don't mind that I worked from it. At least I did reshape it a little...

I really liked your shape and saved it probably 2011 or 12 when I first started looking into trying my hand at building. A nice solid sensible non-wacky design. (There are some more unconventional designs I also like, but nothing that looks like the batman symbol). The first wacky design I liked was seeing Bo Diddly's square Gretsch guitar as a kid. "I'm a road runner, honey, and you can't keep up with me!"

I also admire your VRB design, which looks very Fenderesque but not like a copy. Your headstock on that model seems like a halfway-between morph of a Tele and a Jazz. So it looks like a family member without being a clone. Nice.
 
  • Like
Reactions: Rodent