
• TalkBass has been independent since 1998. Add your voice.
    Create a free account to reply to discussions, view embedded media, and browse with fewer display ads.
    Join freeLog in
    Want zero display ads or expanded classifieds tools? Compare plans.

Sin Cabeza Cinco - Headless Fretless 5 String Bass Build

The white styrene lines came out really nice, and for the most part the CA filled the other parts of the slots nicely. There are a few voids that are being corrected today, but all in all it worked out well. I really like the way the fret lines look overall, and am seriously considering dispensing altogether with side dots for this build - I don't think they will be needed and it looks very sleek without them.

My apologies for the slightly blurry picture.
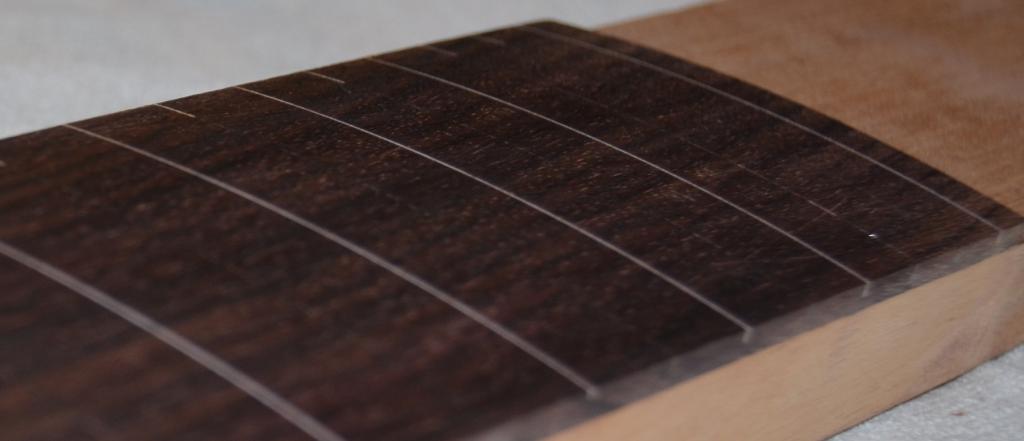
DSC_0377_zps650df42e.jpg
 
  • Like
Reactions: Morten_B
Thank you both for the kind compliments! I am really happy with the styrene, though the process for filling the slots with only CA has been a longer process. I just sanded down the second fill and still needed a few touch ups, but it's 99% there. I am waiting for the third round of CA "patches" to cure and then, hopefully, will be done with lines and can sand the fingerboard smooth.

The next question I have is whether to epoxy the surface, or to leave it bare wood. The rosewood is plenty hard enough to hold up, and it's gorgeous wood. I think I may need some serious convincing to do anything other than leave it as is. ;)
 
It's -11 degrees Fahrenheit in my garage, but that did not stop me from routing a neck pocket and applying a 1/2" roundover to the body. She's starting to look more and more like an actual bass. I have a LOT of sanding to do still, and the neck needs a whole list of tasks to be completed before glue in, but progress is progress.

DSC_0382_zpscbd651b8.jpg
DSC_0383_zpsab9e7d98.jpg
 
  • Like
Reactions: Morten_B and Puavo
Happy New Year everyone! This evening saw sanding, more sanding, and I have many hours yet to go of even more sanding. In the midst of all of the wood smoothing I applied a rosewood veneer to the neck where it meets the body and am able to tick off one more of the tasks on my list. The rosewood veneer needs to be sanded, though.

;)

DSC_0401_zpsac6af6d0.jpg
 
This evening a control cavity and rosewood control plate were added to the bass. The plate will be held in place by a total of six 3/16" neodymium disc magnets - three in the plate, and three in the body. I designed the magnet "posts" such that pressing on the curved side will open the cavity when needed. The plate itself is slightly over 1/4" thick and should stay in play nicely the rest of the time. All did not go smoothly, though. The bearing on the 1/2" template bit slipped during the later stage of routing the cavity out and gouged some material out. Fortunately it was lower than the surface of the back. It sucks, and though I wish the control cavity were pristine and beautiful it is not to be. I will sand and do a bit of carving to make it as nice as I can, but it will eventually be covered in copper tape.

DSC_0527_zpsc389c2da.jpg

DSC_0530_zps4af19423.jpg

DSC_0526_zpsb3b0e3e2.jpg

DSC_0528_zps3e4bdc36.jpg
 
Last edited:
Last night saw some more progress. I started gluing and building up the area where the headpiece will be mounted using rosewood veneer, profiled the neck, and glued the neck to the body. The headpiece area needs a lot of attention, but it's getting closer to what I envision. The neck profile was fashioned with a 3/4" round-over bit, and the end product greatly exceeded my desired outcome. There is a LOT of clean up to do, but it looks like a bass now. A naked bass, but a bass nonetheless. I have my strategies planned out for the next few tasks, but I am still trying to figure out how I am going to get the side of the body next to the neck transition dyed black without making a mess on the neck.

DSC_0537_zps1d251f4c.jpg

DSC_0533_zpsc8130990.jpg

DSC_0531_zpsecdc09be.jpg
 
Sorry for the lack of updates on this build. The pickup cavities are done, she has a zero fret, and magnets have been installed in the control cover and cavity. The rosewood veneer between the pickups and bridge looks boogered, but that was slated for replacement so I am not worried about it. The neck pickup route pretty much negates the deep set neck, and I should have known that would happen...live and learn. It should not be a problem, but I am considering putting some screws in from the back and plugging the holes with rosewood. The zero fret is still rough and needs to be shaped, but progress is progress.

DSC_0618_zpsfdiofo9r.jpg

DSC_0619_zpswvdwmuim.jpg

DSC_0620_zpsah2p9vuq.jpg

