• TalkBass has been independent since 1998. Add your voice.
    Create a free account to reply to discussions, view embedded media, and browse with fewer display ads.
    Join freeLog in
    Want zero display ads or expanded classifieds tools? Compare plans.

Sin Cabeza Cinco - Headless Fretless 5 String Bass Build

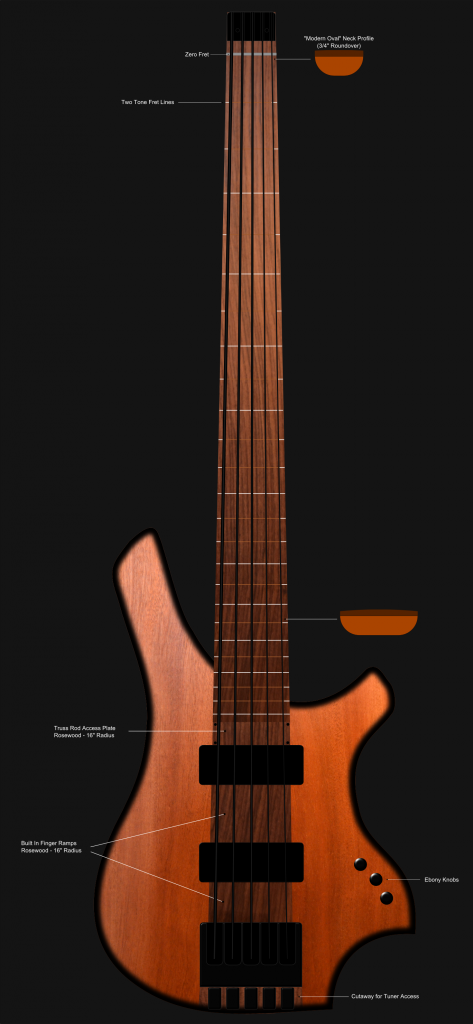
After a bit of soul searching I took @reverendrally's advice and revisited the body shape. A small bit of tweaking here and there did seem to create a slightly more organic flow, but the modifications are fairly minimal. Once I can get recovered enough to trust myself with power tools sawdust will fly...

sin-cabeza-cinco-2_zpse770ef94.png
 
After a bit of soul searching I took @reverendrally's advice and revisited the body shape. A small bit of tweaking here and there did seem to create a slightly more organic flow, but the modifications are fairly minimal. Once I can get recovered enough to trust myself with power tools sawdust will fly...

sin-cabeza-cinco-2_zpse770ef94.png

That does look a little better. If I were to work on it, I'd angle the bottom of the body a little. Somewhat like a jazz bass. That would give more real estate to work that leg cutaway into. You'd end up with more of an offset body and that would better suit the horns and curves you already have.
 
I like the straight one better. and the angled design asks for the bass to fall over all the time

To my eyes the angled version has a more "modern" feel to it than the straight version, but after spending a bit more time tweaking with the flow of the curves I prefer the straight version as well. I like the "dreadnuaght" acoustic feel to the bottom, and for me the cutout is part of the overall charm of the design. I really appreciate the feedback as it encouraged me to fine to tune to design prior to ripping into the wood.

sin-cabeza-cinco-2_zpsf02c6249.png
 
That's a great-looking bass design: really like the wood color/tone (vis) combination, and the fingerboard line idea looks great as well.
I think the more straight bottom looks good, as it goes well with the more angular horn ends, and it all fits well with the square headstock end.
However, there are enough curves in the body with offset cutouts and knob layout that the angled bottom adds a 'sexy bottom' look that certainly has its own merit.
Also, a straplock located just above the bridge/tuner will allow the bass to stand straight.
 
Here's another revision of the "slanted" version. @reverendrally was very right - a little goes a long way. I am going to let them sit for a bit before committing, and this version is my favorite so far. I made a quick slideshow with all of the changes, and it's very gratifying to see the progression visually. Thanks again for everyone's honest feedback - it is helping to make this a better bass for my customer, and I am learning a ton! I am in the process of designing a single cut 8 string bass that will be built after this one, and now I am tempted to post the design way ahead of time to see what feedback I can get there as well...

sin-cabeza-cinco-slanted-2_zps80b5d05b.png
 
Last edited:
  • Like
Reactions: reverendrally
I have a few days before the last of the parts roll in, and though I am going to abstain from cutting the body out until then I am pretty happy with the latest revision. Hopefully tomorrow night will see the start of the work on the neck and this bad boy will get rolling! I am not sure I will get it done by Christmas, but that's what I am hoping for. I loves me my Tru Oil, but it takes a LOT of coats and the finish may well take longer than the rest of the build. I generally avoid glass smooth finishes because I like the organic feel of wood, which will help a bit.
 
Danish oil dries pretty fast. You could try that. It's not shiny at all. Gave me a nasty shock that. I'm very used to tru-oil finishes which shine up nice.
I REALLY like Tru Oil, but now you have me curious...

Now that I have the concept finalized I am chomping at the bit to get started, but it it going to be a few days more before I am going to be able to put blade to wood.
 
A few things to consider with your control knob layout:
Does the combination of knob position (near the body edge), cavity wall thickness, pot body size, and body roundovers allow for an executable design as far as pots in the cavity? As far as having sufficient rear body surface for a rear cover and a lip to mount it to?
Does the combination of knob position (near the body edge) and knob height create a hazard where the knobs and pots could be damaged by slight mishandling?
 
A few things to consider with your control knob layout:
Does the combination of knob position (near the body edge), cavity wall thickness, pot body size, and body roundovers allow for an executable design as far as pots in the cavity? As far as having sufficient rear body surface for a rear cover and a lip to mount it to?
Does the combination of knob position (near the body edge) and knob height create a hazard where the knobs and pots could be damaged by slight mishandling?

I have executed this body shape a few times, and have found control cavity space to be a non-issue thus far, and there is plenty of room for a small lip. I have not considered the knob placement so close to the edge as a potential hazard- that's a great point and moving them in some sounds like a wise idea. Thanks!
 
And the wood removal begins...this evening saw the truss rod channel routed. I am using a spoke wheel truss rod, and the end had to be chiseled out a bit for the spoke to fit nicely, but the Honduran mahogany is a LOT softer than I expected, so it was easy work.

DSC_0192_zpse68655d4.jpg
DSC_0193_zpsa285c0a5.jpg
 
  • Like
Reactions: PDX Mathias
I have been considering next steps, and am wondering whether to go ahead and glue the finger board down before I cut the neck down to size. If I glue it down now I can cut both the neck blank and the fingerboard at the same time on my table saw. Hmmmm.... Decision, decisions.... I won't have time to do much until this evening, so I have plenty of time to consider.
 
I decided to go ahead and glue the fingerboard on and shape the neck after. It snowed today, and the temperature in the garage is going to approach or be below freezing, so the neck and fingerboard came in out of the cold to be joined. No matter how many clamps I have I find myself always desiring more.

DSC_0221_zpscc6f57b0.jpg
 
Last edited: