
Ok.....I understand that now.....do you know what is a finish for a bass? some brands/people make finish for beauty, i prefer a strong finish and not a beautifull finish.

TalkBass has been independent since 1998. Add your voice.
Create a free account to reply to discussions, view embedded media, and browse with fewer display ads.
Join free Log in
Want zero display ads or expanded classifieds tools? Compare plans.
Ok.....I understand that now.....do you know what is a finish for a bass? some brands/people make finish for beauty, i prefer a strong finish and not a beautifull finish.
English only for me....tu prefieres hablar español? vouz parle franCois?


i founded something like that in the filling drawer... but its dry... maybe look for something like that later because it exists here... do you use just a little?Yes, I use tried and true original wood finish.
Keeps the raw look and feel.
i founded something like that in the filling drawer... but its dry... maybe look for something like that later because it exists here... do you use just a little?
Other than good ventilation, gloves, and a mask, any tips on wet sanding with naphtha?
does the neck fit perfectly on the neck pocket? is there any troubles besides aestetics with making a not perfect hole? i know that the screw holes of the neck and the pocket have to be straight, but im sure the pocket i'll make wont be perfect for the neck...

Do you mean because of the paint? It’s pretty minimal. Neck sits pretty well in the pocket.
In any event we are sanded and buffed.
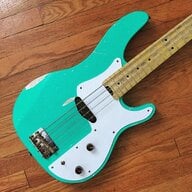
Customer was cool with keeping this more of a semi gloss. So we rubbed out to 1200 and then hit it with medium compound.
I kind of like this as it looks a little worn in but not aged, and you don’t have to worry much about fingerprints lol
Mocked up. Just gonna shield the cavities and put it together.
View attachment 2798247

Thanks!
This one:
Whiteside Spiral Flush Trim Router Bit
Go up cut, 2" cutting length, 1/2" diameter. I still only use it to shave off the smallest bit left over from the robo sander with maple.
On my body blanks I've used it on all types of woods without tear out without robo sanding first.
Pricey but worth it.


