• TalkBass has been independent since 1998. Add your voice.
    Create a free account to reply to discussions, view embedded media, and browse with fewer display ads.
    Join freeLog in
    Want zero display ads or expanded classifieds tools? Compare plans.

Special Edition Build Off - 5 string Modern Walnut/Ash build

So, I’ve really been considering a wenge neck to get a nice dark/light contrast between the neck/fretboard, but one of my main concerns is weight. Any of you guys have experience with Wenge vs maple in terms of neck weight?

Late to the party as you've already gone with wenge, but I did measure two of my completed necks about 10 years ago. 35" scale, full-string spacing w/neck extension: Maple + palisander FB: 1012g, wenge + macassar ebony FB: 1193g. Wish I had measured before installing the fretboards since the ebony was way heavier than palisander, but I imagine the ratios would have worked out closely to the available density numbers of maple and wenge anyway.
 
Finally making some progress again on this one, the new wenge stock and walnut is in! That beautiful slab of walnut that came in did not disappoint.

D8DEA6E8-C61C-43AF-851F-C6178AB5295B.gif


Here is a quick mock-up of the headstock veneer I will be making out of the walnut.

I will be prepping the neck headstock veneer pocket for the walnut tonight, as well as (hopefully) cutting the fretboard. In the meantime, I put together a timelapse of the shielding job I did on the body today.

 
That's walnut? ^ It looks a lot like khaya mahogany...like a lot... :angel:

Yep I got it from Goby Walnut, it’s “Oregon Black Walnut”. Here is the full slab I got, I should get a ton of headstock veneers and control covers out of it. Has some beautiful figuring in it as well.

4E7EB054-C784-4607-8249-EA9E111E62B0.jpeg
 
Finally making some progress again on this one, the new wenge stock and walnut is in! That beautiful slab of walnut that came in did not disappoint.

View attachment 3806039

Here is a quick mock-up of the headstock veneer I will be making out of the walnut.

I will be prepping the neck headstock veneer pocket for the walnut tonight, as well as (hopefully) cutting the fretboard. In the meantime, I put together a timelapse of the shielding job I did on the body today.


Wow, that walnut is amazing!
 
So the past few days have been a whirlwind, with a few setbacks and some progress.

Setback #1:
For whatever reason, 4.25” x 1.25” in an Aguilar DCB /= 4.25” x 1.25” in a single or super split:

here are the DCBs:
C37D6350-B9A3-4856-A24B-0A382F903B24.jpeg

06CED4CB-8DD0-40DA-9CB7-B379672D8C35.jpeg


The pickup cavity I cut was 1.29” x 4.29”, and it is just too tight to fit the pickups :(.

Setback #2:
While cutting the fretboard (beautiful Birdseye maple), right at the end of the operation the end of the fretboard moved up about 1/16” (wasn’t secured properly). This caused the fret slots at the end to be slightly wider. I’m going to either have to find a way to crimp/widen the tangs on one end, or make another FB.

Step 1: Rough Facing the FB
CC4C51E1-D495-471D-AB56-BC3E771D4D12.jpeg

Removed the cutout
0.jpg


Step 2: Radiusing the FB:
ezgif-2-0609615acfeb.gif

1.jpg


Step 3: Fret Slots!
3.jpg

You can see where the slot ends from about 15 on are a bit larger
4.jpg


Ugh. So if the fret tang crimping/widening technique doesnt work, im cutting a new one on Saturday morning.

Setback #3:
So this is actually from my other build, but the stupid control cover decided to potato chip on me overnight lol. I guess that wood really wanted to move. I'll put the pictures in that thread.


Now on to the progress! As you may remember I had a disastrous mistake on the first wenge/walnut neck. The new wenge and walnut came in, and its ready to glue up!
5.jpg


Here is the obligatory "in the clamps" shot:
6.jpg


Looking good!
7.jpg


After cutting the truss and CF rod channels (forgot to take a pic), I flip the stock and cut out the contour:
8.jpg


After that, I rough cut the shape with a flat end mill
9.jpg


Finally, the surface is finished with a 3/8" ball end mill. It gives a ready-to-sand surface that still has tool marks/dimples, but is pretty close!
10.jpg

11.jpg


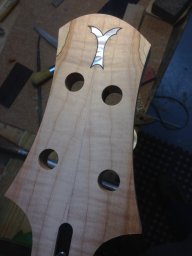
Next up will be drilling tuner holes, logo inset, neck insert holes and of course adding the inserts.
 
For the incorrectly cut fret slots - what about gluing veneer in the slots to plug them up, and then cutting new slots?

The problem on those is I wouldnt be able to align it perfectly again since I CNC the slots for blind ends. A fret saw would cut the ends open (if that makes sense). I might be able to crimp/bend the tang to give it traction and glue it in, but I want to be VERY sure it is going to work before I glue this to the neck, since that would be a big pain if I have to remove it. I'm kind of leaning towards new fretboard just to be sure its done right.
 
Last edited:
Maybe save that one for a lined fretless? Would be a shame to waste such a nice piece of maple!

How wide are the slots? I've purposefully cut slots oversized and then used thick CA to glue frets in before, for instance when fretting the end of the fretboard on an acoustic where I didn't want to hammer/press the frets over the not-well-supported soundboard. I didn't measure the slots, just cut them with a wider razor saw. It works great, even if the frets are barely a friction fit they've always stayed put once the glue cured. The trick there is pre-radiusing the wire to exactly match the board, so there isn't any "spring tension" from trying to get the fret to lay flat in the slot, if that makes sense.
 
Maybe save that one for a lined fretless? Would be a shame to waste such a nice piece of maple!

How wide are the slots? I've purposefully cut slots oversized and then used thick CA to glue frets in before, for instance when fretting the end of the fretboard on an acoustic where I didn't want to hammer/press the frets over the not-well-supported soundboard. I didn't measure the slots, just cut them with a wider razor saw. It works great, even if the frets are barely a friction fit they've always stayed put once the glue cured. The trick there is pre-radiusing the wire to exactly match the board, so there isn't any "spring tension" from trying to get the fret to lay flat in the slot, if that makes sense.

So I did some test fitting, and the tang makes good contact for about 3/4 of the slot. the last 1/4 there is not much if any contact at all. I was considering maybe thick CA in combination with a flared out tang (assuming I can find a way to do that). I can even over-radius the wire to force it "down" on the end perhaps. Im going to take some fret cutoff today and try to see if I can get it close. If I feel warm and fuzzy that it will work ill give it a run. You are right though, it is a shame to waste that beautiful board.
 
  • Like
Reactions: Reedt2000
As I mentioned in the last post, I will have to enlarge my pickup cavities in order for the pickups to fit. This should serve as a lesson to me to have all parts in hand and measured before starting a build.

In order to fix it, I came up with a template/jig that will attach to the bridge screw holes and the neck bolt holes so I can use a plunge router and a flush trim bit to fix it. Here is a look at the design:
12.jpg


Im hoping it doesnt destroy the existing finish too bad with a downcut endmill, but I have no idea to be honest. Crossing fingers on this one. Here is the template I cut last night:

13.jpg
 
  • Like
Reactions: Matt Liebenau
You could always buy stewmac's $96 fret crimpers! :roflmao:

I crimped some frets for a repair once - a friend had tried to refret his guitar and had pulled a handful of frets himself before giving up. He had totally mangled parts of those slots somehow, the fretwire tangs were totally loose over a portion of those frets. I tried needle nose pliers and end cutters, that was frustrating and didn't work. What I ended up doing was clamping the wire down on a piece of scrap wood, tang side up, and using a cold chisel perpendicular to the wire to hammer little notches into it, which caused the tang to mushroom out.

Or you could get a pair of $3 pliers from harbor freight and grind the jaws to match the shape of the jaws on stewmac's official tool.
 
Last edited:
ohh
You could always but stewmac's $96 fret crimpers! :roflmao:

I crimped some frets for a repair once - a friend had tried to refret his guitar and had pulled a handful of frets himself before giving up. He had totally mangled parts of those slots somehow, the fretwire tangs were totally loose over a portion of those frets. I tried needle nose pliers and end cutters, that was frustrating and didn't work. What I ended up doing was clamping the wire down on a piece of scrap wood, tang side up, and using a cold chisel perpendicular to the wire to hammer little notches into it, which caused the tang to mushroom out.

Or you could get a pair of $3 pliers from harbor freight and grind the jaws to match the shape of the jaws on stewmac's official tool.

Haha yeah i saw those $96 crimpers. I really like your idea with the notches, that is what I am going to try! That sounds very do-able, especially since I only need to notch about 3/8" of the tang. Thanks for the advice!
 
Couple of long overdue updates:

First the pickup route. It was nigh impossible to find a router endmill that was short enough to route the pickup cavity with a bearing or using the shaft as a flush cut bearing. I ended up ordering a 1/4” downcut bit with 0.75” flutes. I still needed a bit more room so I didn’t cut the template, so I added a spacer from scrap walnut.
1F1BCC61-14A3-4976-BA75-1916645567F7.jpeg

2B444441-9782-419F-A781-D8C8F6A06EA2.jpeg


By putting the spacer on top the screws still held the template flush. Next time... thicker template!
BE405078-1BC6-4D3C-B8B5-CE2B04431A6A.jpeg


Came out perfect!
C1CD139E-DF55-4825-863C-DC76105284B9.jpeg

6D80D5BF-848B-42D9-96F8-9EA8B0132F57.jpeg
 
Kind of side track here, but I also built a downdraft table into the end of my workbench. I used 3/8” holes 1 inch apart. 418 of them. I hope I never have to do that again lol. Here is a quick look:

6028A81E-4B8E-484C-82B9-C0E31692440E.jpeg

3975FC21-85C6-486A-8E3B-0B4FC2C0D0A8.jpeg

B5FC508E-6657-4F2A-965A-0E0D2B7064E9.jpeg

C3017AD2-3EE4-4BEB-8E8C-E66B0AAB0DDA.jpeg

3F56CB70-FE19-4F2A-A9C4-B41B476D1E79.jpeg

273188E0-8630-4725-AC6D-F488183ECD85.jpeg


I sealed up the edges with silicone, and fired it up, works pretty well for a quick project!
 
More updates! Recut the fretboard, glued up the neck, sanded and mostly ready for fretting and finish!

Fretboard under the knife (er.. endmill)
46AD5D7A-00B2-41F0-9926-965B8DF94DA6.jpeg


Added the walnut 12th fret inlay.. rough sanding it to get close to fretboard height. Once it is level with the tape, I will remove the tape and finish sand the entire fretboard
936C9BA0-844A-4425-8DB8-C948CAB32635.jpeg


After sanding the top of the fretboard surface, it’s time for glue up
7C4CDCFD-09D2-4333-BFDA-2C90BF26F6B3.jpeg


Quick hit with mineral spirits to get an idea of finish
8F82C99C-F00D-4FE8-A44F-276A9F73D478.gif


I bolted the neck on to get a feel for the finished product.. here are a few pics
10A3A9B6-9FD2-4252-851E-2665EAB6C8C1.jpeg

24B77D65-0A35-4217-81DF-007263DD98FA.jpeg


12th fret inlay came out nice!
598E1A14-2224-4BF6-87CB-18ED45C38AB0.jpeg

6334B566-51BD-4E0B-8403-2FAF3CE87398.jpeg

F5500087-9604-43D1-B912-07CBD53C1C8B.jpeg
 
Kind of side track here, but I also built a downdraft table into the end of my workbench. I used 3/8” holes 1 inch apart. 418 of them. I hope I never have to do that again lol. Here is a quick look:

View attachment 3822642
View attachment 3822643
View attachment 3822644
View attachment 3822645
View attachment 3822646
View attachment 3822647

I sealed up the edges with silicone, and fired it up, works pretty well for a quick project!

Thats a really cool setup built into your bench like that. I used to work in a cabinet shop that had a couple of large downdraft tables and they were a similar design. Instead of using a vacuum there was an exhaust fan blowing out the bottom of the table to provide suction and an air conditioner style filter a few inches under the table to catch all the dust. It ran much quieter than a vacuum and you could lift the table top and blow the filter clean at the end of the day.