
Enjoy the benefits of a premium membership!
Upgrade Account
-
TalkBass has been independent since 1998. Add your voice.
Create a free account to reply to discussions, view embedded media, and browse with fewer display ads.
Join free Log in
Want zero display ads or expanded classifieds tools? Compare plans.
You are using an out of date browser. It may not display this or other websites correctly.
You should upgrade or use an alternative browser.
You should upgrade or use an alternative browser.
More options
Who Replied?

Got a cavity cover made

You can still see a tiny bit of the original dark finish around the edges. Same is true of the plastic cover, but it's black so it hides it better. In the end I think it'll be fine, gotta see the new cover w finish on it, I can always use the plastic cover if it pisses me off
The material I bought is thin (1/16"). This is great for laminating to the top, but thin enough to worry me for a cover so I made a second layer underneath that sits in the cavity to beef it up.

I think it was a good move. With a thin layer of wood glue it wanted to curl, I'd assume it would do the same with poly. I was able to clamp it totally flat, will know tomorrow what the end result is

Got a later start than I meant to so didn't fool with a truss cover today.
You can still see a tiny bit of the original dark finish around the edges. Same is true of the plastic cover, but it's black so it hides it better. In the end I think it'll be fine, gotta see the new cover w finish on it, I can always use the plastic cover if it pisses me off
The material I bought is thin (1/16"). This is great for laminating to the top, but thin enough to worry me for a cover so I made a second layer underneath that sits in the cavity to beef it up.
I think it was a good move. With a thin layer of wood glue it wanted to curl, I'd assume it would do the same with poly. I was able to clamp it totally flat, will know tomorrow what the end result is
Got a later start than I meant to so didn't fool with a truss cover today.
Last edited:

Looks good. It’s a bit late now but the only thing I might suggest is if you do that again maybe turn the second piece so the grain is 45 or 90 degrees from the top piece. That should help keep it from warping or curling.
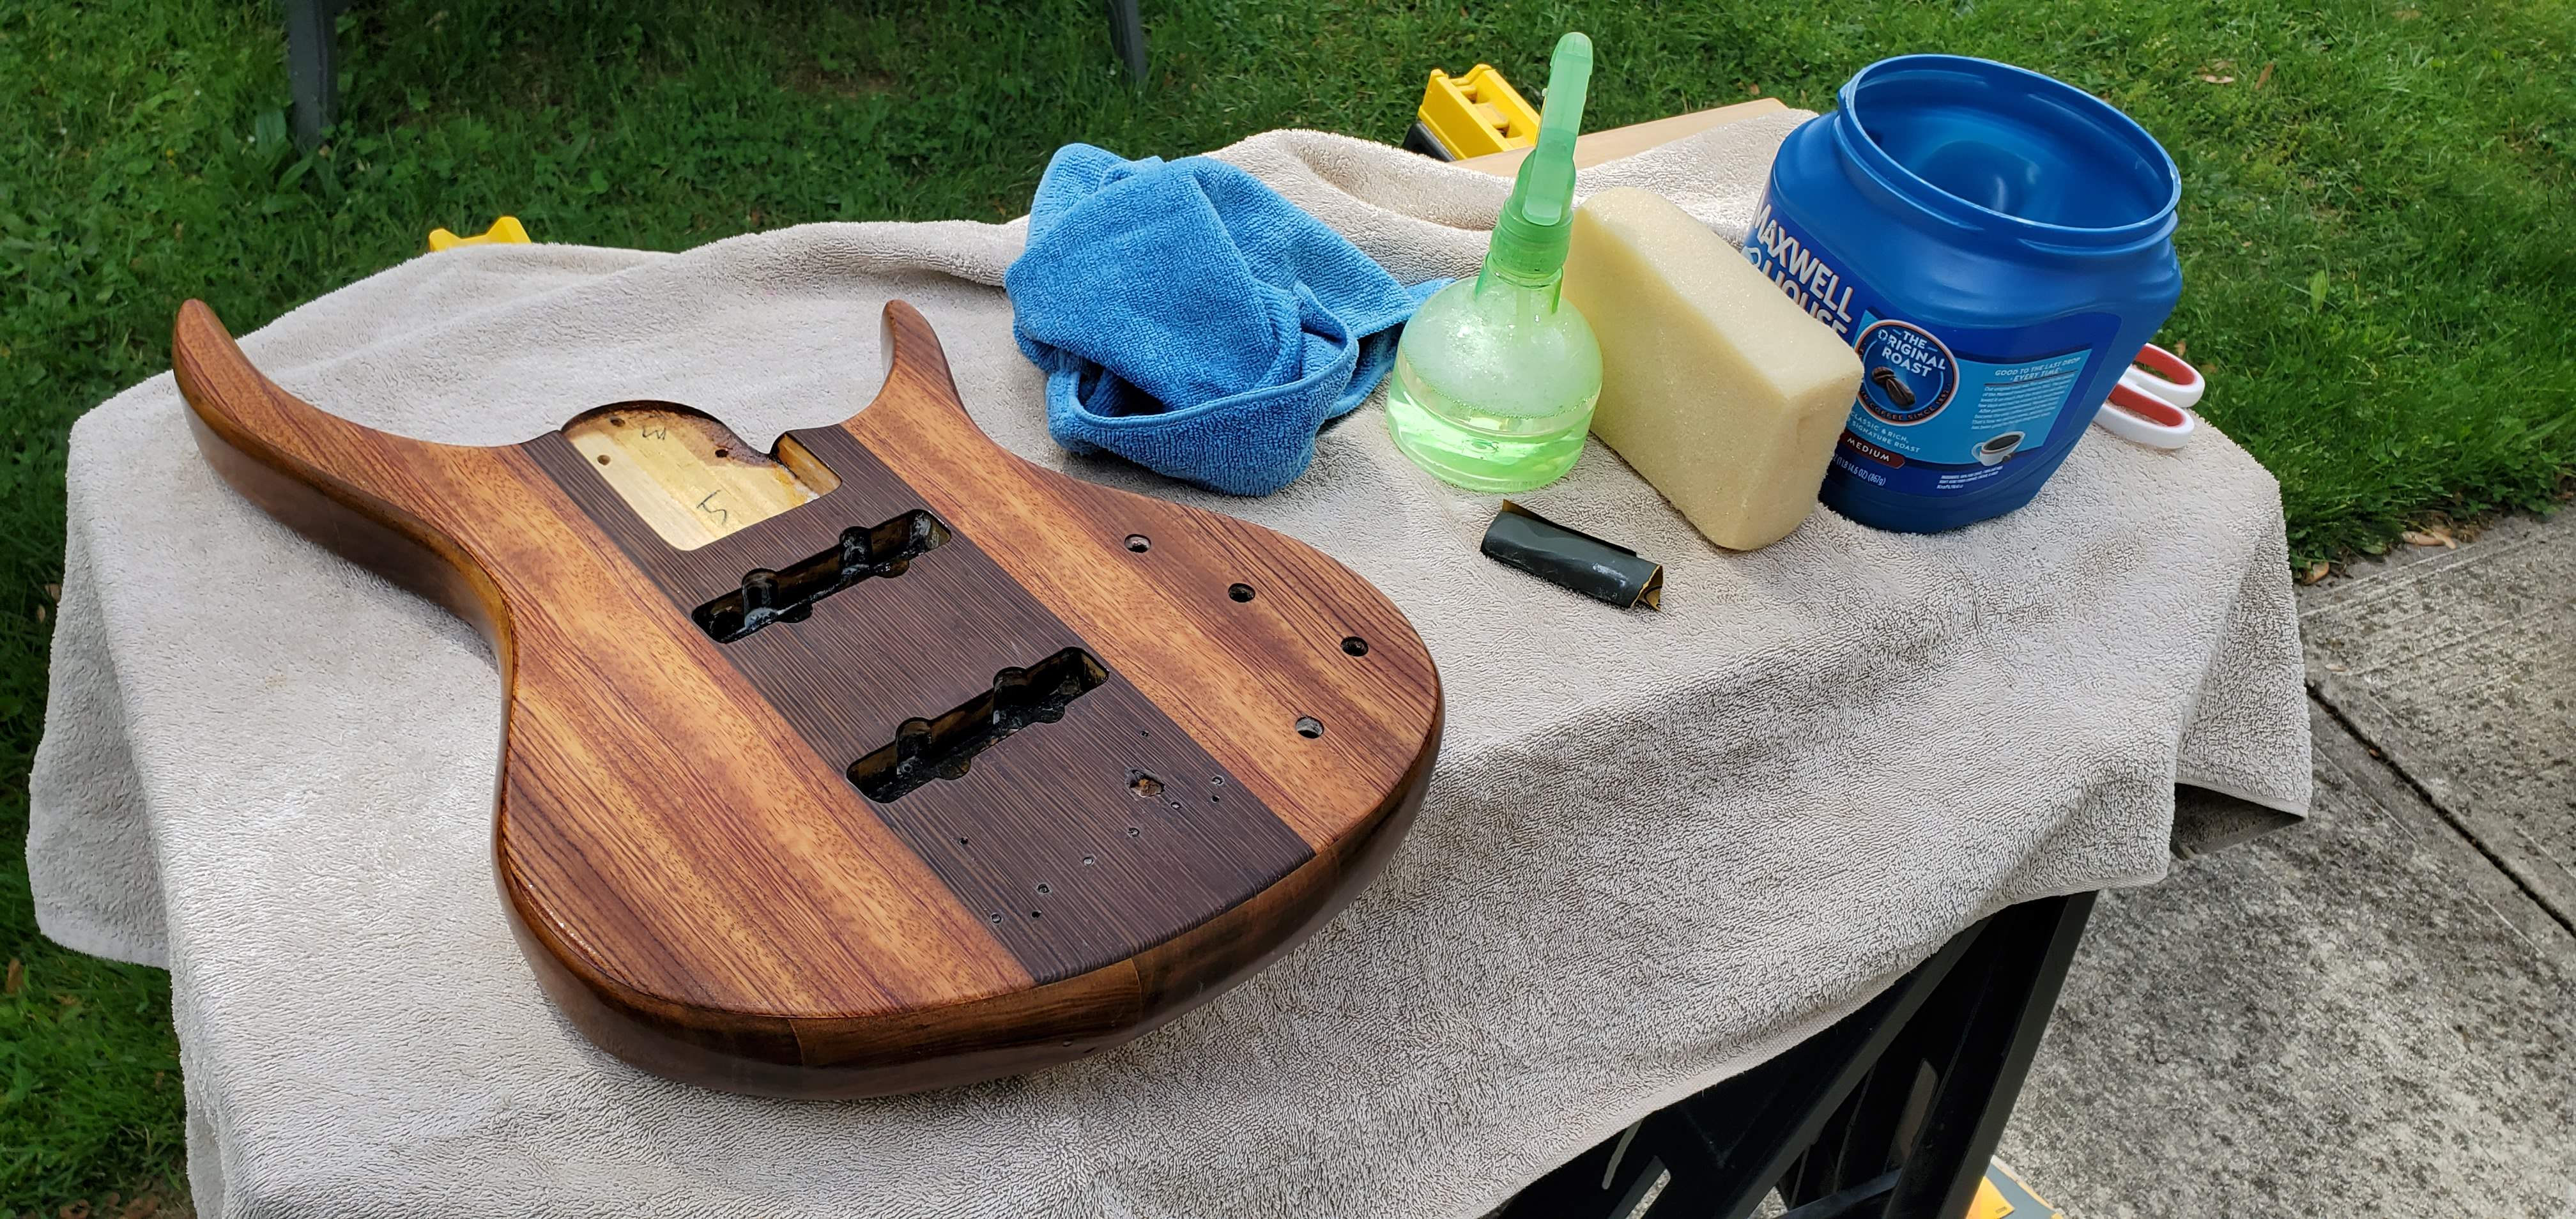
Poly no longer smells like poly, so I setup a wet sand station in the yard. So far, so good 
Last edited:
Whelp, things went really good... mostly
I got rid of 95% of surface texture, and ended up after sanding and polishing compound, with a nice, even, semi-gloss (leaning more to the gloss side)


I think by hand this is about the best I can get it, and I'm not unhappy.
Of course, there is always something
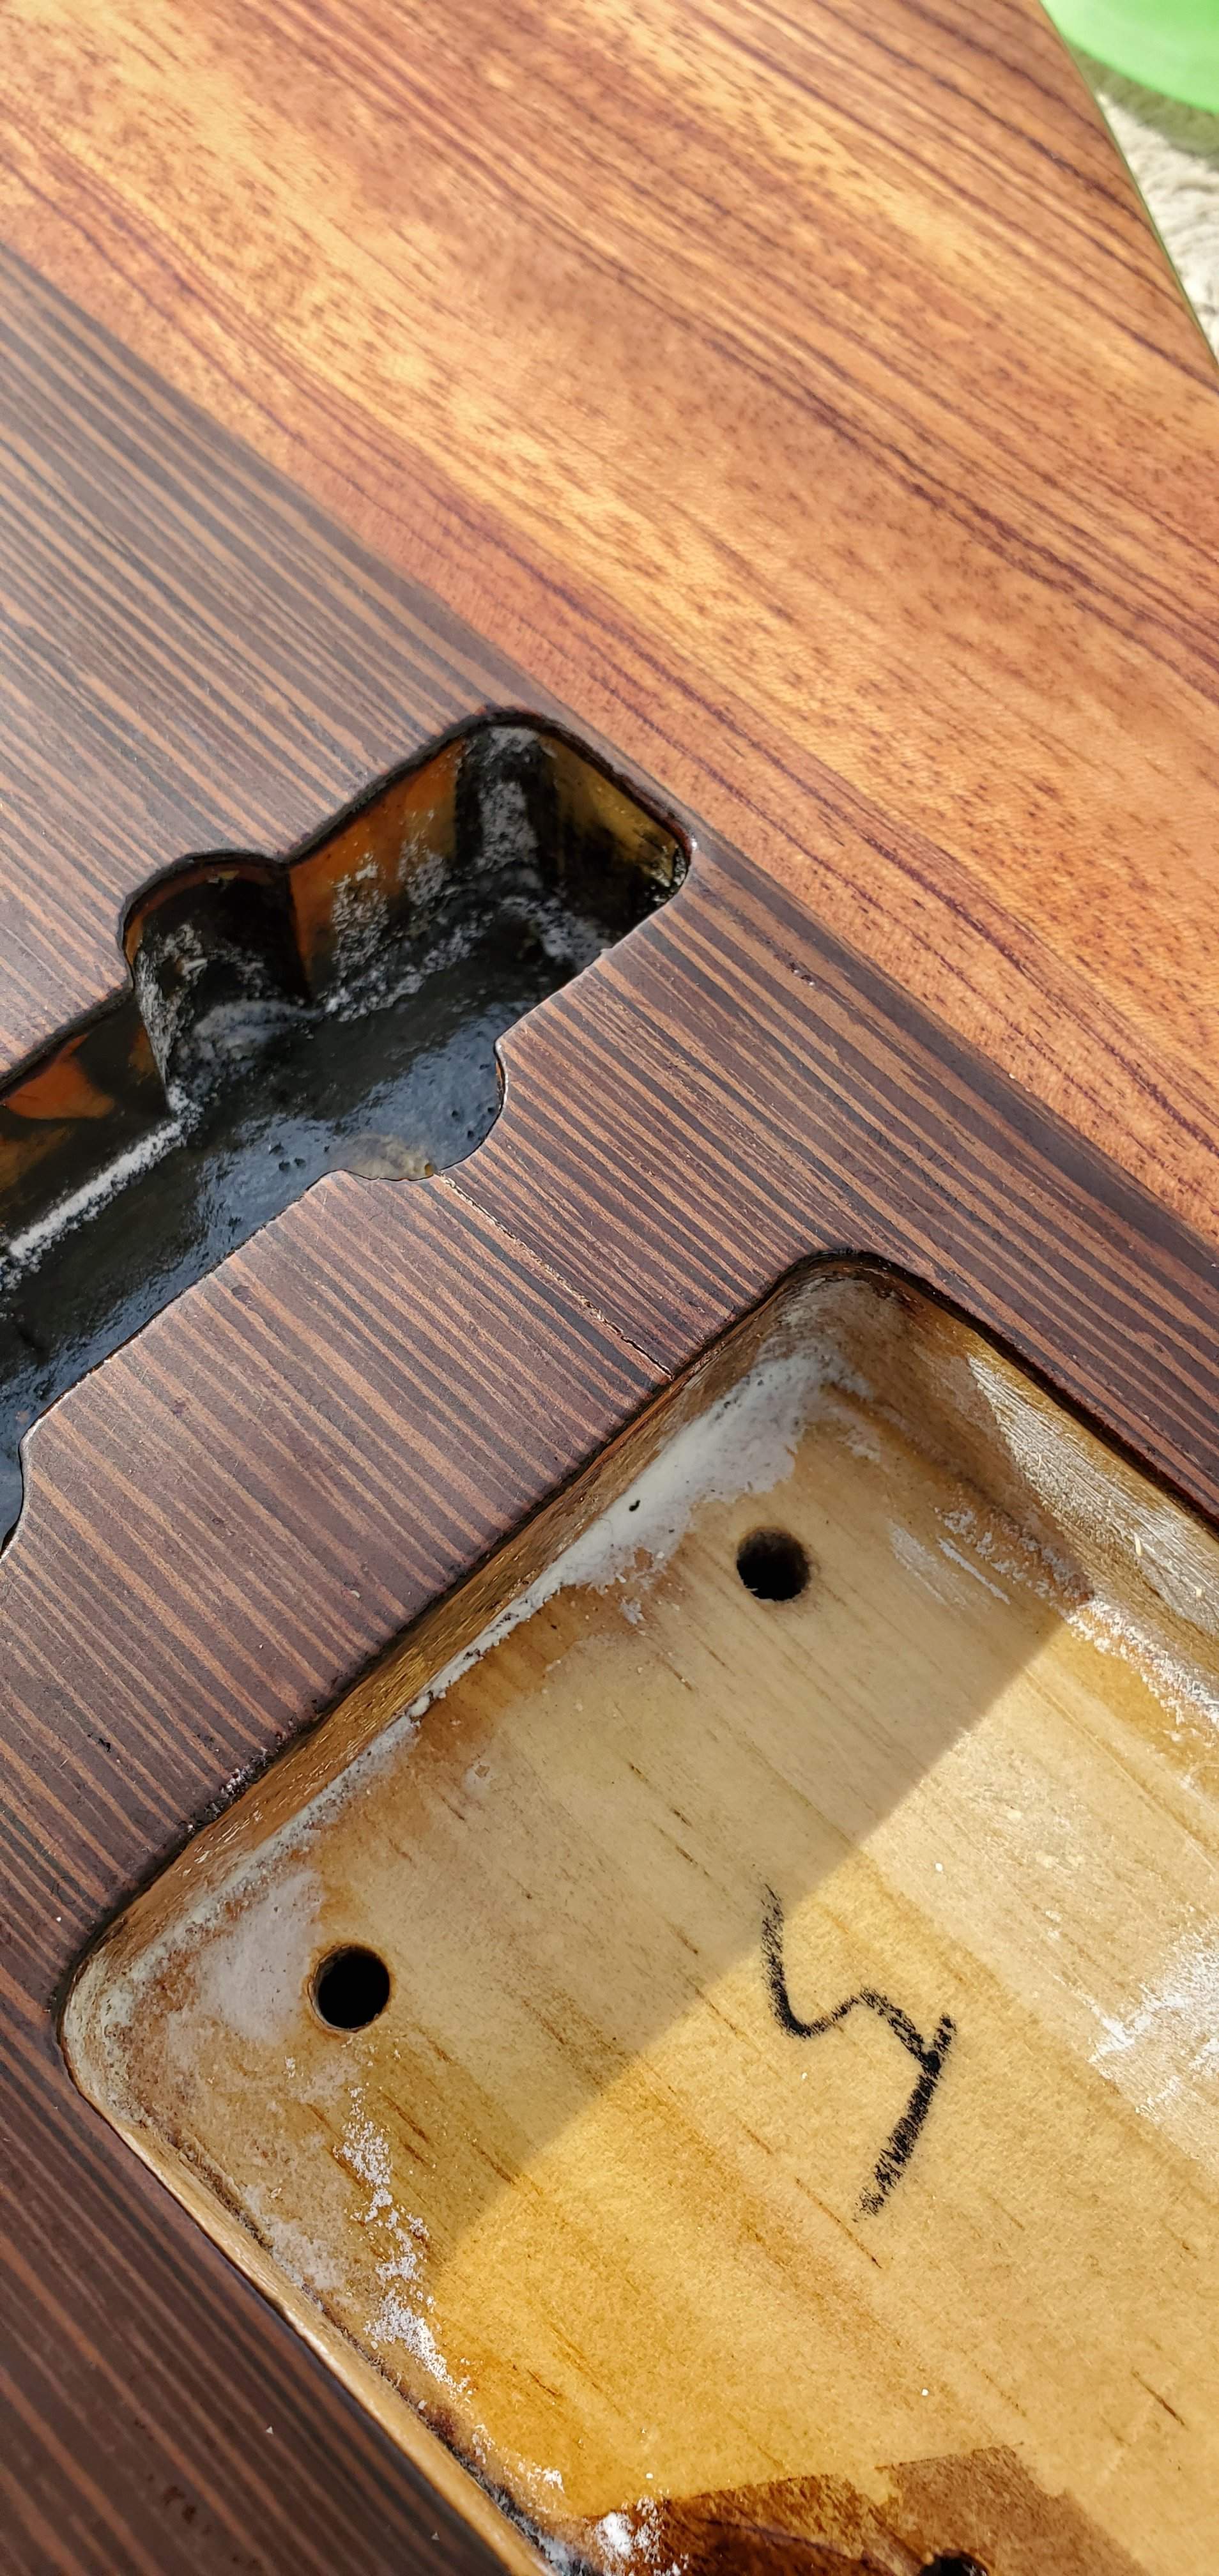
Some of the water from wet sanding must have gotten into the end-grain of the wenge, in the spot where my hang-to-spray rig kept poly from covering. And it cracked
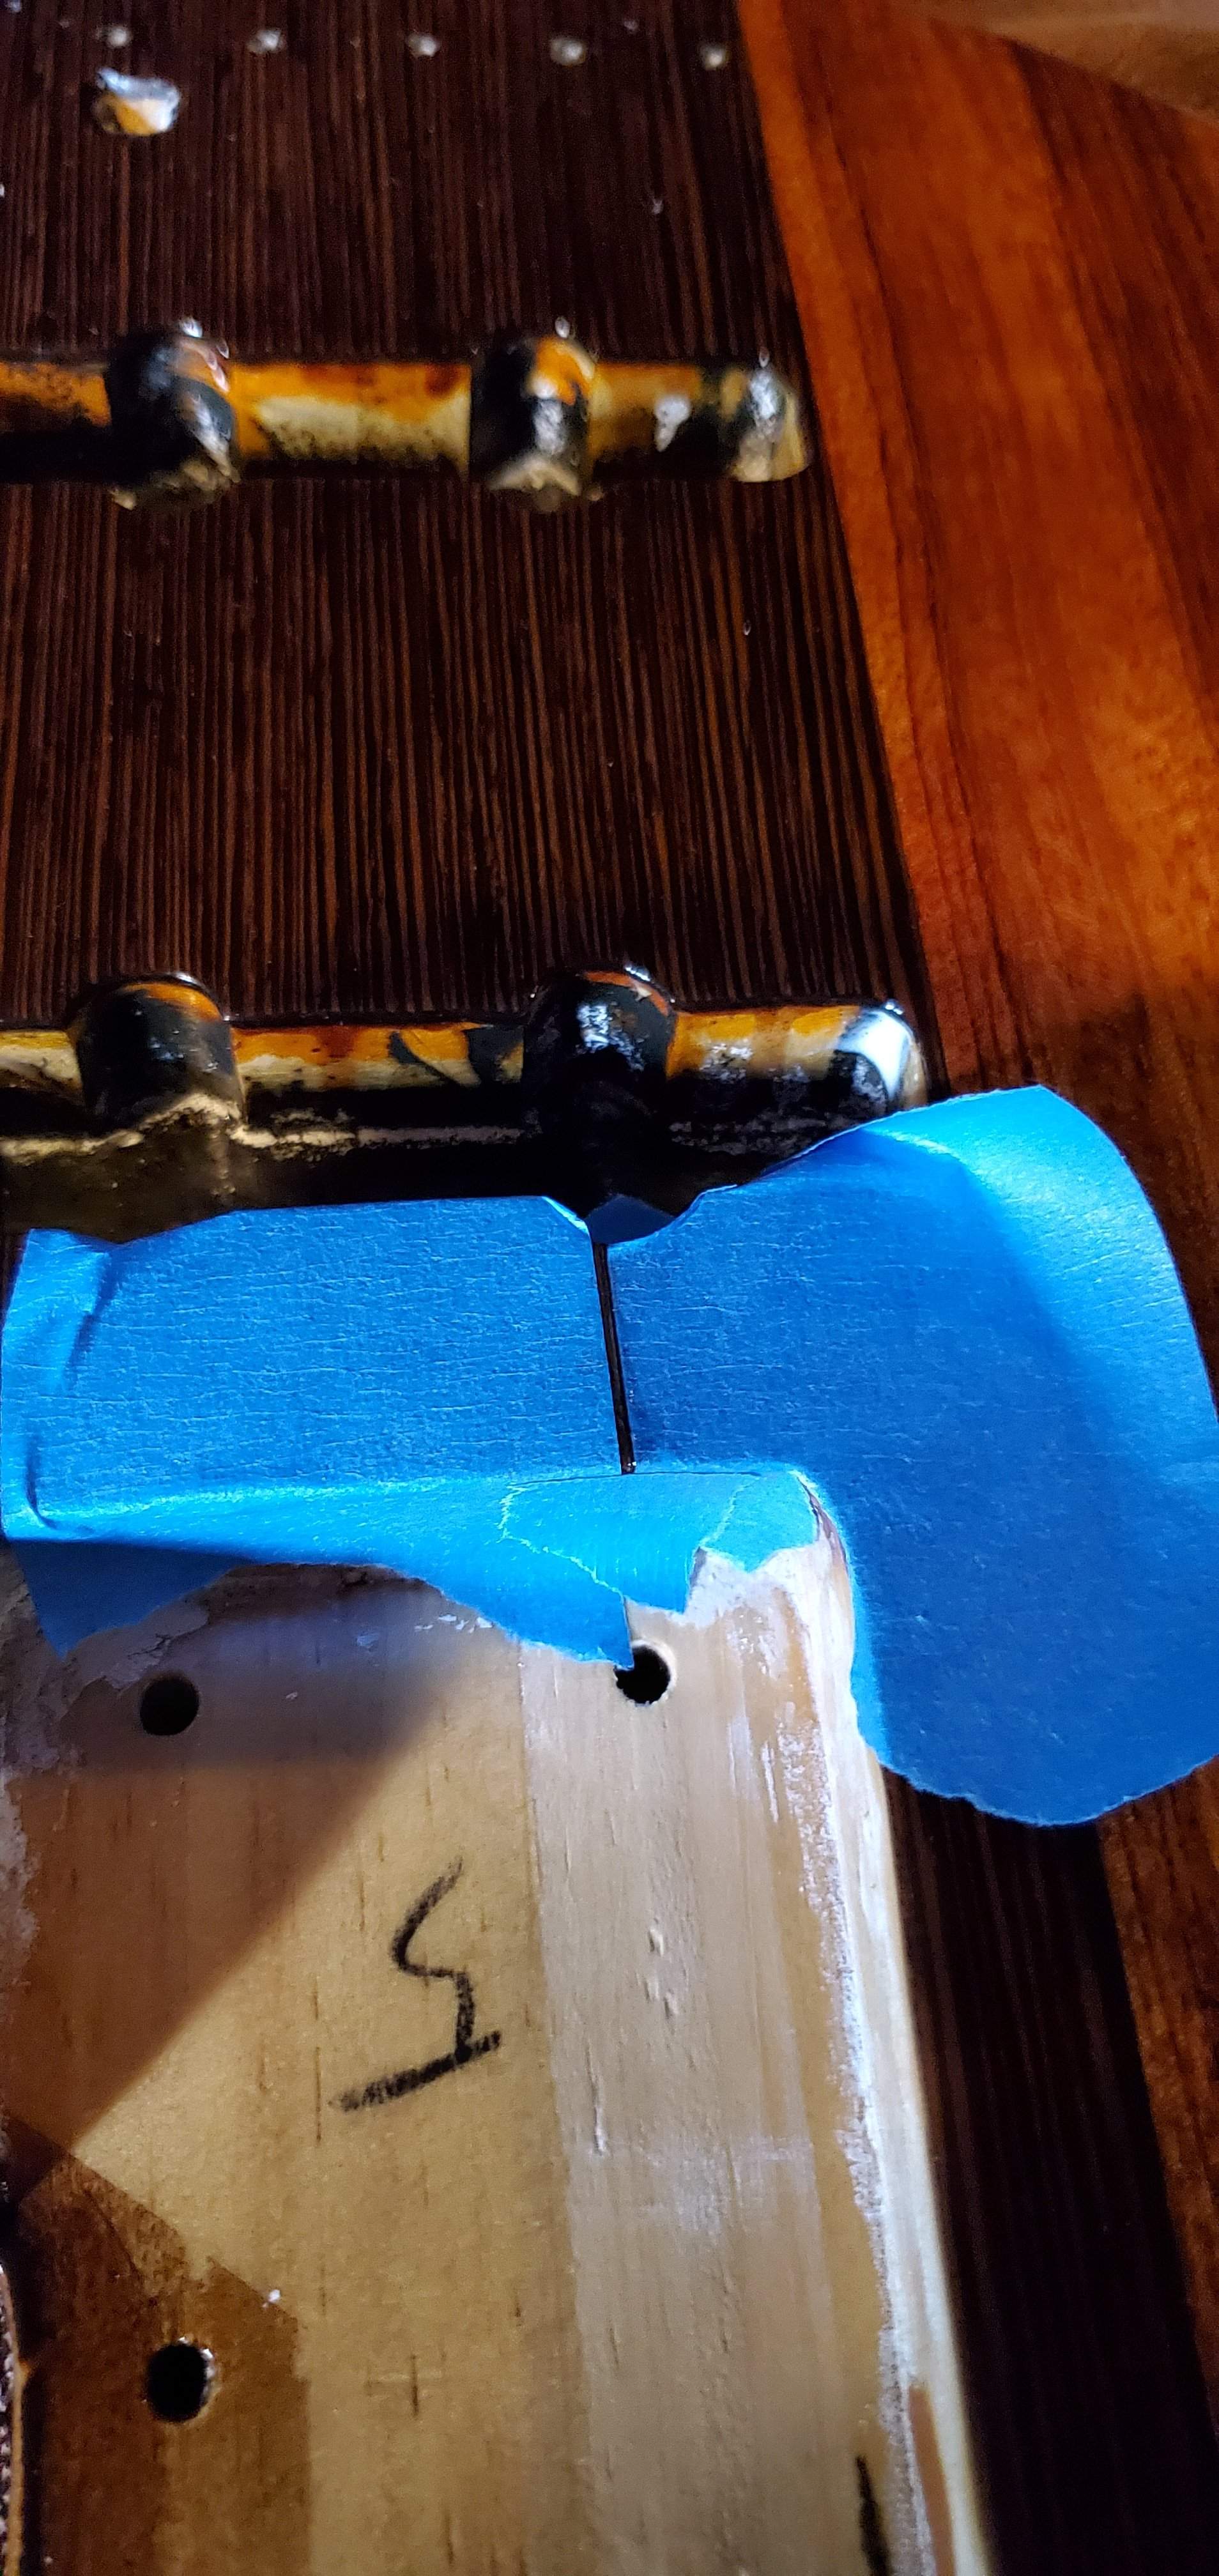
I masked it off, and wept some thin CA in there. I'm gonna hit it with really fine sand paper and compound when it dries.
It should be fine. All things considered, for my first shot at this process it came out nice. You have to get real close to see any flaws (so please don't! ) and I plan on using this thing, so some little imperfections won't make a difference in the end. With mechanical buffing I could probably coax a higher gloss, but I'm cool with it. Almost time to put it all together!
I got rid of 95% of surface texture, and ended up after sanding and polishing compound, with a nice, even, semi-gloss (leaning more to the gloss side)
I think by hand this is about the best I can get it, and I'm not unhappy.
Of course, there is always something
Some of the water from wet sanding must have gotten into the end-grain of the wenge, in the spot where my hang-to-spray rig kept poly from covering. And it cracked
I masked it off, and wept some thin CA in there. I'm gonna hit it with really fine sand paper and compound when it dries.
It should be fine. All things considered, for my first shot at this process it came out nice. You have to get real close to see any flaws (so please don't!
) and I plan on using this thing, so some little imperfections won't make a difference in the end. With mechanical buffing I could probably coax a higher gloss, but I'm cool with it. Almost time to put it all together!
Last edited:
Had some time this afternoon so I masked off the cracked spot and sanded the CA and raised wood down to flat.

I had to go through the the clear, but I still have enough in the bottom of the cans (I stopped spraying at about 20% to avoid spitting when I did the body) to touch up this spot. I masked the whole thing off and sprayed a thick coat.

Then I started laying down coats of wipe-on poly on the cavity cover I made.

I'm confident I can wet sand and buff out my touch up spot to blend it in with the rest of the finished body.
Anyone have experience with jeweler's rouge? I saw an online article where someone used it as the final buffing compound and the result was awesome. Thinking about giving it a go, any thoughts?
I had to go through the the clear, but I still have enough in the bottom of the cans (I stopped spraying at about 20% to avoid spitting when I did the body) to touch up this spot. I masked the whole thing off and sprayed a thick coat.
Then I started laying down coats of wipe-on poly on the cavity cover I made.
I'm confident I can wet sand and buff out my touch up spot to blend it in with the rest of the finished body.
Anyone have experience with jeweler's rouge? I saw an online article where someone used it as the final buffing compound and the result was awesome. Thinking about giving it a go, any thoughts?
Still moving forward. Its been 10 days since I touched up the finish over the small crack. Today I sanded the repair and blended it in with the rest of the finish. The repair worked out pretty well. It's NEARLY invisible, if you get up close and know what to look for you'll see it (so please don't look there! ).
Because I had to sand on the top anyway, I lightly cut the whole top back w 2500 grit (along with water and a tiny bit of soap). Then I worked it with the compound (all over). The compound makes it shine, but leaves light swirls so... while waiting for the touch up to dry I bought swirl remover from Stewmac. It worked really well and I went over the whole thing 4-5 times by hand. I'm left with a nice shiny gloss, better than I was expecting  .
.

I also flattened and shined up the cavity cover, then gave it one coat of wipe-on poly on the underside to seal it.
Of course, always something...
I burned through a tiny bit, right up against the neck pocket while blending the touch up in. Its super small, but I carefully laid a tiny bit of wipe-on poly on the spot with a Q-tip just to seal it and discourage finish peeling in the future. Gotta give it time to setup, so assembly starts tomorrow.
Nearly there
).Because I had to sand on the top anyway, I lightly cut the whole top back w 2500 grit (along with water and a tiny bit of soap). Then I worked it with the compound (all over). The compound makes it shine, but leaves light swirls so... while waiting for the touch up to dry I bought swirl remover from Stewmac. It worked really well
and I went over the whole thing 4-5 times by hand. I'm left with a nice shiny gloss, better than I was expecting .I also flattened and shined up the cavity cover, then gave it one coat of wipe-on poly on the underside to seal it.
Of course, always something...
I burned through a tiny bit, right up against the neck pocket while blending the touch up in. Its super small, but I carefully laid a tiny bit of wipe-on poly on the spot with a Q-tip just to seal it and discourage finish peeling in the future. Gotta give it time to setup, so assembly starts tomorrow.
Nearly there
Continuing to progress. Got the hardware and electronics installed. The Bart pre I have had its leads extended by its previous owner. Making it tidy was nerve racking after reading threads here recently about wires breaking off right at the epoxy. And I can see a break in the insulation on the ground in that spot . I didn't wire it, I felt good about how far I got today, I don't wanna rush, and its beautiful outside so I'm heading out hiking. Couldn't resist taking it outside for a quick pic:

I should change the thread name to "always something"
I bought these knobs cause they're small and look similar to what Tobias used in the late 80s early 90s. I even modded one to fit over the Bart stacked knob so they match. Go to put em on... only the one I modded has its little brass set screw . I've only ever kept them in the zip lock baggie they shipped in (I bought em new)
Well, looks like I've got emails to send when I get outta the woods...
. I didn't wire it, I felt good about how far I got today, I don't wanna rush, and its beautiful outside so I'm heading out hiking. Couldn't resist taking it outside for a quick pic:I should change the thread name to "always something"
I bought these knobs cause they're small and look similar to what Tobias used in the late 80s early 90s. I even modded one to fit over the Bart stacked knob so they match. Go to put em on... only the one I modded has its little brass set screw
. I've only ever kept them in the zip lock baggie they shipped in (I bought em new)Well, looks like I've got emails to send when I get outta the woods...
Last edited:
Man, sure is a lot of stuff crammed in there...

...but its not too messy, and it all works exactly as it should!
Just a set of strings and a setup away from done
Got a set of GHS Contact Core Super Steels in the mail today (thanks TB Store). I'm pretty sure these are the same string as the Ken Smith taper cores I usually buy, but couldn't find in the size I like (GHS makes the Smith strings).
So close, should be rock-able by the weekend!
...but its not too messy, and it all works exactly as it should!
Just a set of strings and a setup away from done
Got a set of GHS Contact Core Super Steels in the mail today (thanks TB Store
). I'm pretty sure these are the same string as the Ken Smith taper cores I usually buy, but couldn't find in the size I like (GHS makes the Smith strings).So close, should be rock-able by the weekend!
Oh, and parts express sent replacement knobs (shipped quickly and no charge). Never bought from them before but their customer service was top notch.

- Apr 18, 2008
- 16,019
- 1
- 31,738
- Disclosures
- I'm highly opinionated and extremely self-assured
Wow, awesome job on that wiring. I’m impressed!
Wow, awesome job on that wiring. I’m impressed!
Thanks, much appreciated. I was working with used pickups and preamp so it was a bit more of a puzzle than starting with fresh stuff. I worked for an electrician in my youth and making it neat has been drilled into me. You should see my electric panel. I put in a new 200 amp service when I bought my house, township inspector said it was the cleanest inside of a panel he'd ever seen
(not really that hard to do if you make neatness part of the planning phase).Here it is, got the strings on and adjustments made. This is my entry to the Special Edition Build Off - Build em if ya got em
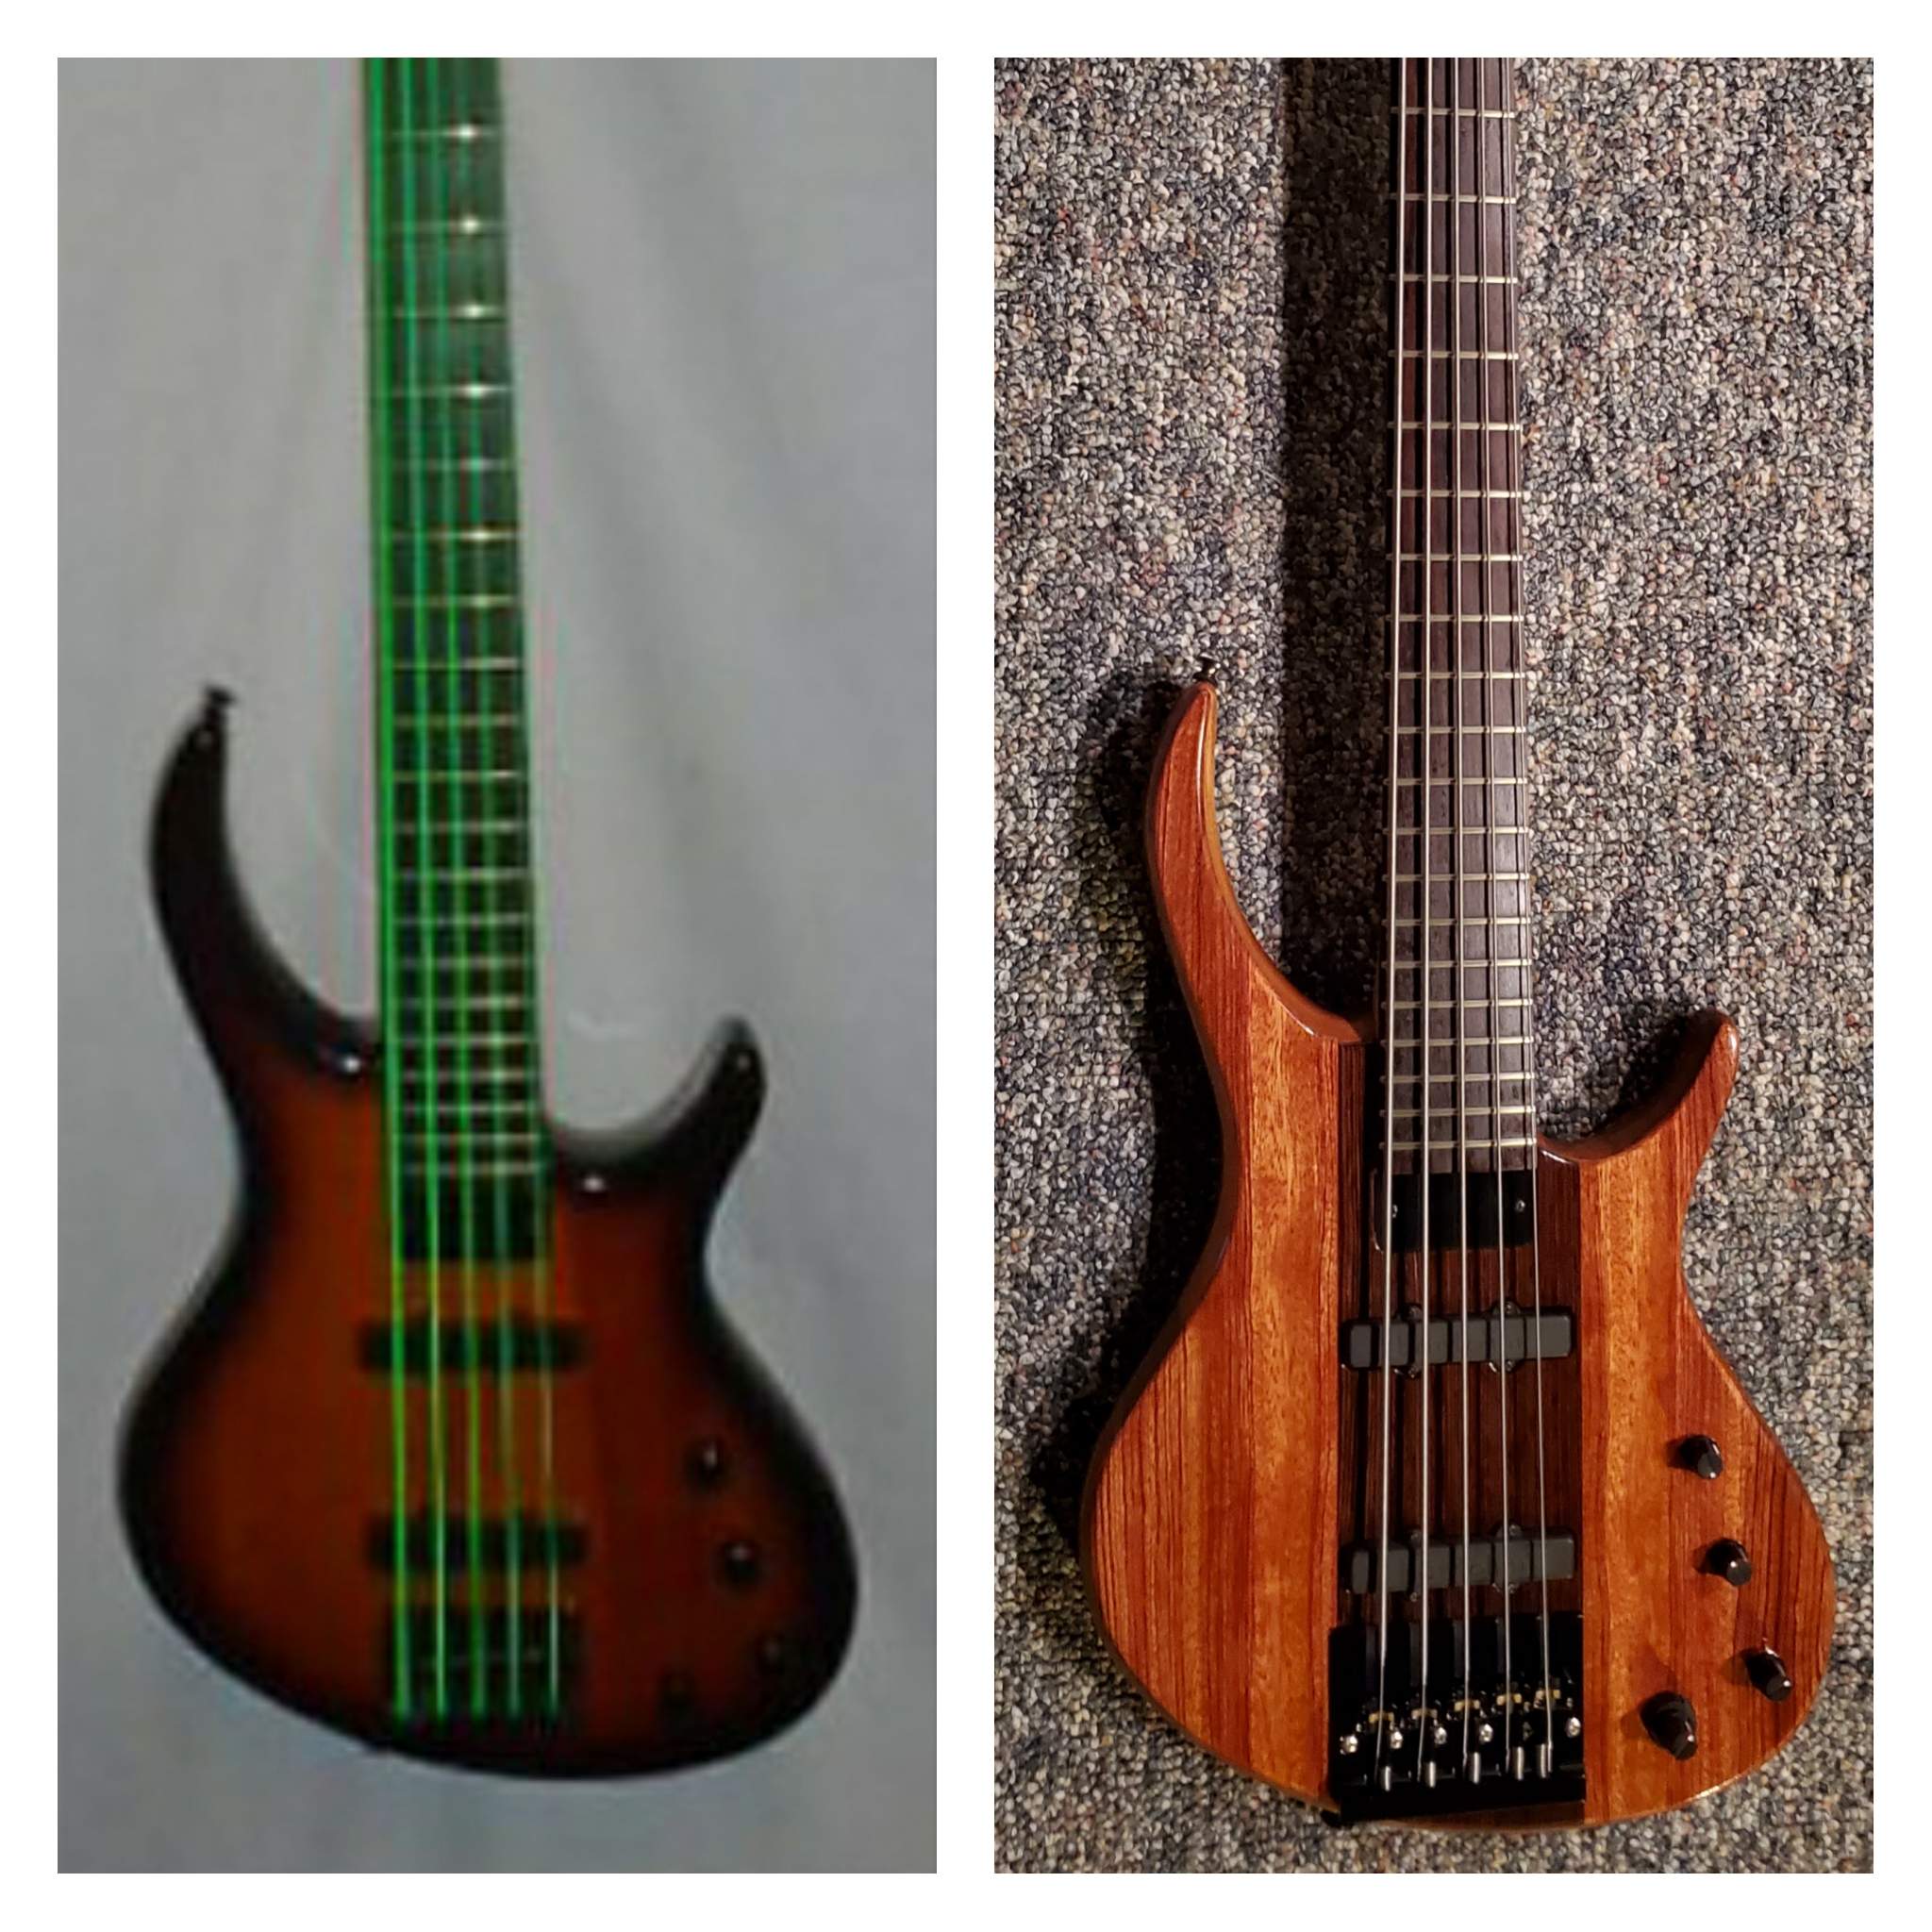
It is an Epiphone-made Tobias Toby Deluxe V which started in 2-color sunburst (side-by-side pic uses the actual crap photo from the GC listing where I got it).
The top is wenge in the center with bubinga wings glued to the original radiata (pine) body. The finish is minwax poly-shade pecan on the back and sides with minwax fast-dry clear gloss poly on the whole body (both are oil-based). The control cavity cover is made of leftover bubinga with clear gloss poly, wood grain texture left in.
The bridge has been replaced with a Hipshot Kickass 5. The pickups are Bartolini 59J split coil "original bass" and the preamp is a Bartolini hr-4.6ap/918, 3-band with active/passive (push/pull on volume knob), blend control, and selectable mid range frequency (250hz or 800hz with a push/pull on the mids knob).
The neck is original and unmodified, it's maple in the Tobias asymmetrical shape with a Rosewood fingerboard.


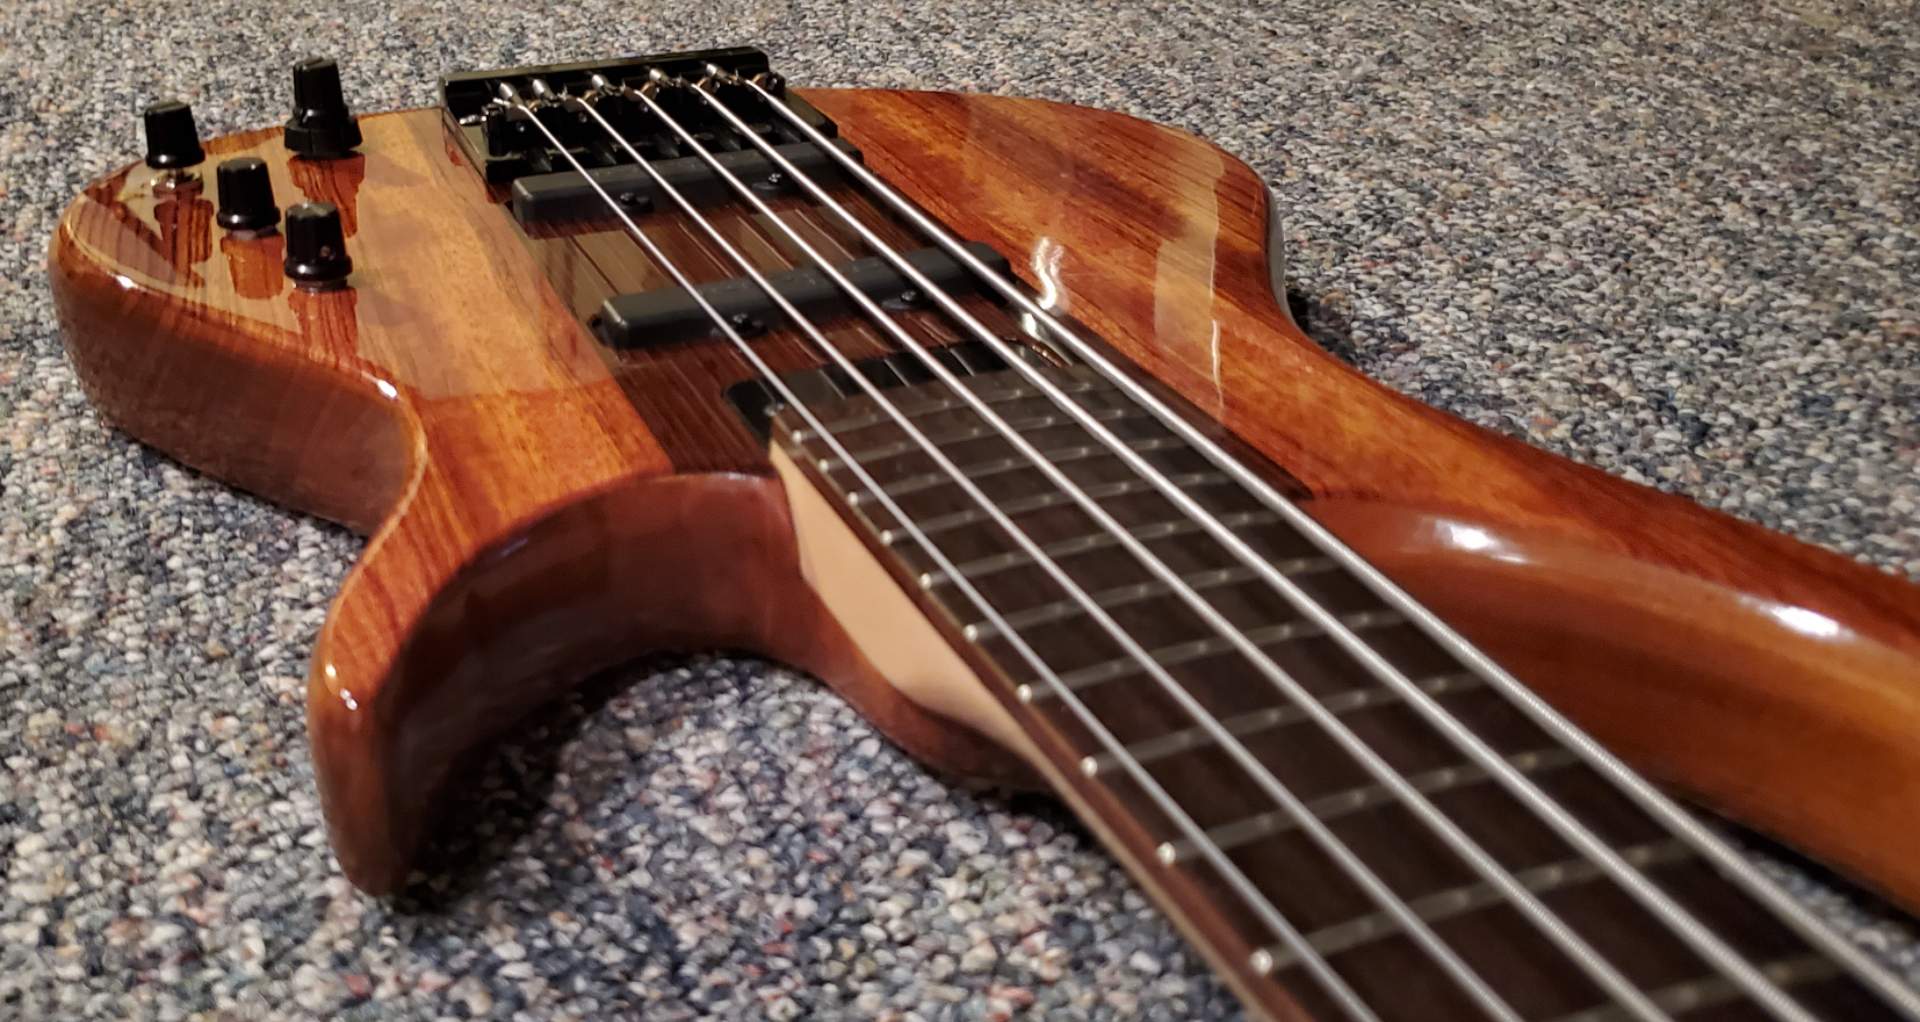


I'm really happy with the results. I wanted a project that would make me do things I hadn't done before but also be within the scope of what my tools and experience could reasonably pull off. If you look close there are imperfections, but I learned a lot and I think I could avoid those in future projects.
It sounds very much like a classic J bass passive. Active really allows for a variety of tones and the electronics are dead quiet. It setup really easily and the action is low without buzz. Im gonna keep an eye on the neck as it hasn't been under tension in quite a while so it might need tweaks as it settles into the idea of being a bass again  .
.
It is on my list to make at least a short recording before the close of the build-off. I'll post it here when I do.
Thanks all for looking, thanks to TB for providing the opportunity for things like this, thanks to @Scoops for setting these build-offs up, and thanks to all the builders for sharing both their journeys. Ive always said this sorta thing is my favorite part of being a TB member and its been great to get to be a part of one. It doesn't matter to me if I get any votes at all, the experience is the best reward.
It is an Epiphone-made Tobias Toby Deluxe V which started in 2-color sunburst (side-by-side pic uses the actual crap photo from the GC listing where I got it
).The top is wenge in the center with bubinga wings glued to the original radiata (pine
) body. The finish is minwax poly-shade pecan on the back and sides with minwax fast-dry clear gloss poly on the whole body (both are oil-based). The control cavity cover is made of leftover bubinga with clear gloss poly, wood grain texture left in.The bridge has been replaced with a Hipshot Kickass 5. The pickups are Bartolini 59J split coil "original bass" and the preamp is a Bartolini hr-4.6ap/918, 3-band with active/passive (push/pull on volume knob), blend control, and selectable mid range frequency (250hz or 800hz with a push/pull on the mids knob).
The neck is original and unmodified, it's maple in the Tobias asymmetrical shape with a Rosewood fingerboard.
I'm really happy with the results. I wanted a project that would make me do things I hadn't done before but also be within the scope of what my tools and experience could reasonably pull off. If you look close there are imperfections, but I learned a lot and I think I could avoid those in future projects.
It sounds very much like a classic J bass passive. Active really allows for a variety of tones and the electronics are dead quiet. It setup really easily and the action is low without buzz
. Im gonna keep an eye on the neck as it hasn't been under tension in quite a while so it might need tweaks as it settles into the idea of being a bass again .It is on my list to make at least a short recording before the close of the build-off. I'll post it here when I do.
Thanks all for looking, thanks to TB for providing the opportunity for things like this, thanks to @Scoops for setting these build-offs up, and thanks to all the builders for sharing both their journeys. Ive always said this sorta thing is my favorite part of being a TB member and its been great to get to be a part of one. It doesn't matter to me if I get any votes at all, the experience is the best reward.
Last edited:
I just totalled up what I put into this project. I bought everything I could used, and I'm in it for the same price as a new Toby Deluxe V

I just totalled up what I put into this project. I bought everything I could used, and I'm in it for the same price as a new Toby Deluxe V

There's a local guy here who does "build your own guitar" courses here, and an option is to bring in an existing guitar and rebuild it. The course is $950.00. So really, you got it for the cost of a new Toby, but less the roughly grand it would cost to learn this from someone.I just totalled up what I put into this project. I bought everything I could used, and I'm in it for the same price as a new Toby Deluxe V
- Apr 18, 2008
- 16,019
- 1
- 31,738
- Disclosures
- I'm highly opinionated and extremely self-assured
I just totalled up what I put into this project. I bought everything I could used, and I'm in it for the same price as a new Toby Deluxe V
Yeah, but that’s a deal, because now you have a one-of-a-kind Toby Deluxe Extra Especial Bespoke Custom Custom Extremely Limited And I Do Mean Limited Edition 2020 V.
 That’s worth at least an extra 6% premium over the garden variety Toby!
There's a local guy here who does "build your own guitar" courses here, and an option is to bring in an existing guitar and rebuild it. The course is $950.00. So really, you got it for the cost of a new Toby, but less the roughly grand it would cost to learn this from someone.
Yeah, but that’s a deal, because now you have a one-of-a-kind Toby Deluxe Extra Especial Bespoke Custom Custom Extremely Limited And I Do Mean Limited Edition 2020 V.
I'm stoked it came out to be that little. I didn't pay attention while working on it, just bought what I needed. I did hunt down deals on bridge, pre, and pickups (love the TB classifieds
), but this is the first time I added all materials up (I'm not counting the tools I bought of course ). I was expecting it to be much higher.
Yeah, I only add up the costs if I'm building for someone else; for me, I'm probably better off not knowing
You have a truly unique and beautiful Toby V
You have a truly unique and beautiful Toby V
Wot he sed...^^^^...Yeah, I only add up the costs if I'm building for someone else; for me, I'm probably better off not knowing
You have a truly unique and beautiful Toby V
 ....
....Mrs. Freddy loves it too....


