

Enjoy the benefits of a premium membership!
Upgrade Account
-
TalkBass has been independent since 1998. Add your voice.
Create a free account to reply to discussions, view embedded media, and browse with fewer display ads.
Join free Log in
Want zero display ads or expanded classifieds tools? Compare plans.
You are using an out of date browser. It may not display this or other websites correctly.
You should upgrade or use an alternative browser.
You should upgrade or use an alternative browser.
Step by step amateur Warmoth build
- Thread starter braindead0
- Start date
More options
Who Replied?


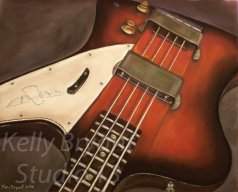
Excellent, we need more artists in this world! If you want to burn through a bunch of color ink, google Poxodd and you'll find tons of her work... She's been doing this full time for over 10 years (pretty much as soon as she married me...ala Sugar Daddy/Patron ;-).

Wow, that is strange and beautiful, and unique. I would suggest a non-yellowing water based finish over poly, which will yellow eventually, but I don't know how the paper layer would react. Probably fine, as the water carrier evaporates pretty quickly, but.... I'd hate to see those colors change to greens if the poly goes amber on you down the line. Is there an oil based poly that doesn't yellow?
The paint is watercolor, paper is watercolor paper (thick stuff). it's been coated with the same UV art fixative she uses on all of her art, I think 6 or so coats. Also it just got a coat of some sort of wax art stuff that hardens and is supposed to make it easy to restore later (details on that are sketchy, she's an artist not a technician so I don't get many of the geeky details I would enjoy ;-).
I'm not going to do any further work on the finish, she's confident it'll be durable and in this realm I defer to her judgement..
I'm not going to do any further work on the finish, she's confident it'll be durable and in this realm I defer to her judgement..
At the risk of sounding too commercial, she's done a fair bit of art and costuming for musicians. We both do music videos' as well, mostly weird stuff and often we do this work in exchange for free music/swag. Most exciting was having Renaldo and The Loaf contact her to work on Hurdy Gurding... when she got that email... we were both stunned.... big fans here.
So if you had a project and thought her art would work.. don't hesitate to contact her... you never can well what will catch her fancy..... money helps but interesting/unique music is currency in our world.
So if you had a project and thought her art would work.. don't hesitate to contact her... you never can well what will catch her fancy..... money helps but interesting/unique music is currency in our world.
I've seen her work on some other basses and guitars.
As far as using her art I'd honestly love to but I'm currently not in anything
I want to hear some examples now. If the music she's doing work for is even half as trippy as some of her stuff I know I'd love it
As far as using her art I'd honestly love to but I'm currently not in anything
money helps but interesting/unique music is currency in our world.
I want to hear some examples now. If the music she's doing work for is even half as trippy as some of her stuff I know I'd love it
I would think those would be the other builds we did, guitar and a bass both from cheap chinese kits. I've been playing the j-bass for a while now, works great.I've seen her work on some other basses and guitars.
A lot of it is available on youtube. Here's a few examples.I want to hear some examples now. If the music she's doing work for is even half as trippy as some of her stuff I know I'd love it
This is a video for RatL that I did:
Another from the same album, Poxodd did some of the costuming (imagine sending those hats through mail from the U.S. to the U.K.... the customs forms..yack:
Here's an Ostrich Von Nipple videos Pox and I did, all the art is Poxodd I did most of the animation
And one more from OvN, my only contribution was some post production effects work
As suggested by the title, step by step amateur build, so I'm going to detail how I setup a bass. The end result of this process has worked for me on 3 basses so far.. I'm sure I picked it up from a youtube video + websites..somewhere along the line.
Setup Step #1. Truss rod. The truss rod counteracts string tension to keep the neck from bowing.
*Important: Between each change in the truss rod tension, let the bass 'rest'. How long likely depends on environmental conditions, specific instrument..etc. I usually adjust then go do something else for a while... rinse and repeat.
** amazing, this bass is spot on. I'll check again in a day or two, but for now I know I can continue on to the next setup step knowing the relief is correct.
- Tune strings, you need to be as full tension
- Clamp a capo on the first fret, right on top of the fret. Goal is to have the strings going over the fret as level as possible.
- Hold bass in playing position... we're talking about thousandths of an inch... gravity could affect things
- Fret E string on the fret nearest where the neck joins the body. Now you have a handy straight-edge that clearly shows the neck relief.
- Check the string height above the fret that's between the 1st and where you're fretting. Usually around 7th, in this build the 8th had the largest gap so I used that.
- A a .015" feeler gauge should just slip in under the string. The string should not lift when you insert the gauge, and any movement in the feeler gauge should move the string.
*Important: Between each change in the truss rod tension, let the bass 'rest'. How long likely depends on environmental conditions, specific instrument..etc. I usually adjust then go do something else for a while... rinse and repeat.
** amazing, this bass is spot on. I'll check again in a day or two, but for now I know I can continue on to the next setup step knowing the relief is correct.
Last edited:
Next up, bridge action/string height. In playing position, fret nearest where body joins neck. E string 2mm, G string about 1.5mm A/D string 1.75mm. Fret/play notes from about 12th fret up to highest fret any buzzing see if raising the string height helps.. usually does. If not.. consult an expert, or fiddle with it more ;-)

On the string height, it can either be the string saddle needs to be raised or a high fret if you get buzzing, note whether it's one note that buzzes. Does it buzz at say the 11th, 12th and 13th, but not on the 14th? probably the 14th fret is high. If you get buzzing from the 12th up then most likely it's the saddle height, but if you are only getting it on one position, you can certainly raise the saddle height to get rid of it, but you're probably setting the action too high to address a single high fret.
Excellent point. I had already verified the frets on my neck were straight as an arrow. Certainly when setting up a guitar checking frets level is required.
On the cheap Chinese kits I made previously, it took a lot to level the frets/recrown. This Warmoth neck.. nothing necessary. Probably a good example of getting what you pay for.
On the cheap Chinese kits I made previously, it took a lot to level the frets/recrown. This Warmoth neck.. nothing necessary. Probably a good example of getting what you pay for.
Last edited:
Next is neck action. The specs I use call for .022" at the first fret for all strings. Mine are a tad high, I'll be taking it out to my workshop and carefully filing the nut slots. If you don't have a set of nut files, might want to leave this to a pro who does.. or buy some. Carefully file each slot, angled slightly down toward the tuning machines. Check frequently, you don't want to overdo it and have to replace your nut.
Last step is intonation. I think most folks would know how to do this, however I'll go through the steps just for the sake of completeness.
For each string
I usually repeat until I get the same results on each string. As of now I'm spot on.
For each string
- Tune, double/triple check... use multiple tuners if you really want to do it right.
- Fret at the 12th fret, check tuning. I mute the string above the 12th to make sure it doesn't vibrate. It should be the exact same note as the open string.
- If it's too high you'll need to move the saddle further to the rear (aka lengthen the string/lower the tone).
- Too low, move the saddle towards the head.. shorten/higher...you get the idea
I usually repeat until I get the same results on each string. As of now I'm spot on.
Thanks for following along! I hope my thread was entertaining and helpful.
Now I've got to get back to practicing..
Attached are pictures of the completed project, as well as two mp3's. Captured pretty much raw other than Radial JDI. OpenStrings is just open strings, let them ring out a bit...seems to have nice sustain. Second is the bass line from smokestack lightening, at least as I learned it... a bit rushed, and rusty but my point was to demonstrate the sound not my skill ;-)
I'm happy... purty bass and it sounds good as well!
Now I've got to get back to practicing..
Attached are pictures of the completed project, as well as two mp3's. Captured pretty much raw other than Radial JDI. OpenStrings is just open strings, let them ring out a bit...seems to have nice sustain. Second is the bass line from smokestack lightening, at least as I learned it... a bit rushed, and rusty but my point was to demonstrate the sound not my skill ;-)
I'm happy... purty bass and it sounds good as well!
Attachments


It's roasted maple, according to Warmoth a finish isn't required so I left it. Gives a little contrast and the unfinished wood feels nice.
Thought I'd post a follow up... I've been using this bass pretty much exclusively since the build. Probably on average 3-5 hours a week... The art is holding up fine, haven't noticed any issues... still looks like it did the day I built it as far as I can tell.


