• TalkBass has been independent since 1998. Add your voice.
    Create a free account to reply to discussions, view embedded media, and browse with fewer display ads.
    Join freeLog in
    Want zero display ads or expanded classifieds tools? Compare plans.

Summer ‘24 Oddball

Dec 24, 2018
1,387
4,604
Looking ahead to shop season, I have a lot of thoughts. I have a ton of things to finish up, and some things to contribute to future projects, and the oddball centerpiece.

For the more mundane, I have sanding and finish work to do on a few basses. I also have access to my school’s 1981 American P-bass, which I will be making templates from.

However, I am thinking of trying my first original design, and that is occupying my thoughts right now. It will be a slow burn until after concerts are over early next month, but I think it will stimulate lots of conversation.

So to start off with, I am positive just about everything I am going to try has been tried before in one way or another. However, that doesn’t mean discovery in a journey wasn’t worth the trip. So first off, here is a rough body idea.
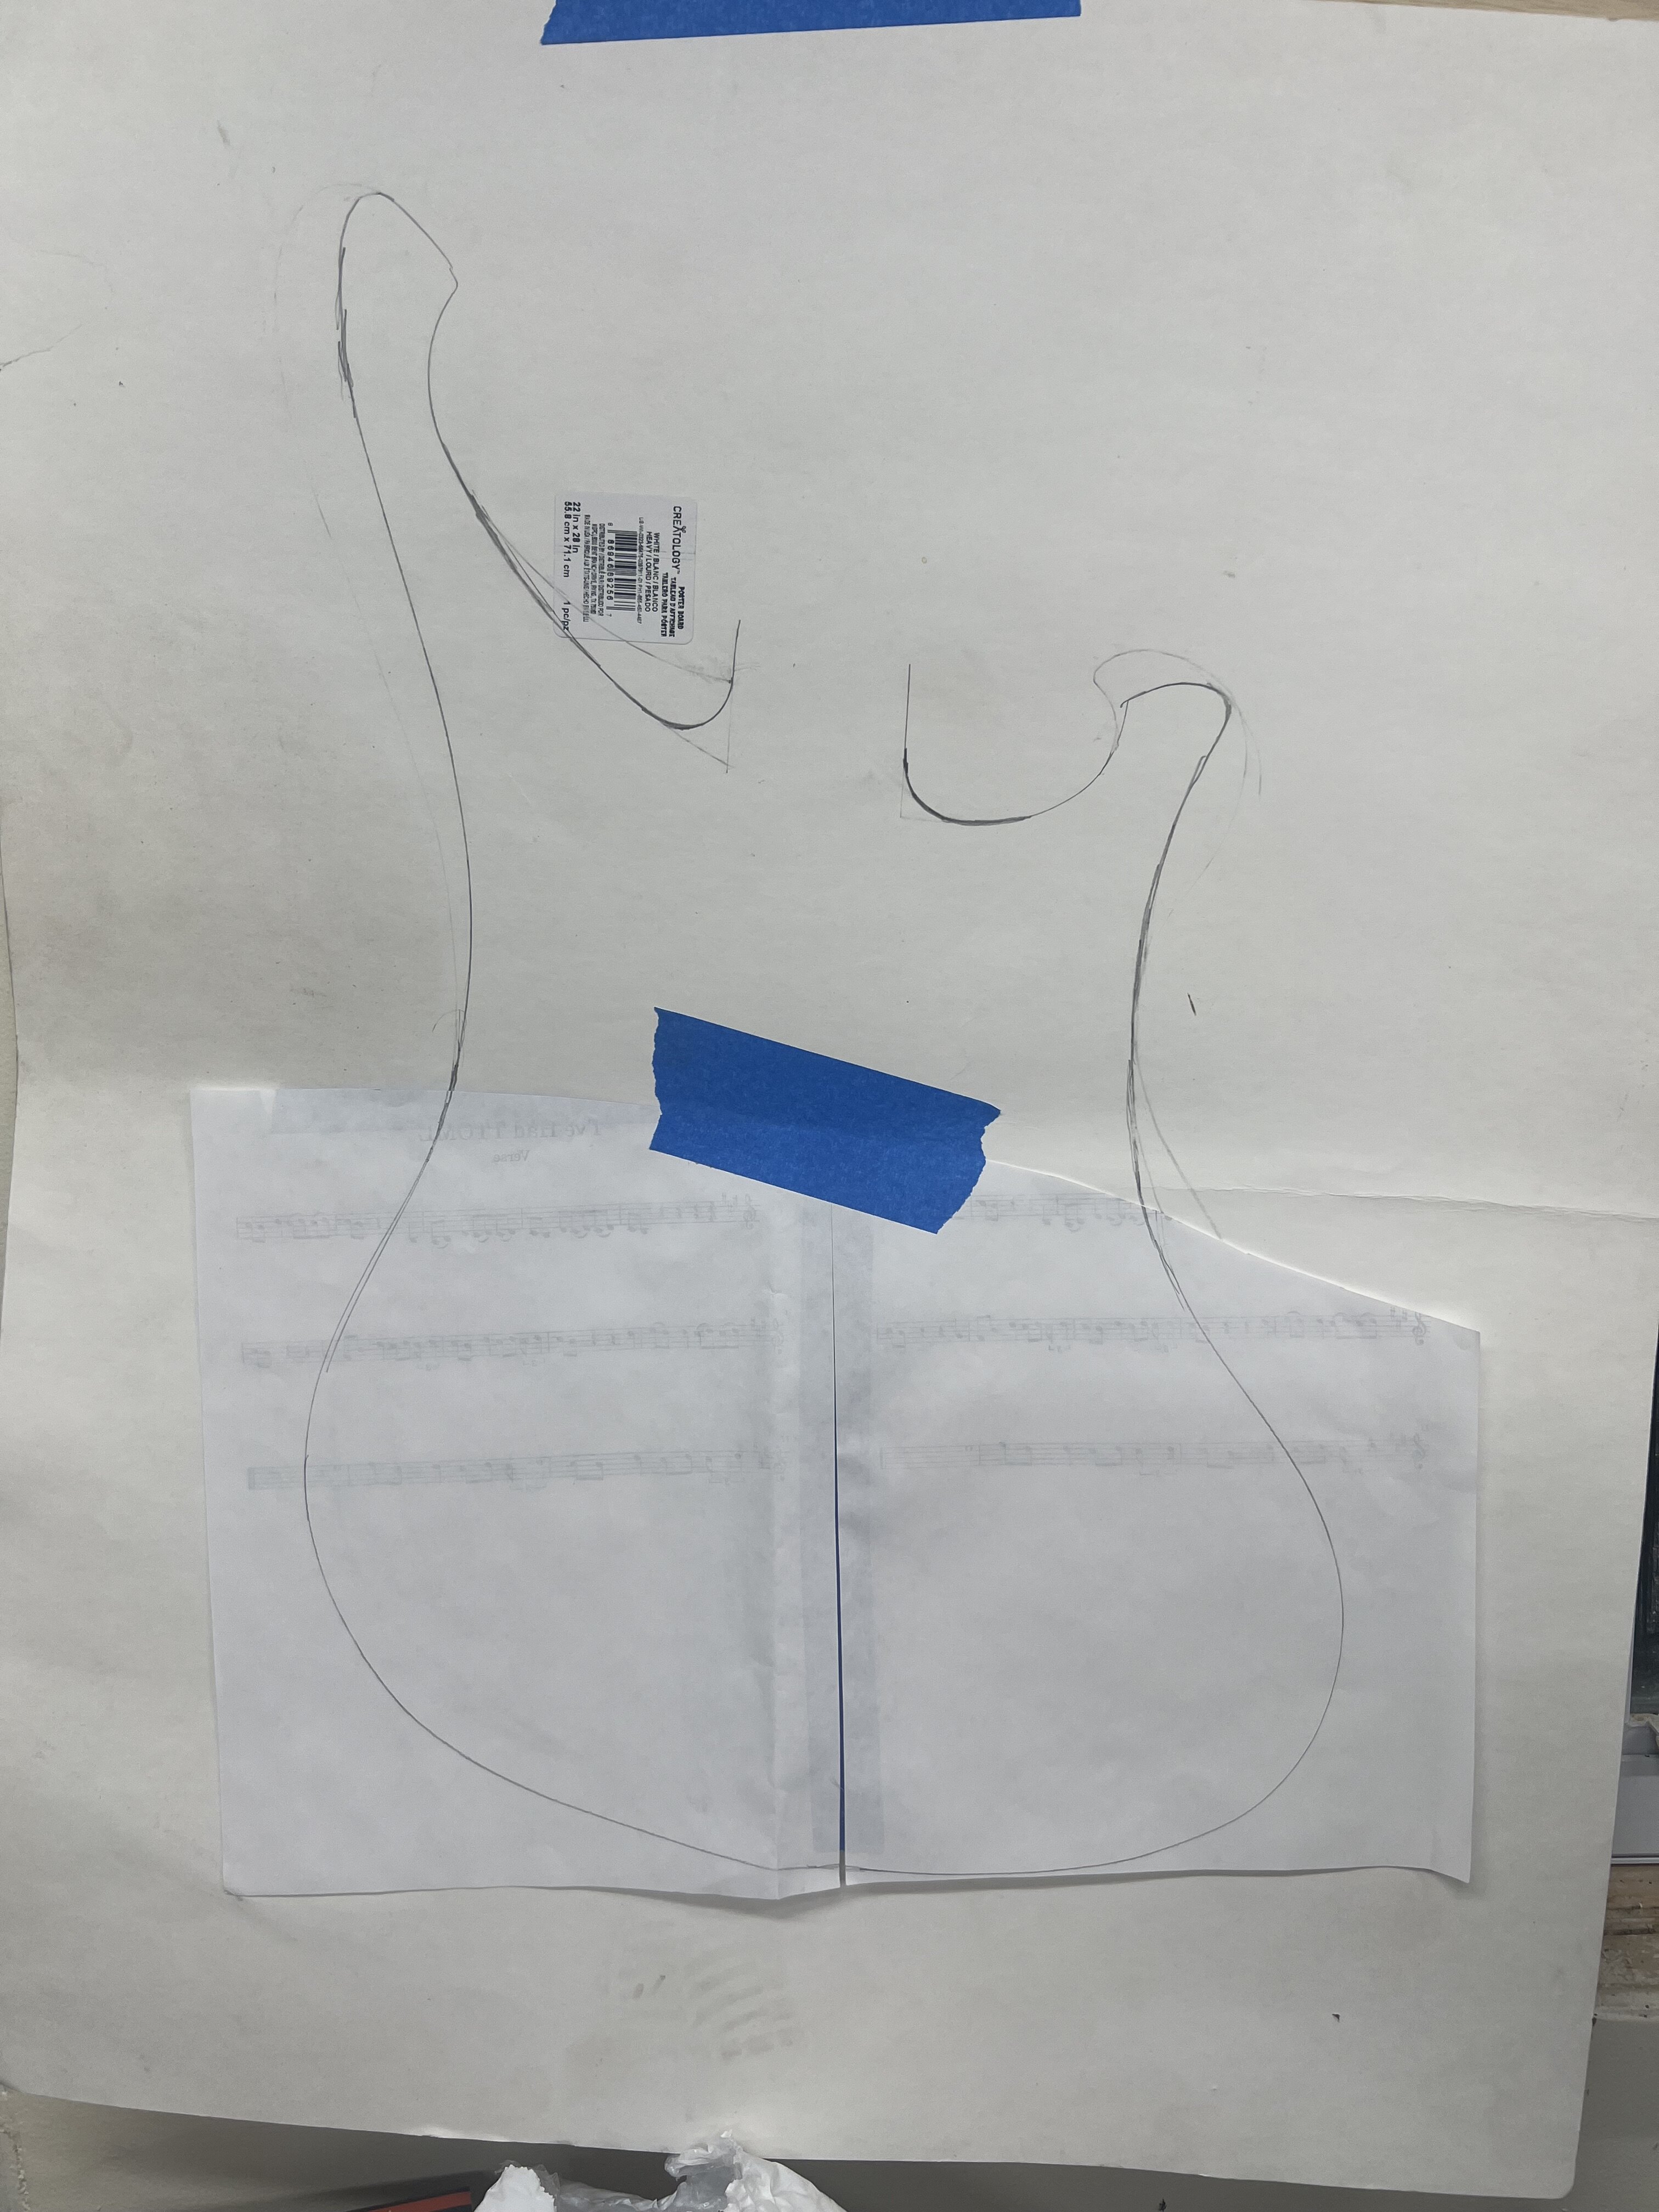
IMG_9871.jpeg


I’ve sketched quite a few, but you can clearly see it is derived from several basses. The 4003, Jazz, maybe a little Yamaha Samurai. But I am liking it so far.

I will try my best to explain my concept in a coherent fashion, but please keep in mind this is an evolving design and I am no engineer.

So the idea sprung from several well-respected TB builders suggesting more wood/less plastic on my last build. So I got to thinking about that. And could I maybe make a bass with no plastic, that fully showcased the wood, with a minimal amount of metal showing. The most organic-looking bass I could conceive is the goal.

So first, I am thinking neck-through. I want integral lines for the eye to follow. With the 4003, I don’t like the huge rise over the body, as it creates a thick neck by structural necessity. So my first idea is to get that fingerboard as close to the top of the instrument as possible.

The reason I want it that close is for my conceptual pickup system, which won’t be visible on the top of the instrument. No covers, no screws, no visible pole pieces. Just a bare top.

The knobs will also be integral to the instrument, being separated from the top itself. No plastic or metal knobs, and they won’t be raised. I have ideas for this.

The pickups will be a new design, which I am working on now. I’ll go into some ideas in the next post. I feel like people will have strong opinions, and I have a lot to learn about every corner of pickups, magnetism, magnetic transference, and design principle. However, it has got my curiosity on overdrive. I am very excited about all of this, but the pickup concept is consuming my thoughts.

More to come!
 
Last edited:
I’m in. I love the 4003 influence. Not so much the Jazz influence. A J bass falls over when you lean it against the wall. And the shape of the lower bout pushes the neck too far to the left, causing balance issues when playing seated. But I digress….

Natural wood is almost always beautiful. What woods are you considering?
 
  • Like
Reactions: Verner
I’m in. I love the 4003 influence. Not so much the Jazz influence. A J bass falls over when you lean it against the wall. And the shape of the lower bout pushes the neck too far to the left, causing balance issues when playing seated. But I digress….

Natural wood is almost always beautiful. What woods are you considering?
I agree, the jazz always felt the same to me sitting down, I just really like the look like it was stretched like putty at the horn and the lower bout. I have an old maple bed frame and lots of walnut seasoned and ready to go, so I’ll probably go with that. I have to go through the pile though, I know I have birch and cherry in the barn pile as well. Just have to get a new moisture meter, it hasn’t been acclimated to the shop yet.

So, probably another maple walnut deal. I think I’ll be done with that combo after this one for a while though, I have been sitting on some ash and mahogany for a while that’s ready to go in the future.
 
Have you seen @Rôckhewer 's Arachnophilia? Stealthy pickups discussed starting here: https://www.talkbass.com/threads/homage-to-devastator-arachnophilia.1259619/page-4#post-20180067
:D
Shucks... I wish there was more on the subject.
I really miss @michaelwayneharwood on this forum.
We've stayed in touch on and off a little since he quit posting here.
The man is an absolute genius.
The pickups will be a new design, which I am working on now. I’ll go into some ideas in the next post. I feel like people will have strong opinions, and I have a lot to learn about every corner of pickups, magnetism, magnetic transference, and design principle.
Yup...
If you want some cool alternative views... look up anything this cat has posted here.... it's all pure gold.
Screenshot_20240510_185532_Chrome.jpg
 
  • Like
Reactions: Beej and Verner
For my pickups, I have a design in mind which may be a total failure, but I want to give it a shot. Those in the know, my apologies in advance if my ideas and explanations are flawed, please be gentle with my ignorance.

So as I see it, I have some primary problems to overcome in this potential bass design:

1. Pushing a magnetic field up through the wood of the top of the instrument with a sufficient strength to equal the force of a normal pickup situated much closer to the strings. I would like to keep the top 1/4” thick in the smallest area possible for structural integrity.

2. I would like the pickups to be hum cancelling both together and individually, with splitting options.

3. I would like to keep some character of fender style pickups if possible, for jazz and slap tones.

4. Passive electronics

5. the main body rout should be as shallow and unobtrusive as possible, again for structural purposes.

Now everything I do is intuitive, I am not an engineer and I don’t have a background in the sciences beyond what curiosity provides. So I will try and explain my idea to basically walk through the design and execution phase. I am aware of and prepared for the possibility of failure, that’s part of the fun.

In the 60s fender was toying with a guitar called the Marauder. The guitar’s main feature was a hidden pickup under the pickguard. The pickup patent was owned by a fellow named Porky Freeman (if I remember correctly). His idea was a double row of magnets in a single coil pickup, all of which had the same polarity facing up. They would be forced close to each other, and the opposing force of the field would be amplified, thus penetrating beyond the pickguard, allowing them to be ‘invisible’. This guitar made it into catalogues, but was never sold, apparently because he wanted too much money for the patent license.

I actually made this type of pickup years ago using the patent as a general guide. I made a version to amplify a 5 string banjo, as I didn’t like the commercial offerings at the time for stage use. The banjo strings sit high above the head, so I figured I needed a tall magnetic field to reach the strings and get a typical output. I used double sided tape to stick it under the banjo head, and it worked beautifully. Besides the construction of the bobbin and double row of magnets, it was a typical fender strat style pickup.

So I am first off using this concept to increase my magnetic field strength, using neodymium magnets. They already are powerful, and I figure this power will allow me to use a single row and create a very thin profile to rout under the top. The rod style magnets may also impart some fender flavor into the sound.

So I made a keeper for the rod magnets, spacing them much closer than they want to be. I designed it in fusion 360, and it is the first design I have ever attempted. I used my 3D printer to make a few prototypes, ultimately having to print at 103% due to the tolerances of my consumer grade 3D printer.
IMG_9868.jpeg


The magnets are 1/4”, so it won’t take a wide slot to extend them right up to sitting 1/4” under the top. The keeper is 3/8” wide, and both slots can be cut with the same simple jig setup.

Now my next idea is borrow from the sidewinder style pickup. In this design, the humbucking coils are attached to a plate with adjustable pole pieces in the middle. Magnets are placed outside the coils with reverse polarity, and their magnetism transfers through the plate to the pole pieces. The reverse wind of the coils and the reverse polarity of the magnets attached to the coils cancels hum in the total signal.

So my idea reverses the direction the magnetism takes. The magnet rods transfer their magnetism to a steel baseplate that goes through each coil. The plate will have the same polarity as the magnets, so if the magnet poles have the north side up, the plate top will also be north. Conversely, the bottom of the plate will be south. Here is a very rough idea:
IMG_9875.jpeg


Now, if I wind the coils reverse, one coil direction will travel in past the north/south sides of the plate in one direction, and the opposite in the opposing coil. Thus I am hoping this produces a reverse wound/reverse polarity hum-cancelling functionality. Utilizing mini-humbucker coils will allow me to keep the main pickup body rout very shallow from the back of the instrument, thus maintaining structural integrity vs the pull of the strings.

So that’s my idea, I have no clue whether it is catastrophically flawed in a way my ignorance can’t predict, but I’m hoping to cobble up a prototype this weekend to try it out. I used my recently build pickup winder to wind up a coil, and I have some metal work to make the baseplate along with the reverse wound coil. Then I can make a test rig to see how it works with some string space and a 1/4” piece of wood in between.

IMG_9869.jpeg

Hope that all made sense!
 
Last edited:
Here is my idea for unobtrusive matched grain knobs:

1. Use a hole saw to cut a cylinder directly through the instrument body, cut down to appropriate height (tbd).

2. Create a finger indent in the top of the cylinder for use as a finger spinner using a roundnose bit.

3. Wrap the cylinder in a layer of veneer to take up some of the space left by the hole saw.

4. Cut a channel in the cylinder for a slice of veneer to act as a pointer as well as a clean join for the veneer wrap.

5. Fill the top center hole of the veneer with a plug of contrasting (or matching) wood.

6. Expand the bottom center hole to accommodate a plastic cylinder insert, 3D printed to have an ID just smaller than a typical knurled split-shaft pot shaft top,

7. Heat a potentiometer shaft and press into the plastic insert to create matching knurling.

The pots will be recessed in the body, so as to line up the tops of the knobs flush (or just proud) of the surface of the instrument top. Knobs will be rotated to match the grain of the area they were taken from.

Here are some bad drawings of the concept:
IMG_9876.jpeg
IMG_9877.jpeg
 
If you drill from the back of the body, you can start drilling with the hole saw as usual, stop and back out the pilot bit, then finish with just the saw part so the center hole doesn't go all of the way through.
It might make disassembly in the future a little challenge - you can drill a hole through the body cavity behind the knob and push a punch through it to push the knob off.

I've always loved the, "Simplest wood-only appearance" concept, and I'm looking forward to your take on it!
 
  • Like
Reactions: Verner
If you drill from the back of the body, you can start drilling with the hole saw as usual, stop and back out the pilot bit, then finish with just the saw part so the center hole doesn't go all of the way through.
It might make disassembly in the future a little challenge - you can drill a hole through the body cavity behind the knob and push a punch through it to push the knob off.

I've always loved the, "Simplest wood-only appearance" concept, and I'm looking forward to your take on it!
Thanks, I am interested to see if future me is pleasantly surprised or hanging his head in defeat.

That’s a good thought on the knobs, my current idea on that is to connect the three holes that go through the body with a back rout, which will allow a plate to be inserted that will hold the pots and wiring. In my head, I’ll be able to pull the whole assembly, including the knobs, out in one shot. Basically an internal jazz bass plate.
 
Softball and birthday parties sucked up the whole weekend, I really want to try out the darn pickup! Family first, of course.

I started thinking about knob placement during lunch today. Uniformity would be easier, but I’m thinking it would be neat to kind of mirror the curve of the upper horn in the bottom of the instrument. Trying to include features to draw the eye since there won’t be the usual protrusions.
IMG_9878.png
 
I gave up lunch today, I need to see if this pickup works. Started by winding the second coil in reverse.

Darn thing broke past the halfway point..
IMG_9879.jpeg


I am getting better at this the more I do it, but I’ve only tried this four times, so that isn’t saying much. Second time I got distracted and let the wire slip past the stops, but I was able to carefully unwind and redo. That’s why the count doesn’t match.
IMG_9880.jpeg


Now it’s time for some metal. At work I only have this mini-hacksaw. At home I would have broken the grinder out. And I’ll never do it this way again.

Now I just need to shape it. I’ll have to consult my files.
IMG_9881.jpeg
IMG_9882.jpeg
IMG_9883.jpeg


The pickup footprint isn’t big at all, not much larger than a regular mini-humbucker. If this works I have some design ideas for later.


