• TalkBass has been independent since 1998. Add your voice.
    Create a free account to reply to discussions, view embedded media, and browse with fewer display ads.
    Join freeLog in
    Want zero display ads or expanded classifieds tools? Compare plans.

That's it. It's over.

organworthyplayer337

Professional Hack
Oct 28, 2014
3,069
3,243
27
Charlotte, NC
After planning meticulously since early May; I finally purchased the last part of my first build.

It's over.

No more planning, just waiting. And waiting.

This bass has gone through many phases, different (and I mean different) designs and such. The only aspect that stayed constant throughout the entire process was the '51 style pickguard. I just wanted to document this process. That's all.

To be *smooch* :
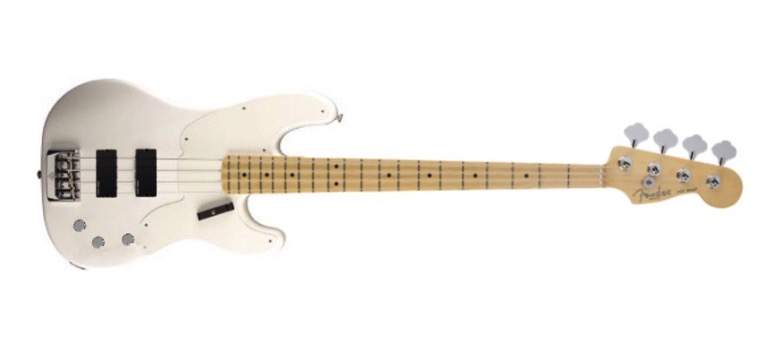
image.jpeg
 
Last edited:
Give us some details! That's a knockout!

1. What neck are you going to use? Most of the 51ish bodies available use a square heel neck, which mostly have the older "tele" head.

2. What are those pickups? From the placement I'm thing G&L MFDs? or MM? Or something completely different? Active?

3. How about the finish? Olympic, trans blonde, or again, something completely different?

I totally love the concept! I am subbed to this thread, so keep us updated as the parts roll in, etc!

I built a much less ambitious version of the early 50s thing, really just a parts assembly, so when I see somebody move the idea forward, I'm a fan!

Mine:
Dirnt Bass 2.jpg


Dirnt body, Cabronita neck, pretty much standard Fender parts throughout. I have a black 51 pickguard, but it would cover the grain, so I never put it on!:wacky:

I'll be watching!!
 
Give us some details! That's a knockout!

1. What neck are you going to use? Most of the 51ish bodies available use a square heel neck, which mostly have the older "tele" head.

2. What are those pickups? From the placement I'm thing G&L MFDs? or MM? Or something completely different? Active?

3. How about the finish? Olympic, trans blonde, or again, something completely different?

I totally love the concept! I am subbed to this thread, so keep us updated as the parts roll in, etc!

I built a much less ambitious version of the early 50s thing, really just a parts assembly, so when I see somebody move the idea forward, I'm a fan!

Mine:
View attachment 709974

Dirnt body, Cabronita neck, pretty much standard Fender parts throughout. I have a black 51 pickguard, but it would cover the grain, so I never put it on!:wacky:

I'll be watching!!
I'll be using a maple Jazz bass neck with the modern headstock. Warmoth Ash Modern P body w/ Mary Kay White transparent finish (drool)
I've chosen Aguilar DCB soapbar pickups which are drop in replacements for EMG 35s. Passive VVT. I'm doing pretty much the same thing as you did with the hardware; Fender standard throughout.

Thanks for the kind words! Nice bass by the way. Looks killer!
 
1) Fender High-Mass Vintage Bridge (4 string)

2) Telecaster/Precision Chrome Dome Knobs

3) Fender/Warmoth String Ferrules (I don't know if the Fender's will fit so I have both though, the Warmoth ones seem really small :whistle:)

4) Strap Pins - what it is, nothing special

5) Stealth String Retainer - Have one of these on my other bass and they're pretty cool and handy. They help angle the string at the nut.

6) Tugbar - purely aesthetic :D

7) Fender Neck Plate - Now this is very controversial for some reason but hey it's my bass. I like how it looks/feels.

8) Pickguard - W/B/W 51/54 pick guard from Warmoth, omitted the control plate notch because I got the rear rout so no control plate like a typical 51/54 inspired bass has.

9) Aguilar DCB Pick-ups - G3, Warmoth routes for EMG 35's and these are drop in replacements

10) 2015 Fender USA Jazz Bass Neck; Maple on Maple (my favorite), pulled off of an American Standard I believe, spent a lot of time contemplating which neck, I was going to get a custom one made at Warmoth but after playing around on a few US Jazzes I knew that was what I wanted.

11) Body Specs - Swamp Ash, Mary Kay Transparent White, Modern P-Bass body

12) CTS Pots 250k and Bourns 500k. I'm going to go with VVT (250-250-500 if that makes sense?). Sprague Orange Drop Capacitor (.047uf) Switchcraft output jack. Most of this came in a P-Bass wiring kit so... hahaha


**I decided to go with 98% Fender Genuine Parts because it's a one stop shop kinda thing. Easier than getting everything from different places (and I got some good deals too). I didn't put the pictures on full view because my pictures are HUGE and I don't know how to make them any smaller :D


Well.... Back to waiting for the body :bassist::hyper:
 

Attachments

  • Bridge.JPG
    Bridge.JPG
    494.9 KB · Views: 109
  • Knobs2.JPG
    Knobs2.JPG
    523.1 KB · Views: 100
  • Ferrules.JPG
    Ferrules.JPG
    633 KB · Views: 111
  • StrapPins.JPG
    StrapPins.JPG
    510.4 KB · Views: 109
  • Stealth.JPG
    Stealth.JPG
    417.9 KB · Views: 104
  • Tugbar.JPG
    Tugbar.JPG
    569.8 KB · Views: 103
  • NeckPlate.JPG
    NeckPlate.JPG
    516.6 KB · Views: 102
  • Pickguard.JPG
    Pickguard.JPG
    650.5 KB · Views: 103
  • PU1.JPG
    PU1.JPG
    515.6 KB · Views: 110
  • PUbox.JPG
    PUbox.JPG
    461 KB · Views: 103
  • NEck.jpg
    NEck.jpg
    504.1 KB · Views: 105
  • Neckback.jpg
    Neckback.jpg
    604.4 KB · Views: 113
  • neckbackhead.jpg
    neckbackhead.jpg
    686 KB · Views: 109
  • Insides.JPG
    Insides.JPG
    585.9 KB · Views: 106
Last edited:
I can't imagine this build ending up being anything short of FANTASTIC! I am digging all of your choices. Do you mind telling me what it's going to end up costing (if not I understand)?
It's going to be around $1,200. Which is around the same as a new American Standard (or something similar) so I figured why not :D I love '51 inspired basses with "modern appointments" so this was natural for me :hyper:
 
Last edited:
I didn't put the pictures on full view because my pictures are HUGE and I don't know how to make them any smaller
Assuming you are on a Windows PC:
  1. Right click on the picture's file name.
  2. Select Open With
  3. Select Paint
  4. Click on Resize in the ribbon
  5. You will see two text boxes right under the By: Percentage Pixels One labeled Horizontal the other labeled Vertical. Both will have the number 100 in them.
  6. Below that is a check box labeled Maintain aspect ratio. Be sure that is checked.
  7. Reduce the value in one of the check boxes.
  8. repeat #7 until you get the size you want.
  9. Save and close the file.
 
  • Like
Reactions: rumblefish
Assuming you are on a Windows PC:
  1. Right click on the picture's file name.
  2. Select Open With
  3. Select Paint
  4. Click on Resize in the ribbon
  5. You will see two text boxes right under the By: Percentage Pixels One labeled Horizontal the other labeled Vertical. Both will have the number 100 in them.
  6. Below that is a check box labeled Maintain aspect ratio. Be sure that is checked.
  7. Reduce the value in one of the check boxes.
  8. repeat #7 until you get the size you want.
  9. Save and close the file.
I'm actually using a Mac computer, the photos look just fine on mobile but much too big on desktop view. I'll figure it out....