• TalkBass has been independent since 1998. Add your voice.
    Create a free account to reply to discussions, view embedded media, and browse with fewer display ads.
    Join freeLog in
    Want zero display ads or expanded classifieds tools? Compare plans.

The bass that never was, redefined

Can you school me on fiber optics?

In your last image I can see the light emitted out the end of a single tube.
How does one go about distributing the light to multiple locations?
Are there "T" fittings required? Maybe you create a distribution box at the light source and run multiple lengths of tubing?
I honestly know nothing about this stuff except that it is functional and cool looking.
 
  • Like
Reactions: bassestkkm and JIO
Here we go… first I needed to reduce the footprint of the LED by chopping off the key-ring loop and doing some filing. The Moses example was on a carbon fiber neck w/a larger P/J shape. Using a (maple wood) Tele hs meant close tolerances - but I pulled it off. The cover w/screw knob works great! The cover plastic is soft so it self-tapped after drilling the hole and feels very firm. A simple twist and - blue light - !

Showing depth of hs and the unit -
IMG_8773_zpsmuy3vtvg.jpg


Tried this first on a piece of pine I had to make sure of my tolerances etc - then I roughed the hs cavity with chisels & files after using a fostner bit to drill the main hole
IMG_8774_zps6sujdnor.jpg


Snug as a bug in a rug


Behold - light at the other end! Yay!
IMG_8778_zps7jpw7jqh.jpg


I held my breath on this one - and luckily bored into the channel cleanly! The slight bump was from the router when I did the channel.
IMG_8776_zpseczjkoau.jpg


Drilled one hole in the wrong place on the cover - will fill and it gets gilded anyway so will disappear - slick!
IMG_8779_zpsmpji5sxn.jpg


Showing the slim profile - onward and upward!
IMG_8781_zpsnnzdiwwv.jpg
 
Last edited:
  • Like
Reactions: GKon
Can you school me on fiber optics?

In your last image I can see the light emitted out the end of a single tube.
How does one go about distributing the light to multiple locations?
Are there "T" fittings required? Maybe you create a distribution box at the light source and run multiple lengths of tubing?
I honestly know nothing about this stuff except that it is functional and cool looking.

This is my next step - I will need to widen my rout by a hair to make space for 5 side-by-side fibers. I will also need to deepen it by 1/8" so I can have 2 layers of 5 fibers. (10 total from end to end) That will leave a 1/8" space for the maple channel plug. I need to experiment with heating the ends so they bend into each position hole, and the 10 cluster needs a full-sized hole to funnel to the small single LED light hole in the hs. As long as the ends get light - the individual end points will each light.

IMG_8771_zpsb5qz9sv2.jpg
 
  • Like
Reactions: charlie monroe
That error totally worked out in your favor. Are you gilding the fretboard as well?

Yah - but it was a close call - I grazed the LED dome with that mis-drilled hole, luckily with no real damage. Because it ended up right there - it became a perfect cover light indicator and doesn't affect any of the fb marker lights.

And yes - once the fiber is installed, I'll cap it with a maple plug, radius the fb, gild the fb & hs face in (solid) gold and the neck in the blue-gold variagated leaf and finally seal and have it final-finished in gloss poly. Stringing it with the tapewounds will assure the fb won't get chewed up and besides they sound great on a fretless. I just finished deepening and widening the route and will install the fiber next. (pics will follow)
 
Photon Micro Light LED Keychain Flashlight Blue Light Made in USA Model AB 790134001034 | eBay

I ordered the type of key-chain (blue beam) LED that Moses showed on their site used for fiber-optics fingerboard side-markers. These cheap little units were everywhere in hardware stores etc at one time but this isn't the case anymore. So of course ebay has them, mostly coming from China. I found this one which they state is made in the US. If I have an option - I don't order from China and will pay a bit more to buy from a US company, even if the part is actually made in China. I just prefer to support a US based company - so this is optimal for me being made in the US. Just ordered the fiber - 25' for $16.43 delivered.

I was correct about the dial function simply being pressure sensitive - so easy to replicate using a small plastic cover which is screwed into the hs back. I like how low-tech this design is. So that's my plan - rout a channel near the edge of the fb (under the E string), drill holes in the correct positions, rout the hs back to fit the LED unit, run the fiber and epoxy it in, plug the channel w/a maple strip including filling/sanding/leveling and gild the whole neck (& body).

I've bought several products from this company, and they've all been very tough and high quality. The light shown also is avail in a model that has a slide-locking switch, as this one has a momentary 'on' switch. Also, some of them are avail with different intensities as well as colors.
 
As an eBay Associate, TalkBass may earn a commission from qualifying purchases.
I've bought several products from this company, and they've all been very tough and high quality. The light shown also is avail in a model that has a slide-locking switch, as this one has a momentary 'on' switch. Also, some of them are avail with different intensities as well as colors.

So far so good :thumbsup: I very much appreciate their LED was made in the US. I'll support that concept!
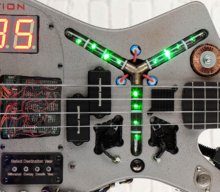
 
After a very frustrating trial & error installment of the fiber - I pulled it all out and I'm back to scratch. I'm waiting for a response from the company I bought it from for further clarification related to their products. The issues/problems I ran up against were as follows; the 25' length of 2mm fiber arrived in a roughly 6" coil. It is a plastic material and once cut in the individual lengths needed, it remained as an arch of cable. It is flexible to a point, and once beyond that point it is brittle and snaps. Bending the end (to be inserted into the side of the neck) wasn't a problem using a bic lighter briefly to heat the bend and hold it in place until it cooled and stayed in that shape. The issue was the arched spape of each piece/length. If it were straight lengths, or less stiff (more noodle-like, or even uncooked pasta like) - I would have had much less installation issues. I used super-glue to hold each length in place in the routed channel and ended up using a lot to get the arched fiber to stay flat. (a big mess) If straight, a single drop here and there would be sufficient. The other issue was creating a funnel-like cavity from the LED, with the LED-side hole only big enough to fit the clear dome of the LED unit expanding (funnel like) to an opening that would equally shed the light on the ends of 10 fibers (about 1/4" diameter). I got all the neck-points to light, but not all with equal brightness. The combination of installation difficulties and not resolving that 'funnel' was the cause.

So, after removing the fibers, I carefully honed the segway between the LED cavity light-dome hole and the channel into a fairly even transition or 'funnel'. To further aid the light distribution, I used silver tape (like used for shielding etc) to line that funnel. As you can see, it ain't pretty but seems to give the light more 'umph' into the channel. I'm hoping the company can either send a more noodle-y fiber or can send me 10 straight lengths of 24". Then, I'll bundle the hs end of the 10 fibers tightly with the end facing evenly flat into the funnel which should give each position dot the same level of light.

And lastly - to achieve this lighting system, there was the need to internally remove wood from a critical part of the neck. (at the juncture between neck & hs) Filling the channel with a maple cap will maintain it's integrity and I don't worry about that. I also am less concerned about the hs cavity (for the LED unit). But time will tell if the 'funnel' area will present a problem or not. Any concept/idea can potentially fail when tested, so once the fiber is installed and the cap glued in - I'll string it up and play it/let it exist at tension for a week or so to make sure it will be stable before moving forward. It is maple, so I'm hoping it will be fine. The Moses neck fiber optic installation design I modeled this on has the advantage of being carbon fiber which if done correctly wouldn't budge with a similar set-up. Part of the process.

IMG_8790_zpspnagaezl.jpg


IMG_8788_zpsgdywhzva.jpg
 
Last edited:
You could strengthen that tunnel area by filling it with epoxy after the fiber optics are set in place. It should reinforce that area quite well.

The maple fb strip that will cap it won't leave that much space around the fiber cluster but epoxy is a good consideration and being clear it shouldn't affect the fiber. May be worth filling the channel as well and let it squeeze out of the plug strip. :thumbsup:
 
The maple fb strip that will cap it won't leave that much space around the fiber cluster but epoxy is a good consideration and being clear it shouldn't affect the fiber. May be worth filling the channel as well and let it squeeze out of the plug strip. :thumbsup:

By the way, that was a very clever idea on how turn the LED on and off.
 
By the way, that was a very clever idea on how turn the LED on and off.

I lifted it from the Moses example so not original and luckily I had a knob that had a broken threaded shaft long enough to use. I'm one of those people who keep broken parts thinking they'll come in handy some day for something. In this case - bingo! :)
 
  • Like
Reactions: bassestkkm
How did you like the original P/MM setup? I'm toying around with the idea but not a lot of recorded examples

I dig it - buckers always sound big/full and blending the two gets a great tone the you wouldn't likely get with a P/J. I think it may be a better mix all things considered. So many players of P/J's seem to defuse the J in favor of the P pu. With this bass, I dial in the P more as flavor/colour with the bucker in the drivers seat.
 
I lifted it from the Moses example so not original and luckily I had a knob that had a broken threaded shaft long enough to use. I'm one of those people who keep broken parts thinking they'll come in handy some day for something. In this case - bingo! :)

LOL, I know the feeling. Using one piece that you have saved somehow justifies a junk drawer full of crap that you will probably never use, but you never know.
 
  • Like
Reactions: JIO
I have a couple of thoughts about your situation. If I understand correctly, the residual curve in the fiber is preventing the ends from being presented squarely to the LED source.

The first is the most straight forward. Since you had success creating a 90° by introducing heat, could you not chase the arc out of the fiber by also using controlled heat? I can think of a couple of quick jigs that are nothing more than pins or dowels imbedded in a flat work surface. You could slowly work your way down the material applying heat with perhaps a paint stripper gun and using the pins as leverage.

The other I am about to explain poorly. I can see it more clearly than describe it, so bear with me.

Your channel is of defined dimensions, dictated by the LxWxH of the bundle of 2 layers of 5 fibers. Let's consider this bundle a single unit. If the bundle was lodged snugly in the channel, would it be of benefit to notch a "vee" relief cut into the bundle that mirrors your reflective "funnel"?

In my head, this would remove some of the influence of the latent curve because you are addressing the ends of the fiber in relation to the light source as they are physically located, as opposed to trying to force the ends into a position that is unnatural to them.

Not sure that I have made that approach clear, or if it will work, but it's def worth what you paid for it ;)
 
I have a couple of thoughts about your situation. If I understand correctly, the residual curve in the fiber is preventing the ends from being presented squarely to the LED source.

The first is the most straight forward. Since you had success creating a 90° by introducing heat, could you not chase the arc out of the fiber by also using controlled heat? I can think of a couple of quick jigs that are nothing more than pins or dowels imbedded in a flat work surface. You could slowly work your way down the material applying heat with perhaps a paint stripper gun and using the pins as leverage.

The other I am about to explain poorly. I can see it more clearly than describe it, so bear with me.

Your channel is of defined dimensions, dictated by the LxWxH of the bundle of 2 layers of 5 fibers. Let's consider this bundle a single unit. If the bundle was lodged snugly in the channel, would it be of benefit to notch a "vee" relief cut into the bundle that mirrors your reflective "funnel"?

In my head, this would remove some of the influence of the latent curve because you are addressing the ends of the fiber in relation to the light source as they are physically located, as opposed to trying to force the ends into a position that is unnatural to them.

Not sure that I have made that approach clear, or if it will work, but it's def worth what you paid for it ;)

I mostly get it - thanks cm. I'll post a drawing to help illustrate my take on it tomorrow. What I plan to do is bundle the 10 fiber strands (coming from the 10 position locations on the neck) in a tight 1/4" ring and have the ends be flat/even at the end of the ring pressed into the funnel. Coming from the position locations, they would be as I started with, which was 2 layers of 5 across. At the funnel taper, they would re-order to create the bundle. That's where a more flexible material would be ideal. It's also why I ended up using so much superglue - to keep the strands conforming from flat layers into bundle. I think I can find a writing pen collar that would act as the ring. But I'll still need to keep the strands flat until it gets to the hs end. I will experiment with heat, to see if I can get them to 'behave'. I have ideas, so it'll just be trying until achieving. A bic lighter works ok for the 90 degree bends (but that's all), a hair dryer may help tame the arched stands, but isn't focused enough for articulated focus, and I think a heat-gun (like for blistering/removing paint) would be too intense. A small focused torch might work, I'll just have to see. I'm waiting to hear back from the company that I bought the fiber from… hopefully soon.
 

Latest posts