• TalkBass has been independent since 1998. Add your voice.
    Create a free account to reply to discussions, view embedded media, and browse with fewer display ads.
    Join freeLog in
    Want zero display ads or expanded classifieds tools? Compare plans.

The Hossenfeffer Bass Build

I know this is an old question, but this is how I de-tang frets:Vintage Modern Build

I threw my Stew-Mac fret de-tangers in the garbage a long time ago. It might look scary, but the bit is flush with the metal bar across the router base and the "depth bar" covers all but about 1/8". You would really have to try hard to get your finger in there. I've never had even the slightest issue using this and I've been doing it this way for about 15 years.
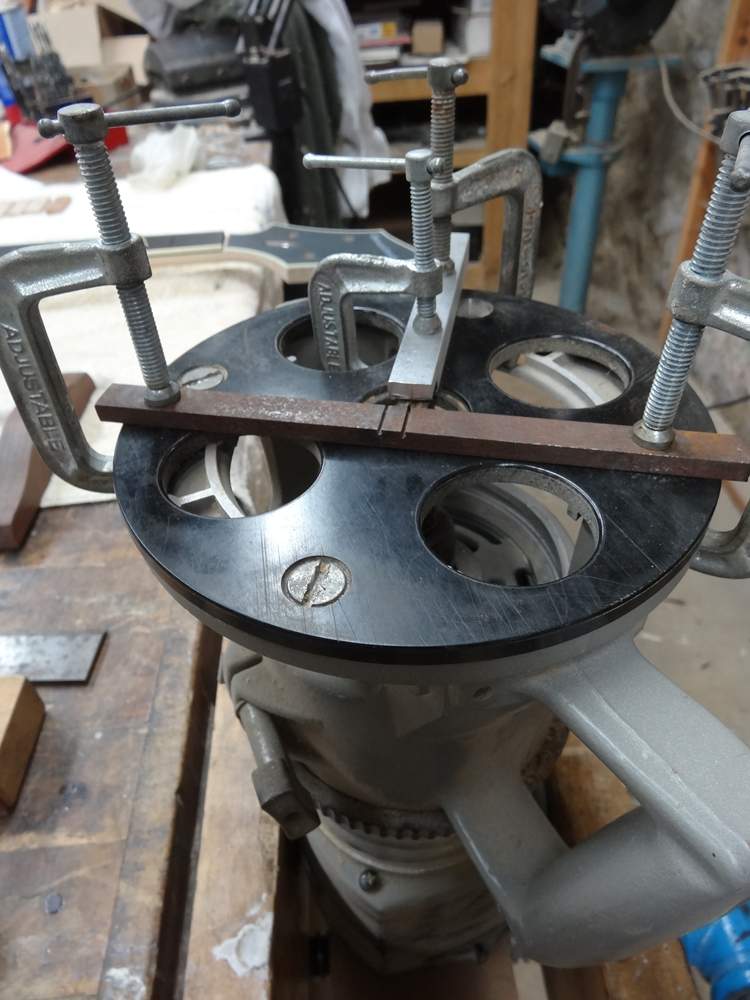
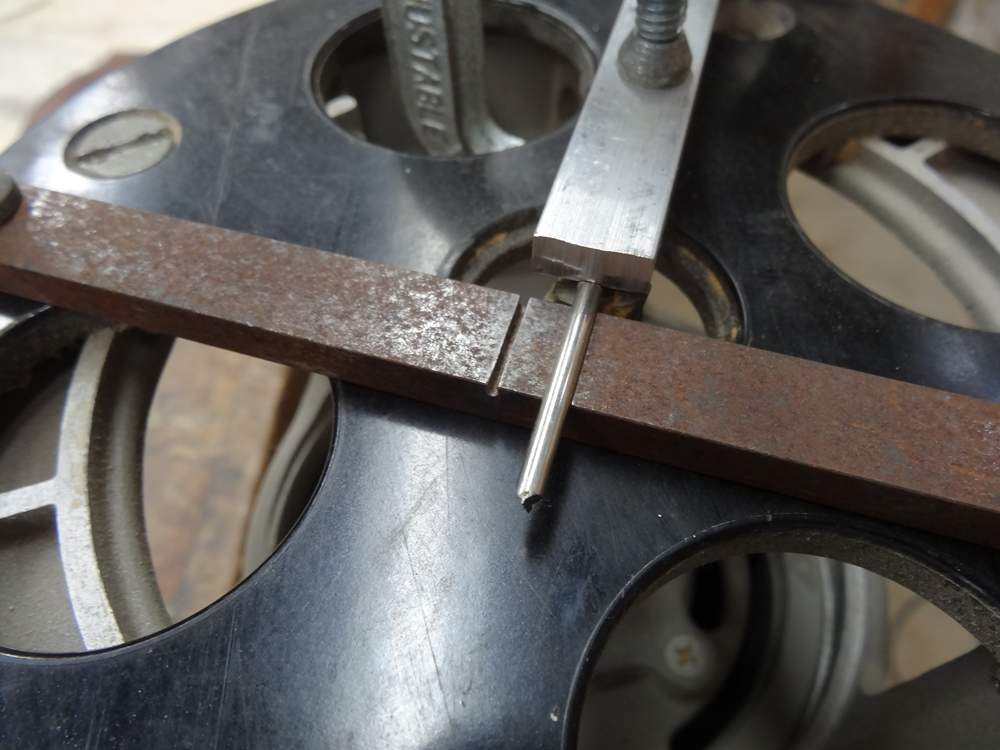
DSC02288.JPG


DSC02289.JPG
 
A it is then. I was pretty nervous about effing up my finished board, but the Stewmac binding cutter does such a nice clean cut, it's really a no brainer. I think the .060 binding will look better, and give me more of a "seat" for the fret ends where the tangs are cut back. Im using a Dremel cut off wheel and a file to cut back the fret tangs, slow, but it works. How do you guys measure fret slot depth? The depth blade on my dial caliper is too thick to get into the slots. Just eyeball them a little deeper? I still have around 1/4" of wood under the slots due to the 3/8" FB thickness.
 
Last edited:
. How do you guys measure fret slot depth? The depth blade on my dial caliper is too thick to get into the slots. Just eyeball them a little deeper?
I made a very simple "gauge" for this purpose.

Sand down 1/4" along the edge of an old credit card until it is thin enough to fit into a fret slot. Hold fretwire with the tang against the card and draw a pencil line. Then, using a straightedge, scribe a line at the top of the pencil line (since the pencil will wear away). Now just dip the edge of the card into the fret slot, and and as long as the scribed line is even with the fretboard surface, there is room for your tang plus a pencil line's width of air below it.
 
  • Like
Reactions: Gilmourisgod
I made a very simple "gauge" for this purpose.

Sand down 1/4" along the edge of an old credit card until it is thin enough to fit into a fret slot. Hold fretwire with the tang against the card and draw a pencil line. Then, using a straightedge, scribe a line at the top of the pencil line (since the pencil will wear away). Now just dip the edge of the card into the fret slot, and and as long as the scribed line is even with the fretboard surface, there is room for your tang plus a pencil line's width of air below it.
As we colorful, dour Yankees say around here, "thats wicked smaht". Im sure Stewmac makes an overpriced tool for this as well.
 
  • Like
Reactions: Jonny5bass
As we colorful, dour Yankees say around here, "thats wicked smaht". Im sure Stewmac makes an overpriced tool for this as well.
StewMac [Invalid or Expired Link Removed]


To the European, a Yankee is an American.
To an American, a Yankee is a New Englander.
To a New Englander, a Yankee is a Vermonter.
To a Vermonter, a Yankee is someone who eats apple pie for breakfast.
And to a Vermonter who eats apple pie for breakfast
a Yankee is someone who eats it with a knife.
~An old Yankee joke

"What New England is, is a state
of mind, a place where dry humor
and perpetual disappointment
blend to produce an ironic
pessimism that folks from away
find most perplexing."
~ Willem Lange

Nice to see you back, "du hexen hase" (you wascal wabbit!) ;).
 
Last edited:
StewMac [Invalid or Expired Link Removed]


To the European, a Yankee is an American.
To an American, a Yankee is a New Englander.
To a New Englander, a Yankee is a Vermonter.
To a Vermonter, a Yankee is someone who eats apple pie for breakfast.
And to a Vermonter who eats apple pie for breakfast
a Yankee is someone who eats it with a knife.
~An old Yankee joke

"What New England is, is a state
of mind, a place where dry humor
and perpetual disappointment
blend to produce an ironic
pessimism that folks from away
find most perplexing."
~ Willem Lange

Nice to see you back, "du hexen hase" (you wascal wabbit!) ;).

Eureka! Another opportunity to spend money on Stewmac tools! Just ordered a .060 bearing for cutter and some .060 binding. Now I'm hunting for a cheap fret slot saw, found this one:
Invalid Link Removed

In the interest of reducing my embarrassment over how much this project is costing me, I've decided to remove the cost of tools from my running cost estimate, which is up to over $900. This is not blatant fiscal dishonesty, it's "creative accounting", in the great American tradition.

Hey @ctmullins :
These Stewmac binding cutters really are the shizzle, as you well know! :):)
 
Hey @ctmullins :
These Stewmac binding cutters really are the shizzle, as you well know! :):)

:thumbsup: Yes indeedy! People like to complain about StewMac's prices, and sometimes there's some truth to it. But there is no substitute for having exactly the right tool for the job, and that's the value that they bring to our community. I've reached the point in my life at which I avoid the cheapest items of any category, having learned that there can often be a significant step up in quality or functionality for a very modest increase in price. I don't mind paying StewMac prices, because I am assured of receiving a good product. It also helps to have a decent income...
 
Yep! luckily, back of the neck beam is still square, so I just put it in a simple plywood box jig with rails for the router to run along above the neck. The binding cutter bearing just runs along the neck beam, and Bobs Your Uncle. I was nervous as hell, but the first side went off without a hitch. Fingers Crossed. I'll have to scrape the new binding nearly flush and then fine sand it down to perfectly flush with fingerboard. Typical one step forward Gilmour maneuver.
 
Roller glue slathering: (and yes, I did remember to take the tape off)
IMG_2111_zpsqdyf91xy.jpg

Did you use any particular kind of roller? I had a laminated body to glue up today and thought I'd borrow this trick but I had a bit of an issue. I put an entire small bottle of titebond in the tray, ran the roller through it and it sucked up all the glue. Then I couldn't get it to release the glue. Ended up having to throw out a roller loaded with a bottle of Titebond. :banghead: I'm guessing it was just too heavy of a nap but wanted to check if you used something special. Really like this build btw, great attention to detail.
 
  • Like
Reactions: Gilmourisgod
What a roundabout fiasco.... I was all set to route off all the .040" binding and start over with .060" binding. Doh! Realized with the fingerboard glued on, I don't have clear enough depth off the neck beam for the binding cutter, including bearing, set screw, etc. So..... The .040" binding stays as-is on three sides, just the side I screwed up gets re-bound. While i had the binding off on one side, double checked the fret tang depth:
IMG_3968_zpsasujpp4d.jpg

It's nearly a perfect 1/16" depth tang measured against my incra-ruler, which is thin enough to get into the fret slots to measure depth. Forgot I even owned this thing.

After a bit of work with my new fret saw, a hook blade exacto, etc., I managed to get all the slots down to 3/32" depth, so approx. 1/32" clear under each fret. A few of the slots were really gummed up with ooze from the binding glue, so this would have really screwed me fretting it.
IMG_3983_zpssjz9btll.jpg


Re-bound the neck, have to scrape it flush and re-radius sand to bring it back up to polish.
IMG_3984_zpsububs4q1.jpg


For want of a fret tang nibbler, using a dremel cut off wheel to grind down fret tangs, works fine but oh-so-tedious.
IMG_3985_zpsaok0jsno.jpg

IMG_3985_zpsaok0jsno.jpg
 
Last edited:
I haven't noticed any discoloration on the frets. Im using the cutoff wheel to cut about half the tang depth off, then hand filing. Any suggestions other than an overpriced fret nibbler appreciated. My small nippers don't seem to have enough leverage to cut the tangs without distorting them.
 
Tedious, and it can heat up the fret and color it. Which is not an enormous deal, but it does mean that you have to address 100% of that surface when you dress the frets.

I think that would be a bigger issue if using SS fret wire vs NS. The NS is so soft that it can be cut away without generating that much heat
 
  • Like
Reactions: Gilmourisgod
Arrrrrrrggggghhhhhh!!!!
Setback #423 and counting....

So, I installed the new binding strip, polished FB back up to shiny with 320-1500 grit paper, took very little wood off, but noticed that my radius sanding beam only seemed to be contacting the board at the nut and heel ends. I remember checking the neck straightness right after initial sanding, and at various other points up to high polish, and it seemed straight. The back of the neck beam is straight to withing a few thousands, it had a very slight backbow before, now its maybe a little forward bowed, but very small deviation. A straightedge along the bottom edge of the FB looks straight too.

Setting a straightedge against the fingerboard reveals a pronounced (1/16" or so) dish in the middle. I don't know when this happened, but there it is.

You can see it clearly in this photo, it's most pronounced at the nut:
IMG_4047_zpslzpuivfg.jpg


Here'a a straightedge a the heel. The neck thickness, measured from back of neck beam to center of FB is 1.7375". it drops to 1.7130" by the 13th fret.
IMG_4038_zpspvbaihkl.jpg


Down to 1.7025" by the 9th fret
IMG_4039_zps1wubk2ys.jpg


Down to 1.6970" at the 4th fret, then back up to 1.7325" at the nut. You see I have a real "ski jump" up to the nut. Don't know why i never saw this before now. Sigh...sucks to lose your vision.
IMG_4040_zpsl6qky93n.jpg


I suspect that because I used a wood radius sanding beam, I torqued it down without realizing it at the center, and dished the FB a little. I assume that 1/16" out of straight is way too much to level frets into. I haven't tried cranking down the trussrod, because the back of the neck beam is flat. Do I just need to carefully sand down the high spots at the two ends until I get this back to flat? Any suggestions as to a fix for this latest eff-up greatly appreciated.
 
Last edited:
Bummer.

Don't torque the rod with all that uncarved neck wood. It's pointless, and might break the rod.

That actually looks to me approximately like the amount of relief needed when strung up to pitch. If your planned neck carve is beefy, this might work to your advantage. I have a couple of three-piece laminated rock maple necks with beefy profiles, and I actually have to induce some relief with the double-action rod. I might be a bit cavalier about these things, but my inclination would be to carve the neck and measure again, then correct as needed with the truss. Might be best to do that before fretting, so you can fine-tune by sanding if needed.
 

Latest posts

