• TalkBass has been independent since 1998. Add your voice.
    Create a free account to reply to discussions, view embedded media, and browse with fewer display ads.
    Join freeLog in
    Want zero display ads or expanded classifieds tools? Compare plans.

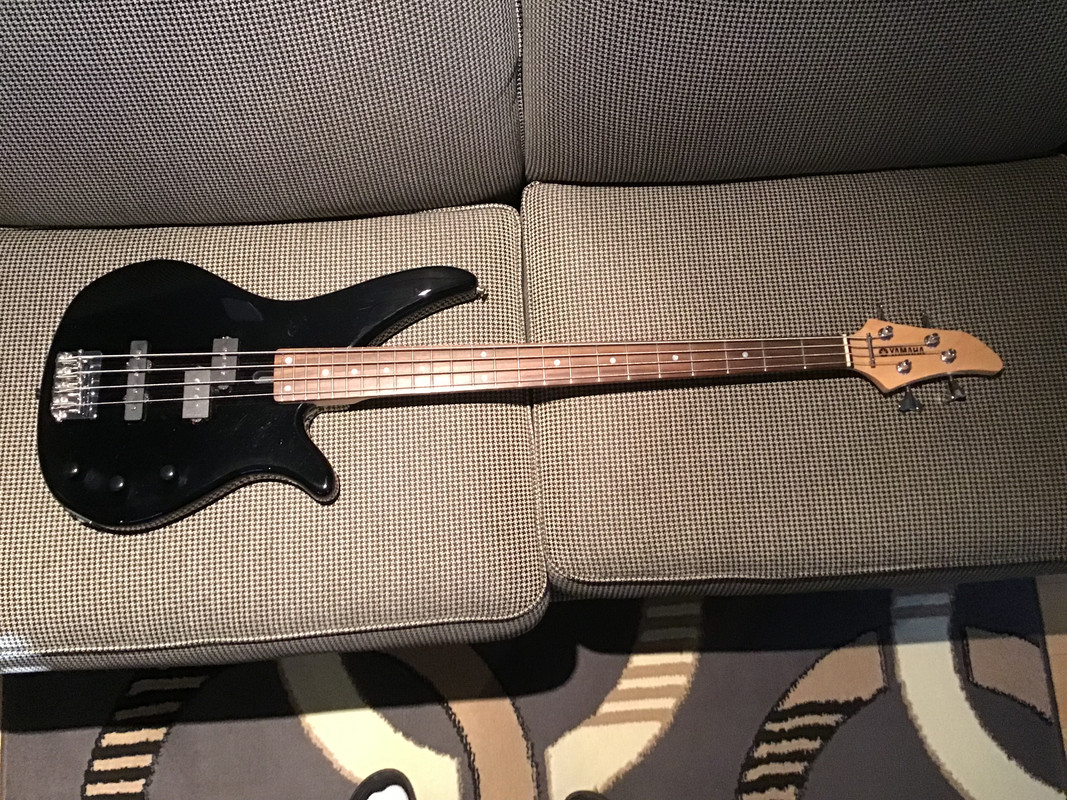
Unexpected results from a $30 bass

That thing looks SWEET!

My daughter loves to hit the thrift stores around here, and awhile back she bought two electric guitars, $10 each! One was a New York pro strat style, the other a Lyon that’s configured like a tele, and, even though I’ve never found the time to set it up to my liking, the thing actually has a really nice tone.
 
Who's "Lyon" now....
View attachment 5482136 View attachment 5482137 View attachment 5482138


Still waiting on knobs...

I don't know much about these, but I can tell you the easy things that the company "cheaped out" on, and it's on basic setup and shielding inside the bass itself. Nothing that can't be remedied with a little patience. Turns out that after a good setup and some shielding, this bass is actually quite impressive. It's super light, and after a good setup is super easy to play.

At the moment it has Ernie Ball Super Slinky's in .45 to .100 because that's what I had on hand. But I have a pretty firm left hand, so the next set are likely going to be .55 to .110's.
I always thought that the P bass format if adhered to fairly closely, is hard to mess up. Any P copy I've played from the early plywood Hondos to today's SX, 70s Japanese to the basic Squiers has always to me, had a usable gigable tone.

That one looks like a very nice example.

:)
 
I borrowed this Indonesian entry level Yamaha RBX 170 bass from a friend and quite honestly, when using the neck pickup only, it does at least 85% of what a good precision bass does.

And by looking at yours and mine, they almost seem to be made in the same factory………

 
  • Like
Reactions: DJ Bebop
Unfortunately this bass has hit a snag.

This bass came from Wisconsin, a state with much higher humidity than Colorado, where I live. Even here on Colorado, the humidity varies enough that I need to make truss rod adjustments (albeit very minor) to my basses roughly every 6 months. Normally, not a problem.

The neck on this bass has started to adjust itself to the climate here, and is starting to require adjustment. When I first got it and set it up, I noticed that the truss rod nut has been boogered by someone using the wrong tool. It wasn't a problem initially, as I was still able to turn it. However, now I can't get enough grip on it to be able to adjust it where it needs to be.

So, now I'm stuck with one of 2 options:
1) deal with light strings forever
2) fix it

I'm opting to fix it. Truss rods are cheap, and I'm handy. At the moment, the fretboard is slowly being removed and seems to be coming off without issue. (Of course, now that I said that I'll probably run into all kinds of issues). But if all goes well, it should be a relatively easy repair. I'll try to post pictures if I remember to take them.
 
  • Like
Reactions: AllieCat
Fretboard came off pretty easily with some heat and patience. In the pictures you'll see the high-tech equipment I used to remove it. (note: If you don't have a dedicated ironing board and iron for non-laundry purposes, make sure and clean up well before your wife finds out you used her stuff!!)

I applied heat with an iron, and contained that heat in a wrap of tin foil. Adding a small spray of water creates steam, which will help to distribute the heat evenly, and help to soften the glue where it comes in contact with the steam. The steam creates a bit of a forward bow in the neck after it's all said and done, but at present the humidity is low enough here that I can already see it returning to it's flat state after about an hour of sitting in the open air.

It took me about an hour to remove the fretboard, moving the heat and prying up the fretboard with a thin knife. The 'fun' part will be removing the glue residue from both the neck and the back of the fretboard. Only a very small amount of the fretboard stayed stuck to the neck after I was done.

The truss rod pulled right out -- wasn't even epoxied in place. Unfortunately for me, the truss rod is of the type that has a metal sleeve around the adjustment which is welded to the "body" of the truss rod. This "sleeve" or "shell" does not move, and only the inner nut is supposed to spin. Due to this I can't simply replace the nut -- the end of the truss rod "IS" the nut, and is held captive by the metal sleeve around it. The adjustment being captive inside the sleeve allows the truss rod to perform a dual-action role, and adjust for necks that have a natural back-bow in them. This is a versatile design that will account for different types of neck problems, and is good for manufacturers that are "less than optimal" at dimensional accuracy during the build. But it has a drawback: The inner adjustment nut can bind inside of the sleeve, making adjustment difficult and risking the stripping-out of the nut. Not sure I'm going to replace it with a dual-action truss rod, as I don't foresee having that problem, especially on a bass. But that decision is going to come later. This weekend is ham radio Field Day, and I need to get ready for that.

WARNINGS:
--Only use a well-fitting tool to adjust your truss rod or you may wind up in this situation!
--Using oil to free a binding truss rod may work. BUT! if you wind up having to epoxy a new one in place, the oil will migrate into the wood, and the epoxy will not bond. Use a liquid soap instead.


More to come later...

truss_rod_end.JPG
Nut_condition.JPG
fretboard_removal-1.JPG
fretboard_removed.JPG
 
Fretboard came off pretty easily with some heat and patience. In the pictures you'll see the high-tech equipment I used to remove it. (note: If you don't have a dedicated ironing board and iron for non-laundry purposes, make sure and clean up well before your wife finds out you used her stuff!!)

I applied heat with an iron, and contained that heat in a wrap of tin foil. Adding a small spray of water creates steam, which will help to distribute the heat evenly, and help to soften the glue where it comes in contact with the steam. The steam creates a bit of a forward bow in the neck after it's all said and done, but at present the humidity is low enough here that I can already see it returning to it's flat state after about an hour of sitting in the open air.

It took me about an hour to remove the fretboard, moving the heat and prying up the fretboard with a thin knife. The 'fun' part will be removing the glue residue from both the neck and the back of the fretboard. Only a very small amount of the fretboard stayed stuck to the neck after I was done.

The truss rod pulled right out -- wasn't even epoxied in place. Unfortunately for me, the truss rod is of the type that has a metal sleeve around the adjustment which is welded to the "body" of the truss rod. This "sleeve" or "shell" does not move, and only the inner nut is supposed to spin. Due to this I can't simply replace the nut -- the end of the truss rod "IS" the nut, and is held captive by the metal sleeve around it. The adjustment being captive inside the sleeve allows the truss rod to perform a dual-action role, and adjust for necks that have a natural back-bow in them. This is a versatile design that will account for different types of neck problems, and is good for manufacturers that are "less than optimal" at dimensional accuracy during the build. But it has a drawback: The inner adjustment nut can bind inside of the sleeve, making adjustment difficult and risking the stripping-out of the nut. Not sure I'm going to replace it with a dual-action truss rod, as I don't foresee having that problem, especially on a bass. But that decision is going to come later. This weekend is ham radio Field Day, and I need to get ready for that.

WARNINGS:
--Only use a well-fitting tool to adjust your truss rod or you may wind up in this situation!
--Using oil to free a binding truss rod may work. BUT! if you wind up having to epoxy a new one in place, the oil will migrate into the wood, and the epoxy will not bond. Use a liquid soap instead.


More to come later...

View attachment 5483594 View attachment 5483595 View attachment 5483596 View attachment 5483597

Thanks for bringing us along on the journey. I like your high-tech tool set!

Hope you can fix it.

73,

KC9JD

.
 
  • Like
Reactions: HaphAsSard
Well, since I had the neck apart already, I decided to upgrade (almost) everything else in this bass while I was at it. Because I liked the sound, I kept the existing pickups.

--new CTS top-of-the-line potentiometers
--lining and grounding of all the cavities (had already done this prior to taking the neck apart)
--new knobs and pointers--they finally came in

With the exception of replacing the truss rod, everything is pretty easy. The most time consuming part was lining the cavities with copper foil. I even put some under the bridge so that the ground connection had a bit more surface area. The short wire that sits under the bridge is likely adequate, but since I was in there I wanted to be SURE that there was a good ground connection. I've already hooked up the body to my amplifier, and it's now just as quiet as all the rest of my basses.

The existing potentiometers had been replaced at some point with mini's, and whoever did the job wasn't the the best with a soldering iron. To ensure a good ground, and to couple that ground with the rest of the copper foil, I mounted and soldered them to a copper plate first. This plate also served as the common ground connection for everything else. Of course, that's when my high-wattage (140W) soldering gun decided to fail. Anyone who's soldered to copper plate knows that it takes a good amount of heat to get a good solder job. I had to use my 85W Weller, which was BARELY up to the task. But, it got done -- not as pretty as I like, but effective nonetheless.

I had ordered the knobs from Amazon. The first shipment I got were the wrong ones, so I tried to re-order using overnight delivery. I don't know how Amazon treats you guys, but if I order from them overnight, the shipment is pretty much guaranteed to be late. I got the Kaish aluminum knobs with the white pointer. I also got some pointers that fit under the knob so I have a point of reference when I use the bass with different amplifiers.

The truss rod replacement went well. Currently, the neck and fretboard are glued back together and are curing. It'll be at least a day before I can join the neck and body, and I may even wait a bit longer just to be sure.

Excluding the truss rod problem, this is a good bass. Hopefully after I'm done it'll be a GREAT bass.

fretboard_gluing.JPG
bass_knob.JPG
pots_1.JPG
pots_2.JPG
electronics_cavity.JPG
pickup_cavity.JPG
electronics_cavity_full.JPG
neck_fretboard_trussrod.JPG
 
Fretboard came off pretty easily with some heat and patience. In the pictures you'll see the high-tech equipment I used to remove it. (note: If you don't have a dedicated ironing board and iron for non-laundry purposes, make sure and clean up well before your wife finds out you used her stuff!!)

I applied heat with an iron, and contained that heat in a wrap of tin foil. Adding a small spray of water creates steam, which will help to distribute the heat evenly, and help to soften the glue where it comes in contact with the steam. The steam creates a bit of a forward bow in the neck after it's all said and done, but at present the humidity is low enough here that I can already see it returning to it's flat state after about an hour of sitting in the open air.

It took me about an hour to remove the fretboard, moving the heat and prying up the fretboard with a thin knife. The 'fun' part will be removing the glue residue from both the neck and the back of the fretboard. Only a very small amount of the fretboard stayed stuck to the neck after I was done.

The truss rod pulled right out -- wasn't even epoxied in place. Unfortunately for me, the truss rod is of the type that has a metal sleeve around the adjustment which is welded to the "body" of the truss rod. This "sleeve" or "shell" does not move, and only the inner nut is supposed to spin. Due to this I can't simply replace the nut -- the end of the truss rod "IS" the nut, and is held captive by the metal sleeve around it. The adjustment being captive inside the sleeve allows the truss rod to perform a dual-action role, and adjust for necks that have a natural back-bow in them. This is a versatile design that will account for different types of neck problems, and is good for manufacturers that are "less than optimal" at dimensional accuracy during the build. But it has a drawback: The inner adjustment nut can bind inside of the sleeve, making adjustment difficult and risking the stripping-out of the nut. Not sure I'm going to replace it with a dual-action truss rod, as I don't foresee having that problem, especially on a bass. But that decision is going to come later. This weekend is ham radio Field Day, and I need to get ready for that.

WARNINGS:
--Only use a well-fitting tool to adjust your truss rod or you may wind up in this situation!
--Using oil to free a binding truss rod may work. BUT! if you wind up having to epoxy a new one in place, the oil will migrate into the wood, and the epoxy will not bond. Use a liquid soap instead.


More to come later...

View attachment 5483594 View attachment 5483595 View attachment 5483596 View attachment 5483597
Double-action truss rod was in the neck then?
 
Well, since I had the neck apart already, I decided to upgrade (almost) everything else in this bass while I was at it. Because I liked the sound, I kept the existing pickups.

--new CTS top-of-the-line potentiometers
--lining and grounding of all the cavities (had already done this prior to taking the neck apart)
--new knobs and pointers--they finally came in

With the exception of replacing the truss rod, everything is pretty easy. The most time consuming part was lining the cavities with copper foil. I even put some under the bridge so that the ground connection had a bit more surface area. The short wire that sits under the bridge is likely adequate, but since I was in there I wanted to be SURE that there was a good ground connection. I've already hooked up the body to my amplifier, and it's now just as quiet as all the rest of my basses.

The existing potentiometers had been replaced at some point with mini's, and whoever did the job wasn't the the best with a soldering iron. To ensure a good ground, and to couple that ground with the rest of the copper foil, I mounted and soldered them to a copper plate first. This plate also served as the common ground connection for everything else. Of course, that's when my high-wattage (140W) soldering gun decided to fail. Anyone who's soldered to copper plate knows that it takes a good amount of heat to get a good solder job. I had to use my 85W Weller, which was BARELY up to the task. But, it got done -- not as pretty as I like, but effective nonetheless.

I had ordered the knobs from Amazon. The first shipment I got were the wrong ones, so I tried to re-order using overnight delivery. I don't know how Amazon treats you guys, but if I order from them overnight, the shipment is pretty much guaranteed to be late. I got the Kaish aluminum knobs with the white pointer. I also got some pointers that fit under the knob so I have a point of reference when I use the bass with different amplifiers.

The truss rod replacement went well. Currently, the neck and fretboard are glued back together and are curing. It'll be at least a day before I can join the neck and body, and I may even wait a bit longer just to be sure.

Excluding the truss rod problem, this is a good bass. Hopefully after I'm done it'll be a GREAT bass.

View attachment 5490597 View attachment 5490598 View attachment 5490599 View attachment 5490600 View attachment 5490601 View attachment 5490602 View attachment 5490603 View attachment 5490604
Very nice shielding and grounding
 
  • Like
Reactions: DJ Bebop
Double-action truss rod was in the neck then?
Yes Sir.

Adjustments are necessary. Even if the bass doesn't travel much, there are variations in humidity that will make the neck grow and shrink throughout the year. These are typically not much of a problem, even when bound up a bit, IF the user used the correct tool to make adjustments. Once the truss rod nut is wallowed out, then it's replacement time.

Some truss rods have removable nuts for this exact reason, but I didn't find one that would work with this bass that was readily available, so I'll have to trust myself to use good tools to adjust it in the future.
 
  • Like
Reactions: DJ Bebop
Very nice shielding and grounding
That part took the longest. Nothing inside any of these cavities is what I'd consider a "regular" shape, so all of the pieces had to be cut to fit. Furthermore, it curls up when peeled off, and in placing the foil in, the foil tends to stick to everything BUT what you want it to stick to until you get it firmly in place.

However, I've plugged in the bass (without the neck attached) and it's as silent as can be.
 
Yes Sir.

Adjustments are necessary. Even if the bass doesn't travel much, there are variations in humidity that will make the neck grow and shrink throughout the year. These are typically not much of a problem, even when bound up a bit, IF the user used the correct tool to make adjustments. Once the truss rod nut is wallowed out, then it's replacement time.

Some truss rods have removable nuts for this exact reason, but I didn't find one that would work with this bass that was readily available, so I'll have to trust myself to use good tools to adjust it in the future.
I have a dual-action truss rod in my Carvin Bunny Brunel. It uses this…

IMG_4745.jpeg


Still, I remain nervous and cautious when adjusting it. There was talk the Carvin truss rods were not robust enough and the nut may snap. Fortunately, I've had no problem in 28 years.

:)
 
  • Like
Reactions: Prodigus Filius
That part took the longest. Nothing inside any of these cavities is what I'd consider a "regular" shape, so all of the pieces had to be cut to fit. Furthermore, it curls up when peeled off, and in placing the foil in, the foil tends to stick to everything BUT what you want it to stick to until you get it firmly in place.

However, I've plugged in the bass (without the neck attached) and it's as silent as can be.

I use shielding paint myself, but copper looks really good and robust
 
That part took the longest. Nothing inside any of these cavities is what I'd consider a "regular" shape, so all of the pieces had to be cut to fit. Furthermore, it curls up when peeled off, and in placing the foil in, the foil tends to stick to everything BUT what you want it to stick to until you get it firmly in place.

However, I've plugged in the bass (without the neck attached) and it's as silent as can be.

Indeed...have to be patient and steady with the foil.

I just got a Squire P Bass yesterday that needs a shielding job. Will do that early next week. Hope it ends up.as quiet as yours!

.
 
Yet another (self-induced) setback:

In gluing the fretboard back, I experienced a bit of glue creep. For those non-woodworking types, this means that during the clamping process, the two parts that are being glued together move a bit. As a result, the fretboard was a bit more than 1/32's of an inch too far forward, creating a gap between the nut and where the fretboard starts. This may not seem like much, but will affect intonation to the point that the bass will never really be in tune, no matter what you do. Also, the gap is ugly.

So, I had to remove the fretboard again, and this is where I realized another mistake: The use of "Gorilla" brand wood glue.

But before I get into why this is bad, let me backtrack a bit: A bass guitar is an assembly of parts, much like an engine or any other mechanical device. There are methodologies for assembling, and dis-assembling the parts of any mechanical device, including bass guitars. With any guitar or bass neck, the use of heat can break down the glue bond and allow for a neat disassembly of the neck. However, Gorilla glue is a polyurethane compound that is water resistant, and once hardened becomes impervious to water. Having used the stuff, it took what I consider to be an excessive amount of heat to separate the fretboard from the neck, and in the process broke down the glue in the scarf joint (the joint between the headstock and the neck). In short, during the fretboard removal, the headstock fell off.

Additionally, and as stated, Gorilla glue is impervious to water. In order to get all the glue off, I had to dissolve as much as I could using Acetone. This left the Gorilla glue in a "boogery" state that could (mostly) be scraped off with a putty knife. The rest would not wipe off even with a rag soaked in Acetone, which left me to have to sand both the neck and the fretboard in order to get a surface where normal wood glue (Elmers, TiteBond, ect...) will work. I'm never using Gorilla glue for this kind of work ever again!

Anyway, having to sand, unless only very slightly, will change the dimensions of the objects to be glued together, and as a result the parts won't fit together as perfectly as they did out of the factory. So, in order to avoid sharp edges, I'll have to refinish the entire neck. Grrrrr....

Thankfully, this is costing me nothing but time. At this point the headstock has been re-installed (using TiteBond Original formula glue!) and the neck has been finish sanded and stained. After the fretboard install, I'll have to sand the area where they meet in order to eliminate any sharp edges. Once that's done, it'll get a few new coats of satin Polyurethane and be ready for re-installation.

After all this trouble (some of which is self inflicted!) this bass BETTER play as well, or better than it did when I got it. If it doesn't, it's going into the wood chipper! I started this post to encourage people to not shy away from a cheap used bass, but in the end I fear this post has done the complete opposite. I think that this is a one-off and uncommon scenario, though, and I hope that readers can see past some of the difficulty I've had with it.