• TalkBass has been independent since 1998. Add your voice.
    Create a free account to reply to discussions, view embedded media, and browse with fewer display ads.
    Join freeLog in
    Want zero display ads or expanded classifieds tools? Compare plans.

What's On Your Workbench?

You Guys are very inspirational to a non luthier..
I have a wood shop & was a maintenance man + auto parts salesman & am now retired.
Here I am up @ 2:00am again..
I've been playing for 43 years & have many projects to be repaired..
My youngest Son turned 30 last week & ordered a Steinberger XP-2 that needs a Claw, Leg Rest & a Setup + New Strings.. Never worked on a Steinberger before BTW..
I've ordered the strings, 1 Claw/Jaw & a Leg Rest from Ed Roman's & expect the parts & Bass the middle of this week, 1st of September..
Got several guitars that need repair in my dungeon/basement that include a Parker Fly, Jackson DK2, Banjo, two acoustics, Fender strat copy, stratocoustic & a couple more I've forgotten about..
Most need a nut & assembly, strings & setup, neck screws stripped etc.. = No Big Deal but takes time.
As far as Basses Go We Have a Jackson JPB-7, Ibanez SR300 & the upcoming Steinberger XP-2..
My Son's Studio has several Gibsons, Fenders, Ovation, Brian Moore & the list goes on & on..
A couple organs, keyboards etc etc.. Either in my upstairs or in two other rooms in the house & basement/dungeon..

I joined to find answers to questions & share in the wealth of knowledge here..

Can anyone tell me how the intonation is set on these early Steinbergers??
Until I have it in my hands I won't know..
I don't see the other end of the screws that run back from the bridge saddles, Only the tuning knobs that attach to the claws.. I know that they are locked from the side via a hex head set screw.
Here's a picture a the broken claw/jaw on the XP-2
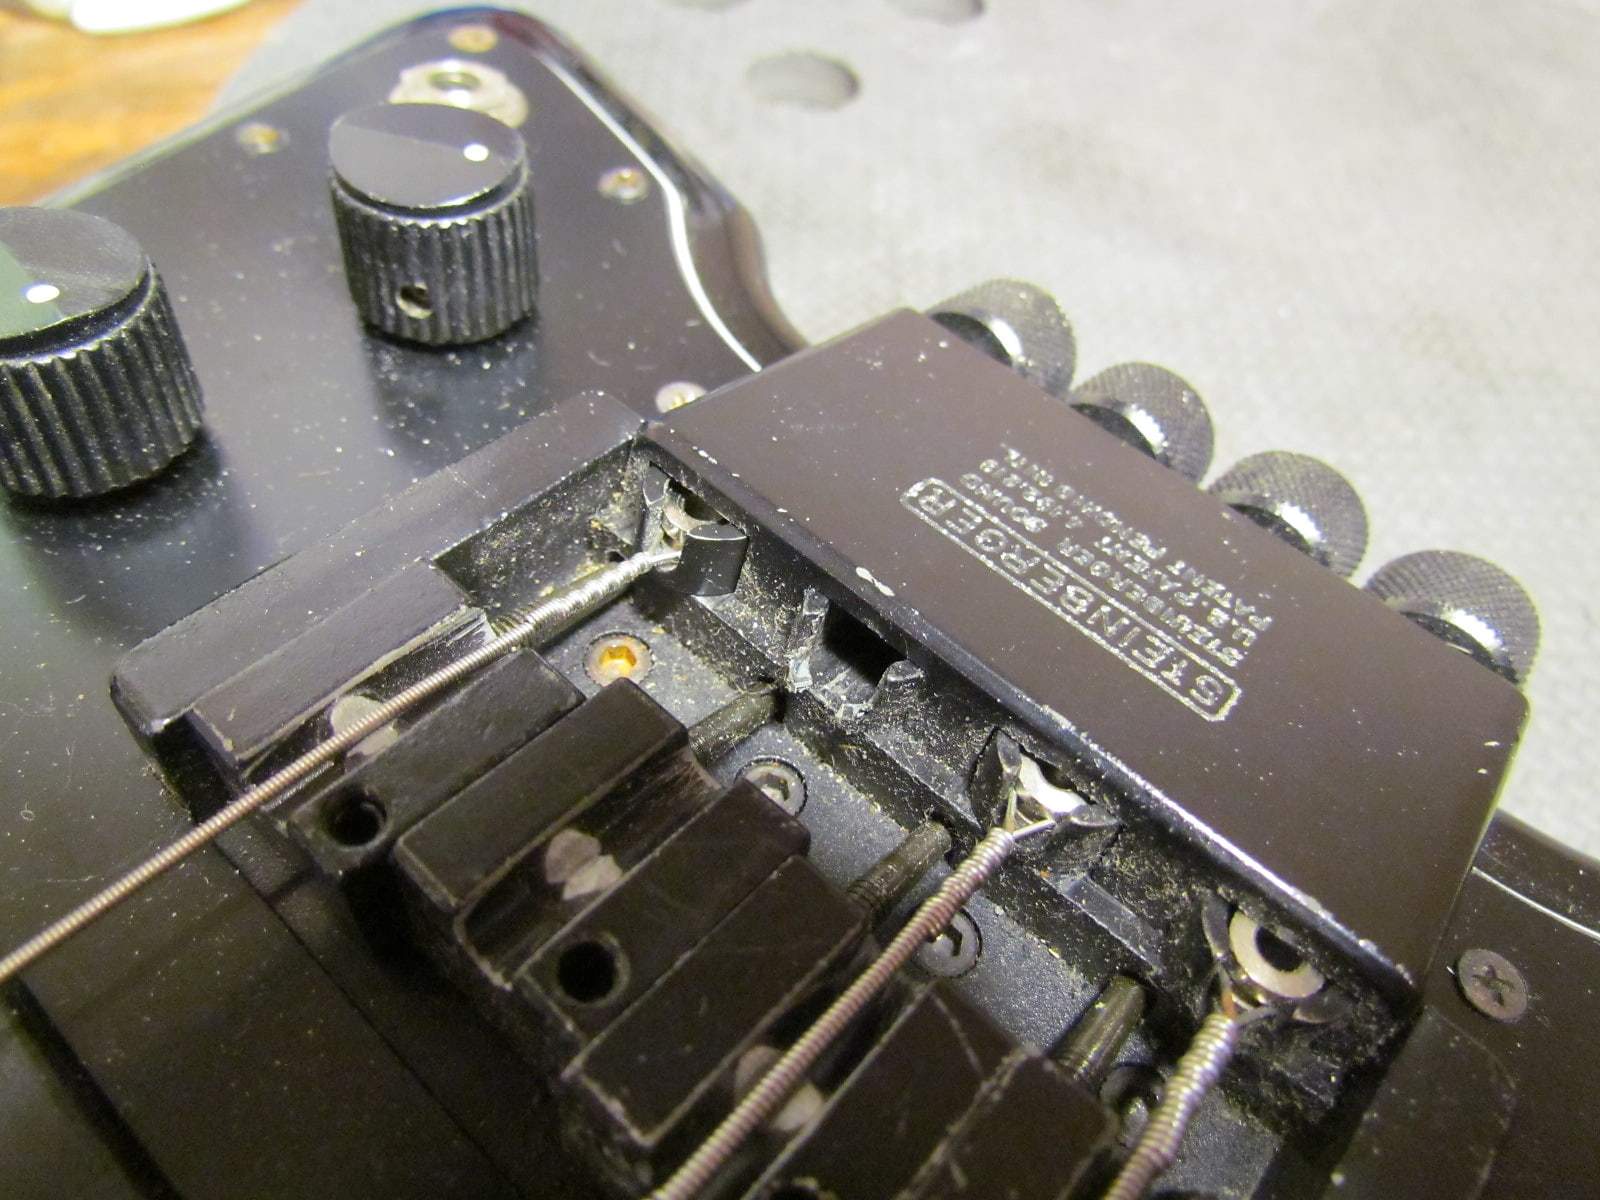
Steinberger XP-2 Bridge I.jpg

Looks like the G string jaw was already replaced & the E is getting close..
It'll need them all before too much longer..
Filthy isn't it.. We'll get that fixed up but still don't see how to adjust the intonation, You can see the four threaded bolts running toward the rear of the bridge? Won't know until I have it up close & personal
Unless someone tells me how.. Already went out to my shop & got the imperial hex keys = allen wrenches waiting on the Steinburger.. Will also have to go to the hardware store to get a couple
6-32 x 3/8" Hex Head Screw = Allen Bolts for the leg rest..
XP-2 Bag.jpg

Need to get to bed!!
Gary 2:30am
 
You need to loosen a set screw at the E-string side of the bridge. Then you can adjust the intonation with the screw at the front of each saddle. When adjusted both for intonation and string height, tighten the set screw at the side.
For future parts need check HeadlessUSA. They have parts for Steinbergers.
 
  • Like
Reactions: Gary Sutter
I have that exact XP-2 bass, including the nomex gig bag. I have put the body in storage and replaced it with a mahogany home built body, but otherwise intact. Buying parts for these is a sticker-shock experience, but the hardest part may be finding strings for it. These basses are very string-length particular, so measure them very carefully before buying. I got a set of strings for mine recently and the D&G strings were too long! Let me know if you need help adjusting these. The bridge is actually pretty simple to take apart for cleaning if its not rusted too bad, but pay attention to the order of washers under the tuning knobs, which are held on by tiny set screws keying to machined flats on the tuner screws. Mine still has the original claws, but you can get replacements in better quality steel now. If you dont mind me asking, how much did you pay for it? No idea what mine is worth. Ill never sell it anyway, the neck is amazing.
 
  • Like
Reactions: Gary Sutter
Well, that kind of a band saw would never be allowed to sell here in Finland. That missing blade shield is just plain stupidity. I would never use a bandsaw like that.

That's one of the common 14" iron delta clones. They come with a guard from the factory. I've seen many of these saws without it. I would assume that people leave it off when they change the blade, or they put a riser in and don't bother with the taller guard that comes with the riser kit. Or they bought it used and don't realize the guard is missing, maybe. It is pretty unsafe without the guard - the blade is like an inch from the power button! Another reason why I like modern box steel frame saws, at the back the blade is down inside the frame nowhere near your fingers.
 
  • Like
Reactions: TerribleTim68
That's one of the common 14" iron delta clones. They come with a guard from the factory. I've seen many of these saws without it. I would assume that people leave it off when they change the blade, or they put a riser in and don't bother with the taller guard that comes with the riser kit. Or they bought it used and don't realize the guard is missing, maybe. It is pretty unsafe without the guard - the blade is like an inch from the power button! Another reason why I like modern box steel frame saws, at the back the blade is down inside the frame nowhere near your fingers.
So it is user that is acting stupid. You should always, always check the machine you're using. If there's any shield missing or any electrical issues don't use the machine. It may feel that these things don't matter so much but it's too late to think again when your finger is on the floor or you're lying dead after an electric shock.
 
  • Like
Reactions: TerribleTim68
Looking thru the internet I did see the orientation of the washers behind the tuning knobs.
I have seen some where the tuning knobs were staggered meaning the nylon washer was missing.
The washers appear brass & the other maybe nylon or polymer, I have made the little nylon spacers for tuners before with a little nylon tube & cut them with a razor blade..
Necessity is the Mother of Invention..
Claw Jaw Bolt Washers.jpg

I know there is a spring on that shaft too, I guess it's behind the claw..
It's threaded rod is M3.5 x 0.6, I learned that here on TalkBass BTW..
The two sets of strings I ordered are LaBella Flat Wound .043-.103
My Son Paid just a little over $1100 for this bass AS IS..
They had it listed for $1900 before the claw broke.
Current value I have ascertained from Reverb currently the ones on there range from $1450 to $4600.
Now that I look at the bridge photo It appears that maybe the E strings claw may be spread out & the bridge is keeping it from breaking, There's a gap around the brass ball & it looks like the opening is bigger than the rest, It also looks like the G claw is cleaner Newer than the rest..
I will soak the hardware with some light weight olio like Rem-Oil, I'm out of Sili-Kroil & it's $35 a can.
Got dozens of different types of Gun Oils & greases in my basement or even WD-40..
I did see Stainless Steel Claws available on eBay & they are sold by ginobass for $35ea ----> Steinberger Bass Stainless Steel Original Replacement Bass Jaws Claws USA | eBay
Steinberger XP-2 Bridge II.jpg


Sure hope I can get it up & running for Him quickly.. Might have too go ahead & order 4 of those stainless Jaws/Claws from the eBay seller ginobass, Says More than 10 Available, 4 would be $140..

Thanks @MPU & @Gilmourisgod for the replies & Knowledge on the Steinberger XP-2

I may have posted this in the wrong area as TalkBasses website is hard to navigate for a NewBie
Is there an area specific for Steinberger or Headless basses?
10:00am Gotta Go Eat Breakfast with my Wife & Son..
See Ya!! YES Dear I'm Coming!!
Gary Sutter
 
As an eBay Associate, TalkBass may earn a commission from qualifying purchases.
  • Like
Reactions: Rafar and ctmullins
That's one of the common 14" iron delta clones. They come with a guard from the factory. I've seen many of these saws without it. I would assume that people leave it off when they change the blade, or they put a riser in and don't bother with the taller guard that comes with the riser kit. Or they bought it used and don't realize the guard is missing, maybe. It is pretty unsafe without the guard - the blade is like an inch from the power button! Another reason why I like modern box steel frame saws, at the back the blade is down inside the frame nowhere near your fingers.

So it is user that is acting stupid. You should always, always check the machine you're using. If there's any shield missing or any electrical issues don't use the machine. It may feel that these things don't matter so much but it's too late to think again when your finger is on the floor or you're lying dead after an electric shock.
So this is all interesting info, and I'm glad you guys chimed in. My point in posting was to simply raise awareness. All of you are correct that the user needed to be more aware, the saw is not to blame here. We all need constant reminders to stay vigilant and think about shop safety. :cool:
 
Well, that kind of a band saw would never be allowed to sell here in Finland. That missing blade shield is just plain stupidity. I would never use a bandsaw like that.
I just had a look at the Jet website. All of their other bandsaws have a completely enclosed blade, but the photos and manual for the 14" saw really do seem to show the blade running in an open channel with no guard. Seems crazy.
JWBS-14DXPRO, 14" Deluxe Pro Bandsaw Kit
 
That's an interesting video - I believe his is not missing the guard, but the guard (aluminum channel) is open enough that he was able to get a finger in there. Mine is similar in design and in my case, I put a piece of aluminum tape over that slot opening after each blade change. I do it to help with sawdust management, but a side effect is that it would also stop one of my ladylike fingers from getting in there and getting wounded. :thumbsup:
 
So, speaking of jointers (I know, we weren't), this one was a while back, 8 months to be exact. But my fear of the jointer remains! Remember, the jointer at my boss's shop took his entire pointer finger to the first knuckle, so I have this inner voice telling me "these things are bad!". Nobody has used that machine since. He said that it happened so fast and cut so cleanly that he didn't even feel it.

So another YouTuber that I subscribe to posted this video -


Now, what strikes me here is just how simple a mistake this was and how a momentary lapse in judgement literally could have cost him a digit. He got crazy lucky! My jointer scares the bejeesus out of me every time I turn it on. It's probably an unhealthy fear to be honest. I went to great lengths to fix the guard before I even started cleaning it up. And even with a fully functioning guard, I'm still stupid scared of it. I literally can't find enough push blocks or hand positions to make me feel better when it is running. It vibrates like crazy, it screams at the top of it's lungs, all in a warning of the inner hunger for flesh! :eek:
I joke a bit, but seriously, that thing freaks me out. And that video shows just how stupid fast bad things can happen.
 
  • Like
Reactions: ctmullins
So another YouTuber that I subscribe to posted this video -


Yikes, his "I could have done it another way" technique doesn't really strike me as all that great, either. Small flat push blocks held against the side face like that puts your knuckle right next to the cutter! Not to mention how awkward they are to use. Or the fact that you don't really want to be pushing on the board near the cutter in the first place. For the top, it would be better to have a bigger block with a notch in it register onto the corner of the piece so it couldn't slip or move on you. And for the side, it would be better to have a long push stick so you could apply pressure without your hand even needing to be over the table, much less the cutter.

The real trick with jointers as far as I'm concerned is learning where and how to press on and feed the workpiece. Pushblocks or not, your hands should never be near the cutter anyways and you don't really need to apply pressure to the piece anywhere near the cutter like most people seem to want to do naturally (as if it was a router table or other tool). Just over the outfeed table or sometimes the infeed table depending on the board. Pushing at or near the cutter usually just makes things worse.
 
I understand everyones concern here w/shop safety, but (personally) haven't watched the posted injury vids because (as a bicyclist/motorcyclists) I also don't watch WCS vids involving crashes. Just respect the involvement you are in and know that being cautious is helpful and being "100% in the moment" is mandatory. :)
 
I had a couple jointers in my old pre-move shop but don't own any now and don't miss them. For instrument building I find that a router planing jig is much more versatile. Even just a plain old set of rails and a sled can solve all the problems a jointer would, plus others. It doesn't take up as much space, it's cheaper, easier to adjust and set up, easier to learn, gives a much better finish on gnarly or figured woods, and it's much harder to hurt yourself with!
 
  • Like
Reactions: TerribleTim68
I understand everyones concern here w/shop safety, but (personally) haven't watched the posted injury vids because (as a bicyclist/motorcyclists) I also don't watch WCS vids involving crashes. Just respect the involvement you are in and know that being cautious is helpful and being "100% in the moment" is mandatory. :)
It's funny, 'cause I'm the same way when it comes to racing. I won't put a sticker of a fallen racer on my car, because I don't want to think about it and because at some point your car becomes a memorial to all these people who are no longer with us. So I totally get that.

I had a couple jointers in my old pre-move shop but don't own any now and don't miss them. For instrument building I find that a router planing jig is much more versatile. Even just a plain old set of rails and a sled can solve all the problems a jointer would, plus others. It doesn't take up as much space, it's cheaper, easier to adjust and set up, easier to learn, gives a much better finish on gnarly or figured woods, and it's much harder to hurt yourself with!
Yeah, the router planing jig seems way safer and way more versatile. I'm planning on building one as soon as I can cash out my 401k or something to buy some lumber. I already have the router bit, that was the cheap part. :roflmao:
 
  • Like
Reactions: dwizum
That's an interesting video - I believe his is not missing the guard, but the guard (aluminum channel) is open enough that he was able to get a finger in there. Mine is similar in design and in my case, I put a piece of aluminum tape over that slot opening after each blade change. I do it to help with sawdust management, but a side effect is that it would also stop one of my ladylike fingers from getting in there and getting wounded. :thumbsup:

I dunno -- have a look at that frame: there are a bunch of screw holes there that I am pretty sure were originally used to attach a cover plate. Any company would be crazy to sell a tool with an exposed blade edge an inch away from a power switch.

Edit: some searching shows no pictures of that model of bandsaw with a cover. It looks like they designed allowance for a guard in the castings and then never implemented it. That is truly bonkers!
 
Last edited:
  • Like
Reactions: TerribleTim68
So I'm headed back to the "woodshop" this weekend. For those who don't recall, this is my boss's shop, I outlined it in my build thread here -
First Build - "Lucifer"
I don't really have specific things on my to-do list right now, so I'm not sure where the time will be spent. The wife said "We're going camping, I don't care where" so that's what we're doing. I'll park the giant RV next to the woodshop and we'll use it as base camp. She did say she has a Christmas project she wants to start on, so maybe we'll do that.

I'm sure there's things I could do on Lucifer, there's always something. I could route the cavity for the battery box now that I have that in hand. I could make my control cavity cover. I still need to finish reshaping the neck profile now that I skinny'd it up. There's a metric ton of sanding that needs to happen.
I could even start doing "things" to the Diva build if I really felt like it. I've got body wing panels ready to make a hippy sammich out of. I've got a neck blank and a truss rod in hand. I've got a chunk of rosewood that wants to be a fretboard.
I've also got that sheet of plywood that I just purchased for the mere cost of a low-income house. I have a couple projects that it is slated for, such as a hand plane till and a cross cut sled for my ShopSmith, maybe a "wedgie sled" for doing segmented turning blanks.
The truth is though, I've positioned myself in a place where I could do a lot of this stuff at my house, we don't need to go to the woodshop any more. So I have less desire to pack everything up and carry it all out there, then pack it up and carry it back. So the "want to" is a bit low.

Anyways, three day weekend coming up! I'm sure I'll do something, so hang tight for progress posts! :woot:
I just gotta get through this work day first. :meh: No meetings today, so I'm just waiting on whatever fresh hell is gonna come busting through like the Kool-Aid Man and screw this up. :cautious:
 
I'll be heading back into the shop myself after a long hot summer of no build progress. The shop is heated, but not cooled, and it's been unbearable up there. We have prioritized boating over everything all summer, but Fall always makes my blood start flowing again on projects. September is my favorite month on Cape Cod, the tourists are mostly gone, but it's still gorgeous, cool nights, my perfect operating temperature in the upper 60's and low 70's. Time to make some more sawdust! Speaking of sawdust, I have developed some pretty strong allergic reaction to some woods (like cocobolo). My Mother In Law is a former carver who's downsizing her woodshop, and straight up gave me this filter system, which I'm hoping will get the worst of the super-fine particulates out of the air.
YK9cPUT.jpg





