• TalkBass has been independent since 1998. Add your voice.
    Create a free account to reply to discussions, view embedded media, and browse with fewer display ads.
    Join freeLog in
    Want zero display ads or expanded classifieds tools? Compare plans.

Who wouldn't want a 6 - string fretless?

MrArose13

Guest
Commercial User
Aug 15, 2011
571
171
Atlanta Georgia
www.rosebudbasses.com
Disclosures
Owner/Luthier:RoseBud Basses & Guitars LLC
It’s time to share again.

First, I like to start off saying that everyone has some really cool stuff going on, and some great tutorials, I don’t seem to find the time to post on them all so I thought I’d Just try throwing some mass recognition to the community, and to all the new folks… Welcome. I hope everyone enjoys my thread(s) as much as I enjoy all of yours.

About every 6 months or so, I tend to turn my focus to the shop itself, cleaning it up, tuning up the tools, updating tools, compartmentalizing, and organizing. This always takes longer than I want it to, and towards the end I start to feel like I should be doing something else… more… work oriented, even though we all know it needs to be done. I was just finishing my most recent maintenance round, (sort of, I never really finish) when a client came to the shop looking to have a bass built.

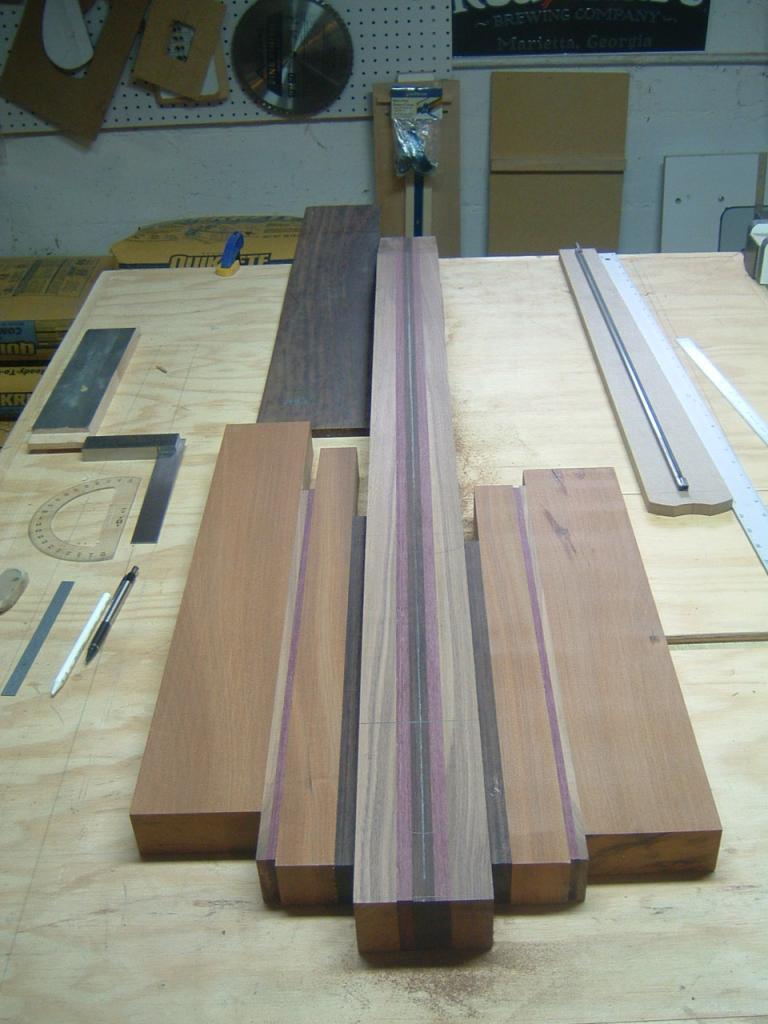
He had fallen in love with my personal fretless 5-S a few years ago that I dubbed the “Black Angel” (Due to the fact that most of the woods used to build it either started with black in its common name or was blackish in color. As for the “Angel” part of the name, it was my personal dream fretless). Well… so, he knew he wanted his very own fretless of this model. As we began to discuss the many options, I pulled out a B.A. (or Black Angel) blank set I had started in my last batch for visual reference. This set was intended to be a 5-S fretted B.A. His eyes got big and asked, ”Can that be a six string fretless?” I responded, ”Yeah, I think the neck blank is wide enough… let’s measure it.” It was just wide enough for the string spacing he wanted and as it turns out, it was just the kind of wood layout he had in mind. So, as we come to the end of the back story,the specs are:

Black Angel 6-S fretless

6 – String Fretless
35.5” scale
5 Piece neck through: Black walnut, Purplehart, Wenge
Wenge Finger Board
Hipshot 3/8” ultralight tuning keys, black
.3625 String spacing @ nut, overall width @ nut 2 1/16”
Laminated wood nut: Katalox, Sapele, Purplehart
Laminated body, 1.5” thick: Sapele, Black walnut, Purplehart, Wenge
.6876” String spacing @ bridge, overall width @ bridge 3 7/16”
Floating laminated wood Bridge: Katalox, Sapele, Purplehart
String through body with custom string retainer/ferrule
Bartolini 3 Band Preamp
2 Pickup - 3 knob configuration with wood knobs
Controls:
- Volume/Volume Stack - Mid (push-pull freq selector)
- Treble/Bass stack
Bartolini Pick-ups w/wood covers
- Bridge - XXP26M T Split coil
- Neck - XXP26C B quad coil

And now for some pics:

EadastoampGuitars042_zps26e14928.jpg
BA6body_zps3220ac10.jpg
BA-6pics002_zpsf09664cc.jpg


There will be more soon; this bass is already under way. So … until next time, Happy Building! .:D.
 
First up, tapering the F.B. - I made a version of the Rockler tapering jig for this (and other tapering needs) I like it a lot more than the aluminum folding type. So I put my F.B. template in the jig to set the fence with a couple of scrap wood blocks at one end to compensate for extra wood length on the wenge F.B. stock. I make my F.B. stock 4” to 6” longer than my longest finger board. The extra length allows me to do 2 things: 1) to move the final location up or down a bit should I get a bad cut or want to get a little more figure, and 2) it gives me an area I can do test cuts when it goes on the fret cutting sled to make sure the cuts are perpendicular to the center line. After it’s all clamped down, I run it through the table saw set up with a 200 tooth blade (btw, this is after I have milled it down to ¼” thick) most of the time I get a nice clean cut. Lay the template on it again and line it up flush with the edges and mark both ends.

BA-6pics003_zps5a71df0a.jpg


Next, it’s over to the fret cutter. Now even know this is a fretless with no markers, (it will have side markers) I still use my fret template to measure and cut for the nut and body end of the finger board. After setting up the sled, I make some test cuts and make some adjustments until I’m satisfied. Place my template on the F.B. with double side tape and cut. The body end is cut at the 26th fret placement. I don’t cut all the way through the thickness of the board, mainly because the blade won’t go up that high and I don’t have to fuss too much with setting blade height next time I need to cut fret slots.

BA-6pics004_zps205d76f1.jpg


So… it’s to the band saw with it. At the nut I trim off the extra leaving the little ledge, at the body end (I know there is a name for the decorative body end of the F.B. but I can’t remember it, if someone could remind me that would be cool) I cut the extra off just outside my decorative line.

Two more steps and we’re done… temporally. Time to clean up the ends and for this I use a belt sander in a shop built stand to hold it vertical. Kind of funny, this has worked so well that I keep putting funds into other thing and places around the shop instead of buying an appropriate tool… any way, with the sander I sand the ledge off of the nut end of the fret board. I find the sander to be more forgiving than to just try to cut it off. After lots of checking and light sanding I’m happy and flip over to the body end and sand a large radius across the width of the F.B. . For my final shaping of the finger board I use a spindle sander and sand a smaller radius right down the center line, about 1/8” deep. This is how I shape all my F.B. unless requested otherwise (you'll see a pic of the F.B. done road). Last, I register the F.B.

With the F.B. registered I make all my measurements again (I tried to get a pic, but the pencil did not show) to make sure everything is lining up. With everything on mark so far, it’s time to rout for TR and CF. I may be crazy but I saw no reason for two TR in this bass so I’m going with 1 TR (custom length from LMII) and 2 CFs. I did this on my router table. Sorry I did not get any photos other than this one of the job done.

BA-6pics005_zpsde8fc063.jpg


No, I did not use the Quikrete to adhere the CF… ha, ha, ha…:D.

I’m hoping for a relatively quick turn around on this bass so I’m moving faster than the thread and missing some photo ops and may be some explanations of what I’ve done along the way, there have been a few times already that I thought “ahhh I should of got a pic of that” so if I miss something you may want to know, feel free to ask.

This seems like a good place to stop for now; I’ll be back with more later, till then Happy building. .:).
 
It’s time to share again.

First, I like to start off saying that everyone has some really cool stuff going on, and some great tutorials, I don’t seem to find the time to post on them all so I thought I’d Just try throwing some mass recognition to the community, and to all the new folks… Welcome. I hope everyone enjoys my thread(s) as much as I enjoy all of yours.

About every 6 months or so, I tend to turn my focus to the shop itself, cleaning it up, tuning up the tools, updating tools, compartmentalizing, and organizing. This always takes longer than I want it to, and towards the end I start to feel like I should be doing something else… more… work oriented, even though we all know it needs to be done. I was just finishing my most recent maintenance round, (sort of, I never really finish) when a client came to the shop looking to have a bass built.

He had fallen in love with my personal fretless 5-S a few years ago that I dubbed the “Black Angel” (Due to the fact that most of the woods used to build it either started with black in its common name or was blackish in color. As for the “Angel” part of the name, it was my personal dream fretless). Well… so, he knew he wanted his very own fretless of this model. As we began to discuss the many options, I pulled out a B.A. (or Black Angel) blank set I had started in my last batch for visual reference. This set was intended to be a 5-S fretted B.A. His eyes got big and asked, ”Can that be a six string fretless?” I responded, ”Yeah, I think the neck blank is wide enough… let’s measure it.” It was just wide enough for the string spacing he wanted and as it turns out, it was just the kind of wood layout he had in mind. So, as we come to the end of the back story,the specs are:

Black Angel 6-S fretless

6 – String Fretless
35.5” scale
5 Piece neck through: Black walnut, Purplehart, Wenge
Wenge Finger Board
Hipshot 3/8” ultralight tuning keys, black
.3625 String spacing @ nut, overall width @ nut 2 1/16”
Laminated wood nut: Katalox, Sapele, Purplehart
Laminated body, 1.5” thick: Sapele, Black walnut, Purplehart, Wenge
.6876” String spacing @ bridge, overall width @ bridge 3 7/16”
Floating laminated wood Bridge: Katalox, Sapele, Purplehart
String through body with custom string retainer/ferrule
Bartolini 3 Band Preamp
2 Pickup - 3 knob configuration with wood knobs
Controls:
- Volume/Volume Stack - Mid (push-pull freq selector)
- Treble/Bass stack
Bartolini Pick-ups w/wood covers
- Bridge - XXP26M T Split coil
- Neck - XXP26C B quad coil

And now for some pics:

EadastoampGuitars042_zps26e14928.jpg
BA6body_zps3220ac10.jpg
BA-6pics002_zpsf09664cc.jpg


There will be more soon; this bass is already under way. So … until next time, Happy Building! .:D.

Who wouldn't want a 6 - string fretless?

Me.
I I have no interest in a 6 string bass whatsoever.
Be it a fretted or a fretless one
 
I've had a steady pace with this bass, but where I left off with you guys was here…

What I think to be one of the necessary tricks to neck through construction, the pick-up wire channel. With the neck on its side (treble side up) I measure and mark ¾” down from the top for pick-up cavity depth (I had previously marked the pick-up locations) and then I measure down another 1/16” lower than the pick-up cavity mark. From that mark I measure up ¼” and over to the end of the bridge pick-up cavity, in this case it is 3 1/2”. The extra 1/16” depth is to compensate for the body pitch and make sure the wires run lower than the pick-up. Then I setup the router to match my marks and rout a ¼” deep channel to connect the pick-up cavities. This channel will be discovered later when I rout the actual pick-up cavities, it’s kind of entertaining to me when I find it again later in the build, it’s like a treasure hunt moment.

BA-6F002_zpse01fca5d.jpg


Now I can start trimming some of the excess wood. Don’t worry, it won’t get trashed, it will be used for something. I throw very little away. First the head stock…Then the back of the neck…

BA6cuttingneck_zps78cc2a77.jpg


Of course I cut the excess outside of my lines and true it up on my luthier’s’ drum sander with a shim under the nut end to get approximately .050 tapper. The headstock is cleaned up to finale thickness on the drum sander as well. As for the back of the neck, I left it a little oversize to fine tune to my clients’ preference later, you know what they say, “you can take more wood off, but you can’t put it back”.

The body angle, (sorry no pic of cutting the body angle) I know this is not just a builders preference, but a players as well. Personally, I like body angle I feel it has a slight ergonomic feel and I don’t have to worry about the bridge being too high, (a cause for the need to recess the bridge) fortunately my client likes it too. So to do this I first find my scale length and make a mark (yes, I actually measure again just in case anything moved or changed in some way that I had not noticed) then transfer that mark to the side of the neck and carry it down the side of neck 1/8” and mark it. Then go back to the top side of the neck and measure 1/8” past the body end of the FB, this is my 0 point of the angle, mark that and transfer the mark to the same side of the neck as my first mark. With a straight edge (ruler) I’ll draw a line connecting the two points and continuing to the butt end of the neck, (HA, HA, I said “Butt” HE, HE, I’m cheese too). Now I can cut it off. If there was a pic of this, it would look a lot like the ones above so you’re not missing much. Again I cut outside my line, so to true it up I must sand this angle up to the 1/8” beyond the FB mark while keeping parallel with the angled pencil line generated on the side of the neck. I haven’t come up with any special way of do this yet, (I’m open to suggestions) so it’s good old fashion hand sanding. I have a couple cheep hand planes with aggressive sandpaper grits adhered to the shoe for moments like this, A small one (bench plane from Harbor fright, if you check out the link you’ll see what I mean by cheep. I wouldn’t waste a good plane for a sanding block) with 40 grit, and a large one (joint plane, I use this one the most for a lot of things) with some worn-out 60 grit, so it’s probable more like 75 grit, and finish up (temporally) with a maple block wrapped with 80 grit and a little card scraping.

Here is a pic of when I started…
BA-6F006_zpsb4b25358.jpg


That went well…

Time for the head stock to get some ears, when I cut these one piece neck lams I’m always left with triangles from cutting the head stock angles, I like to try to use them for the ears and other odds and ends. After some digging around in the triangle hardwoods box, as luck would have it, I found the walnut triangle cut-offs from this neck. The cut-offs aren’t always big enough for ears but these were so I squared them up and glued them on for a nice match (It really is a nice match, you’ll see later).

Glue up & After
BA6ears_zpsf508b1ea.jpg


I’ll be back with more in a couple days, till then, .:). building
 
Who wouldn't want a 6 - string fretless?

Me.
I I have no interest in a 6 string bass whatsoever.
Be it a fretted or a fretless one

OK, I know a 6-string isn't for everybody, I myself used to think I wanted one, but after building my 5-string felt 5 was enough and most of the time when I play I just play my 4-string, Sooo...

I'm glad you came to see what I was up to anyway, hope you like the build thread. .:smug:.
 
OK, I know a 6-string isn't for everybody, I myself used to think I wanted one, but after building my 5-string felt 5 was enough and most of the time when I play I just play my 4-string, Sooo...

I'm glad you came to see what I was up to anyway, hope you like the build thread. .:smug:.

Masterful diplomacy :D

It's threads like this one that make me sad to have moved into a flat, going from being too lazy and talentless to build a bass, to having too small of a place to have a workshop :P

Diggin' it, looks beautiful!

To speak to what is clearly the point of the thread (<-- sarcasm), I think 6's are overrated, but a cool thing to have, and certainly something everyone should try. With some verb and looper, nothing will make your solo playing fuller
 
OK, I know a 6-string isn't for everybody, I myself used to think I wanted one, but after building my 5-string felt 5 was enough and most of the time when I play I just play my 4-string, Sooo...

I'm glad you came to see what I was up to anyway, hope you like the build thread. .:smug:.

I do indeed like the build threat and have to say that I quite like what I have seen thus far, regardless of wether I'd have use for a 6 or not. :)
My main bass is a 5 but recently I too have gotten really into playing a 4.
 
Masterful diplomacy :D

It's threads like this one that make me sad to have moved into a flat, going from being too lazy and talentless to build a bass, to having too small of a place to have a workshop :P

I've know guys (who lived alone mind you) to start building in the kitchen of there one bedroom, "flat".

Diggin' it, looks beautiful!

Thank you!

To speak to what is clearly the point of the thread (<-- sarcasm), I think 6's are overrated, but a cool thing to have, and certainly something everyone should try. With some verb and looper, nothing will make your solo playing fuller

Well put. If I was still more a player than a builder, I'd have one. The way i see it, it's just another tool in the toolbox. ;)
 
Thanks SaintMez, although, it's nothing compared to that Tiger Stripe Myrtle of yours, that top is spectacular.

Thanks! Very kind of you to say. I got lucky finding that one.
I'm excited to watch this build! Id love a 6 string fretless. May have to add one to the To Do List. Keep up the nice work!:)