• TalkBass has been independent since 1998. Add your voice.
    Create a free account to reply to discussions, view embedded media, and browse with fewer display ads.
    Join freeLog in
    Want zero display ads or expanded classifieds tools? Compare plans.

Who wouldn't want a 6 - string fretless?

I played 6's exclusively for about 10 years and still love 'em. Looking forward to seeing this one. I've been getting the itch to make myself a new 6. Cant wait to see where you take this one.

Thanks B, I'll get my 6-fix during mock up. They'er most defiantly fun to play. I say if you got an itch... you should scratch it HA,HA. .:p.
 
Here we go,

I replaced the tape on the head stock and drew my center line on it, (I get a clear fine line that is easy to see on the tape) placed my head stock on, lined it up, clamped it down and traced the template. Now, I can simple remove the clamps and take it to the band saw to rough cut it. After a few minutes of looking at notes, scratching my head and general pondering, I decided it was time to glue on the FB. Since I had registered it earlier, I didn't have to fuss TOO much with lining it up. It was just a matter of dropping the TR in with a few dabs of blue RTV underneath, (silicone gasket maker),

BA6PIII007_zpse8610514.jpg


Now glue, (I did put tape over the TR to prevent glue from getting on it or in the channel and removed the tape before placing the FB on the neck), check alignment, clamp and check alignment again, as fast as I could.

BA6PIII008_zps24b50ccf.jpg


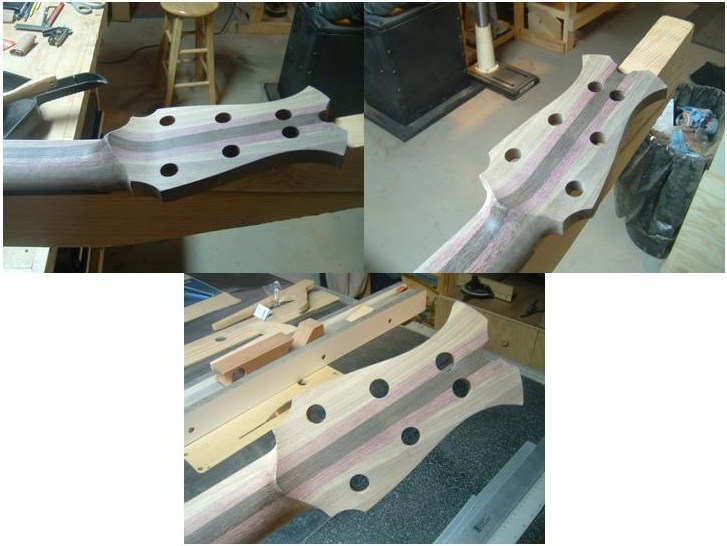
After letting it sit in clamps over night , it was time to cut the extra from the sides of the neck. One of the things I like to do with my head stock templates is to drill small holes (centered) where all the tuning machines will go to use as starter pilots, I had not done this for my new 6-S head stock template yet, (I’m finally getting some things generated on a computer 1:1 instead of drawing by hand, for more accuracy) so I did that next. With that taken care of, I double side taped the template to the head stock lined up to center. I also finally got a trim/palm router and plan to use it (or did use it) to flush route the head stock and sides of the neck to the FB with a top bearing bit. So I put together a (sarcasm coming) very “sophisticated” set up to route the head stock and wile in this setup went ahead and routed the sides of the neck flush with the FB. I’m not even going to try to explain this setup, although it worked well (and I’ll probable build a jig based off of this) a pic should say it all.

BA6PIII009_zps5f2a0d8d.jpg


With everything trimmed up, I moved on to drill my tuning machine pilots and then the full size holes (with the template off).

BA6PIII004_zps0fa88eaf.jpg


Last for this up date, I cut the excess wood from the inner side of the horns. I like to do this before gluing them to the neck, while I have the most accesses. I also put them to the spindle sander to clean them up to final size (or darn close).

BA6PIII001_zps86e166f8.jpg


More to come, so in tell next time, Happy Building! .:).
 
Moving on… neck carving!

This is a pretty straight forward kind of thing, I had already leveled the back of the neck with a .050” ish thickness taper, so I just draw a bunch of lines starting in the middle and measure out ¼” to the edge and also down the sides at the volute end. Then pull the lines down to the heal flowing the FB taper. Using my lines as a guide, I’ll start carving away with a rasp creating facets, then blend the facets and check with a contour gauge then check with a shop made gauge of the clients’ desired profile. Back and forth I go between gauges, smooth files and a card scraper till I reach a happy spot, then it’s time to make a phone call and get the client to come check it out.

Neckcarve_zps92a12c6c.jpg


While I waited for my guy to show up, I cleaned and shaped the volute
Volute_zpsacd9da68.jpg


The verdict…

My client is very happy. :bassist:

I've got more folks; I’m just a little slow with the updates. I’ll try to get some more up this evening.

For now I've got to get back to work so, happy building. .:).
 
Time for position markers, this bass is getting side line markers (by request) I had to start with the 24th fret marker in the FB only before I glued the FB, I probably should have mention that earlier. The 24th marker is over the body joint, it was much easier to cut in to the FB from the side before glue up rather than to try to do this as an inlay. Now, with the neck prepared for wing glue up I did the rest of the side line markers to have the best access to all the marker locations on the neck before gluing on the wings.

First I had to put the line markers together.
multypicinlay_zpsd5981676.jpg


Before I cut into the neck, I decided to build a little jig to try to keep things lined up. I took some tips from all you guys out there that have showed your jigs to cut fret slots by hand and created this…

MPsidelinejig_zpsa3849b40.jpg


It’s just a piece of MDF with some acrylic sheet epoxied in a dado. On the right side edge of the MDF I inserted 2 earth magnets (one in front of the acrylic and one in back) to pull the hand saw tight to use this edge as a fence. Toward the left edge, on the back side (or FB side) of the acrylic I installed a machine screw to compensate for the neck taper. On the front side is an attempt at an adjustable depth stop. It could use some refinements, but I like it.

To lay this out I double side taped my fret scale template to the FB with the edge on the center line. With a right angle triangle I line up with each (needed) fret notch and mark a line.

BA6IIII020_zpsb2ebc75d.jpg


then I place my jig on the neck, (as shown in pic above) adjust the FB taper compensation screw so the acrylic edge is parallel with the marked line, clamp it and cut. I had tested this on a piece of scrape earlier to know how many cuts to make, and then file to fit with needle files.

In the end (don’t mind the super glue, it will get sanded off later) I got this…
BA6IIII031_zpsb284f3cb.jpg
BA6IIII032_zpse852a9d6.jpg


That’s it for now. Till next time, happy building. .:).
 
Moving on… neck carving!

This is a pretty straight forward kind of thing, I had already leveled the back of the neck with a .050” ish thickness taper, so I just draw a bunch of lines starting in the middle and measure out ¼” to the edge and also down the sides at the volute end. Then pull the lines down to the heal flowing the FB taper. Using my lines as a guide, I’ll start carving away with a rasp creating facets, then blend the facets and check with a contour gauge then check with a shop made gauge of the clients’ desired profile. Back and forth I go between gauges, smooth files and a card scraper till I reach a happy spot, then it’s time to make a phone call and get the client to come check it out.

Neckcarve_zps92a12c6c.jpg


While I waited for my guy to show up, I cleaned and shaped the volute

Volute_zpsacd9da68.jpg


The verdict…

My client is very happy. :bassist:

I've got more folks; I’m just a little slow with the updates. I’ll try to get some more up this evening.

For now I've got to get back to work so, happy building. .:).
I love that little neck carving stand - great idea! Does it just clamp to the side of the bench?
 
what's up Beej, Thanks for checkn in.

Typically, I use it in my bench tail vice, but the mess that's generated in that spot of the shop is undesirable, although it's the best location for that bench, (at least currently). So I was trying it out in a new spot by just clamping it to the leg of my table saw out feed table. I like it there, it's close to a central vac down spout and there's lots of elbow room, so should I find the time (my next maintenance round project) I've got a design that's like a bench jack leg I'd like to build in to that corner of the out feed table. This one is a very simple yet handy jig made from two 2x4s with a lap joint in the middle and a wedge (notched for FB thickness) cut from the bottom of one end to match my head stock angle, then screwed to the top which makes clamping the head stock easy and keeps the clamps out of the way. It could have been a little longer though. The next one will be. .:).
 
BTW, guys and gals… Those side line markers… Yep… luminlay, with wood veneer. I love this stuff. So much… That it will become a standard on my basses.

I’ve been trying to get a good pic of them glowing, but my camera SUUcks, so you’ll just have to take my word on it, Luminlay kicks butt, with no batteries.
I’ll put it like this, I’ll be using a lot of it here on out.

We got a pro. Photographer taking pics when this thing is done and I’ll make sure we get a good Luminlay shot.

For now, I’m gana move on, and we may have to do some pictorial stuff so I can try to keep up with reality, HA, LOL. I’ve never been good at keeping up with reality, HA.

So give me a bit to look at pics and stuff and I’ll get something up on this thread.

Back in a few…
 
Well… That took longer than expected.
Busy, busy, busy, what can I say…

Anyhow, the wings got glued on.

BA6IIII033_zps39130164.jpg


After the glue dries, I do some clean up.
BA6IIII034_zps991a84bc.jpg


It’s coming to gather nicely. Next I must level the back, this is probably where I create the most waste. The best way I've found to do this Is with a router sled and just work my way down in tell I have a little height left that can be finished off with an orbital sander and some 80 grit sandpaper.
BA6IIII035_zps8d57c1cf.jpg


With both top and bottom rough sanded flush, I trace the body template back on to the body wood. With that done, I can locate the full circle portion of the “cord curl” And drill it out with a forstner bit.
guitarsandmotorcycles005_zps2dfdd793.jpg


Finale, I get to cut this body to shape.
guitarsandmotorcycles006_zpsf4380b2a.jpg


Then, double side tape the template to the body and I can start some flush routing. A little of this a little of that… and we've reached a halve way point.
guitarsandmotorcycles008_zps043ba49b.jpg


Time for all the little parts, and we’ll get to those in a bit. Till then, Happy Building. .:).
 
Nice bass! I scared myself off of 6 string fretless basses in the early 80s when I saw a Modulus Quantum TBX with no lines. I finally got my first Carvin LB76F in 1992 and it was no harder to play in tune than my 4s or 5s. Now I have four of 'em (Modulus, 2 Carvins, Hotwire).
That certainly looks like it's going to be a nice one. Following along....