• TalkBass has been independent since 1998. Add your voice.
    Create a free account to reply to discussions, view embedded media, and browse with fewer display ads.
    Join freeLog in
    Want zero display ads or expanded classifieds tools? Compare plans.

Winter Buildoff 2022: Still A Diva

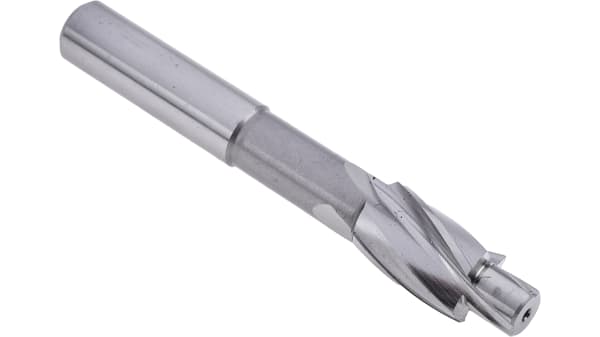
I would use a counterbore, to make a flat bottomed recess, versus a countersink to make an angled one.

Specifically a counterbore with a pilot so it stayed centered around the screw hole.

F5089250-01?pgw=1.jpg


I don't want to sit here and dictate your process though! :D
 
I would use a counterbore, to make a flat bottomed recess, versus a countersink to make an angled one.

Specifically a counterbore with a pilot so it stayed centered around the screw hole.

View attachment 4588830

I don't want to sit here and dictate your process though! :D
Can you get one that small tho? Those screws are teeny tiny, like Trump's hands. :roflmao:
 
They come teeny tiny - mcmaster has them down to the size you'd need for a #0 screw. I bet you could find them cheaper elsewhere. I use one to counterbore screw holes on wood pickup shells to recess the mounting screws. I think the one I use is either a #3 or #4.
 
They come teeny tiny - mcmaster has them down to the size you'd need for a #0 screw. I bet you could find them cheaper elsewhere. I use one to counterbore screw holes on wood pickup shells to recess the mounting screws. I think the one I use is either a #3 or #4.
Are the Delano screws a #0? Does anyone know? They don't really state it anywhere and I'm not good at looking at them and knowing what size that is.
 
Are the Delano screws a #0? Does anyone know? They don't really state it anywhere and I'm not good at looking at them and knowing what size that is.
I don't know what size they are (you have calipers and/or micrometers, I assume), but if one stripped on a test fit, they all go in the trash and get replaced with something decent....
 
Wife Won't Let Me Give Up -
So yeah, after some marital disciplinary action (otherwise known as that conversation that sort of goes "after you spent how much money?" ), I guess I better keep moving on this thing. So today I did a bunch of hand sanding around some of the areas I wasn't able to get in with the RoS. No pictures of that, it's sanding, mundane, lots of dust, sure you can picture it. After that I wiped it down real good with the denatured alcohol and masked off the fretboard -
20220217_192935.jpg


The astute among you will ask about the darker finish. I had to go back in and blend a couple areas that got nicked when final carving that neck, so during that exercise the finish ended up a bit darker. This shot exaggerates it due to lighting and denatured alcohol, but honestly, I kinda dig it darker. The pale look wasn't jiving with me for some reason, probably because I'm a bright, bold, neon finish kind of guy. Give me one of them Ibanez Gem neon swirls and I'm a happy dude. :cool: So yeah, we're going darker if I can help it. Right, so now that I've decided I'm done sanding. Not because I'm probably done sanding, but because I feel like sanding is one of those things you could just keep doing until you sand the whole thing down to a toothpick if you wanted to. Much like my drafting work at the office, at some point you gotta just say "this is good enough, I need to stop". So let's start applying finish to this thing! No, no sanding sealer. I'm just gonna use the wipe-on poly and keep applying coats until I'm happy. I have great concerns that the sanding sealer I have will discolor everything. It turned the zebrano on Lucifer a nice amber color and I don't want that here. So we'll just build poly until I'm happy with the feel and sheen.

HERE WE GO!!! -
First coat applied to the front, mainly to lock the color in -
20220217_192950.jpg


20220217_192954_HDR.jpg


I will say this, these images really don't do it justice. The amount of movement (chatoyance for you wood grain geeks) in this is MUCH more than I expected. It's pretty, I'm super happy with this piece of reject wood. We'll let that dry for an hour (because the jar says "ready to recoat in 1 hour") and then we'll see about a second coat. I may hang it from the ceiling by a tuner hole so I can apply a coat to the whole thing, we'll see. :cool:
 
Hang 'Em High -
So, here's my janky rig to see about putting a full coat on this thing. i have some big J hooks in my ceiling, they used to be for hanging bicycles when the kids were little. But my youngest is 26 now and none of them have lived at home for a very long time now. I had rigged these up in this house to try and run my dust collection hose overhead. Didn't work at all, collector is too underpowered to suck the dust up that high, so I took the tubing down but left the hooks. Let's go ahead and use one of those. We'll hang it with some high strength kite line. As a dual and quad line kite flyer (no, I'm no that good, I just enjoy them) I always have extra kite line around. A good surgeon's knot helps here -
20220217_200624_HDR.jpg


Anemic dust collector in the background. It was free, I don't complain. it works great as long as you understand the limitations of hose length and sizing. And hey, added bonus, this hangs it near the air filtration unit so the air will be moving a bit too! :thumbsup:
Okay, let's put a coat on this whole thing -
20220217_202416_HDR.jpg


20220217_202358_HDR.jpg


So, yeah, using the poly as a sealer will take some time I'm sure. You can really see some areas where the purpleheart drank it up -
20220217_202453_HDR.jpg


That's not lighting, that's the grain soaking it in. By the time I coated the back, moved around to the front and coated the front again, that side was rather dry. I'm gonna just let this whole thing sit until tomorrow and we'll hit it again. This will take some time, this is why I wanted to be on this step already, clock is ticking people, clock is ticking! You guys who are just starting to glue up wood stress me out! :eek:

For those of you who use water based (or oil I guess) wipe-on poly; what are you using as an applicator? I bought some of those foam brushes, but I find it doesn't spread very well. Is it just part of the game, or is there a better method of application I should know about? Can I just wipe it on with the blue shop towels? :cautious: o_O
 
Hang 'Em High -
So, here's my janky rig to see about putting a full coat on this thing. i have some big J hooks in my ceiling, they used to be for hanging bicycles when the kids were little. But my youngest is 26 now and none of them have lived at home for a very long time now. I had rigged these up in this house to try and run my dust collection hose overhead. Didn't work at all, collector is too underpowered to suck the dust up that high, so I took the tubing down but left the hooks. Let's go ahead and use one of those. We'll hang it with some high strength kite line. As a dual and quad line kite flyer (no, I'm no that good, I just enjoy them) I always have extra kite line around. A good surgeon's knot helps here -
View attachment 4589589

Anemic dust collector in the background. It was free, I don't complain. it works great as long as you understand the limitations of hose length and sizing. And hey, added bonus, this hangs it near the air filtration unit so the air will be moving a bit too! :thumbsup:
Okay, let's put a coat on this whole thing -
View attachment 4589587

View attachment 4589588

So, yeah, using the poly as a sealer will take some time I'm sure. You can really see some areas where the purpleheart drank it up -
View attachment 4589586

That's not lighting, that's the grain soaking it in. By the time I coated the back, moved around to the front and coated the front again, that side was rather dry. I'm gonna just let this whole thing sit until tomorrow and we'll hit it again. This will take some time, this is why I wanted to be on this step already, clock is ticking people, clock is ticking! You guys who are just starting to glue up wood stress me out! :eek:

For those of you who use water based (or oil I guess) wipe-on poly; what are you using as an applicator? I bought some of those foam brushes, but I find it doesn't spread very well. Is it just part of the game, or is there a better method of application I should know about? Can I just wipe it on with the blue shop towels? :cautious: o_O
I won't make the deadline. But I will finish.
 
For those of you who use water based (or oil I guess) wipe-on poly; what are you using as an applicator? I bought some of those foam brushes, but I find it doesn't spread very well
I've been trying the water based varathane satin poly on test pieces.
I also grabbed a few foam brushes and I'm not crazy about them. I noticed that the poly flattens out after 24 hrs, but I've only tried it on flat boards. I'm not sure I wanna use the foam brushes on the bass, with all the curves and crevices. I'm going to try a nice purdy brush and also some different rags for wipe on and see what applies it best.
I noticed the poly tacks up quick, so it has to be something that lays it down nice in a few swipes and no need to go back over it 20 times to get it even.
For me, that's likely a brush. But I'll try a rag too, to see how it works. I've never applied poly with a rag.
Maybe it will look better if I do twice as many thinner coats with a rag, like oil(?)
 
Last edited:
  • Like
Reactions: TerribleTim68
I've only sprayed varathane, but I've wiped on the saman stuff I've used. I used small pieces of t-shirt in a ball, around 2" square. I'd wipe for around 10 mins max and then make a new one, because it started to harden slightly and would cause light scratching. I've done a couple of instruments that way, both satin finishes though. I prefer to spray it having both sprayed and wiped it on.
 
  • Like
Reactions: TerribleTim68
Wife Won't Let Me Give Up -
So yeah, after some marital disciplinary action (otherwise known as that conversation that sort of goes "after you spent how much money?" ), I guess I better keep moving on this thing…


Forget about the bass for a second - the quote above is possibly the greatest thing ever posted in the Luthier’s forum!
 
I’ve used both the water-based spray Varathane, brush-on Varathane, and several oil-based wiping varnishes.

My preference is to use a small rag folded into a small square. You can buy the lint free rags at HD, but run them through the dryer just in case. Old t-shirts work great too. I experimented a bit with foam brushes but was never happy with how they distributed finish, and always found air bubbles after the application. Forgot to mention- despite the longer cure time, I much prefer the oil-based finishes for the kinds of instruments I like to make. The oil finishes are much warmer looking and do much more justice to highly figured woods than water-based finishes will do on their own.
 
  • Like
Reactions: TerribleTim68