• TalkBass has been independent since 1998. Add your voice.
    Create a free account to reply to discussions, view embedded media, and browse with fewer display ads.
    Join freeLog in
    Want zero display ads or expanded classifieds tools? Compare plans.

Z Bass II - Preliminary Designs Underway

It's coming along nicely. I'm able to get a few hours in here and there.

Here are some progress shots:

IMG_0761.jpg


IMG_0812.jpg


The pic below shows how the body of this thru-neck design actually sandwiches around the neck. This is critical because I am designing this instrument so that you can replace the body tops.

IMG_0762.jpg


Because I couldn't decide on which paint job or finish style, I decided to make it so that I could switch them out at will. The tops will bolt on using 1/4" hex key bolts through the back.

The pic below shows the top removed. The neck and bottom of the body will be glued and to form the core. The tops will have t-nuts embedded to receive the bolts and secure them to the core.
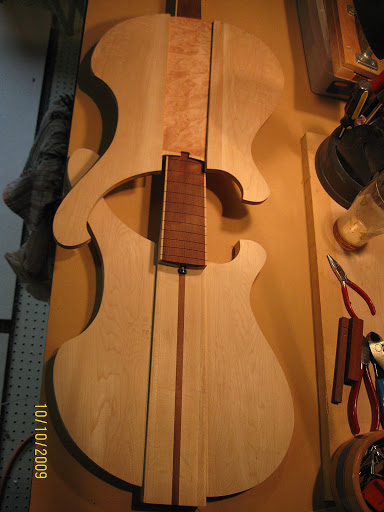

IMG_0823.jpg


IMG_0824.jpg


IMG_0826.jpg


I am really fond of this neck! I shaped it almost entirely with a surform. That's the first time I've used that tool and I really liked it!

IMG_0831.jpg


I revealed a discolored spot while shaping. Not sure what to do about it. It really doesn't bother me much and there's still more sanding to be done so it may just go away...

IMG_0835.jpg


Here's the back of the headstock. I rough cut it with a coping saw and shaped it further with rasps and files.

IMG_0837.jpg


IMG_0838.jpg


Here's my fret wire bending machine:

IMG_0811.jpg


And my very first fret! I used one of my fretboard failures to practice. I found that having the fret properly bent is pretty critical. If the wire is too shallow it just doesn't want to seat. Over bending is better - but not too much.

IMG_0814.jpg


OK - There's the update... Now the question:

There's still a lot of body work to be done - neck work too, but the major shaping is done. The body still has a lot of shaping, the bolt-on system needs to be installed, and so on. I need to do the nut and other headstock stuff like carving the ease where the fingerboard meets the headstock and installing a nut of some sort...

So for now the neck is still independent of the body. Should I wait until I am closer to done before I fret it or should I take advantage of the fact that it's separate?


Thanks in advance!
 
Because I couldn't decide on which paint job or finish style, I decided to make it so that I could switch them out at will. The tops will bolt on using 1/4" hex key bolts through the back.

The pic below shows the top removed. The neck and bottom of the body will be glued and to form the core. The tops will have t-nuts embedded to receive the bolts and secure them to the core.

IMG_0823.jpg

Just brilliant - I love it! You turned an "or" into an "and"!

What's your plan for bridge attachment?
 
RE: Guinness - ah, yes. As a matter of fact I just poured a celebratory glass! For I just did a trial run on how I am going to bolt 'em together with some scraps that are the same sizes as my bottom and top and the results worked BETTER than I expected!!

Here's the scoop:

My top is 5/16" thick and my bottom is 15/16" thick.

1) I start by drilling a 1/4" hole right through both. That's the diameter of the connector bolts that are 1/4" hex key bolts that you use a 3/16" Allen wrench to tighten.

2) In the top of the top I use a 7/8" forstnet bit to bore about a 1/16" deep relief so the top of the T-Nut I insert goes flush.

3) Then I use a 5/16" bit to widen the upper 1/2 of the 1/4" original hole to receive the bottom of the T-Nut.


IMG_0845.jpg


4) I press in the T-Nut using a C-Clamp until it's firmly set and flush in the top.

IMG_0848.jpg


5) in the top side of the bottom (the side that will meet the bottom side of the top) I use an 11/32" bit to widen the original 1/4" hole 5/8" deep to receive threaded inserts.


6) I use a 2 lb. hammer to pound in the threaded insert being careful not to ding the body. When it gets almost flush, I screw in a hex bolt and finish sinking the threaded insert by hitting the bolt.

7) Then through the bottom of the bottom I widen the 1/4" hole with a 3/8" bit deep enough to all but touch the bottom of the threaded insert. This is just wide enough to allow the head of the hex key bolt to sink below the surface of the back.

IMG_0859.jpg


IMG_0860.jpg


That's it! Then you just screw 1/4" hex key bolt in through the back with the top aligned. It connects VERY securely and with only ONE bolt holding my test scrap pieces together, the bond was amazingly tight!

IMG_0866.jpg


IMG_0867.jpg


The only thing you see is the 3/8" bolt access holes on the back. They are VERY discrete - which surprised me! They are really nothing and don't take one bit away from the appearance of the instrument at all.

So I won't have to use many to make a really great join between the bottom and top. Just a few in critical extremity points and a couple in the central core zone and I am sure I'll have a VERY tight bond!

I'll be putting a thin (1/16") veneer of spruce over the top of the top to hide the T-Nuts and to provide a continuous surface to paint. This first one is going to be a fully painted number so I am not showing off any grain or anything like that. Probably a solid - but maybe one of the bursted designs... Still haven't decided that yet. But that's no biggie - if I want a different color or style, I'll just make a new top! ;-)

The bridge is a BadAss and I'll simply attach it as you would normally - right through the top. I don't expect to be changing tops like changing shirts so removing the bridge to replace the top is no biggie to me - at this point.

But I could go with a wooden bridge and ferrules through the back or bottom (like I saw anther TB'er do in another thread). That way swapping would be less unscrewing/screwing.

Or I could figure out a way to make the bridge permanently attached to the core and cut the top to fit around it...

Any thoughts?

Now to enjoy that Guinness! I am thrilled that my experiment went so well!! I have pictures on my experiment - I'll post them soon. But now... It's Guinness time!!

--tz
 
Recap:
34" Scale
Thru-neck (hybrid)
3 (+2) piece Maple/Chechen neck (+2 maple lams added to correct a bad cut)
Chechen Fretboard bound with maple (sort of) 24 frets
Back of body glued to neck core
Top of body bolt-on/Removable/Replaceable (Seeking Patent)

The bolt-on/removable top idea is working even better than I expected, I am please to say! Just nine little inconspicuous bolts and it feels like one solid chunk of bass badness!

Still have to do a lot of routing and sanding - but I'm very close to finishing this prototype and cannot wait to start making new tops for it! I think I am going to start with a classic sunburst - Amber-Red-Black... Haven't quite decided yet, but that's the beauty of this baby, isn't it!

Pics:

Front of top prior to covering with spruce. This shows the location of the t-nuts.

front1.jpg


Close-up of t-nut:

tnut1.jpg


tnut2.jpg


Front of top after adding the spruce cover.

front2.jpg


Full frontal:

wholething_front2.jpg


wholething_front1.jpg


Side View:

sandingsides1.jpg


sandingsides2.jpg


Back with bolts in.

back5.jpg


Neck thru/body join with bolts out:

neckjoin_back1.jpg


lowerhorn_back1.jpg


When the bolts are in, that seam closes up nicely. Not perfectly, however. I am still working on improving that.

Both the bottom and top have 2 lams of maple banding to help hide the seam and cover where the neck end comes through the body.

Note for next build - do a better job planning for the neck/body join. This is kinda ugly - but I'll be able to massage out some of that ugliness with some TLC... I hope!


Full rear view:

back6.jpg


back4.jpg


Headstock:

headstock5.jpg


headstockBack1.jpg


Next steps - frets, routing for pups and controls, drilling for machine heads, mounting the bridge... OK, I'm not as close to finished as I'd like to be - but I am loving every minute of this build!

Thanks for looking!
 
Rochey6957 - Thanks. That was one of those 'oops' made cool things. When we were cutting the neck taper things went quite badly and we ended up cutting too deeply into the neck. In order to recover, I decided to laminate more maple to the outer edges. The results are just as you describe - a sort of bound fb.

I really wanted to bind the fb but prior to the cutting error, I'd decided to just skip that because I was intimidated by the process of binding. I figured I have my fb slotted - radiused and didn't want to run the risk of messing it up in the binding process.

Nice how things sort of force you to do the hard work anyway, huh?


And I love how the real thing is turning out so much like the renderings!

sunburst_rosewood.jpg
wholething_front1.jpg
 
I'd say just make the bridge a permanent device, and cut your top around it. This is a pretty awesome design. Any thoughts on making the pickups inter-changeable too?

I think I am going to do just what you say with the bridge. That's sort of been the plan the whole time but I've been giving myself a LOT of flexibility in that area in case that isn't feasible. But now that it's this far along, I believe it's definitely the way to go.

As as for the pickups and electronics; I think I'm set up to 'possibly' make it so you could swap out the entire system along with the tops. General placement probably needs to remain consistent but since the tops can be designed very specifically for whatever pickups system I choose, I'd just have to make sure the cavities underneath were big enough to handle both J-style and Soapbars, etc...

That's VERY doable - as long as removing that much from the core doesn't weaken the overall stability of the thru-neck. The stability of the core is critical to this design.

But the short answer to the replaceable pups is 'very possibly'.
 
This is the core with the bridge mounted.

IMG_1365.jpg


The replaceable top...

IMG_1367.jpg


...and how they puzzle-piece together.

IMG_1370.jpg


Barts, pots and output jack in their future locations...

IMG_1373.jpg


Routed control cavity and lined with copper.

IMG_1385.jpg


Pick guard roughly cut with pots and output jack in place.

IMG_1391.jpg


It's only a few hours worth of work away from being able to be played for the first time. Man, full-time job, wife, two kids... I can only get an hour here an hour there to chip away at this - but it's SO close!

Still to come - binding the top then it's finishing time! I am going to go with basic black for this top so the end result should be somewhat close to this:

blackWhite_rosewood_whiteBlock.jpg


I'm going to finish the fretboard with a high-gloss finish like you see on Fender Geddys. The rest will have a nice glossy sheen too - but I still don't know exactly what type of finish to do.

Suggestions are very welcome!

After this one is complete I'll begin working on new tops to match many of the renderings at the start of this thread!

More to come!
 
Thanks, Jason.

It's a slog... I'm grabbing every minute I can between soccer games, cub scouts, work and all that other life that keeps demanding my attention. I've got a package coming from Stewmac so this weekend should see a lot more progress. I can't wait to start finishing this thing!

I want to get a super glossy presentation all around. This one is going to be a solid color so I'll need to do all that stuff you need to do to fill the grain and create a solid, even surface for the paint. I also want to finish the fretboard and end up with a really glossy, glassy finish. If you have any tips, on any of this, I am all ears, er, eyes!

--Tony
 
Thanks, Jason.

It's a slog... I'm grabbing every minute I can between soccer games, cub scouts, work and all that other life that keeps demanding my attention. I've got a package coming from Stewmac so this weekend should see a lot more progress. I can't wait to start finishing this thing!

I want to get a super glossy presentation all around. This one is going to be a solid color so I'll need to do all that stuff you need to do to fill the grain and create a solid, even surface for the paint. I also want to finish the fretboard and end up with a really glossy, glassy finish. If you have any tips, on any of this, I am all ears, er, eyes!

--Tony

It appears you already know the direction of this project (whether you realize it or not). I have not reached the "soccer game", "cub scouts" stages yet, my son is almost 1 year old now.

I do like the difference of using bolts, to attach the top, you may want to consider doing multiple tops, maybe even ones that don't have pickguards too. This opens up a big door to different pickups, control configurations, etc. You could put a thin veneer in between the top and body and paint/seal them separately and still get a tight fit. Possibly do binding on the top's edges, with a shallow binding channel on the body, to cover the seam. Looks as though the possibilities could be nearly endless.
 
It appears you already know the direction of this project (whether you realize it or not). I have not reached the "soccer game", "cub scouts" stages yet, my son is almost 1 year old now.

You'll be there before you know it - but by my calcs, you have time for at least one more build before you're schedule is dictated by his!

I do like the difference of using bolts, to attach the top, you may want to consider doing multiple tops, maybe even ones that don't have pickguards too. This opens up a big door to different pickups, control configurations, etc. You could put a thin veneer in between the top and body and paint/seal them separately and still get a tight fit. Possibly do binding on the top's edges, with a shallow binding channel on the body, to cover the seam. Looks as though the possibilities could be nearly endless.

That is why I created this 'replaceable top' system - so I could have many cool designs on one really good, core instrument.

The first top is going to be the black version shown - but once that's done I'll be making many more tops - just like you describe - some with pickguards, some without, sunbursts, custom artwork, the sky's the limit.