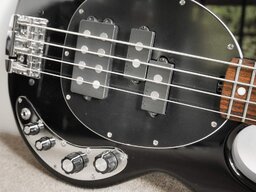
Yes, I thought that title would get your attention  . This is going to be a long, rambling post, BTW, so if theres any chance that youre the sort of person who is going to want those 12 minutes of your life back, reading this might not be for you
  .
.
It's mostly about the steps that I went through to put my latest FrankenBass together and some of the 'tricks' that I used (Roger Sadowsky has nothing to fear from me, I promise), which have mostly been learned the hard way  .
.
Anyway, before that, there's a load of guff and waffle about what I was trying to achieve. So, on with the guff and waffle ...
The obligatory Before pic:
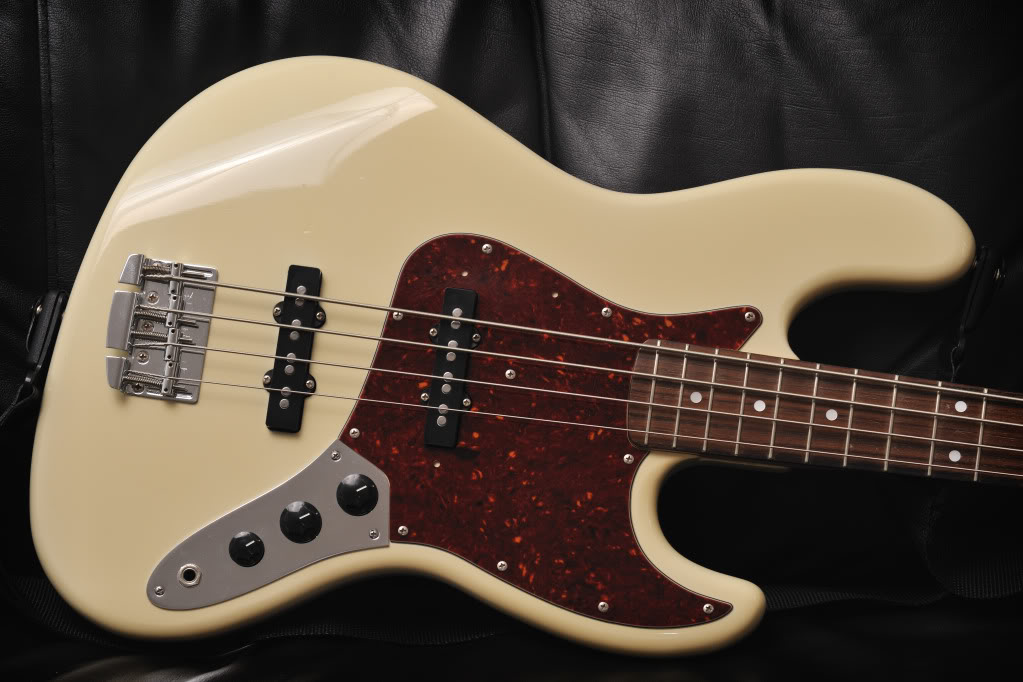
So, what sex is a Jazz Bass anyway!? I would have to say, female. Those gracious body curves (and saggy bottom ), slender neck and dual personality pickups, could scarcely be considered anything else could they!? But a Precision Bass
well, thats altogether more masculine, IMO. The P Bass is a blunt instrument. It cant multi-task and everything that it does (tone-wise) is controlled by one knob. Its body is strong and purposeful in design and, usually, it has a thick neck and man-sized fretboard.
), slender neck and dual personality pickups, could scarcely be considered anything else could they!? But a Precision Bass
well, thats altogether more masculine, IMO. The P Bass is a blunt instrument. It cant multi-task and everything that it does (tone-wise) is controlled by one knob. Its body is strong and purposeful in design and, usually, it has a thick neck and man-sized fretboard.
Well, Ive been a long-term fan of the P Bass and had never really understood the Jazz Bass, until I finally got a good one a few years ago (by the way, Im really talking about bass guitars again now, so you can forget all of the innuendo of the last paragraph). Since then, Ive kind of gravitated towards the Jazz, on account of its slimmer neck profile, which despite having very large hands, I really like. In fact, things had gotten to the point that I had somehow managed to sell off all of my Precision Basses and was running a stable with three (Tokai) Jazz Basses, a StingRay and nothing else  !
!
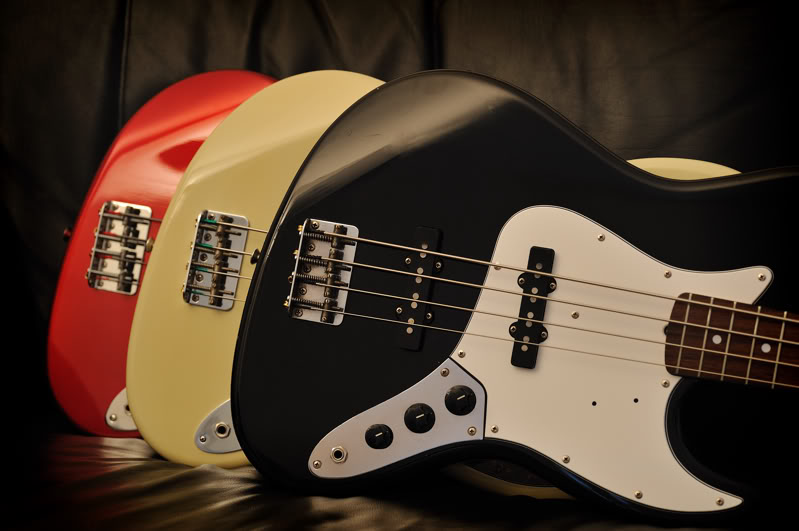
Even after selling one of the Jazzes a few months ago and looking around for the perfect P Bass, I somehow managed to get side-tracked and bought yet another Jazz Bass , albeit a really good one (Geddy Lee signature model). Something had to be done
The thing was, I had owned a few really outstanding P Basses in the past, like these three Fender Custom shop models (a 55, a 61 and a 59)
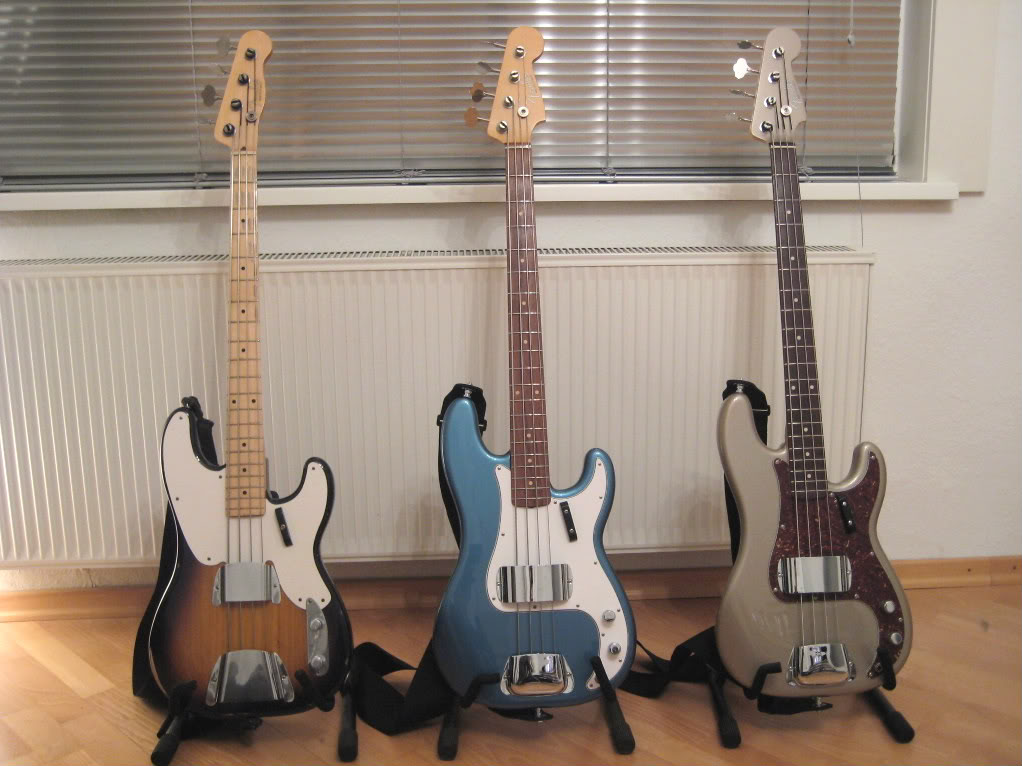
but there was one thing, which they all had in common, that really made me want to put them down after 20 minutes nitro cellulose neck lacquer! Now, I can see most of you who are reading this making a face like this
 right now, but allow me to explain. For some reason, I have sweat/skin (?) which reacts quite badly with nitro lacquer and causes abrasion to either the lacquer, or to me (not sure which ). This results in little bits of dead skin/lacquer forming little sausage like deposits on the back of the neck, after a short amount of playing time. These things look a bit like the small, rubber sausages that you get when you use an eraser to rub out pencil marks on paper (you know what I mean, Im sure ). Whatever causes this, the net result is that the neck feels very sticky indeed and distracts me so much that I lose concentration on the notes Im searching for and start thinking about how to play everything in one hand position instead
  . It was this problem which lead me to sell off all of my vintage and Custom Shop basses and vow to never ever buy another instrument with nitro neck lacquer, ever again :scowl:. So far, I havent!
The other thing that Ive kind of gone off over the years is spending thousands and thousands of Euros/Pounds/Dollars on bass guitars (which I only play at home these days anyway, as Im not currently in a band). And this is where the Tokais came in . Ive written quite a lot about the brand on this and other forums, but for those who dont know; the Tokai basses that I collect are from the mid-1980s period and were made (partly by hand) in Japan, using very similar components and construction techniques to the original (pre-CBS) Fenders. The key difference being that these Tokais were mostly finished in polyurethane (or was it polyester ) lacquer. Whatever the finish was, it was hard wearing, smooth to the touch and
it wasnt nitro
. Ive written quite a lot about the brand on this and other forums, but for those who dont know; the Tokai basses that I collect are from the mid-1980s period and were made (partly by hand) in Japan, using very similar components and construction techniques to the original (pre-CBS) Fenders. The key difference being that these Tokais were mostly finished in polyurethane (or was it polyester ) lacquer. Whatever the finish was, it was hard wearing, smooth to the touch and
it wasnt nitro  ! These Japanese Tokais are famed for their excellent tone and feel and are, currently, still (occasionally) to be had at bargain prices.
So, coming back to the present, I was sitting looking at my three Jazz Basses and wondering which one I could do away with to make way for a new P Bass and also where the hell was I going to find a P Bass with non-nitro lacquer, a comfortable neck and a true (60s) vintage P Bass velvet fist punch!?
Ive been using the Geddy Lee Jazz as my 70s (Jazz)-Funk Machine and wouldnt be without it at any cost. My black Tokai Jazz Sound bass had been strung with LaBella F760M flatwounds and was doubling as a James Jamerson style thump machine and providing some cleaner, Joe Osborne-like clickety-clack noises, when required. This left me with my (very yellowed) Olympic White Jazz Sound, which had been my go-to bass for most of the year, but was starting to reveal itself as a bit of a Jack of all trades, master of none kind of instrument. Dont get me wrong, it still sounds like a good vintage Jazz Bass to me its just that I dont need that specific tone a lot and would usually rather have something a bit more P, a bit more 70s funk, or a bit more
something else!? However, the neck on it really is one of, if not the, very best feeling neck Ive ever had on a bass of any price. It virtually plays itself and despite being nearly 30 years old, is in great shape with almost new frets.
A plan was hatching .
It occurred to me that if I could find a suitable P Bass body, I already had enough spare hardware around to take the neck from the Jazz Bass, bolt it to the P Bass body and make myself the perfect P Bass for my taste (and budget). This was going to be fun.
Immediately, I knew where I was going to do my shopping for the necessary parts WD Music. Disclaimer: This next bit will probably come across as one huge plug for their business, so let me assure you all that I have no affiliation to them, other than the fact that I have shopped there a lot over the years and have always received great service.
WD Music offer fully finished, partially drilled bass guitar bodies, made from well seasoned, North American alder, in both Jazz and P designs and in a limited range of (thin) gloss finishes. That didnt matter to me I wanted black! Whats more, Ben Green in their Customer Service was kind enough to get out of his comfy chair, go down to the warehouse, weigh all of the (three) suitable P Bass bodies that they had in stock and agree to send me the lightest one (4.8lbs) ! What a top bloke! Actually, hes helped me out on a few other projects and Ive seen others on TB praise WD for their good service, so it was no fluke!
To go with my other black/rosewood Jazz Bass, I selected a WD Music tort p/g too. The ones, which they supply, are unusual in that they are actually made of real celluloid, just like the early Fender ones. This gives it a similar look and texture and, IMO, an air of class!
The choice of bridge was another no-brainer - it had to be the standard, threaded barrel saddle, vintage design. Ive tried various different bridge designs on most of my P Basses and somehow, they always change the character of the tone in ways that I dont really like and all of them ... rob the bass of smoothness and warmth. Yeah, tone is very subjective but Ive experimented a lot in the past, and I now know what I like now .
.
The pickup choice was actually pre-determined, as I had a Lindy Fralin vintage pickup left over, which was one of two that I bought for my two Fender CS basses. In every bass Id put it in, that pickup always managed to deliver my idea of the classic P Bass tone.
The neck that I was planning to use from my Tokai Jazz had already been fitted with Hip-Shot (or Slip-Shod as Id taken to calling them, after experiencing some, now resolved, slippage issues in the past ) vintage tuners, to complete the package. Also, it was held on with a brand new chrome neck plate and screws, so the whole bass was going to look pretty new when finished, apart from the vintage neck.
The next part of this thread covers how I went about assembling the bass and whilst I am writing all of this for the pure pleasure of making the experience last that little bit longer, it may actually be of use to anyone who is planning to build/assemble their first bass project.
Step 1: Prepare the old neck.
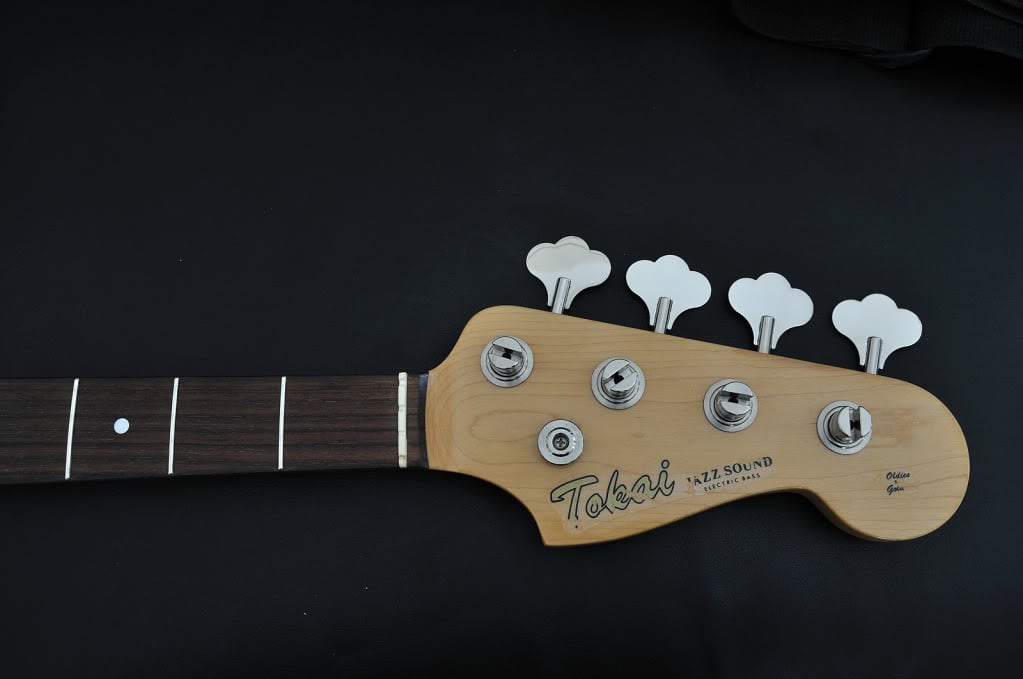
All I really did here was to remove the neck form the Jazz Bass, clean off the old bits of paint chips and compressed wood from around the heel of the neck (using a towel) and then polished the frets, using a Dremel Multi-Tool (small, electric drill type thing, with various buffing attachments). I also cleaned the fretboard with a quick wipe of mentholated spirits to remove the grease and dirt and then applied a thin smear of lemon oil and buffed the fretboard with a clean cloth.
Step 2: Prepare the new body.
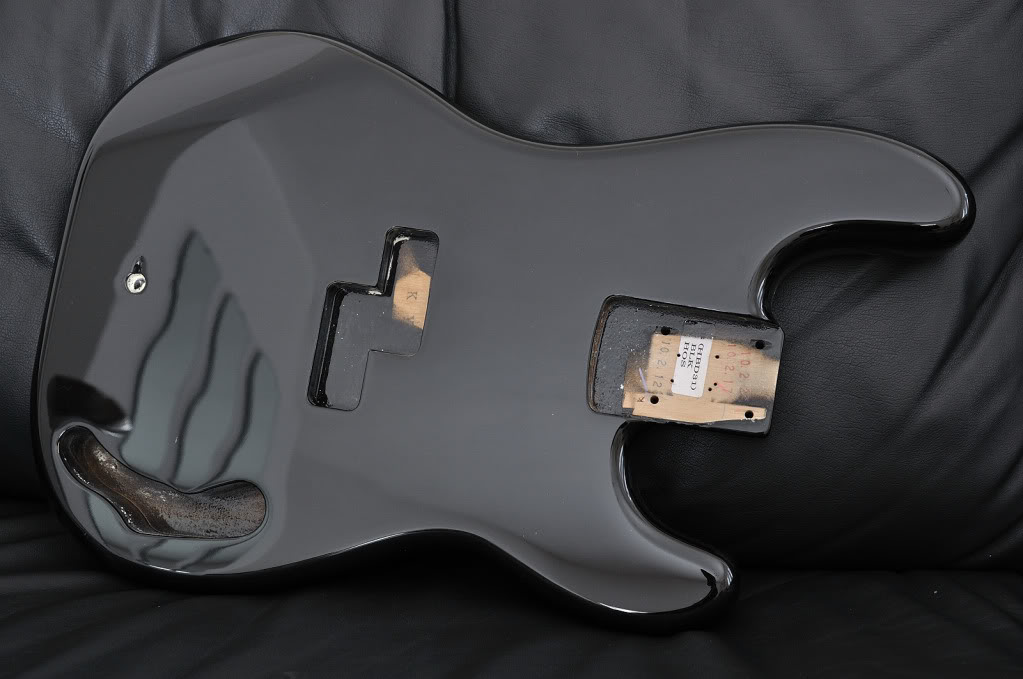
Here it is! Lovely, isnt it? All shiny and new. In fact, so new that its still full of dust and dried polish and cutting compound from the paint shop that wont do! As Im planning to shield this bass against the evils of atmospheric hum, by putting adhesive shielding tape in the body cavities, I first cleaned them all out with meths and a rag.
Step 3: Shielding the cavities.
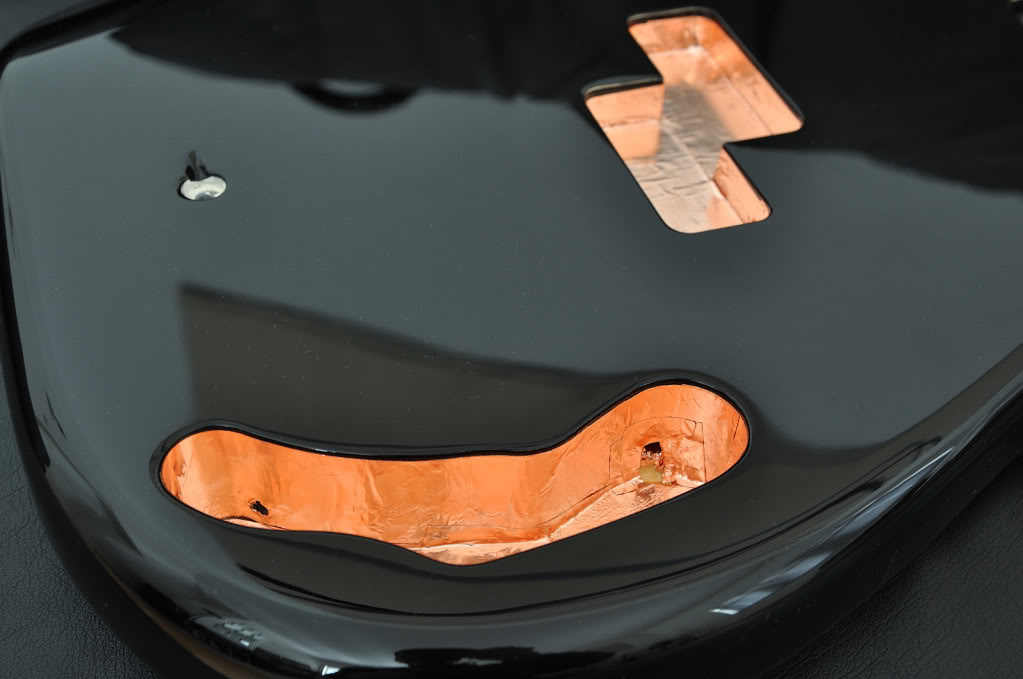
Theres a whole (and quite excellent) thread here on how to do this (http://www.talkbass.com/forum/showthread.php?t=159191), so I wont go through it all again here. Basically, Im using copper tape with conductive adhesive, which removes the need for tack soldering between the different layers of tape.
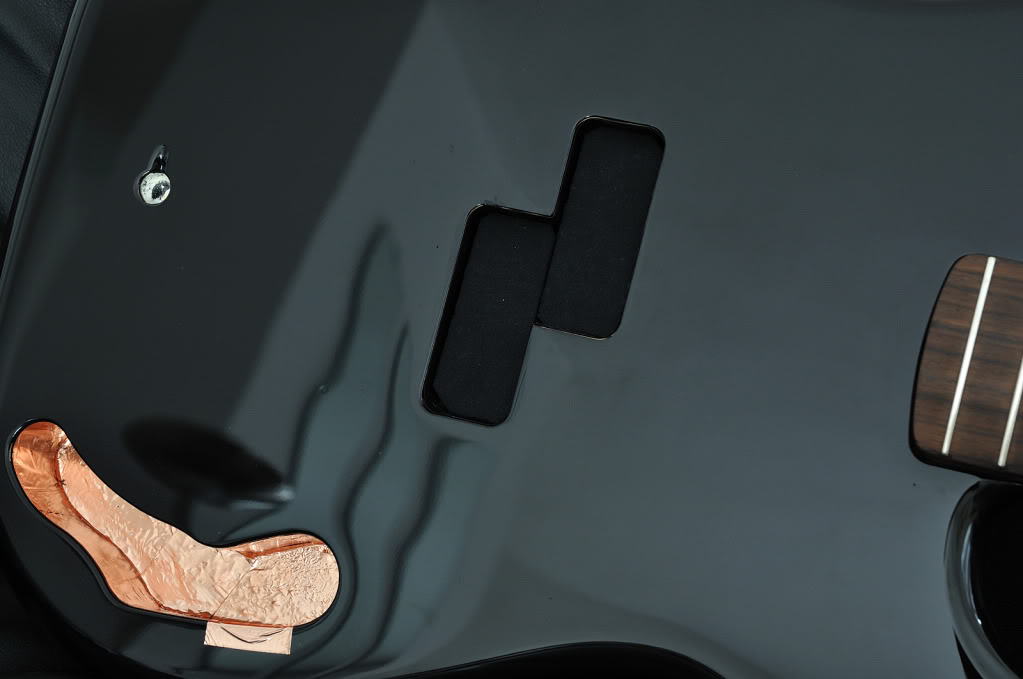
Having shielded the control cavity, the pickup cavity and the tunnel leading from one to the other, I then ran some insulating tape around the inner edges of the pickup cavity and fitted some foam pads (made from a double layer of mouse mat foam) into the pickup cavity. There are two reasons for this; firstly it removes the need for springs and other metal junk underneath the pickup to provide the means of height adjustment and secondly, being black, they will stop any copper foil from being visible through any gaps in the pickguard (which, as you will see later, wasnt a problem in this case ).
Step 4: Wiring and insulation.
Again, no wiring diagrams here, you can Google those up easily enough if required. No, this is just a brief look at a couple of the lesser-known tricks/bodges, which Ive worked into my bass tinkering routine over the years.
First off, star grounding. This is where all earth/ground wires run to a single common point, instead of being soldered to the back of pots and multiple of locations where ground loops can occur. Its covered fully in the thread I linked to earlier.
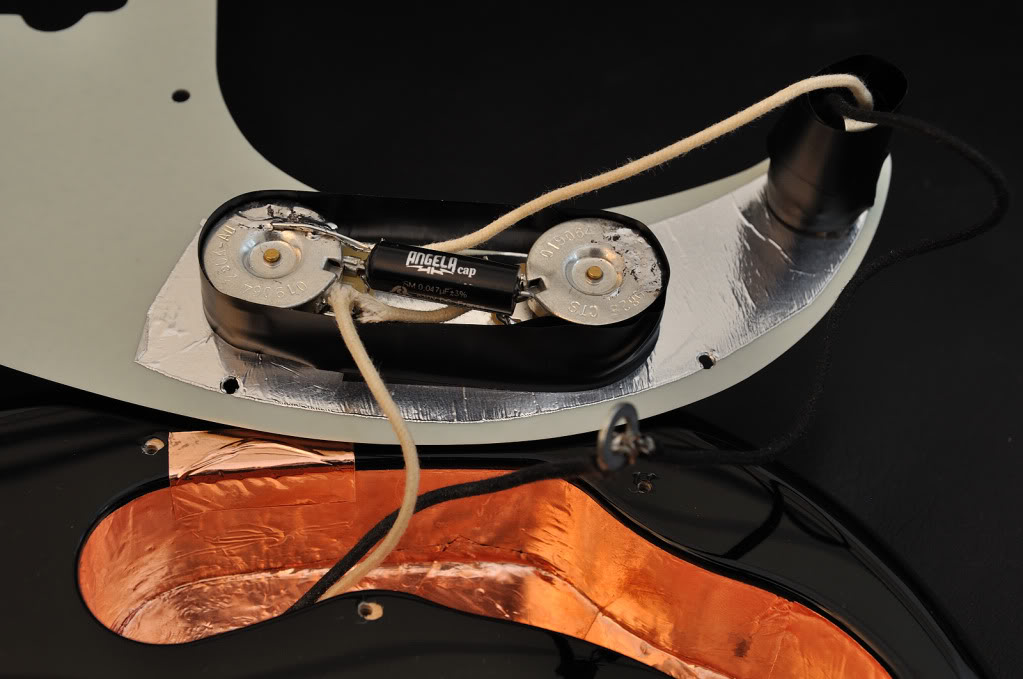
See the little washer (out of focus) in the foreground of the picture? Thats where all of my earth wires are going to, once they have all been fed through the body cavities. Eventually, this thing is simply just screwed directly into the side-wall of the control cavity, where it makes contact with the copper foil. That in turn is connected to the copper foil on the back of the pickguard (via a little lip of foil, which hangs out over the top of the control cavity) and completes the grounding.
Another thing that I have learnt, since starting to do shielding jobs on all of my basses a month ago, is that any contact by the casings of the metal pots, or the output jack, with the copper on the cavity walls/floor is disastrous for hum-cancellation and often results in a total loss of signal. So, I get around this by simply wrapping a little insulation tape around the pots and the output jack. This way, even if a stray piece of conductive material (wire, chrome plating flakes etc.) should find their way in there, there is less chance of them bridging between the cavity sides and a component. More importantly (and likely) than that though, is that if the pickguard is fitted in such a way that the pots or jack are pushed up against the sides of the cavity, you will still not get a short circuit if you have insulated them this way.
Step 5a: Fit the strap buttons.
This might seem a little counter-intuitive, but actually theres a good reason for it. I didnt follow this step when building the bass in this thread and actually fitted them as the very last step. Because the neck was already on, I couldnt get the angle that I needed with the electric drill to put the front strap button in the optimum position on the top horn. I ended up drilling into the horn at an angle almost parallel to the ground and realised afterward that all of my other basses had strap buttons which pointed down a little more, for extra security, one assumes!?
Anyway, at whichever stage you decide to fit them, make sure that you do the following three things: Firstly, fit a little strip of insulation tape or masking tape to the surface of the body, in order to reduce the chance of the drill bit slipping sideways (which, on a curved top horn, its really going to want to do). Then, drill small pilot holes and finally, counter-sink them with a larger drill bit (I always do this part by hand) afterward. If you dont countersink, you might well hear that gut-wrenching CRACK, as dime-size chunk of paint and lacquer fall to the floor  , leaving a lovely bare wood window in your shiny new finish. Same applies to all holes drilled for large screws.
Step 5b: Fit the neck.
Again, you might be thinking to yourself; Why fit the neck now, shouldnt you finish the body first?
Well, in this case, Im using parts from many different sources and theres a very high chance that some parts are simply not going to fit well with each other (as it turned out, this wasnt a big issue with this particular build thank God)! Also, I had checked the fit of the neck with body and frankly, it was so tight that not only did I almost have to hammer it in (I didnt, BTW bad idea), there was absolutely zero room to move it to the left or right. This meant that neck alignment was not a variable in the neck/body/pickguard/bridge equation (not necessarily a good thing).
So, I screwed the neck on and was relived to see that, even though I couldnt alter the angle of it if Id wanted to, it was running nicely parallel to the edge of the neck pocket
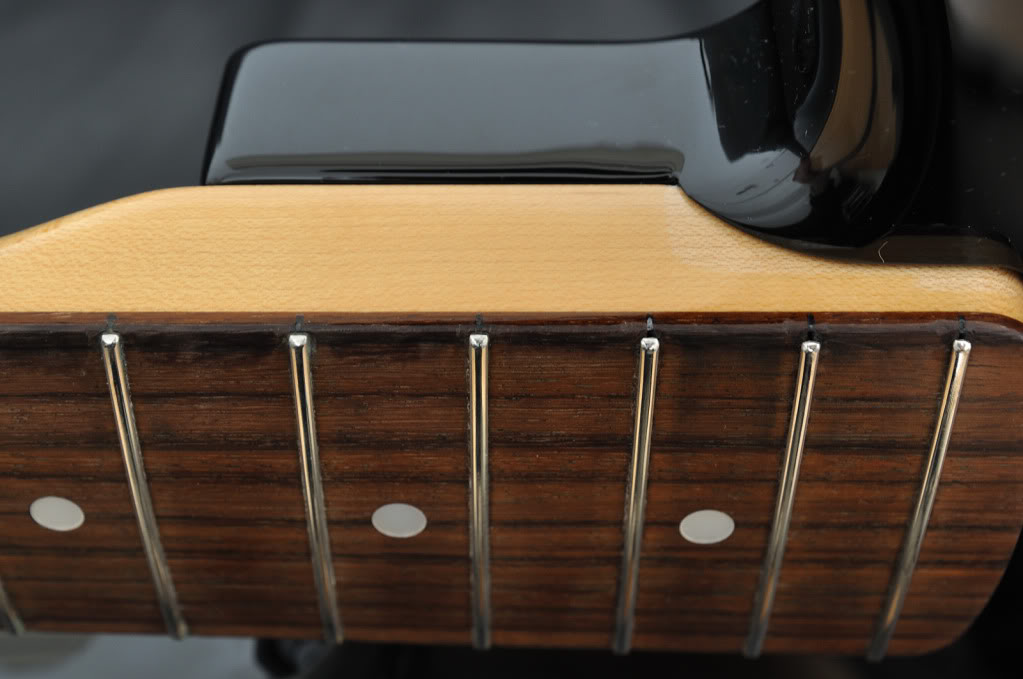
(N.B. The eagle-eyed amongst you may notice that the last three frets are shorter than the others. This is because the fretboard had shrunk over the last 27 years and those three were protruding with jagged edges. I did a bit of a hatchet job and filed quite a lot off, as I was getting cut fingers when doing the plucking part of slapping and plucking).
Step 6: Fit the pickguard.
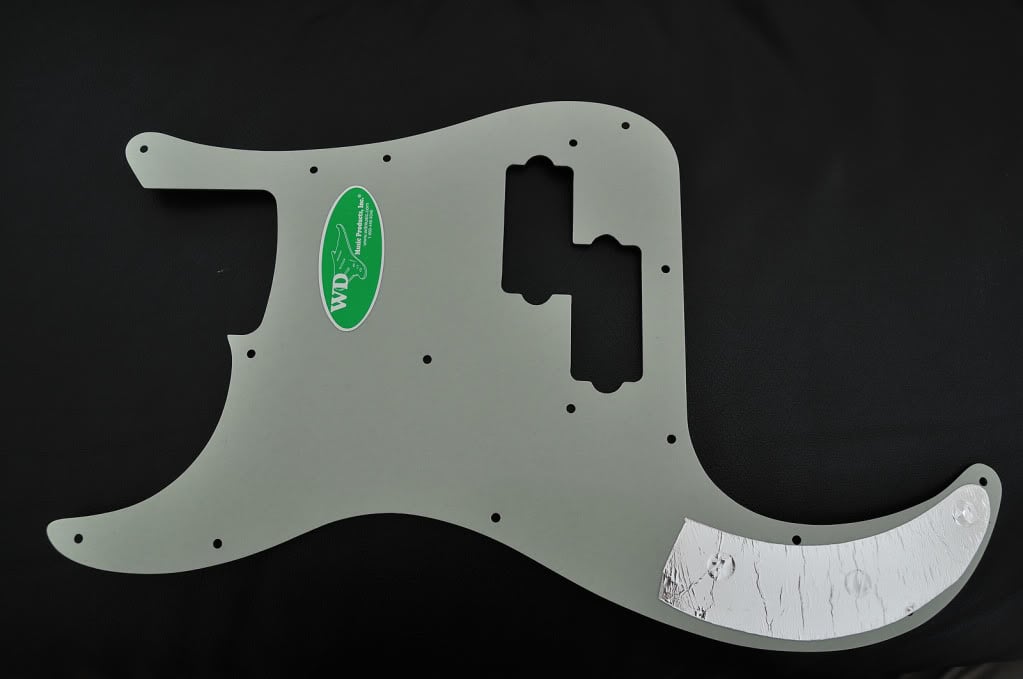
Why not the pickups, or even the bridge?, I hear you cry. Well, as Im using a new body, there are no holes for either the pickups, the pickguard or the bridge. The pickguard is, in this case, the most limiting factor, as it has to fit the neck pocket shape, the edges of the body and totally cover the control cavity (which it almost didnt do on this bass).
Having wrestled it into a position where I was able to fulfil all of the above criteria, I carefully drilled small, shallow pilot holes and put in each screw as I went along, to remove the possibility of the plate slipping whilst I was making the holes. The downside of this is that I wasnt bothering to countersink any of them and so there was a certain amount of splintering of the finish around the screw holes. A better way to do this, especially if you are working on a bass which might one day sport a clear pickguard, is to drill a small hole and then countersink it by hand with a slightly drill bit, before threading the screw in. I was too lazy for that.
... Sorry, I've run out of characters. Will post part. 2 right away ...
. This is going to be a long, rambling post, BTW, so if theres any chance that youre the sort of person who is going to want those 12 minutes of your life back, reading this might not be for you .It's mostly about the steps that I went through to put my latest FrankenBass together and some of the 'tricks' that I used (Roger Sadowsky has nothing to fear from me, I promise
), which have mostly been learned the hard way .Anyway, before that, there's a load of guff and waffle about what I was trying to achieve. So, on with the guff and waffle ...
The obligatory Before pic:
So, what sex is a Jazz Bass anyway!? I would have to say, female. Those gracious body curves (and saggy bottom
), slender neck and dual personality pickups, could scarcely be considered anything else could they!? But a Precision Bass
well, thats altogether more masculine, IMO. The P Bass is a blunt instrument. It cant multi-task and everything that it does (tone-wise) is controlled by one knob. Its body is strong and purposeful in design and, usually, it has a thick neck and man-sized fretboard.Well, Ive been a long-term fan of the P Bass and had never really understood the Jazz Bass, until I finally got a good one a few years ago (by the way, Im really talking about bass guitars again now, so you can forget all of the innuendo of the last paragraph
). Since then, Ive kind of gravitated towards the Jazz, on account of its slimmer neck profile, which despite having very large hands, I really like. In fact, things had gotten to the point that I had somehow managed to sell off all of my Precision Basses and was running a stable with three (Tokai) Jazz Basses, a StingRay and nothing else ! Even after selling one of the Jazzes a few months ago and looking around for the perfect P Bass, I somehow managed to get side-tracked and bought yet another Jazz Bass
, albeit a really good one (Geddy Lee signature model). Something had to be done
The thing was, I had owned a few really outstanding P Basses in the past, like these three Fender Custom shop models (a 55, a 61 and a 59)
but there was one thing, which they all had in common, that really made me want to put them down after 20 minutes nitro cellulose neck lacquer
! Now, I can see most of you who are reading this making a face like this
right now, but allow me to explain. For some reason, I have sweat/skin (?) which reacts quite badly with nitro lacquer and causes abrasion to either the lacquer, or to me (not sure which ). This results in little bits of dead skin/lacquer forming little sausage like deposits on the back of the neck, after a short amount of playing time. These things look a bit like the small, rubber sausages that you get when you use an eraser to rub out pencil marks on paper (you know what I mean, Im sure ). Whatever causes this, the net result is that the neck feels very sticky indeed and distracts me so much that I lose concentration on the notes Im searching for and start thinking about how to play everything in one hand position instead . It was this problem which lead me to sell off all of my vintage and Custom Shop basses and vow to never ever buy another instrument with nitro neck lacquer, ever again :scowl:. So far, I havent!The other thing that Ive kind of gone off over the years is spending thousands and thousands of Euros/Pounds/Dollars on bass guitars (which I only play at home these days anyway, as Im not currently in a band). And this is where the Tokais came in
. Ive written quite a lot about the brand on this and other forums, but for those who dont know; the Tokai basses that I collect are from the mid-1980s period and were made (partly by hand) in Japan, using very similar components and construction techniques to the original (pre-CBS) Fenders. The key difference being that these Tokais were mostly finished in polyurethane (or was it polyester ) lacquer. Whatever the finish was, it was hard wearing, smooth to the touch and
it wasnt nitro ! These Japanese Tokais are famed for their excellent tone and feel and are, currently, still (occasionally) to be had at bargain prices.So, coming back to the present, I was sitting looking at my three Jazz Basses and wondering which one I could do away with to make way for a new P Bass and also where the hell was I going to find a P Bass with non-nitro lacquer, a comfortable neck and a true (60s) vintage P Bass velvet fist punch!?
Ive been using the Geddy Lee Jazz as my 70s (Jazz)-Funk Machine and wouldnt be without it at any cost. My black Tokai Jazz Sound bass had been strung with LaBella F760M flatwounds and was doubling as a James Jamerson style thump machine and providing some cleaner, Joe Osborne-like clickety-clack noises, when required. This left me with my (very yellowed) Olympic White Jazz Sound, which had been my go-to bass for most of the year, but was starting to reveal itself as a bit of a Jack of all trades, master of none kind of instrument
. Dont get me wrong, it still sounds like a good vintage Jazz Bass to me its just that I dont need that specific tone a lot and would usually rather have something a bit more P, a bit more 70s funk, or a bit more
something else!? However, the neck on it really is one of, if not the, very best feeling neck Ive ever had on a bass of any price. It virtually plays itself and despite being nearly 30 years old, is in great shape with almost new frets.A plan was hatching .
It occurred to me that if I could find a suitable P Bass body, I already had enough spare hardware around to take the neck from the Jazz Bass, bolt it to the P Bass body and make myself the perfect P Bass for my taste (and budget). This was going to be fun
.Immediately, I knew where I was going to do my shopping for the necessary parts WD Music. Disclaimer: This next bit will probably come across as one huge plug for their business, so let me assure you all that I have no affiliation to them, other than the fact that I have shopped there a lot over the years and have always received great service.
WD Music offer fully finished, partially drilled bass guitar bodies, made from well seasoned, North American alder, in both Jazz and P designs and in a limited range of (thin) gloss finishes. That didnt matter to me I wanted black
! Whats more, Ben Green in their Customer Service was kind enough to get out of his comfy chair, go down to the warehouse, weigh all of the (three) suitable P Bass bodies that they had in stock and agree to send me the lightest one (4.8lbs) ! What a top bloke! Actually, hes helped me out on a few other projects and Ive seen others on TB praise WD for their good service, so it was no fluke!To go with my other black/rosewood Jazz Bass, I selected a WD Music tort p/g too. The ones, which they supply, are unusual in that they are actually made of real celluloid, just like the early Fender ones. This gives it a similar look and texture and, IMO, an air of class!
The choice of bridge was another no-brainer - it had to be the standard, threaded barrel saddle, vintage design. Ive tried various different bridge designs on most of my P Basses and somehow, they always change the character of the tone in ways that I dont really like and all of them ... rob the bass of smoothness and warmth. Yeah, tone is very subjective but Ive experimented a lot in the past, and I now know what I like now
.The pickup choice was actually pre-determined, as I had a Lindy Fralin vintage pickup left over, which was one of two that I bought for my two Fender CS basses. In every bass Id put it in, that pickup always managed to deliver my idea of the classic P Bass tone.
The neck that I was planning to use from my Tokai Jazz had already been fitted with Hip-Shot (or Slip-Shod as Id taken to calling them, after experiencing some, now resolved, slippage issues in the past
) vintage tuners, to complete the package. Also, it was held on with a brand new chrome neck plate and screws, so the whole bass was going to look pretty new when finished, apart from the vintage neck.The next part of this thread covers how I went about assembling the bass and whilst I am writing all of this for the pure pleasure of making the experience last that little bit longer
, it may actually be of use to anyone who is planning to build/assemble their first bass project.Building the Perfect (P) Beast
Step 1: Prepare the old neck.
All I really did here was to remove the neck form the Jazz Bass, clean off the old bits of paint chips and compressed wood from around the heel of the neck (using a towel) and then polished the frets, using a Dremel Multi-Tool (small, electric drill type thing, with various buffing attachments). I also cleaned the fretboard with a quick wipe of mentholated spirits to remove the grease and dirt and then applied a thin smear of lemon oil and buffed the fretboard with a clean cloth.
Step 2: Prepare the new body.
Here it is! Lovely, isnt it? All shiny and new
. In fact, so new that its still full of dust and dried polish and cutting compound from the paint shop that wont do! As Im planning to shield this bass against the evils of atmospheric hum, by putting adhesive shielding tape in the body cavities, I first cleaned them all out with meths and a rag.Step 3: Shielding the cavities.
Theres a whole (and quite excellent) thread here on how to do this (http://www.talkbass.com/forum/showthread.php?t=159191), so I wont go through it all again here. Basically, Im using copper tape with conductive adhesive, which removes the need for tack soldering between the different layers of tape.
Having shielded the control cavity, the pickup cavity and the tunnel leading from one to the other, I then ran some insulating tape around the inner edges of the pickup cavity and fitted some foam pads (made from a double layer of mouse mat foam
) into the pickup cavity. There are two reasons for this; firstly it removes the need for springs and other metal junk underneath the pickup to provide the means of height adjustment and secondly, being black, they will stop any copper foil from being visible through any gaps in the pickguard (which, as you will see later, wasnt a problem in this case ).Step 4: Wiring and insulation.
Again, no wiring diagrams here, you can Google those up easily enough if required. No, this is just a brief look at a couple of the lesser-known tricks/bodges
, which Ive worked into my bass tinkering routine over the years.First off, star grounding. This is where all earth/ground wires run to a single common point, instead of being soldered to the back of pots and multiple of locations where ground loops can occur. Its covered fully in the thread I linked to earlier.
See the little washer (out of focus) in the foreground of the picture? Thats where all of my earth wires are going to, once they have all been fed through the body cavities. Eventually, this thing is simply just screwed directly into the side-wall of the control cavity, where it makes contact with the copper foil. That in turn is connected to the copper foil on the back of the pickguard (via a little lip of foil, which hangs out over the top of the control cavity) and completes the grounding.
Another thing that I have learnt, since starting to do shielding jobs on all of my basses a month ago, is that any contact by the casings of the metal pots, or the output jack, with the copper on the cavity walls/floor is disastrous for hum-cancellation and often results in a total loss of signal. So, I get around this by simply wrapping a little insulation tape around the pots and the output jack. This way, even if a stray piece of conductive material (wire, chrome plating flakes etc.) should find their way in there, there is less chance of them bridging between the cavity sides and a component. More importantly (and likely) than that though, is that if the pickguard is fitted in such a way that the pots or jack are pushed up against the sides of the cavity, you will still not get a short circuit if you have insulated them this way
.Step 5a: Fit the strap buttons.
This might seem a little counter-intuitive, but actually theres a good reason for it. I didnt follow this step when building the bass in this thread and actually fitted them as the very last step. Because the neck was already on, I couldnt get the angle that I needed with the electric drill to put the front strap button in the optimum position on the top horn. I ended up drilling into the horn at an angle almost parallel to the ground and realised afterward that all of my other basses had strap buttons which pointed down a little more, for extra security, one assumes!?
Anyway, at whichever stage you decide to fit them, make sure that you do the following three things: Firstly, fit a little strip of insulation tape or masking tape to the surface of the body, in order to reduce the chance of the drill bit slipping sideways (which, on a curved top horn, its really going to want to do
). Then, drill small pilot holes and finally, counter-sink them with a larger drill bit (I always do this part by hand) afterward. If you dont countersink, you might well hear that gut-wrenching CRACK, as dime-size chunk of paint and lacquer fall to the floor , leaving a lovely bare wood window in your shiny new finish. Same applies to all holes drilled for large screws.Step 5b: Fit the neck.
Again, you might be thinking to yourself; Why fit the neck now, shouldnt you finish the body first?
Well, in this case, Im using parts from many different sources and theres a very high chance that some parts are simply not going to fit well with each other (as it turned out, this wasnt a big issue with this particular build thank God)! Also, I had checked the fit of the neck with body and frankly, it was so tight that not only did I almost have to hammer it in (I didnt, BTW bad idea
), there was absolutely zero room to move it to the left or right. This meant that neck alignment was not a variable in the neck/body/pickguard/bridge equation (not necessarily a good thing).So, I screwed the neck on and was relived to see that, even though I couldnt alter the angle of it if Id wanted to, it was running nicely parallel to the edge of the neck pocket
(N.B. The eagle-eyed amongst you may notice that the last three frets are shorter than the others. This is because the fretboard had shrunk over the last 27 years and those three were protruding with jagged edges. I did a bit of a hatchet job and filed quite a lot off, as I was getting cut fingers when doing the plucking part of slapping and plucking
).Step 6: Fit the pickguard.
Why not the pickups, or even the bridge?, I hear you cry
. Well, as Im using a new body, there are no holes for either the pickups, the pickguard or the bridge. The pickguard is, in this case, the most limiting factor, as it has to fit the neck pocket shape, the edges of the body and totally cover the control cavity (which it almost didnt do on this bass).Having wrestled it into a position where I was able to fulfil all of the above criteria, I carefully drilled small, shallow pilot holes and put in each screw as I went along, to remove the possibility of the plate slipping whilst I was making the holes. The downside of this is that I wasnt bothering to countersink any of them and so there was a certain amount of splintering of the finish around the screw holes. A better way to do this, especially if you are working on a bass which might one day sport a clear pickguard, is to drill a small hole and then countersink it by hand with a slightly drill bit, before threading the screw in. I was too lazy for that
.... Sorry, I've run out of characters. Will post part. 2 right away
... .
.