

Enjoy the benefits of a premium membership!
Upgrade Account
-
TalkBass has been independent since 1998. Add your voice.
Create a free account to reply to discussions, view embedded media, and browse with fewer display ads.
Join free Log in
Want zero display ads or expanded classifieds tools? Compare plans.
You are using an out of date browser. It may not display this or other websites correctly.
You should upgrade or use an alternative browser.
You should upgrade or use an alternative browser.
Über-Jay 5er Quilted Maple Funk Machine.
- Thread starter miziomix
- Start date
More options
Who Replied?

El-Bob, cccy, JD, thank you so very much.
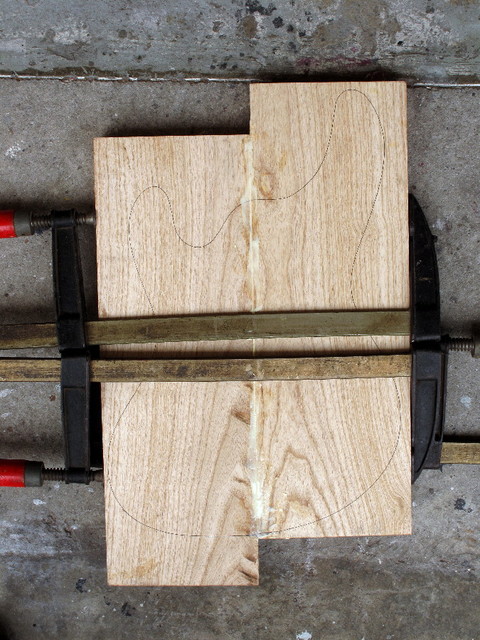
Since the veneers are just a few hours away, I decided to start messing the shop with saw dust. The body blank has been sanded down and glued. The two halves are arranged to achieve a nice grain match, which should be visible once both extra glue and saw marks have been sanded off. The sides will look very nice after the heavy contour has taken proper care of them
The Quilted Maple top has been sliced into two book matching halves. That wood is quite hard and it took some effort to slice it properly. Now it's resting under some weight. Tomorrow will be glued. They're both going to be ready for the veneer on Monday.
Enjoy the week end!
ps: Nothing to do with this build... but I am awaiting Redwood, Walnut and Maple tops and I just can't stop smiling ...LOL....
Since the veneers are just a few hours away, I decided to start messing the shop with saw dust. The body blank has been sanded down and glued. The two halves are arranged to achieve a nice grain match, which should be visible once both extra glue and saw marks have been sanded off. The sides will look very nice after the heavy contour has taken proper care of them
The Quilted Maple top has been sliced into two book matching halves. That wood is quite hard and it took some effort to slice it properly. Now it's resting under some weight. Tomorrow will be glued. They're both going to be ready for the veneer on Monday.
Enjoy the week end!
ps: Nothing to do with this build... but I am awaiting Redwood, Walnut and Maple tops and I just can't stop smiling ...LOL....
Since the veneers are just a few hours away.....
...They're both going to be ready for the veneer on Monday.
Never trust custom officers @*¥! I never learn.
Since the veneers were delayed at custom, I decided it was better to leave the top clamped.
Eventually, the veneers arrived yesterday - late by more than two weeks! :scowl: Perfect timing if you wish
 coz I arrived yesterday too, after ten days in crazy Jakarta.
 And here they are, freshly glued.
Tomorrow I will glue top, veneer and body together.
Lets get this baby started

Another step forward.
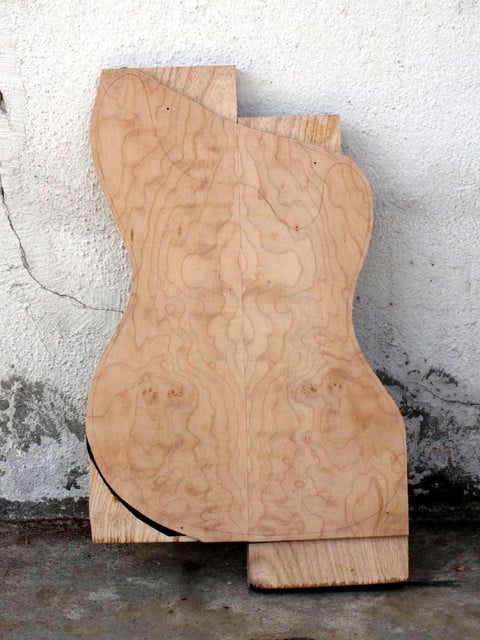
I love this combo. Maple and Swamp Ash really seem made for each other. They almost blend into one another. Then one adds just a thin black accent line....et voila' ahahahhah With an Ebony fretboard this thing is going to explode
thank you!
I love this combo. Maple and Swamp Ash really seem made for each other. They almost blend into one another. Then one adds just a thin black accent line....et voila' ahahahhah With an Ebony fretboard this thing is going to explode
thank you!
Usually a few reasons dictate which build I have to dedicate the day to.
Today one of those reasons decided to claim the day - weather. Heavy rain, to be precise. The kind of rain that makes you start the day saying - Got it, no lacquer today.
So I turned to two other builds that are still at an early stage.
One is the Über-Groove with graphite neck which I am building for a Mumbai based bassist. I will start a thread later on on TB. For now those interested will find pictures here
The other one is this build. The more I look at it the more I feel drawn to it. Even more so now that the neck starts taking shape.
As some might have noticed, I lean towards three piece neck laminate. I like the simplicity and the bold look they tend to produce.
IMHO, this one is really sweet - B-eye M/Purpleheart/BM.
The BEM I selected for this build is especially white so there's a lot of contrasts with Purpleheart.
In spite of the high contrast - or because of it - I decided to add a .6mm black veneer between maple and PH. It won't be very visible, but it will add a nice touch, which is the effect I'm after
I tried something new today - a tip from a friend of mine and excellent carpenter. So, first I glued the veneers to the center laminate and clamp them for ten minutes.
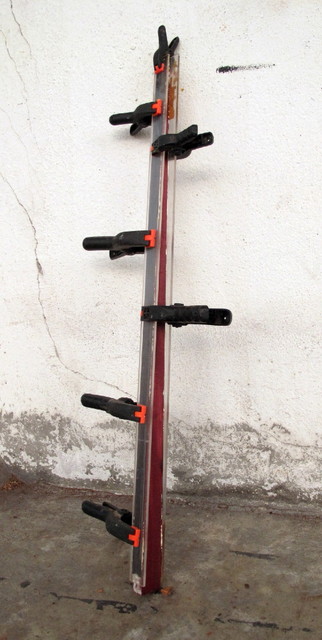
After that, I glued the maple sides. Having the veneers already in position does make things easier thanks Mike.
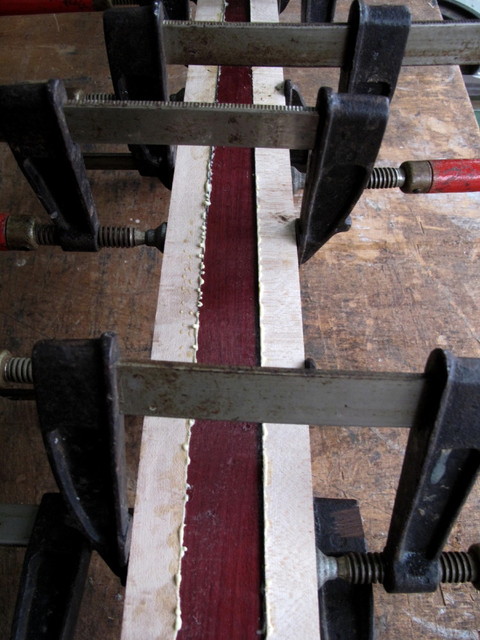
So here's the neck clamped. Much like the necks of my last few builds, this one too sports a tapered center lam.
I've been experimenting with this for three years now and I think this is it. Both in terms of structure and aesthetic, this approach works for me.
This neck will be particularly thin and shaped as a flat C at the nut which gets flatter from around the 12th/15th fret onward.
I should be able to shape the neck/headstock before the week is over. Perhaps even get the ebony fretboard going
thank you
Today one of those reasons decided to claim the day - weather. Heavy rain, to be precise. The kind of rain that makes you start the day saying - Got it, no lacquer today.
So I turned to two other builds that are still at an early stage.
One is the Über-Groove with graphite neck which I am building for a Mumbai based bassist. I will start a thread later on on TB. For now those interested will find pictures here
The other one is this build. The more I look at it the more I feel drawn to it. Even more so now that the neck starts taking shape.
As some might have noticed, I lean towards three piece neck laminate. I like the simplicity and the bold look they tend to produce.
IMHO, this one is really sweet - B-eye M/Purpleheart/BM.
The BEM I selected for this build is especially white so there's a lot of contrasts with Purpleheart.
In spite of the high contrast - or because of it - I decided to add a .6mm black veneer between maple and PH. It won't be very visible, but it will add a nice touch, which is the effect I'm after
I tried something new today - a tip from a friend of mine and excellent carpenter. So, first I glued the veneers to the center laminate and clamp them for ten minutes.
After that, I glued the maple sides. Having the veneers already in position does make things easier
thanks Mike.So here's the neck clamped. Much like the necks of my last few builds, this one too sports a tapered center lam.
I've been experimenting with this for three years now and I think this is it. Both in terms of structure and aesthetic, this approach works for me.
This neck will be particularly thin and shaped as a flat C at the nut which gets flatter from around the 12th/15th fret onward.
I should be able to shape the neck/headstock before the week is over. Perhaps even get the ebony fretboard going
thank you
Another quick update.
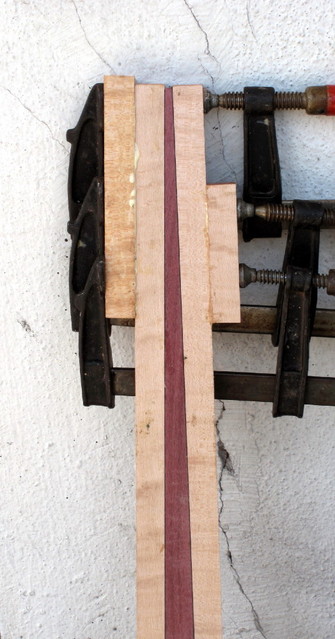
The headstock ears are clamped. Tomorrow I'll sand the whole thing down. The black veneer between Purpleheart and Maple looks really cool, if I can say so myself.
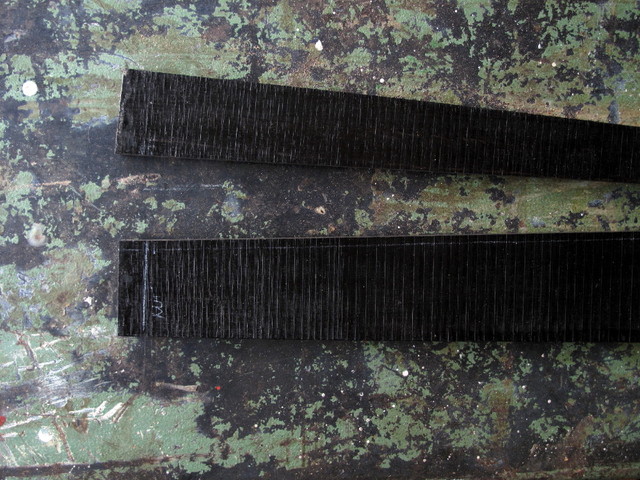
The fingerboard hit the blade. This Gabon Ebony board is as black inside as it is outside. One of Mother Nature's wonders.
The headstock ears are clamped. Tomorrow I'll sand the whole thing down. The black veneer between Purpleheart and Maple looks really cool, if I can say so myself.
The fingerboard hit the blade. This Gabon Ebony board is as black inside as it is outside. One of Mother Nature's wonders.

funny that you mentioned jakarta. do you go there often? i might want to order a custom from you if it's possible in the future
Anw, really cool build sir.. looking forward to see the completed version.
Hi, yes I do go to Jakarta fairly often. You do too? I'm glad you like the build. More work can be viewed here.
Thank you!
This build has been on hold since I came back from Europe as two other builds had to be ready for spraying early next week.
Finally I can get back to it
The Gabon Ebony FB is sanded and slotted for 21 frets. The taper is for 19mm strings spacing at bridge and 9.5mm at nut. It's 8mm thick and has a little extra at both sides.
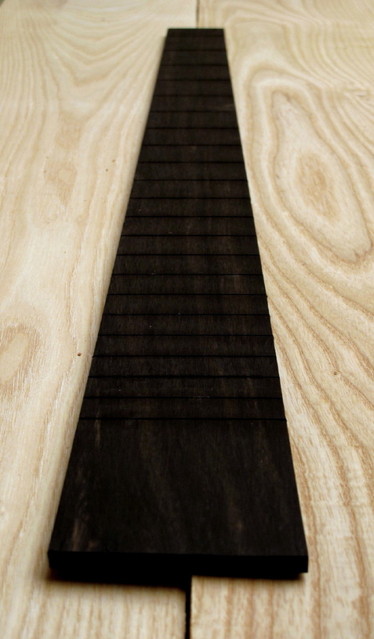
This wood....ahhhh.... hell of a thing
Finally I can get back to it
The Gabon Ebony FB is sanded and slotted for 21 frets. The taper is for 19mm strings spacing at bridge and 9.5mm at nut. It's 8mm thick and has a little extra at both sides.
This wood....ahhhh.... hell of a thing
12:40 AM...it must be update time
These days I've been working on the fingerboard inlays and I thought some of you might be interested.
I got the white MOP inlays already cut for a fiver FB. Usually they come glued to a cardboard and it's very easy to mishandle them at this stage.
The best way to peel them off without breaking them is to soak them in warm water. they'll come off in a few minutes.
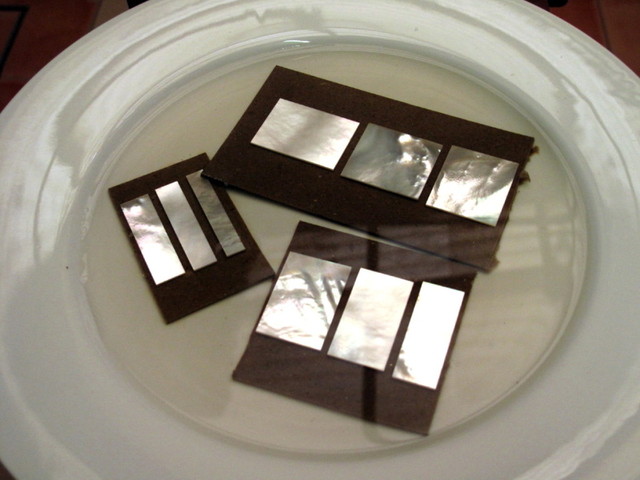
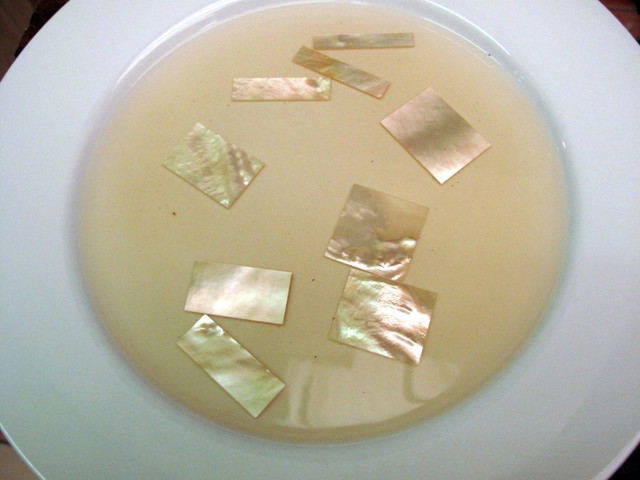
MOP always has a better angle. I inspect each piece looking for it, then write the fret number on the back, so as the position of the number will later help me to find again the block orientation that I had chosen.
Draw a precise grid onto the FB, then place the blocks in position. If the measurements are a little off you should be able to see it now. Check carefully.
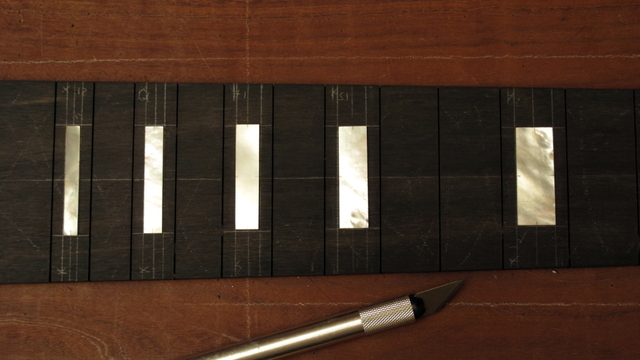
First of all, I use a sharp nail to mark the corners. that serves as a guide for the scalpel. that is, where to start and most importantly where to stop. A deep hole will effectively prevent the scalpel from over shooting.
Then use a scalpel to carve the perimeter. Make it at the least half the desired depth. It will serve as a guide and a warning when you route out the area. I mean that, when the router bit gets close to the perimeter, the tiny fiber or wood left will chip and you'll know that you better back off.
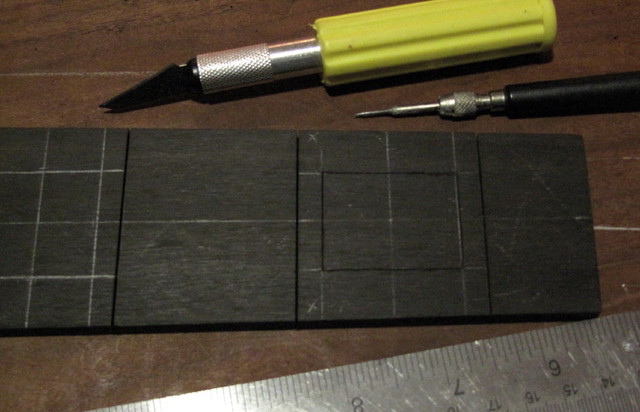
I route most of the inside with a 1/8" router bit. One can get pretty close to the edge without making a mess. This fretboard radius will be 12", so I prefer routing the inlay now that is flat.
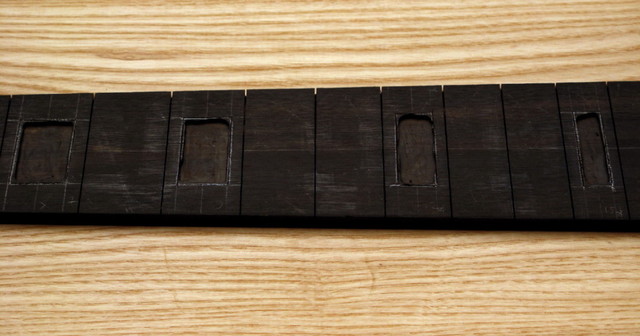
Then I use a smaller bit to get to the edge of the perimeter. Any imperfection and bumps will be eliminated with a chisel later on.
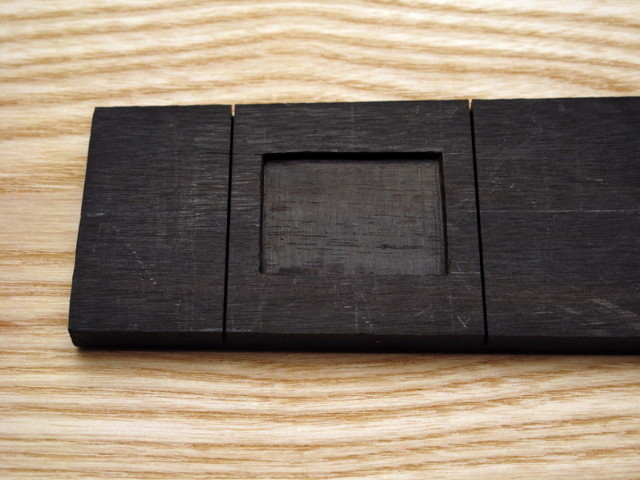
On Ebony one can even go a little beyond the edges and fill up the gaps later on with Ebony saw dust. I prefer a precise fit as much as possible.
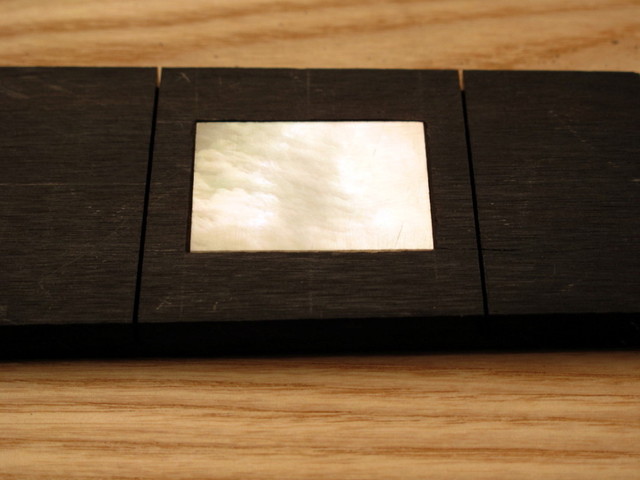
Still a bit of work to do on this one.
1:09 AM... Good night
These days I've been working on the fingerboard inlays and I thought some of you might be interested.
I got the white MOP inlays already cut for a fiver FB. Usually they come glued to a cardboard and it's very easy to mishandle them at this stage.
The best way to peel them off without breaking them is to soak them in warm water. they'll come off in a few minutes.
MOP always has a better angle. I inspect each piece looking for it, then write the fret number on the back, so as the position of the number will later help me to find again the block orientation that I had chosen.
Draw a precise grid onto the FB, then place the blocks in position. If the measurements are a little off you should be able to see it now. Check carefully.
First of all, I use a sharp nail to mark the corners. that serves as a guide for the scalpel. that is, where to start and most importantly where to stop. A deep hole will effectively prevent the scalpel from over shooting.
Then use a scalpel to carve the perimeter. Make it at the least half the desired depth. It will serve as a guide and a warning when you route out the area. I mean that, when the router bit gets close to the perimeter, the tiny fiber or wood left will chip and you'll know that you better back off.
I route most of the inside with a 1/8" router bit. One can get pretty close to the edge without making a mess. This fretboard radius will be 12", so I prefer routing the inlay now that is flat.
Then I use a smaller bit to get to the edge of the perimeter. Any imperfection and bumps will be eliminated with a chisel later on.
On Ebony one can even go a little beyond the edges and fill up the gaps later on with Ebony saw dust. I prefer a precise fit as much as possible.
Still a bit of work to do on this one.
1:09 AM... Good night


12" radius... this Gabon ebony's as hard as marble...
I put a 10" radius on my first build, an unlined fretless 4-string with a "select" grade madagascar ebony fingerboard. it took a couple hours of sanding with a radius block. It gave me blisters on my hands.

Thank you lburton!
yeah.... radius is one thing I would gladly leave to others. LMI offers such a service... I think of them every time I find myself staring at an ebony board... LOL
I put a 10" radius on my first build, an unlined fretless 4-string with a "select" grade madagascar ebony fingerboard. it took a couple hours of sanding with a radius block. It gave me blisters on my hands.
yeah.... radius is one thing I would gladly leave to others. LMI offers such a service... I think of them every time I find myself staring at an ebony board... LOL

Hopkins
Commercial User
miziomix said:Thank you lburton!
yeah.... radius is one thing I would gladly leave to others. LMI offers such a service... I think of them every time I find myself staring at an ebony board... LOL
If it takes two hours you should look into a better sand paper. It took me all of 30 mins to radius the mac ebony board the last time I used it. I use Norton sticky back paper, it comes on a roll. Its not cheap but worth every penny.
Latest posts
-

-
Post a funnier picture than the one above - Parallel Universe Edition
- Latest: BassicJazzy
-

-

