

Enjoy the benefits of a premium membership!
Upgrade Account
-
TalkBass has been independent since 1998. Add your voice.
Create a free account to reply to discussions, view embedded media, and browse with fewer display ads.
Join free Log in
Want zero display ads or expanded classifieds tools? Compare plans.
You are using an out of date browser. It may not display this or other websites correctly.
You should upgrade or use an alternative browser.
You should upgrade or use an alternative browser.
Über-Jay 5er Quilted Maple Funk Machine.
- Thread starter miziomix
- Start date
More options
Who Replied?
Thank you Bassingeorge! Glad to have you on board!
I have been slow at updating this thread. So here are a few WIP pictures.
As it always happens, a serendipity moment hit me while I was minding my own business and the thought of an invisible fretboard binding began taking shape.
So I cut two 2mm thick Gabon Ebony strips, sanded 1mm off each side of the FB and glued the bindings.
After the CA had dried, I sanded off the excess width and thickness of the bindings on the sander. As you can see in the picture below, the bindings are still proud of the board by about 1mm. It will be sanded down by hand, with the help of a radius block, masking the center of the board. I don't want to spoil the block inlays.
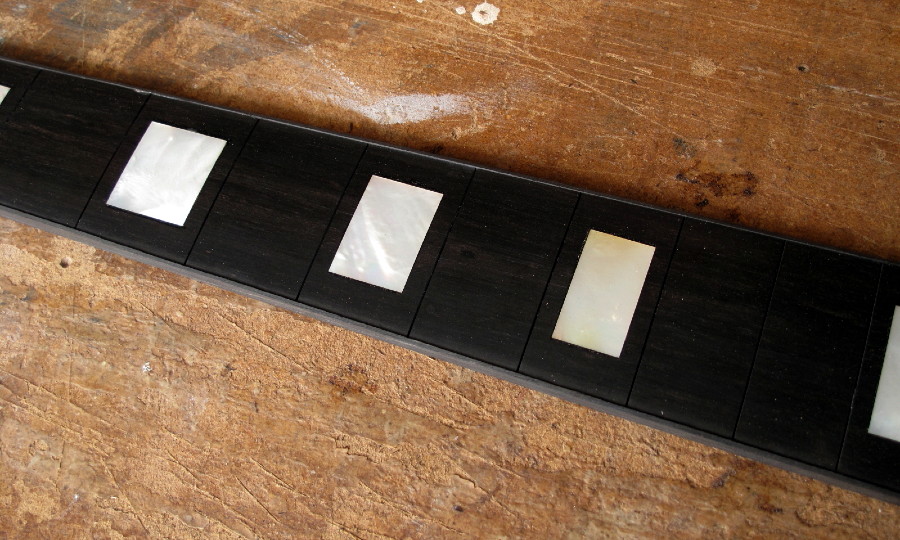
Once the bindings are flush with the board, they will become pretty much invisible. Eventually there will be no fret tangs and hardly any sign of a binding either.
Those who have followed previous builds know how fond I am of little surprises hidden in every bass I build. To me, that's Über factor - if I can be so bold
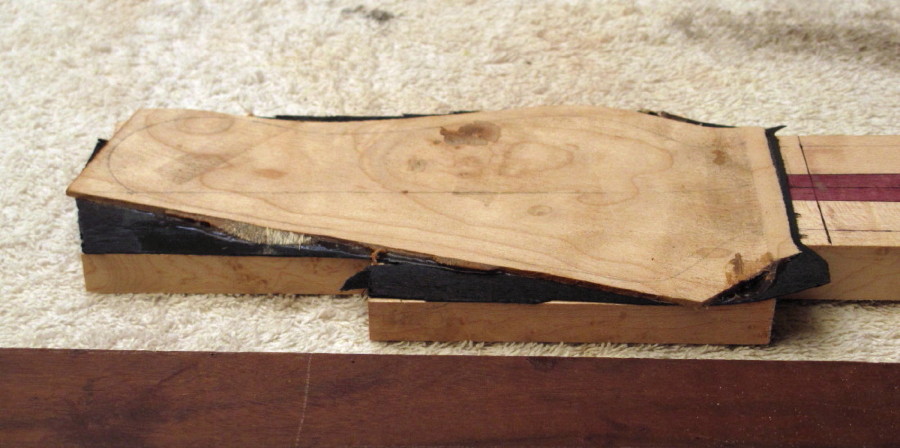
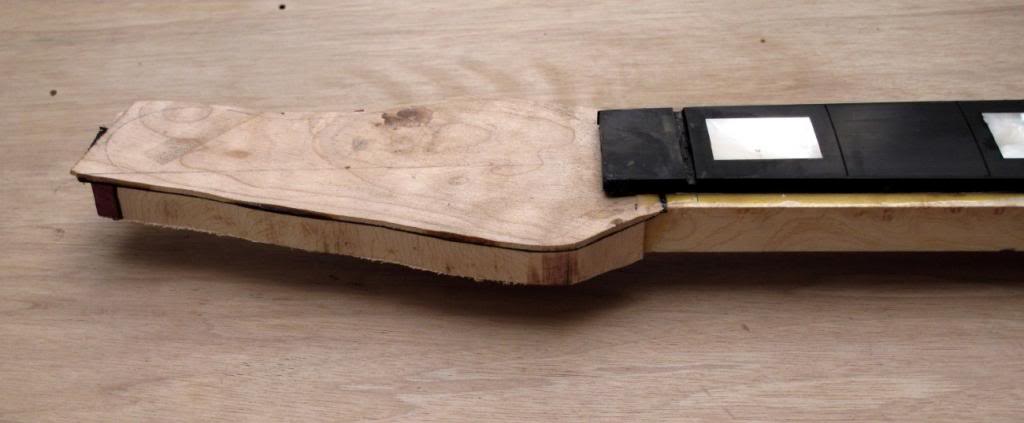
OK,OK.... On to the headstock. This bass features both black accent line and matching Quilted Maple veneer.
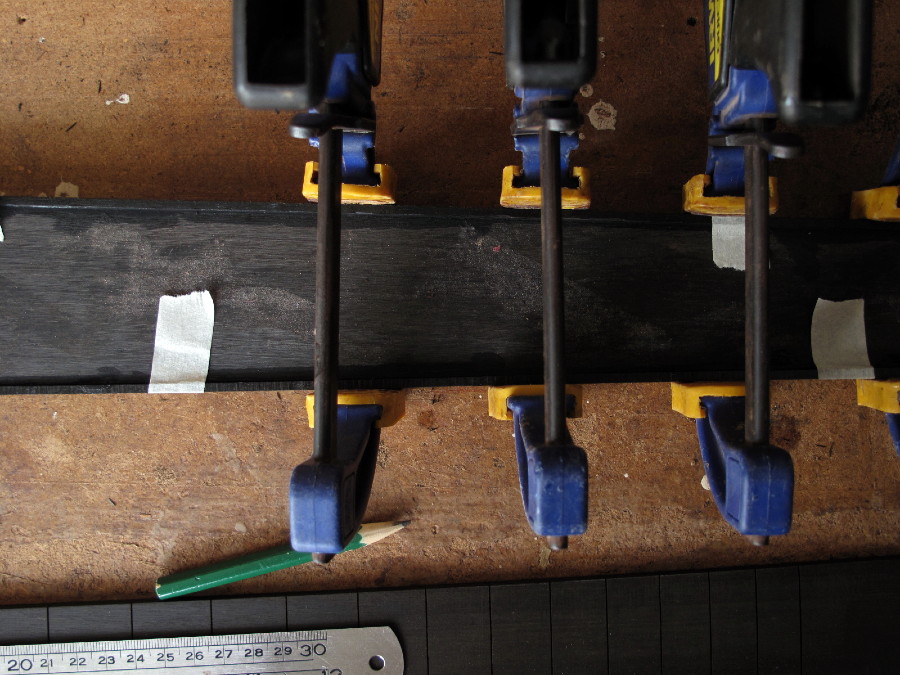
The black veneer was glued first and clamped for just about 30 minutes.
Meanwhile, the QM piece was being sanded down to about 2mm, bent to shape and eventually glued to the headstock. (The one in the picture is only a scrap protecting the veneer from the clamps )
)

Finally, the extra veneers protruding over the headstock slope were sanded flush.
Thank you for following this build!
Maurizio
I have been slow at updating this thread. So here are a few WIP pictures.
As it always happens, a serendipity moment hit me while I was minding my own business and the thought of an invisible fretboard binding began taking shape.
So I cut two 2mm thick Gabon Ebony strips, sanded 1mm off each side of the FB and glued the bindings.
After the CA had dried, I sanded off the excess width and thickness of the bindings on the sander. As you can see in the picture below, the bindings are still proud of the board by about 1mm. It will be sanded down by hand, with the help of a radius block, masking the center of the board. I don't want to spoil the block inlays.
Once the bindings are flush with the board, they will become pretty much invisible. Eventually there will be no fret tangs and hardly any sign of a binding either.
Those who have followed previous builds know how fond I am of little surprises hidden in every bass I build. To me, that's Über factor - if I can be so bold
OK,OK.... On to the headstock. This bass features both black accent line and matching Quilted Maple veneer.
The black veneer was glued first and clamped for just about 30 minutes.
Meanwhile, the QM piece was being sanded down to about 2mm, bent to shape and eventually glued to the headstock. (The one in the picture is only a scrap protecting the veneer from the clamps
)Finally, the extra veneers protruding over the headstock slope were sanded flush.
Thank you for following this build!
Maurizio
Where were we.... necks. Yes. Those who are familiar with my builds might remember that my necks go all the way to the first p-up, wherever that is. I am convinced that that increases attack and sustain. So I do that. The extension gets covered with a veneer from the top laminate.
Routing the recess is a rather simple task. However, when building a few necks efficiency matters. So I thought this time around a jig was in order. I turned to my mentor for counsel. His answer - Why do you need a jig when you can simply route along a straight piece of acrylic?
OK, you've got to know that the man is an old school artist. You should see him routing free hand on his acoustic guitars. It's like magic.
I, on the other hand....
But I've learned to never throw away an advice when it's given from someone I respect. Just because I don't feel ready to do exactly as he says it doesn't mean that there isn't a way to make use of a good advise.
So, I added a safety net - two scraps of wood to support the router and an old p-up template that I don't use anymore.
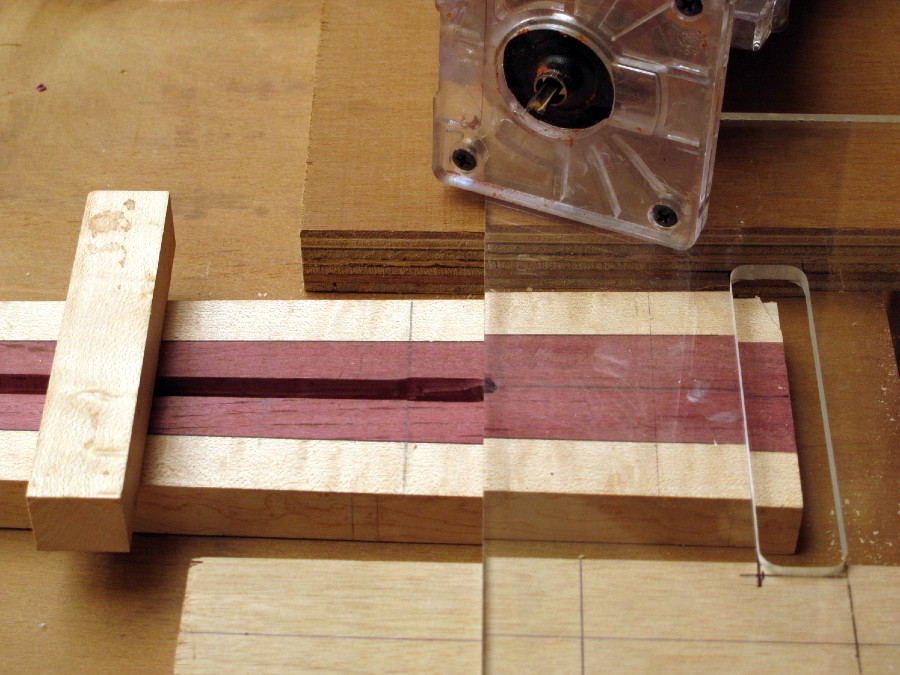
The router follows the template until it reaches the stop - a small wood scrap secured with double sided tape. Nice and easy. I did three necks in less than 30 min, including set up. That's what I'm taaalkin' about
If you look carefully, you'll see the spot where I tested the router bit depth. Top right corner. I always make the neck 1" longer and then saw/sand it to size just before spraying.
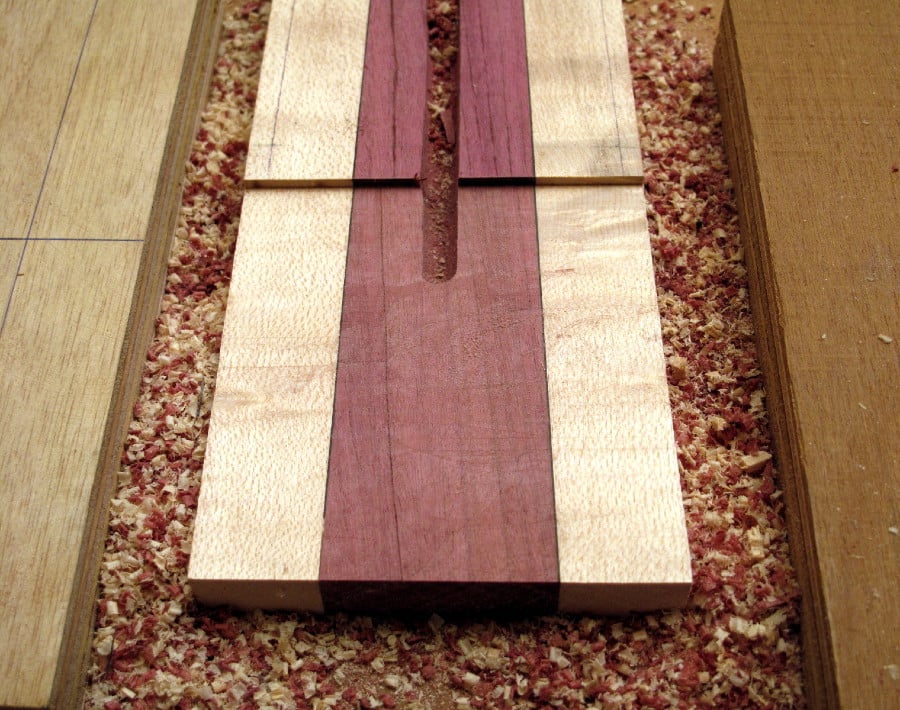
This is the result. Quite pretty. Nothing compared to the beauty of all that Maple and Purpleheart sawdust.
Allow me to do justice to it.

There. Together with some Padauk and Wenge from another neck.
Those of you with X-ray vision will have noticed that the two pictures feature two different necks. Same combo. Just, the neck in the first picture is for a four stringer. The other one is the neck for this fiver. I forgot to take the first picture with this neck, so...

The black veneer gets glued onto the recess. Clamped for about 30 min. Use a piece of acrylic to clamp a 0.6mm veneer. Don't use wood or it will get glued with the rest. But you already know that
Finally the maple veneer gets glued over the black veneer and left to cure overnight.
2mm Maple veneer + .6mm black veneer. If I did it right they are flush with the neck.

Thank you for reading this far
Routing the recess is a rather simple task. However, when building a few necks efficiency matters. So I thought this time around a jig was in order. I turned to my mentor for counsel. His answer - Why do you need a jig when you can simply route along a straight piece of acrylic?
OK, you've got to know that the man is an old school artist. You should see him routing free hand on his acoustic guitars. It's like magic.
I, on the other hand....
But I've learned to never throw away an advice when it's given from someone I respect. Just because I don't feel ready to do exactly as he says it doesn't mean that there isn't a way to make use of a good advise.
So, I added a safety net - two scraps of wood to support the router and an old p-up template that I don't use anymore.
The router follows the template until it reaches the stop - a small wood scrap secured with double sided tape. Nice and easy. I did three necks in less than 30 min, including set up. That's what I'm taaalkin' about
If you look carefully, you'll see the spot where I tested the router bit depth. Top right corner. I always make the neck 1" longer and then saw/sand it to size just before spraying.
This is the result. Quite pretty. Nothing compared to the beauty of all that Maple and Purpleheart sawdust.
Allow me to do justice to it.
There. Together with some Padauk and Wenge from another neck.
Those of you with X-ray vision will have noticed that the two pictures feature two different necks. Same combo. Just, the neck in the first picture is for a four stringer. The other one is the neck for this fiver. I forgot to take the first picture with this neck, so...
The black veneer gets glued onto the recess. Clamped for about 30 min. Use a piece of acrylic to clamp a 0.6mm veneer. Don't use wood or it will get glued with the rest. But you already know that
Finally the maple veneer gets glued over the black veneer and left to cure overnight.
2mm Maple veneer + .6mm black veneer. If I did it right they are flush with the neck.
Thank you for reading this far
That sawdust pic is an art
BTW, is your mentor a Malaysian acoustic guitar maker?
Glad you like the picture
 Yes, Mr. Jeffry Yong. You should know him. His guitars are really world class.
Ahh... the founder of GIM guitars. Introduces the monkeypod wood in acoustic guitars.
That's right. He's now making guitars with Mango front, back and sides. Beautiful and great sounding guitars. It's amazing how his guitars retain a signature tone no matter what wood he uses.
I feel really lucky to know him. With him, I am developing an appreciation for tone woods that is very enriching. Even though it is obviously a lot more relevant when building acoustics than solid bodies, I enjoy discovering and learning what tone a wood could produce if used acoustically.
The neck is wider than its final size. it will be sanded after the fingerboard is on. Speaking of which - I just finished sanding the binding and it looks quite neat. Too late for pictures though.
It has been a long day. I deserve a beer and I'm on my way to the pub
Ciao!
That's neat. Looks like this one will have the trussrod access from the body. I think your basses before this have the access from the headstock. Any reason for this change? Or was it a request from the future owner?
That's neat. Looks like this one will have the trussrod access from the body. I think your basses before this have the access from the headstock. Any reason for this change? Or was it a request from the future owner?
Thank you!
About the truss rod access at the neck heel. It was a request of the future owner. But it has also become my preference.
You are correct, the first two Ü-J I built had the tr access at the headstock. Those were for myself and that's my personal preference as a bassist.
Being up there it gets out of my way when I play. I slap with really low clearance between body and strings and use the body like a ramp for slap. So the tr access kinda bothers me.
Building makes you look at things differently and it seems to me that many prefer the tr access at the heel. At the least those I have built for so far.
I should also add that IMO the tr access at the headstock works best with tilt back design which I don't do - for now
cheers!
Maurizio
Update time.
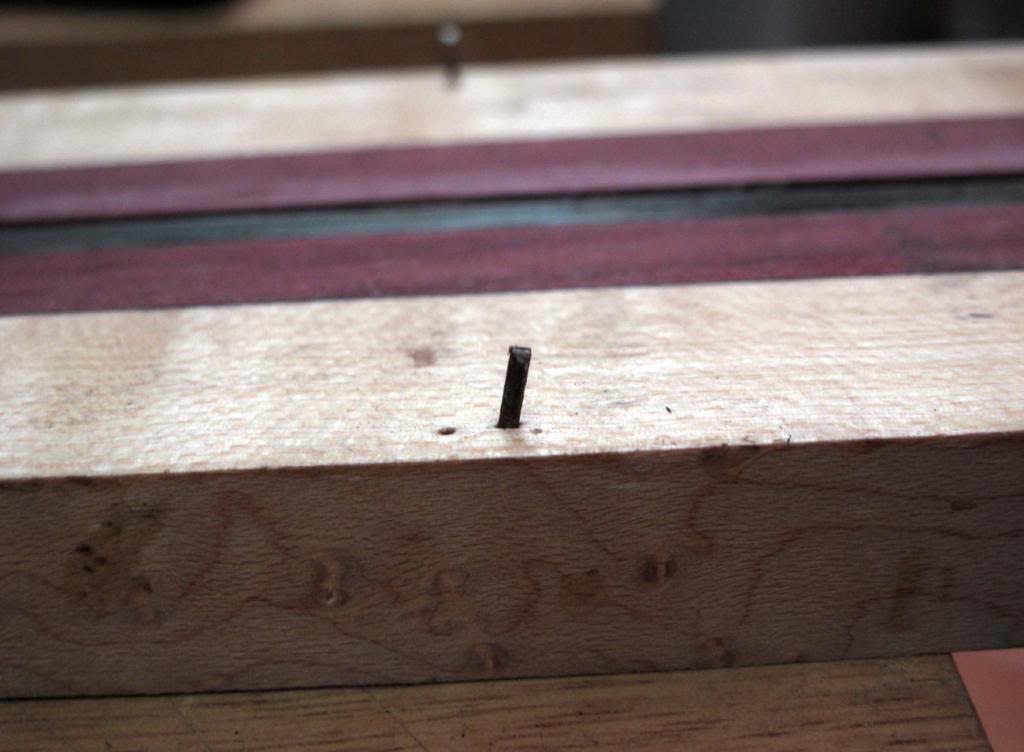
The most annoying thing of all is a fingerboard that doesn't want to stay put while it's being clamped. To avoid that I use three small nails. Two are placed at both sides of the neck. The third one is inserted in a small hole drilled inside the nut slot, through FB and into the neck.
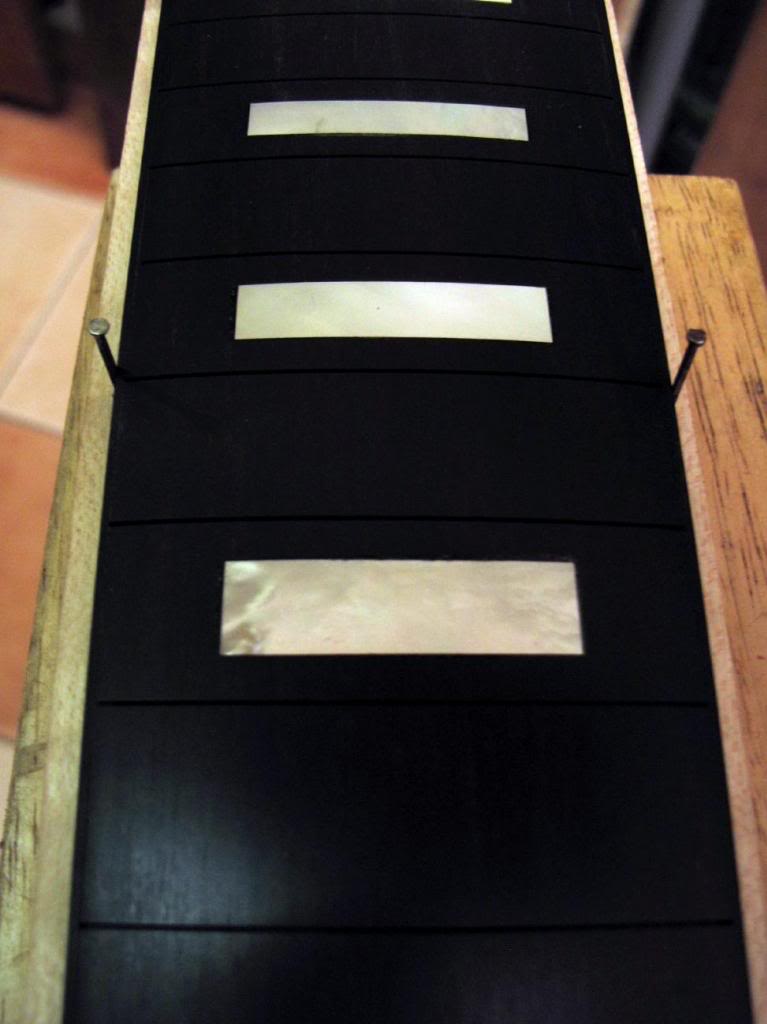
The nails are then clipped at the level of the fingerboard, so as they don't stick out and get in the way with the clamps.
Later on, when the glue has cured, it will be very easy to pull the nails off.
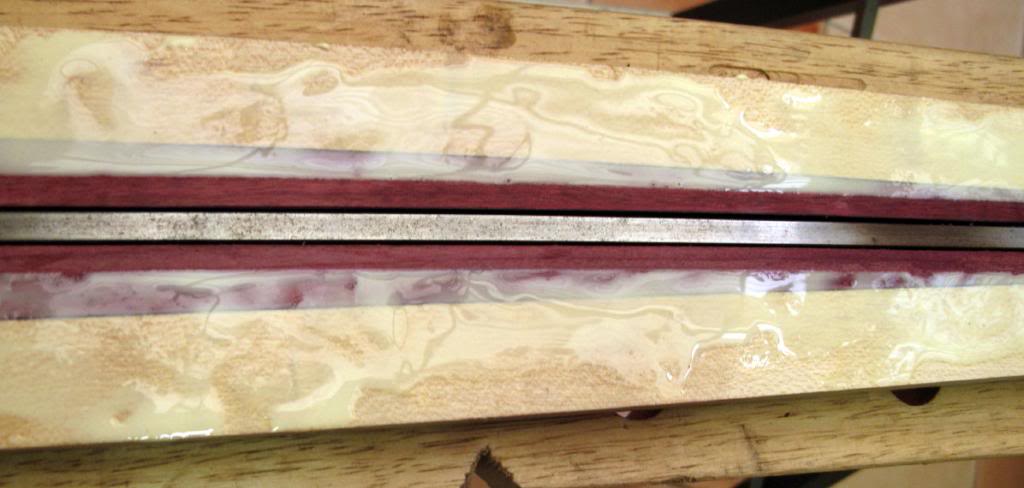
It took me all this while to figure out how much glue to use. Just enough to properly glue the parts without dripping everywhere, making a mess - and a waste. Little by little I think I'm getting a hang of it
The glue in the pictures still needs to be properly spread. The picture was taken while I was doing it. Most of you know the reason for the clean area in the middle. For everyone else - One thing you don't want is wood glue inside the truss rod channel. So you cover it with masking tape. Later on, when the glue has been applied, remove the tape. During clamping the glue will spread to the clean area but it should not be able to reach the channel.
And here's the fingerboard glued. It just needs to be cleaned up a bit.
The Ebony binding came out pretty neat too.

Next up - sand off the excess wood, drill for side markers, anchors and screws and finally neck profile. One of my favorite pastime
Thank you for reading this far
The most annoying thing of all is a fingerboard that doesn't want to stay put while it's being clamped. To avoid that I use three small nails. Two are placed at both sides of the neck. The third one is inserted in a small hole drilled inside the nut slot, through FB and into the neck.
The nails are then clipped at the level of the fingerboard, so as they don't stick out and get in the way with the clamps.
Later on, when the glue has cured, it will be very easy to pull the nails off.
It took me all this while to figure out how much glue to use. Just enough to properly glue the parts without dripping everywhere, making a mess - and a waste. Little by little I think I'm getting a hang of it
The glue in the pictures still needs to be properly spread. The picture was taken while I was doing it. Most of you know the reason for the clean area in the middle. For everyone else - One thing you don't want is wood glue inside the truss rod channel. So you cover it with masking tape. Later on, when the glue has been applied, remove the tape. During clamping the glue will spread to the clean area but it should not be able to reach the channel.
And here's the fingerboard glued. It just needs to be cleaned up a bit.
The Ebony binding came out pretty neat too.
Next up - sand off the excess wood, drill for side markers, anchors and screws and finally neck profile. One of my favorite pastime
Thank you for reading this far

The Ebony binding came out pretty neat too.

Next up - sand off the excess wood, drill for side markers, anchors and screws and finally neck profile. One of my favorite pastime
Thank you for reading this far
I dig the ebony binding a lot..! Looks great so far..
are you really gonna SAND off the excess wood ?? it seems like theres quite a bit to be removed. I only ask because sanding removes material a bit slow, and makes a mess
 .. I guess most guys here just route it off after some bandsawing.
I dig the ebony binding a lot..! Looks great so far..
are you really gonna SAND off the excess wood ?? it seems like theres quite a bit to be removed. I only ask because sanding removes material a bit slow, and makes a mess
Hi Suraj,
yes, I should have phrased that better. I meant to say 'saw and sand off'. I saw the excess wood on the bandsaw to about a couple of mm from the fretboard. Then I sand off most of that on the sander, leaving barely half a mm.
I guess it boils down to preferences and working style. So far - and I am still trying different ways of doing the same thing - I like to finish the fingerboard before gluing it to the neck. Routing the neck with a radiused FB is not something I like doing. Routing the neck before gluing the finished FB isn't either - but I did try that. Edit: All that because I don't have a router table and I have been too lazy to make one
I'm glad you like the invisible binding
Quick update.
I started working on the neck. But I don't have pictures yet. I do have one picture of two little things - Ebony p-up casings. They are still rough - no fine sanding, no rounded edges. Just the basic shape.
I think they look great on the Quilted Maple. This is Asian Ebony, which I have used for fingerboards, neck laminates and tops. It's a wonderful wood with a glass like tap tone, hard and with a beautiful grain.
I am not sure yet whether the future owner will want them jet black, like the fingerboard, or natural colour. Obviously they will turn much darker with fine sanding and oil. But the grain will still be somewhat visible.
That's all for today. Thank you

The most annoying thing of all is a fingerboard that doesn't want to stay put while it's being clamped. To avoid that I use three small nails. Two are placed at both sides of the neck. The third one is inserted in a small hole drilled inside the nut slot, through FB and into the neck.
I tried this out yesterday and it seems to have worked good.
I was worried about getting a pre-slotted fretboard and not having it lined up correctly when gluing, so I'm glad I saw your post.The bass looks beautiful so far, I can't wait to see the end result.
I tried this out yesterday and it seems to have worked good.
The bass looks beautiful so far, I can't wait to see the end result.
That's great. I'm glad it worked for you too. Indeed keeping things lined up to the center line sometimes is utterly annoying. This system works with the top as well. I usually drill two holes, one in the neck pocket area and one in the bridge area, since both will be routed out. Or anywhere in the excess wood around the perimeter. In the body I use toothpicks though.
Glad you like the bass. Thank you.

Just curious but I found it to be easier to cutout the control cavities prior to gluing on tops or backs, cutting out shape. It also allows me to create a control plate template. Just wondering.
p.s. your method of holding the fretboard in place is extremely simplistic...it will be put to good use! maybe i think too much?
p.s. your method of holding the fretboard in place is extremely simplistic...it will be put to good use! maybe i think too much?
Just curious but I found it to be easier to cutout the control cavities prior to gluing on tops or backs, cutting out shape. It also allows me to create a control plate template. Just wondering.
p.s. your method of holding the fretboard in place is extremely simplistic...it will be put to good use! maybe i think too much?
Yes, routing before gluing the top is a possibility. I used that approach on a build that had both top and back laminates and was heavily chambered, therefore it was somewhat easier that way.
I don't think I would do that again though. Mainly because I prefer drilling for pots and jack socket before routing out the control cavity, instead of drilling a top with a void underneath - especially a Burl.
I keep on trying all sort of strategies on how to build a bass. That's a lot of fun. But I keep on coming back to the conclusion that, knowing how to use a router well is the only strategy I will ever need
Glad if the nails thing proves helpful for you too. It's a bit crude, but it does the job.
cheers!

SaintMez
Commercial User
- Jan 3, 2010
- 428
- 59
- Disclosures
- Blood Brothers Guitars - Luthier, Porter Guitars - Contractor
This is a very intriguing build Maurizio! Your stuff is always great. I like the premise that its built to get slapped. Love the Delano pickup choice too.

This is a very intriguing build Maurizio! Your stuff is always great. I like the premise that its built to get slapped. Love the Delano pickup choice too.
You're very kind. Yeah, this bass will be true to its name
The owner and I have put together a lot of ideas to make this bass a slap machine. looks good....
Thank you so much.
Update time.
Shaping the neck is still one of my favorite tasks. This one is a very special neck. I'll explain why when it's finished. For now these are the WIP pictures.
Not much of a picture really. But my old man's rasp gives it a sentimental value.
I hit it with the rasp first. I tend to like scrapers better, but found that I get uneven results with Birdseye Maple, so rasp it is. Then I go on with rounded file and a 60 grit strip from an old belt sanded roll. Finally scrapers and 80, 120 grit.
This picture was taken still at the file and 60 grit stage, I believe.
I almost finished the neck. But it was too late for pictures.
Now it takes me about four hours to complete a neck profile. One great advice I was given was to time each task. Not just to see if I improve. But also because, if one wants to build professionally, keeping each task within a specific time frame becomes crucial. It's fascinating
Thank you for following my builds.
Latest posts
-

-

-
Double Bass Almost 3 years..zero to none result..any help?
- Latest: bass player 53
-
-
