

Enjoy the benefits of a premium membership!
Upgrade Account
-
TalkBass has been independent since 1998. Add your voice.
Create a free account to reply to discussions, view embedded media, and browse with fewer display ads.
Join free Log in
Want zero display ads or expanded classifieds tools? Compare plans.
You are using an out of date browser. It may not display this or other websites correctly.
You should upgrade or use an alternative browser.
You should upgrade or use an alternative browser.
Über-Jay 5er Quilted Maple Funk Machine.
- Thread starter miziomix
- Start date
More options
Who Replied?
Hi there. I'm finally back from a 7 weeks spell in Europe and one week recharging by the beach.
Recharged I am and back to this build.
Updates on this build will now start rolling.
It's good to be back
BTW, while in Europe, I took the opportunity to finalize a project concerning my hardware. The outcome should be featured on this bass for the first time. More on this later.
So sorry for such a late reply. I have been rather inactive on TB over the last two months. Yes, I cut and slot the board. I buy Gaboon Ebony boards from Gilmerwood. Cheers!
Recharged I am and back to this build.
Updates on this build will now start rolling.
It's good to be back
BTW, while in Europe, I took the opportunity to finalize a project concerning my hardware. The outcome should be featured on this bass for the first time. More on this later.
did you cut and slot the board or was that pre-cut? Regardless, where did you get it from?
So sorry for such a late reply. I have been rather inactive on TB over the last two months. Yes, I cut and slot the board. I buy Gaboon Ebony boards from Gilmerwood. Cheers!
And finally work resumes. By work I mean, making sawdust and noise 
The last two weeks went basically into talking to new suppliers and to get better organized. I have been trying to figure out ways to make my workflow more efficient. With a few things now sorted out I can devote my time to build more basses, hopefully better basses, faster. No, really
So, I left this build three months ago at fingerboard inlay stage.
Inlaying a black fingerboard with block inlays is rather straight forward. 12" radius and 2mm thick (thin) block inlays makes it a bit tricky though. The block should be flush with the wood in the center, so as to use all the thickness available. If it sits too high, one may end up over sanding the sides. It can't sit lower either, or you're basically radiusing the fingerboard all over again.
Either ways, a 2mm MOP block inlay will get very thin at the sides and the dark wood underneath might dampen its brightness.
The best solution I know is to glue aluminum foil at the back of the inlay.
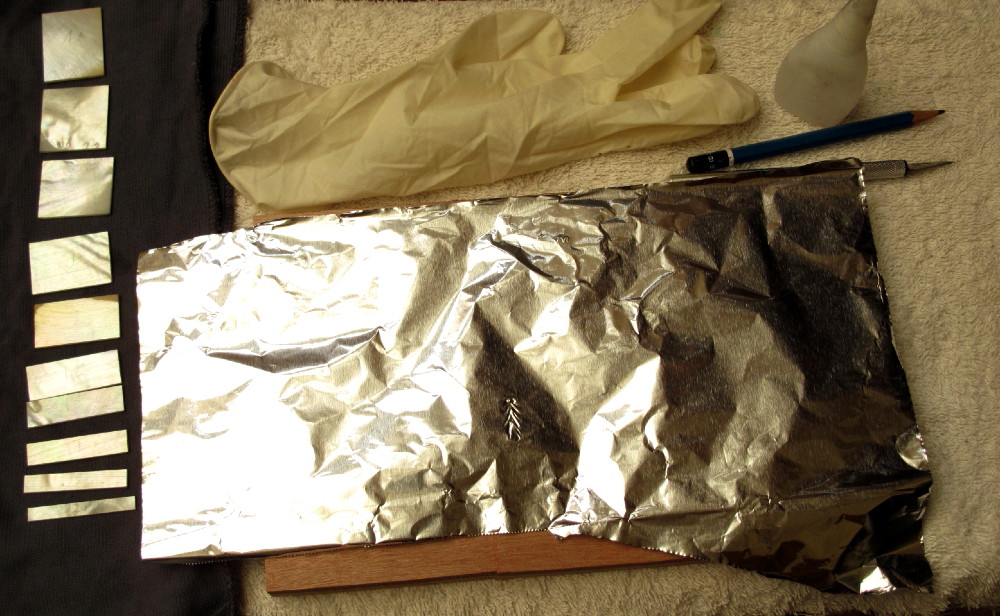
Use a ruler to flatten the foil and get rid of the wrinkles. Remember, you want the aluminum foil shiny face up. It's the shiny side that gets glued to the back of the MOP. Kinda counter intuitive, when you think how we wrap sandwiches
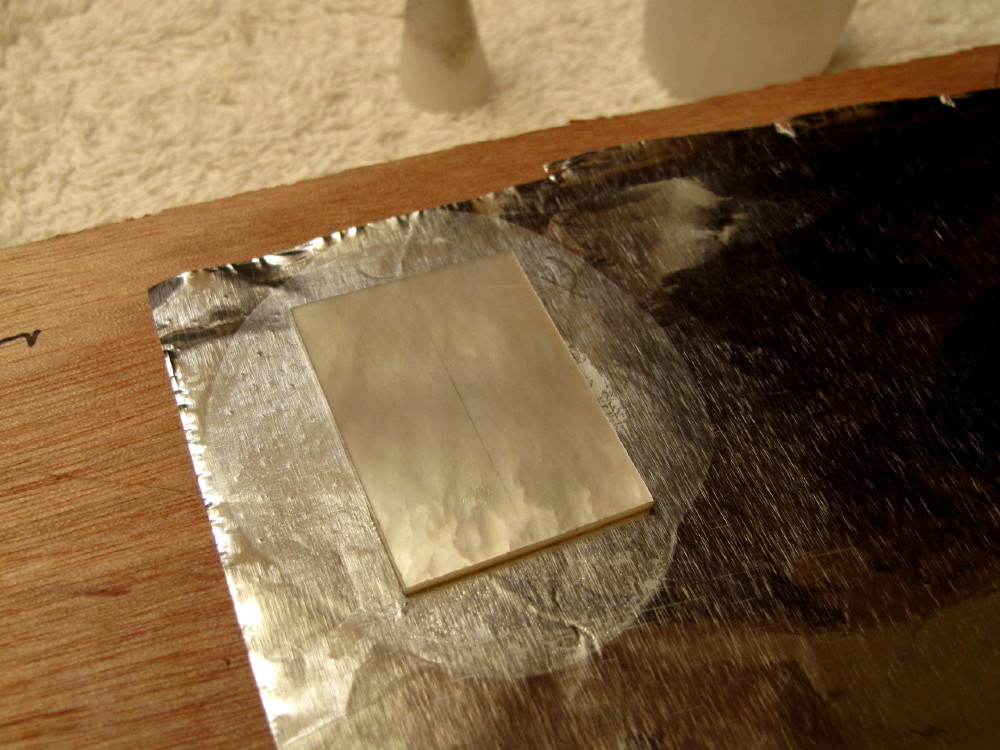
I had previously chosen the best side for each block and marked them at the back with a number to remember the orientation. After gluing the foil, I mark them again. The speed at which I can forget this things never fails to amaze me.
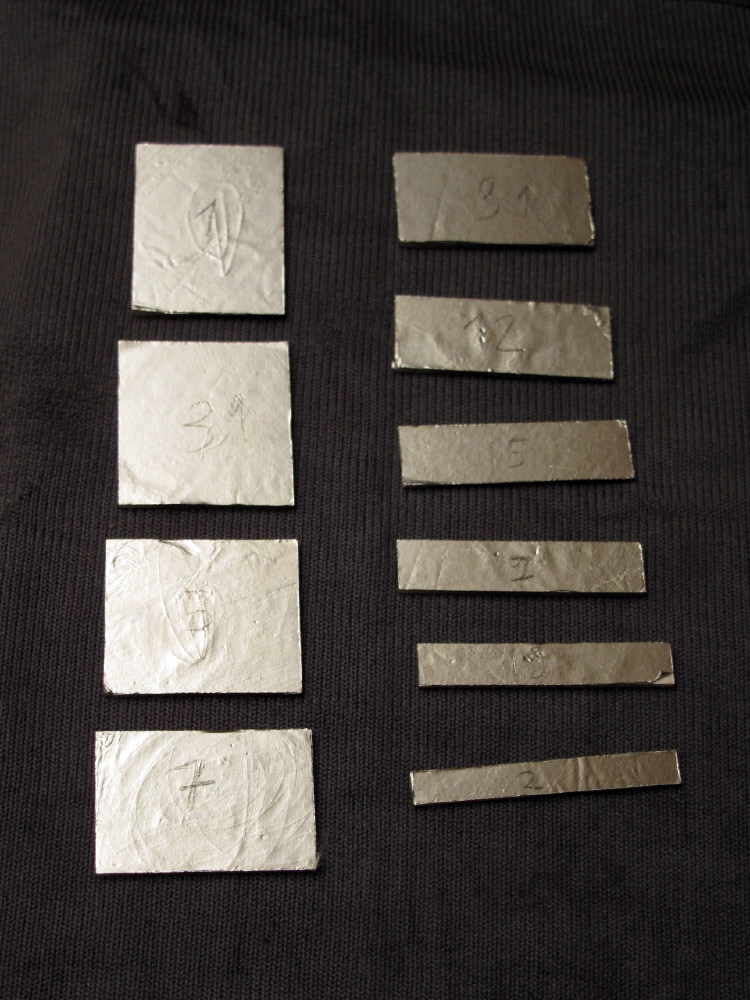
Once the block is fully in and glued, fill the gaps with fine black saw dust of the same wood. I store 80 to 240 grit saw dust and 320 to 500 grit separately. Seal with CA.
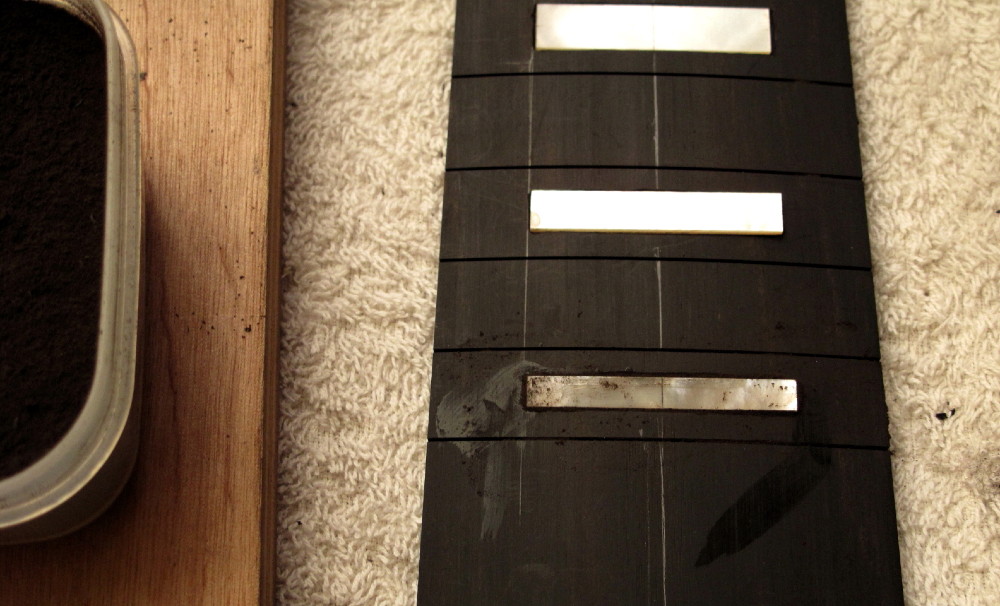
The other blocks in the picture are not fully in. You can see them sticking out quite a bit. Since the inlay is rather tight, I push the block inside only when I'm ready to glue it. Else, the MOP might snap if I try to take it out again.
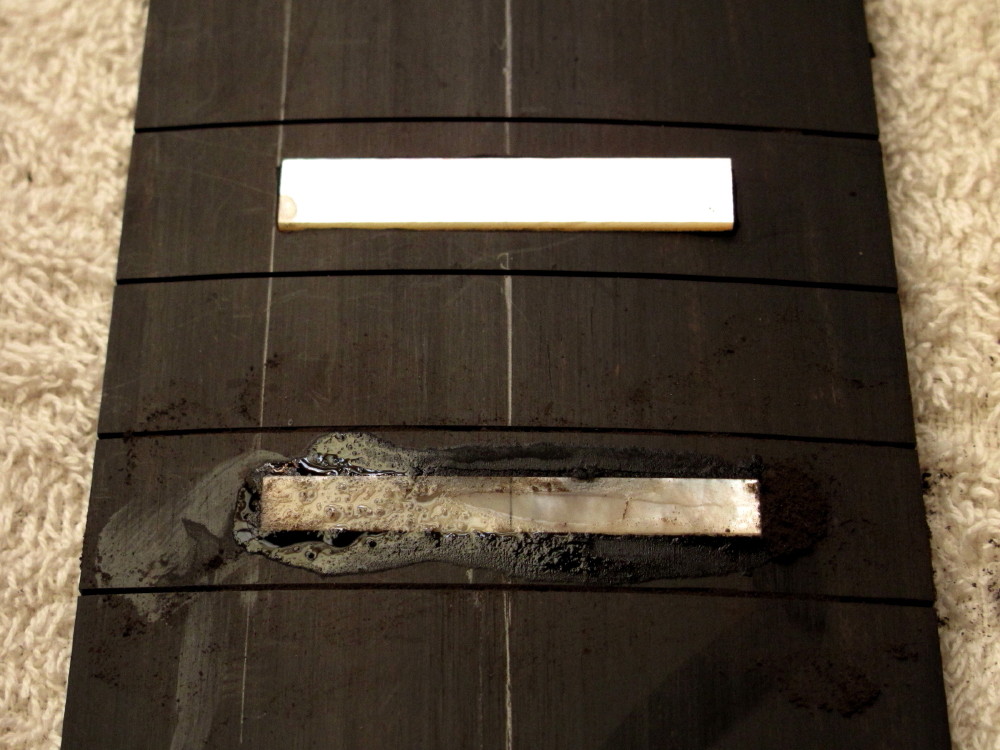
Then sand down the whole thing. There's no need to press much and I personally prefer to start with 180 grit. 80 or 120 will be faster but they'll leave scratches. 180 grit goes pretty fast and I can monitor the progress.
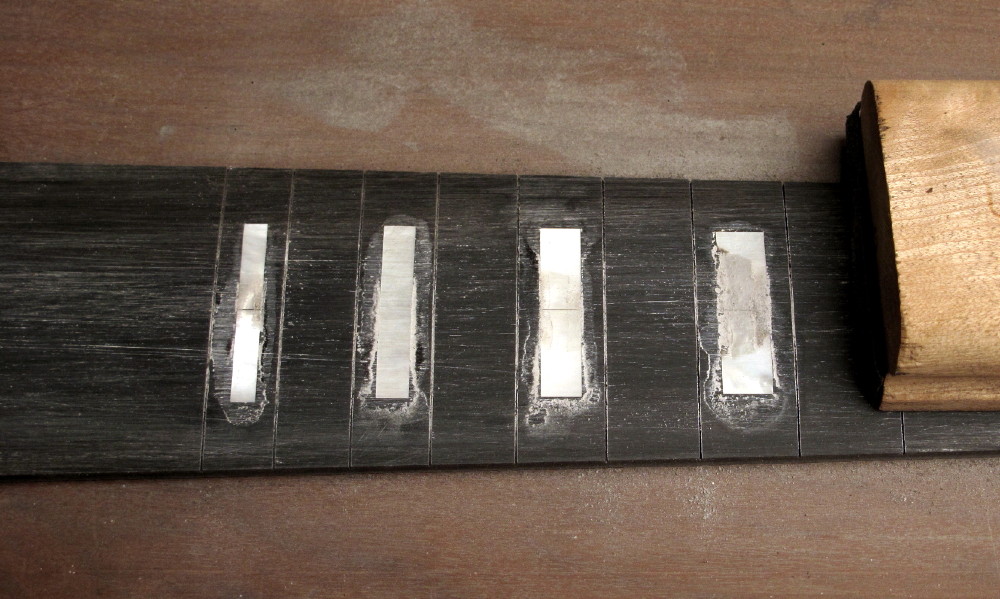
You'll know when it's time to move up to finer grit. At this stage I go up to 400 or 500 grit. It's not really necessary and you can stop at 240, I suppose. But the look of an ebony board with MOP block inlays sanded to 500 does makes my OCDness smile. When the time comes, we'll go to a much finer grit.
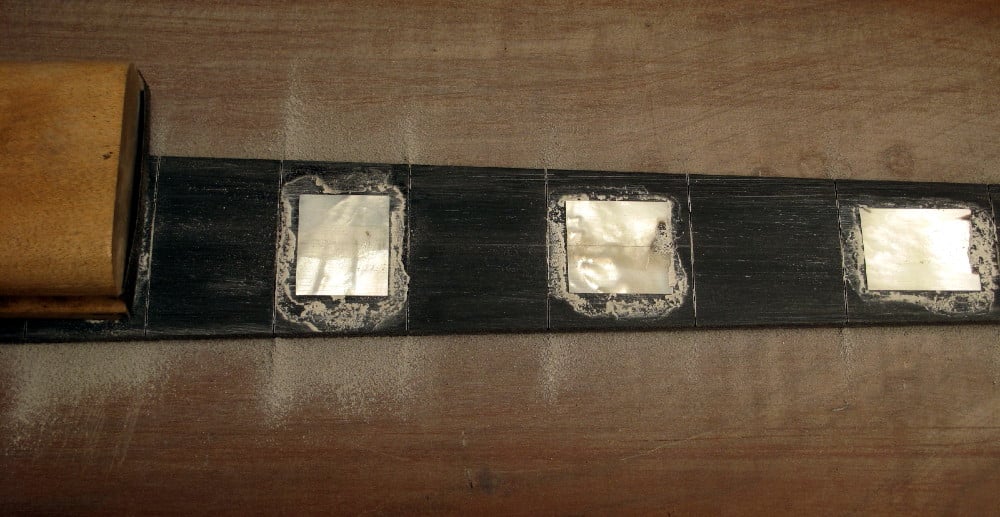
The truss rod channel is routed and I'm ready to route the body.
Thank you for reading this and have great week end! Tomorrow is riding day
The last two weeks went basically into talking to new suppliers and to get better organized. I have been trying to figure out ways to make my workflow more efficient. With a few things now sorted out I can devote my time to build more basses, hopefully better basses, faster. No, really
So, I left this build three months ago at fingerboard inlay stage.
Inlaying a black fingerboard with block inlays is rather straight forward. 12" radius and 2mm thick (thin) block inlays makes it a bit tricky though. The block should be flush with the wood in the center, so as to use all the thickness available. If it sits too high, one may end up over sanding the sides. It can't sit lower either, or you're basically radiusing the fingerboard all over again.
Either ways, a 2mm MOP block inlay will get very thin at the sides and the dark wood underneath might dampen its brightness.
The best solution I know is to glue aluminum foil at the back of the inlay.
Use a ruler to flatten the foil and get rid of the wrinkles. Remember, you want the aluminum foil shiny face up. It's the shiny side that gets glued to the back of the MOP. Kinda counter intuitive, when you think how we wrap sandwiches
I had previously chosen the best side for each block and marked them at the back with a number to remember the orientation. After gluing the foil, I mark them again. The speed at which I can forget this things never fails to amaze me.
Once the block is fully in and glued, fill the gaps with fine black saw dust of the same wood. I store 80 to 240 grit saw dust and 320 to 500 grit separately. Seal with CA.
The other blocks in the picture are not fully in. You can see them sticking out quite a bit. Since the inlay is rather tight, I push the block inside only when I'm ready to glue it. Else, the MOP might snap if I try to take it out again.
Then sand down the whole thing. There's no need to press much and I personally prefer to start with 180 grit. 80 or 120 will be faster but they'll leave scratches. 180 grit goes pretty fast and I can monitor the progress.
You'll know when it's time to move up to finer grit. At this stage I go up to 400 or 500 grit. It's not really necessary and you can stop at 240, I suppose. But the look of an ebony board with MOP block inlays sanded to 500 does makes my OCDness smile. When the time comes, we'll go to a much finer grit.
The truss rod channel is routed and I'm ready to route the body.
Thank you for reading this and have great week end! Tomorrow is riding day
That's quite tricky but you executed it ever so well.
Ride safely, wear those protective gloves and sheilds. We need to keep your hands in good shape
Ride safely, wear those protective gloves and sheilds. We need to keep your hands in good shape
That's quite tricky but you executed it ever so well.
Ride safely, wear those protective gloves and sheilds. We need to keep your hands in good shape
Thank you! No worries, I've got all those gadgets
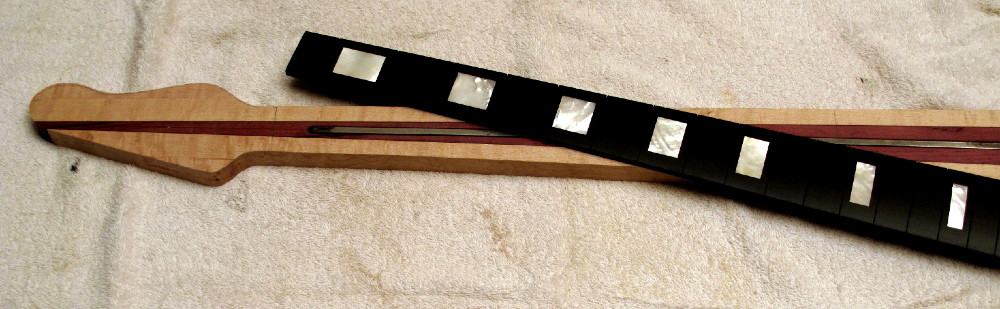
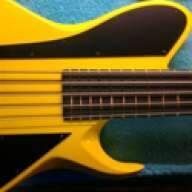
And I forgot to upload this picture with detail of the finished fretboard.

Geoff St. Germaine
Commercial User
- Aug 31, 2001
- 6,267
- 302
- Disclosures
- Owner - St. Germaine Guitars
Those inlays look amazing, Maurizio!! I hope my MOP blocks on the two archtops I'm working on turn out anywhere near that. I'm gonna try your foil trick as well. Your threads are always a treat!


Oh my... that is just flawless!!!
Love it!!!
Thank you!
Those inlays look amazing, Maurizio!! I hope my MOP blocks on the two archtops I'm working on turn out anywhere near that. I'm gonna try your foil trick as well. Your threads are always a treat!
Thank you Geoff! About the aluminum foil - some paint the back of the inlay white. That works well too. I prefer the foil because of the different way the two reflect light.
Does it have to look like another J Bass?
Hi. I know what you mean. In a way yes, it is another J bass. And at the same time it isn't. If I had to build a J clone I'd rather go riding
I am driven by what I dislike about the Fender Jazz, rather than what I do like.
I like the overall design. That's it.
To my eyes, the FJ is too big, too heavy; the headstock is huge and it's prone to neck dive. It doesn't have contours where I would like them.
The Über Jay is the J as I wanted it. It's slimmer, smaller and thinner. A 34" fiver weight 6 lbs. It's deeply contoured, including the headstock which is much smaller than the original one. More to the point, I build headless hybrid basses. In term of ergonomics and aesthetics that's pretty much a tectonic shift.
So, it has to resemble a J because that was my goal from the start, as the 'Jay' in the name states. It's both a tribute to Leo's genius and a personal take on the concept.
In the line up of basses I build there's also a Ü-M (another tribute, to the StingRay, with similar approach). And the Ü-Groove, which is an original design. Or so I like to believe
Anyway, this build will take probably two or three more months before is done. If you were interested to see how it ends, there are a threads on TB featuring finished Über-Jay basses as well as the other two models. Or just click on the Facebook link in my signature and go to the albums section.
Cheers!
Sub'd, Love your builds man!
Thank you so much.
.....
Today was template and design day. I had to make pick up templates for this bass as I didn't have them for Delano 5, and templates for other details that will be a bit different this time around.
I also spent some time with one of my most recent customers. One who can actually drop by in person, not just online
We finalized some details for his very own Ü-Groove and it was fun. It's a cool build, starting soon.The day ended up at the dentist's. I don't suppose you want pictures of that. LOL
ciao

miziomix said:Hi. I know what you mean. In a way yes, it is another J bass. And at the same time it isn't. If I had to build a J clone I'd rather go riding
I am driven by what I dislike about the Fender Jazz, rather than what I do like.
I like the overall design. That's it.
To my eyes, the FJ is too big, too heavy; the headstock is huge and it's prone to neck dive. It doesn't have contours where I would like them.
The Über Jay is the J as I wanted it. It's slimmer, smaller and thinner. A 34" fiver weight 6 lbs. It's deeply contoured, including the headstock which is much smaller than the original one. More to the point, I build headless hybrid basses. In term of ergonomics and aesthetics that's pretty much a tectonic shift.
So, it has to resemble a J because that was my goal from the start, as the 'Jay' in the name states. It's both a tribute to Leo's genius and a personal take on the concept.
In the line up of basses I build there's also a Ü-M (another tribute, to the StingRay, with similar approach). And the Ü-Groove, which is an original design. Or so I like to believe
Anyway, this build will take probably two or three more months before is done. If you were interested to see how it ends, there are a threads on TB featuring finished Über-Jay basses as well as the other two models. Or just click on the Facebook link in my signature and go to the albums section.
Cheers!
You've had a great concept and vision in the first place. Your approach really works as seen from the results. Keep it up, Maurizio. We need more builders like you
miziomix said:I also spent some time with one of my most recent customers. One who can actually drop by in person, not just online
The day ended up at the dentist's. I don't suppose you want pictures of that. LOL
ciao
I envy that guy
The pics at the dentist can be posted in the Miscellaneous section.


- Aug 15, 2011
- 571
- 171
- Disclosures
- Owner/Luthier:RoseBud Basses & Guitars LLC
I really like the aluminum foil trick... what type of glue did you use?
I'm glad to see you back on this one, it's always a pleasure to watch you work.
I'm glad to see you back on this one, it's always a pleasure to watch you work.

You've had a great concept and vision in the first place. Your approach really works as seen from the results. Keep it up, Maurizio. We need more builders like you
Thank you so much!
Watching, learning, taking notes, loving
Thank you. That's pretty much what I do too on TB
I really like the aluminum foil trick... what type of glue did you use?
I'm glad to see you back on this one, it's always a pleasure to watch you work.
Thank you so much. Yes, I have been away for too long. But I'll quickly make up for lost time. I use CA. Just a thin layer spread onto the foil with a finger - wrapped into gloves
That is a beautiful piece of maple. All the best with the build.
Thank you. Yes, it's a lovely piece. Routing through it almost feels like murder
Speaking of which....
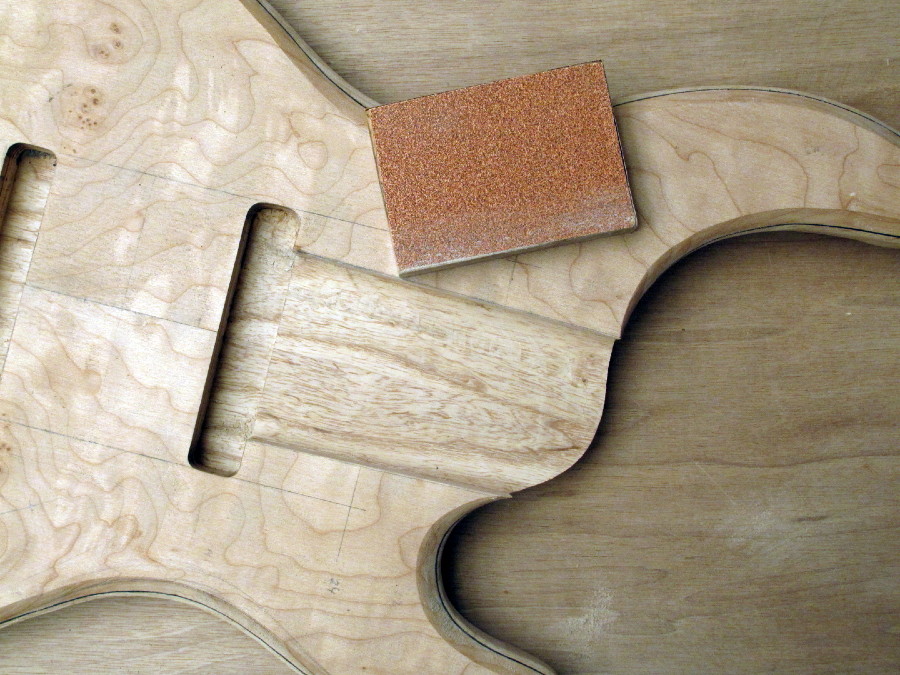
Neck pocket and p-ups cavities.
1
2
3
Sorry for the lack of notes. Tomorrow I take off very early. Riding week end and I better get to destination before the afternoon shower. You've got to love the rainy season.
The pictures above show how I go about with routing the neck pocket. The experienced ones here will not see anything new. But if anyone has question, please ask.
Thank you for following my builds. They would not be as much fun without you guys.
Hi,
today I routed the body profile. I now prefer that to using a belt sander. Too much dust.
This build brings about two small but significant changes to the design of the Ü-J and they will be standard in all future builds.
The owner wished the body could be smaller. I couldn't do that without affecting the ergonomics of the bass. But I had been toying with the idea of bringing to the Ü-J the lesson I had learned developing the Ü-Groove design - a slimmer, more nimble body. That, I can do. And since he had asked, I thought it was a sign

You might not be able to see it from the picture, but the body is slimmer in the center area and horns. The bass horn is slightly longer and the treble one slightly lower - oh, we're talking millimeters here. The difference will be very clear once I start shaping the contour.
The overall look is a bit less 'classic J' if you wish. But it adds a touch of dynamism to the design and it still is a J through and through.
Here's another change.

The area under the tuners is open, unlike the previous builds where there was a recess. The recess will still be available as custom option. But from now on, this is how the standard Ü-J is going to look like.
The tuners unit will still sit on a recess. That hasn't changed, and it shouldn't. The more headless hybrid basses I build the more I am convinced that the recess allows the system to work better.
The body overall is still rather thick. It will lose about 5mm - four from the back.
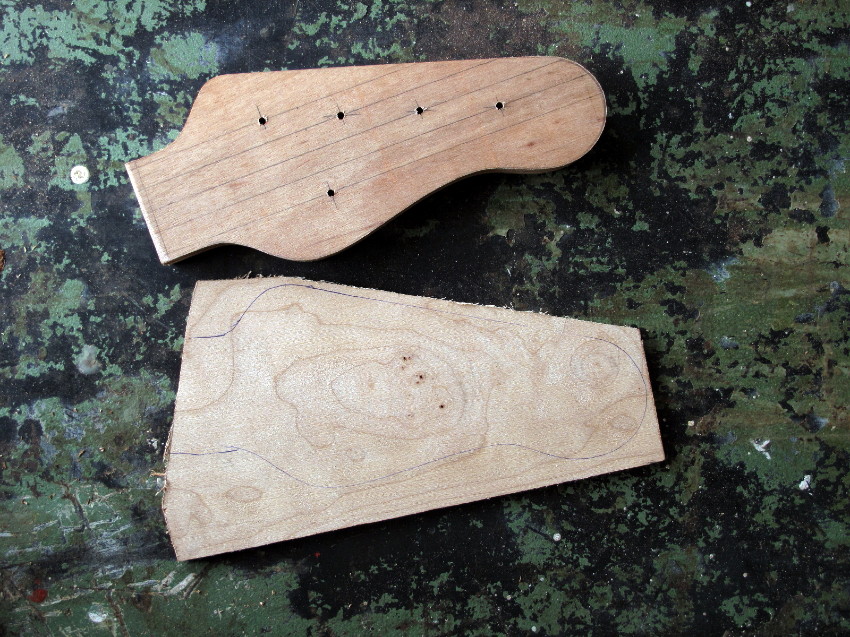
This is the detail of the headstock veneer. Maple is such a pretty wood, even a little scrap looks great
Thank you for reading this far.
Maurizio
today I routed the body profile. I now prefer that to using a belt sander. Too much dust.
This build brings about two small but significant changes to the design of the Ü-J and they will be standard in all future builds.
The owner wished the body could be smaller. I couldn't do that without affecting the ergonomics of the bass. But I had been toying with the idea of bringing to the Ü-J the lesson I had learned developing the Ü-Groove design - a slimmer, more nimble body. That, I can do. And since he had asked, I thought it was a sign
You might not be able to see it from the picture, but the body is slimmer in the center area and horns. The bass horn is slightly longer and the treble one slightly lower - oh, we're talking millimeters here. The difference will be very clear once I start shaping the contour.
The overall look is a bit less 'classic J' if you wish. But it adds a touch of dynamism to the design and it still is a J through and through.
Here's another change.
The area under the tuners is open, unlike the previous builds where there was a recess. The recess will still be available as custom option. But from now on, this is how the standard Ü-J is going to look like.
The tuners unit will still sit on a recess. That hasn't changed, and it shouldn't. The more headless hybrid basses I build the more I am convinced that the recess allows the system to work better.
The body overall is still rather thick. It will lose about 5mm - four from the back.
This is the detail of the headstock veneer. Maple is such a pretty wood, even a little scrap looks great
Thank you for reading this far.
Maurizio

This is gonna look great, can't wait to see it when it's done!
Thank you, I'm glad you like it.
It does look a little slimmer than the Ragnarok. For my taste, I like this one better!
It is a bit slimmer. Than again, the Rök is very muscular - true to its name. I will keep both body shapes available for custom builds. Some builds will call for a larger body, others for a slimmer one. That's custom, innit?
Just a quick update.
The build moves forward steadily. Today I worked on the contour. Run a router bit along the edges - two, in fact. Then I went on with scraper, file and sander. I only had the time to do the bass horn side and it isn't finished yet. But it starts looking like a Ü-Jay to me
Barely visible are - knobs position and the layout of the el. cavity which I'm going to route tomorrow.
It has been a busy week... celebrating, dining, meeting friends, out with my riding buddies and so on. But I had to find the time to post the last update of the year
When routing the neck pocket, I leave a bit less than 1mm extra wood on both sides, to allow for shrinkage, if any.
Two weeks have passed since and now I've sanded the pocket till the neck fits tightly. The lacquer will add a slight thickness. I like the fit to be very tight.
Here's the process of drilling holes for the pots - and forgetting the toggle

The cavity had to be done differently from the usual ones, because this bass features five pots and a toggle. So far the Ü-Jay has had a maximum of four. So the cavity had to make room for the extra pot.
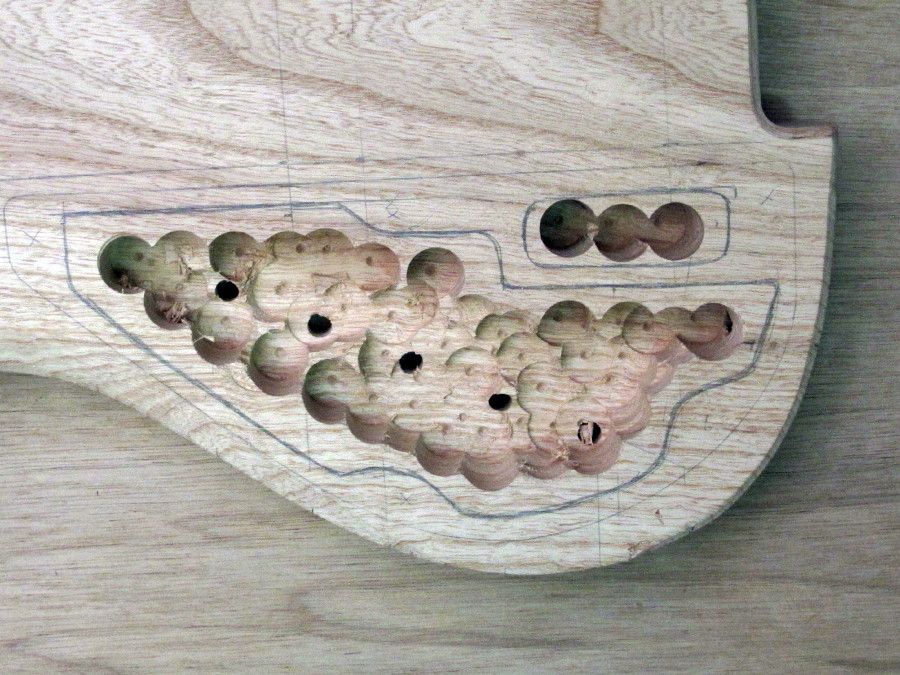
The new cavity covers are (being) custom made and engraved. So shape and size of the cavity and screws placement cannot be changed. I could only rearrange the space within those boundaries.
Instead of making a template I went the other way around and routed the new cavity directly on the bass - free hand with masks. I know many will cringe. But it's a technique I learned when I was an airbrush illustrator many years ago and, albeit a router it's not exactly an airbrush, the way one plans the task is very similar.
I used what you would call a trimmer, rather than a plunge router, and a number of 7mm thick acrylic masks of various shapes. Then I basically use the masks to follow the drawing making sure that the the new mask is positioned flush with the one already routed.
I don't exactly recommend to try this process on a build. But with practice, it works well. I does for me, at the least. The advantage is that, once one gets a hang of it, it allows a certain amount of creativity and improvisation. Which makes it prefect for one of a kind builds, where templates would not be of use later on. In this case, instead, a template will be made out of this cavity by using a bit with reverse ball bearings.
The cavity has not been counter sunk yet. I will wait for the covers. Yes, I checked the Autocad before giving the green light and it matches my template perfectly. But you never know
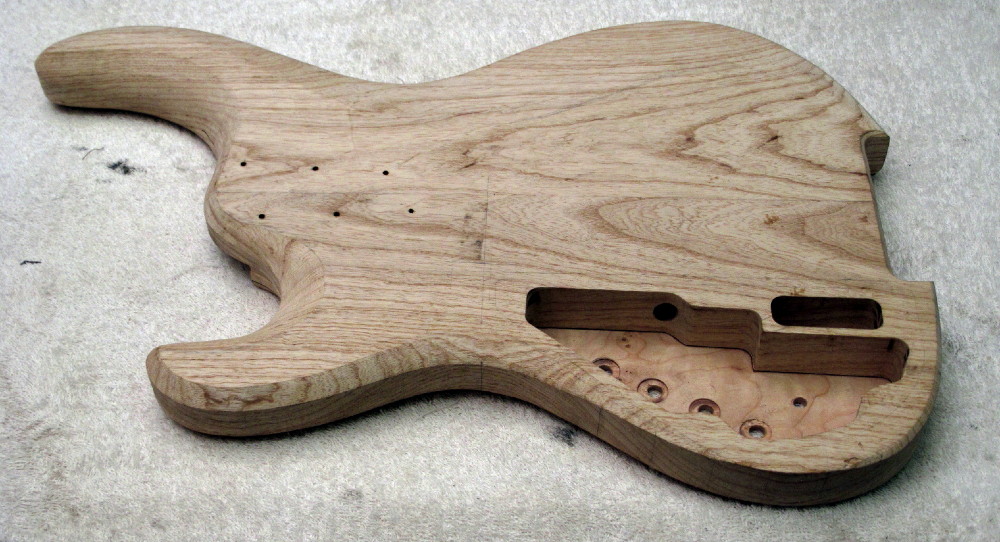
And this is the top with the hole for the toggle and the six screw holes in the neck pocket.
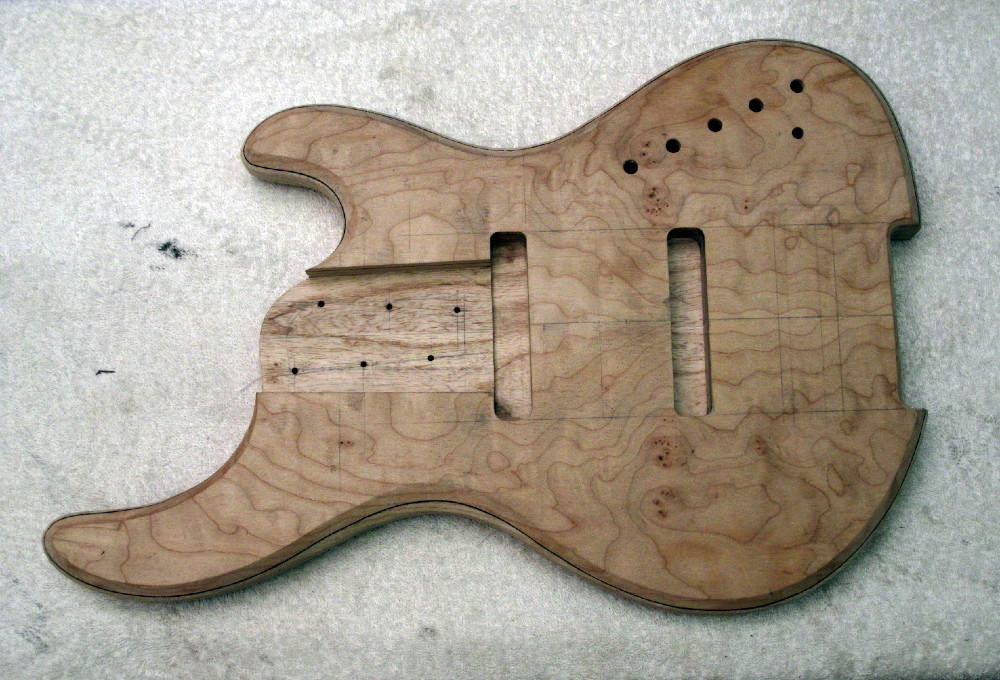
Quilted Maple is such a fantastic wood. With many others I like to arrange the grain to either flow with or against the shape of the body. Quilt, instead, is like silk - whichever way it falls, it looks great.
I haven't worked on the profile and contour. Everything is still rough. That's for the new year.
A brilliant 2013 to you all!
Maurizio
When routing the neck pocket, I leave a bit less than 1mm extra wood on both sides, to allow for shrinkage, if any.
Two weeks have passed since and now I've sanded the pocket till the neck fits tightly. The lacquer will add a slight thickness. I like the fit to be very tight.
Here's the process of drilling holes for the pots - and forgetting the toggle
The cavity had to be done differently from the usual ones, because this bass features five pots and a toggle. So far the Ü-Jay has had a maximum of four. So the cavity had to make room for the extra pot.
The new cavity covers are (being) custom made and engraved. So shape and size of the cavity and screws placement cannot be changed. I could only rearrange the space within those boundaries.
Instead of making a template I went the other way around and routed the new cavity directly on the bass - free hand with masks. I know many will cringe. But it's a technique I learned when I was an airbrush illustrator many years ago and, albeit a router it's not exactly an airbrush, the way one plans the task is very similar.
I used what you would call a trimmer, rather than a plunge router, and a number of 7mm thick acrylic masks of various shapes. Then I basically use the masks to follow the drawing making sure that the the new mask is positioned flush with the one already routed.
I don't exactly recommend to try this process on a build. But with practice, it works well. I does for me, at the least. The advantage is that, once one gets a hang of it, it allows a certain amount of creativity and improvisation. Which makes it prefect for one of a kind builds, where templates would not be of use later on. In this case, instead, a template will be made out of this cavity by using a bit with reverse ball bearings.
The cavity has not been counter sunk yet. I will wait for the covers. Yes, I checked the Autocad before giving the green light and it matches my template perfectly. But you never know
And this is the top with the hole for the toggle and the six screw holes in the neck pocket.
Quilted Maple is such a fantastic wood. With many others I like to arrange the grain to either flow with or against the shape of the body. Quilt, instead, is like silk - whichever way it falls, it looks great.
I haven't worked on the profile and contour. Everything is still rough. That's for the new year.
A brilliant 2013 to you all!
Maurizio
Latest posts
-

-

-
Double Bass Almost 3 years..zero to none result..any help?
- Latest: bass player 53
-
-
