• TalkBass has been independent since 1998. Add your voice.
    Create a free account to reply to discussions, view embedded media, and browse with fewer display ads.
    Join freeLog in
    Want zero display ads or expanded classifieds tools? Compare plans.

4001 Mashup

Funny you should ask, as I was thinking about this myself. I had thought I'd start with 1000 grit, but now I think I'll try starting with 1500. That's the lowest grit on my mesh pads I just received. They go up to 12000 or something. Heh, it goes to 11...

If you are using micro-mesh the numbering system is not the same as regular sandpaper, so just want to be sure you and Hopkins are talking the same language. Micro-mesh 1500 is actually 400 grit, and I don't think you don't want to start with that. Micro-mesh 4000 is the same as regular 1500.
 
If you are using micro-mesh the numbering system is not the same as regular sandpaper, so just want to be sure you and Hopkins are talking the same language. Micro-mesh 1500 is actually 400 grit, and I don't think you don't want to start with that. Micro-mesh 4000 is the same as regular 1500.

Hmmm, there's no way that 1500 micro mesh is equivalent to 400 grit sandpaper, at least the stuff I have.

This is the stuff I bought: Micro Mesh Finishing Polishing Set 3" x 4" Sheets 9 Grades Made in USA | eBay
 
As an eBay Associate, TalkBass may earn a commission from qualifying purchases.
Here's a conversion chart: http://micro-surface.com/images//CONVERSION_CHART.jpg
There's regular US graded paper and European P type. My favorite paper is the rolls of Bosch or Porter Cable sticky back paper, and those are in P-grade which is similar to US grade at the low end, then very different up high. Throw in the micro-mesh grading and it's all a little confusing! Simple solution is start a bit high and if that doesn't cut it, go lower.
 
So the hits just keep on coming. While wet sanding, I noticed that the indicated area has absolutely no clear coat on it.

102s4go.jpg


After all those coats, I apparently entirely missed that little nook under the top horn. So, in my "infinite wisdom", I sprayed a few coats of what's left of the clear on it last night. Now the can is totally empty. Of course, this morning I noticed this:

ei0ay9.jpg


And that's after sanding the "bubbles" level. Apparently, the varathane clear does burn into the previous coats.

In the immortal words of my Mother's Mother, may she rest in peace, "Oi Vey!".
 
road worn… :bag:

There are definitely road worn areas on this finish. But it does buff out pretty shiny.

14wvt4w.jpg


I know I still sanded through a few small areas. *sigh* So I don't know what I'm going to do with this finish just yet. I'm tempted to sand it down to the bare wood and just Tung oil it. But we'll see. I still have fret work to do, and of course final assembly. I just may move forward to that, because I'm really curious if I was able to actually make a functional neck.

Going forward, I don't know that I'll do any more gloss finishes. It's *a lot* of hard work. Tung oil is my friend.
 
If you are using micro-mesh the numbering system is not the same as regular sandpaper, so just want to be sure you and Hopkins are talking the same language. Micro-mesh 1500 is actually 400 grit, and I don't think you don't want to start with that. Micro-mesh 4000 is the same as regular 1500.

Absolutely correct. I was talking about regular 3M wet or dry sand paper. Micromesh uses a totally different grit system for some reason.

Personally I have been completely unimpressed with Micromesh. It is no where near worth its price
 
There are definitely road worn areas on this finish. But it does buff out pretty shiny.

14wvt4w.jpg


I know I still sanded through a few small areas. *sigh* So I don't know what I'm going to do with this finish just yet. I'm tempted to sand it down to the bare wood and just Tung oil it. But we'll see. I still have fret work to do, and of course final assembly. I just may move forward to that, because I'm really curious if I was able to actually make a functional neck.

Going forward, I don't know that I'll do any more gloss finishes. It's *a lot* of hard work. Tung oil is my friend.

Dont give up, finishing is very enjoyable once you get the hang of it.
 
Dont give up, finishing is very enjoyable once you get the hang of it.

Thanks for the encouragement :) On the other hand, my arms are sore from sanding all day. How do you prevent sanding through around the edges? That was the most difficult part, especially sharp edges, like around the perimeter of the headstock.

Despite the finish challenges, the bass actually plays fairly well. It appears I did an ok job on the frets, no sticky outie frets ends, and there's only one note that buzzes, the "A" string, on the 9th fret. Which is weird since I was most concerned about the slight relief on one side and reverse relief on the other in that area. The middle was actually fine. I'll have to take a closer look at that tomorrow. The neck didn't blow out when I tweaked the truss rods, so that's another plus. I know that neck is likely too thin. Feels great though. I also may have to make a new nut - I think the g string is a bit too close to the edge of the fretboard.

The pickups sound pretty good, but the output is pretty low. I never made any setup for height adjustment - I was too focused on putting the thing together, but they could be closer to the strings, which may fix the low output issue. Additionally, the G string is noticeably lower output than the other strings. Perhaps the height adjustment will fix that. or a better spaced nut. We'll see. It could also be that I used the bridge pickup for the neck position and visa versa - I never marked which was which when I put them in the covers. Right now, I have a flat metal plate across the bottom of the poles, with neo magnets just stuck to the metal. I may have to put the neo magnets directly on the poles. (I didn't ever magnetize them) I still haven't shielded the control cavity or pickup cavities and the bass is noisy - until I set both pickup outputs the same - then the noise totally goes away. I reverse wound one of them, and put the magnets reverse to each other on each pickup - humbucker style, which apparently is working.

And finally, while most of the finish is nice and glossy - and I'm real pleased with that - the orange color is, well, not exactly my taste. I'm still deciding what to do about that.

This is definitely a learning experience, and I learned quite a bit on this one. Thanks to everyone for all the help and encouragement. I'm already thinking about what I'll do for my next build, now that I know I can build functional necks.

Oh, and as an afterthought, I'm impressed with the varathane clear coat, despite my learning curve. It fully cured overnight, and is less stinky than nitro. Just keep it in a cool place...
 
Thanks for the encouragement :) On the other hand, my arms are sore from sanding all day. How do you prevent sanding through around the edges? That was the most difficult part, especially sharp edges, like around the perimeter of the headstock.

Despite the finish challenges, the bass actually plays fairly well. It appears I did an ok job on the frets, no sticky outie frets ends, and there's only one note that buzzes, the "A" string, on the 9th fret. Which is weird since I was most concerned about the slight relief on one side and reverse relief on the other in that area. The middle was actually fine. I'll have to take a closer look at that tomorrow. The neck didn't blow out when I tweaked the truss rods, so that's another plus. I know that neck is likely too thin. Feels great though. I also may have to make a new nut - I think the g string is a bit too close to the edge of the fretboard.

The pickups sound pretty good, but the output is pretty low. I never made any setup for height adjustment - I was too focused on putting the thing together, but they could be closer to the strings, which may fix the low output issue. Additionally, the G string is noticeably lower output than the other strings. Perhaps the height adjustment will fix that. or a better spaced nut. We'll see. It could also be that I used the bridge pickup for the neck position and visa versa - I never marked which was which when I put them in the covers. Right now, I have a flat metal plate across the bottom of the poles, with neo magnets just stuck to the metal. I may have to put the neo magnets directly on the poles. (I didn't ever magnetize them) I still haven't shielded the control cavity or pickup cavities and the bass is noisy - until I set both pickup outputs the same - then the noise totally goes away. I reverse wound one of them, and put the magnets reverse to each other on each pickup - humbucker style, which apparently is working.

And finally, while most of the finish is nice and glossy - and I'm real pleased with that - the orange color is, well, not exactly my taste. I'm still deciding what to do about that.

This is definitely a learning experience, and I learned quite a bit on this one. Thanks to everyone for all the help and encouragement. I'm already thinking about what I'll do for my next build, now that I know I can build functional necks.

Oh, and as an afterthought, I'm impressed with the varathane clear coat, despite my learning curve. It fully cured overnight, and is less stinky than nitro. Just keep it in a cool place...


Its pretty simple really. I try and get plenty of finish on them and to not sand them as much
 
  • Like
Reactions: mapleglo
And I've found you need a very light hand. Use warm water with a drop or two of dish soap and clean the sandpaper regularly in the warm water.

But mostly develop a light hand. One of my best purchases has been a Motor Guard Corporation Roller Block for wrapping the sandpaper around. It's thin, bends just enough to get around the curves.
http://www.amazon.com/Motor-Guard-R...040&sr=1-9&keywords=motor+guard+sanding+block
I bought mine locally and it was less than Amazon.
 
As an Amazon Associate, TalkBass may receive commissions from qualifying purchases made via links on this site.
So I've been living with this bass for a week, trying to decide what to do. I've decided I'm not too keen on the orange. It's not a bad color, however orange is not a color that I'd choose for a bass. If that were the only issue, I'd probably just live with it. There's also the issue of the frets/fretboard. This was my first neck with frets. I'm amazed that it's playable and in tune. But there's that dip on the treble side that occurred during the radiusing, and while I was able to compensate to some degree with the fret leveling, if these frets wear down, there's no room to do another leveling on some of the frets. So I'd have to pull them off and re-fret it. And there's that one low fret, somewhere around the 9th fret. If that were the only issue, I'd probably just live with it. And there's the headstock issue, with the truss rods too far north, when they should be level with the end of the fretboard. That would have prevented the crowding of the truss rod adjustment channel to the tuner, and the lumpy back of the neck. If that were the only issue, I'd probably just live with it.

That said, there's at least three major issues with this build, not including the fact that there's that bubble in the clear on the back which needs to be sanded out and redone, and at some point, one has to assess the situation and decide if it's time to set this aside, and just rebuild the darn thing. The amount of work to fix this - at least those items that can be fixed, is more than to build it again. Use this as a learning experience, and don't make the same mistakes.

So that's what I'm doing.

21lifdc.jpg


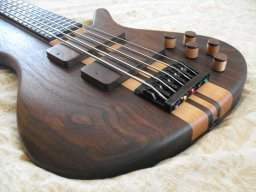
New wood. Maple for the neck, and I found this beautiful piece of walnut for the neck stringers and body wings. Clear coat only on this one. No dye, no paint, no drips, no runs, no errors.

So I cut this wood down, and clamped it up.

wlx6i0.jpg


I think I almost have enough clamps.

Next up, body wings. But I think I've worked on this enough for today. Other chores beckon.
 
So I've been living with this bass for a week, trying to decide what to do. I've decided I'm not too keen on the orange. It's not a bad color, however orange is not a color that I'd choose for a bass. If that were the only issue, I'd probably just live with it. There's also the issue of the frets/fretboard. This was my first neck with frets. I'm amazed that it's playable and in tune. But there's that dip on the treble side that occurred during the radiusing, and while I was able to compensate to some degree with the fret leveling, if these frets wear down, there's no room to do another leveling on some of the frets. So I'd have to pull them off and re-fret it. And there's that one low fret, somewhere around the 9th fret. If that were the only issue, I'd probably just live with it. And there's the headstock issue, with the truss rods too far north, when they should be level with the end of the fretboard. That would have prevented the crowding of the truss rod adjustment channel to the tuner, and the lumpy back of the neck. If that were the only issue, I'd probably just live with it.

That said, there's at least three major issues with this build, not including the fact that there's that bubble in the clear on the back which needs to be sanded out and redone, and at some point, one has to assess the situation and decide if it's time to set this aside, and just rebuild the darn thing. The amount of work to fix this - at least those items that can be fixed, is more than to build it again. Use this as a learning experience, and don't make the same mistakes.

So that's what I'm doing.

21lifdc.jpg


New wood. Maple for the neck, and I found this beautiful piece of walnut for the neck stringers and body wings. Clear coat only on this one. No dye, no paint, no drips, no runs, no errors.

So I cut this wood down, and clamped it up.

wlx6i0.jpg


I think I almost have enough clamps.

Next up, body wings. But I think I've worked on this enough for today. Other chores beckon.
I really admire your dedication...
 
I really admire your dedication...

Thanks!

I think I would have sulked a bit longer and probably wasted lots of time trying to fix things. Your perseverance is admirable.

Well, I sulked for a week, and the bass began to bug me more and more. And after thinking about it, once the design is done, and the hardware bought and paid for, the $75.00 for the wood seemed like a pretty good deal. And that walnut called to me. It was a "scrap", 44 1/4" long (they have a 4 foot minimum for "real" pieces of lumber), and since the bass is 43 3/4" long, it's just long enough. And those walnut RIC's are just beautiful. Really, the only other thing I need to buy is a couple of truss rods. So for just about $100.00 and some work, I can make this right. Assuming I don't make any more unrepairable mistakes...
 
  • Like
Reactions: BassHappy and JIO