• TalkBass has been independent since 1998. Add your voice.
    Create a free account to reply to discussions, view embedded media, and browse with fewer display ads.
    Join freeLog in
    Want zero display ads or expanded classifieds tools? Compare plans.

5-string PJ build - Roasted Maple goodness

turindev

Commercial User
Jul 1, 2005
514
1,594
Chattanooga, Tennessee USA
www.m7bassworks.com
Disclosures
Builder, m7bassworks.com
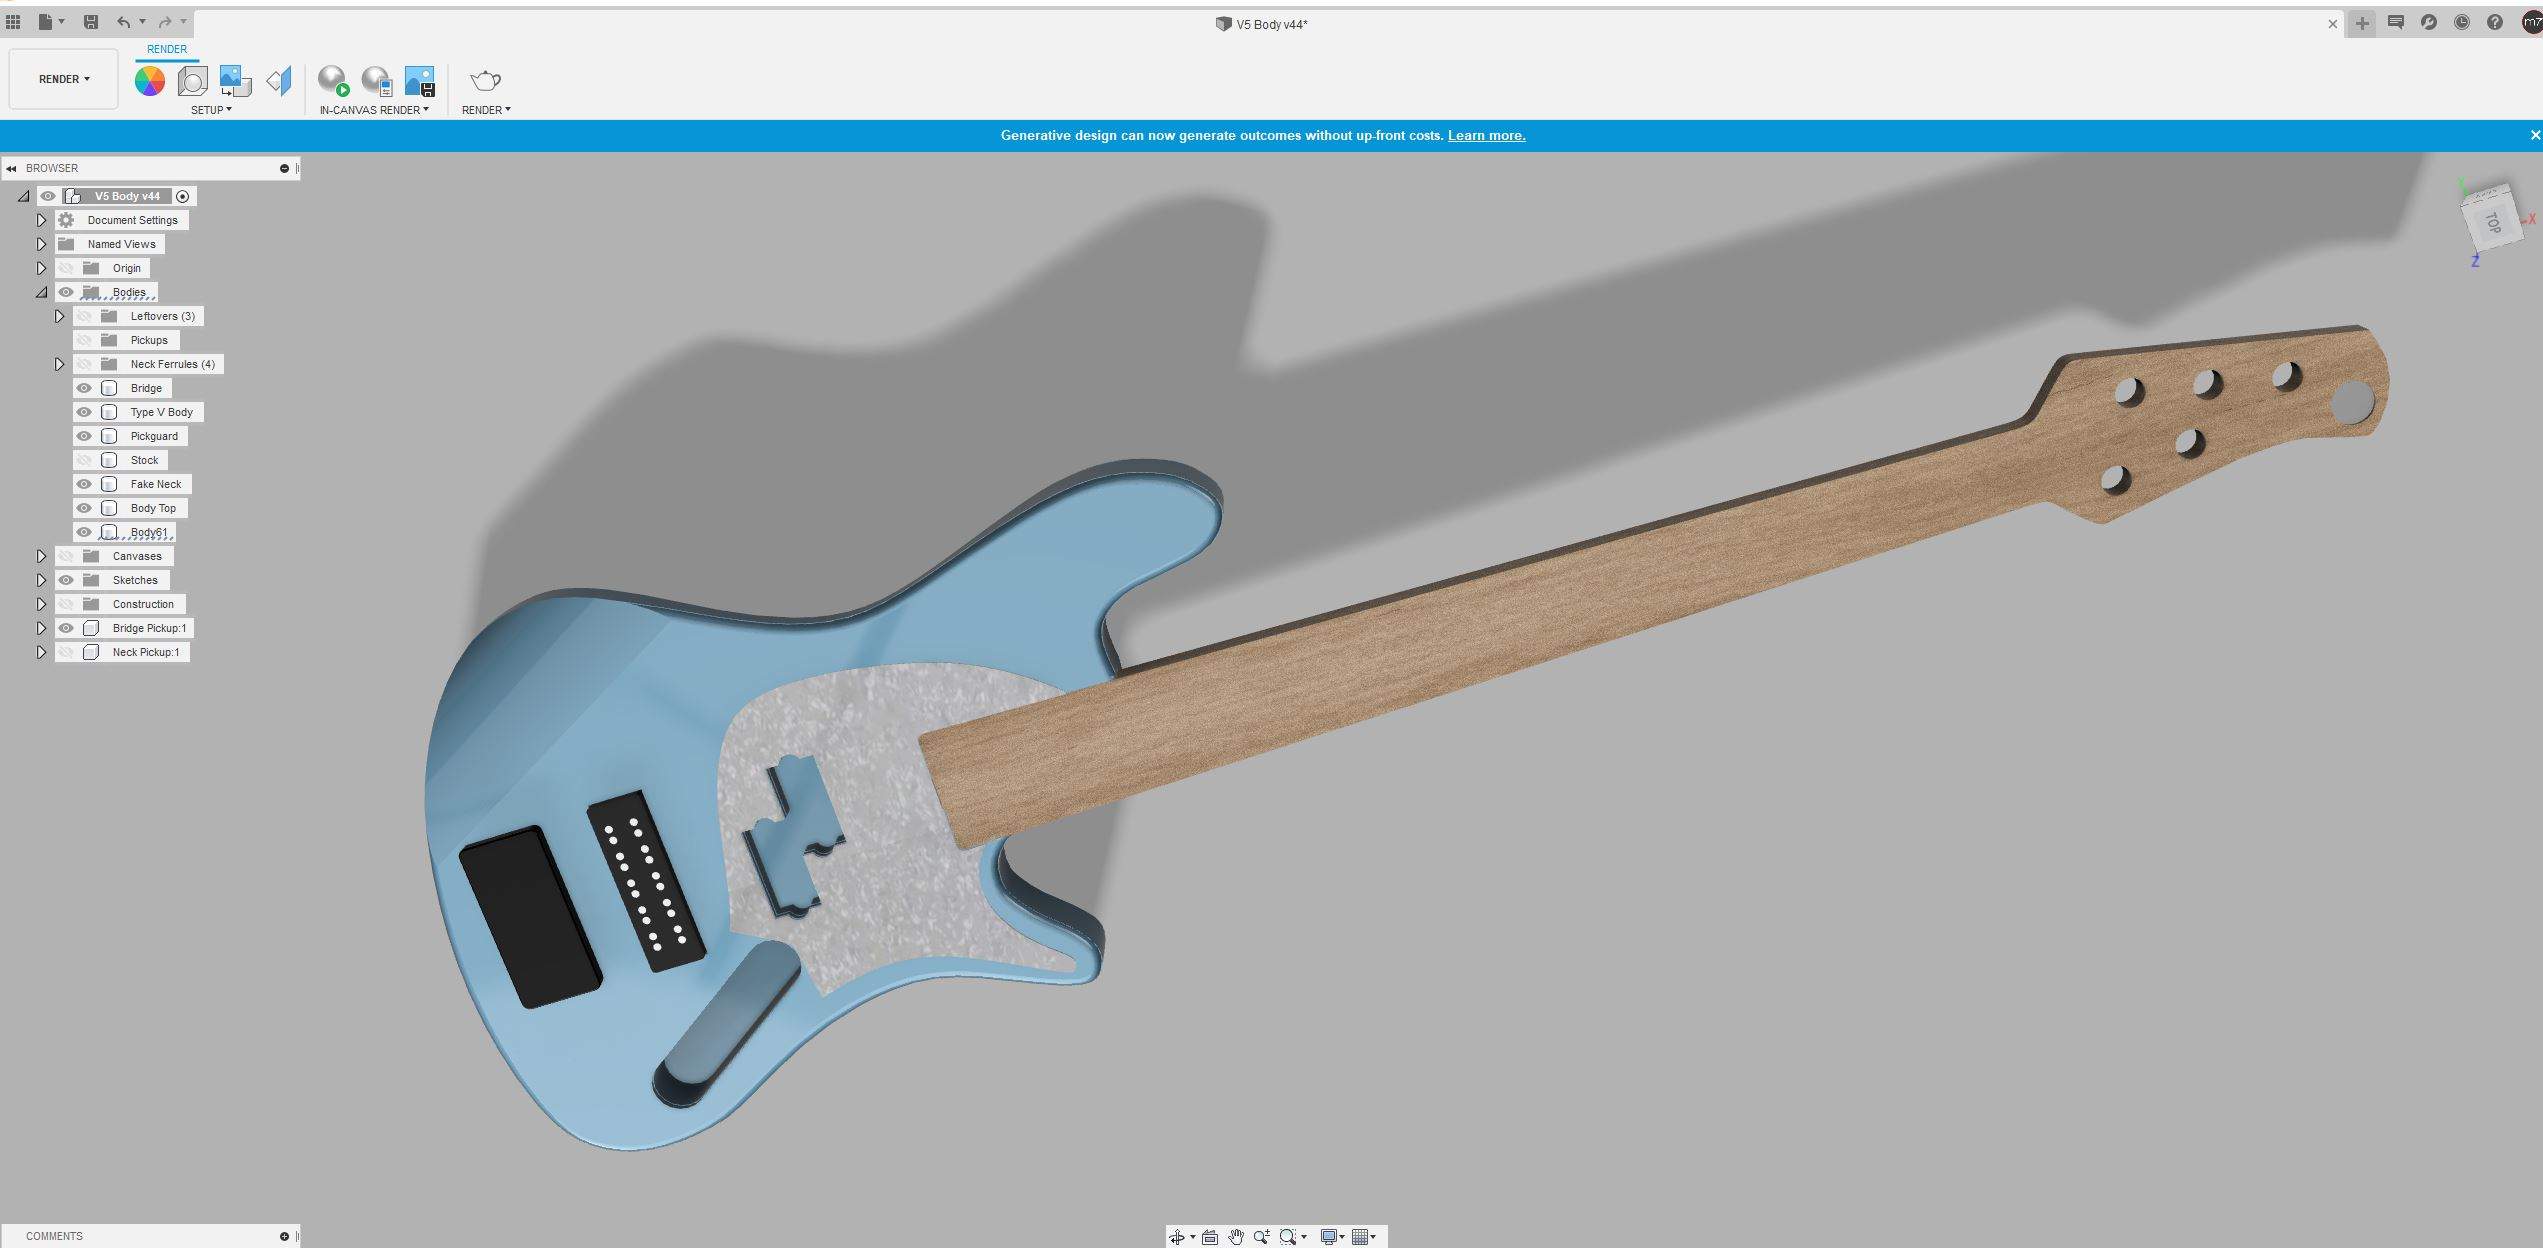
Building a PJ has been on my to-do list for a while, so its time to kick this one into gear! The body style for this one will be my normal Type V style, which is essentially a J body with a modified lower horn for upper fret access. Here is a look at the specs:

Swamp Ash Body (chambered)
Northern Ash Top
Roasted Maple Neck & FB w/MOP blocks
Ice Blue Metallic Paint

Here is a quick render of the color scheme and the chambering:
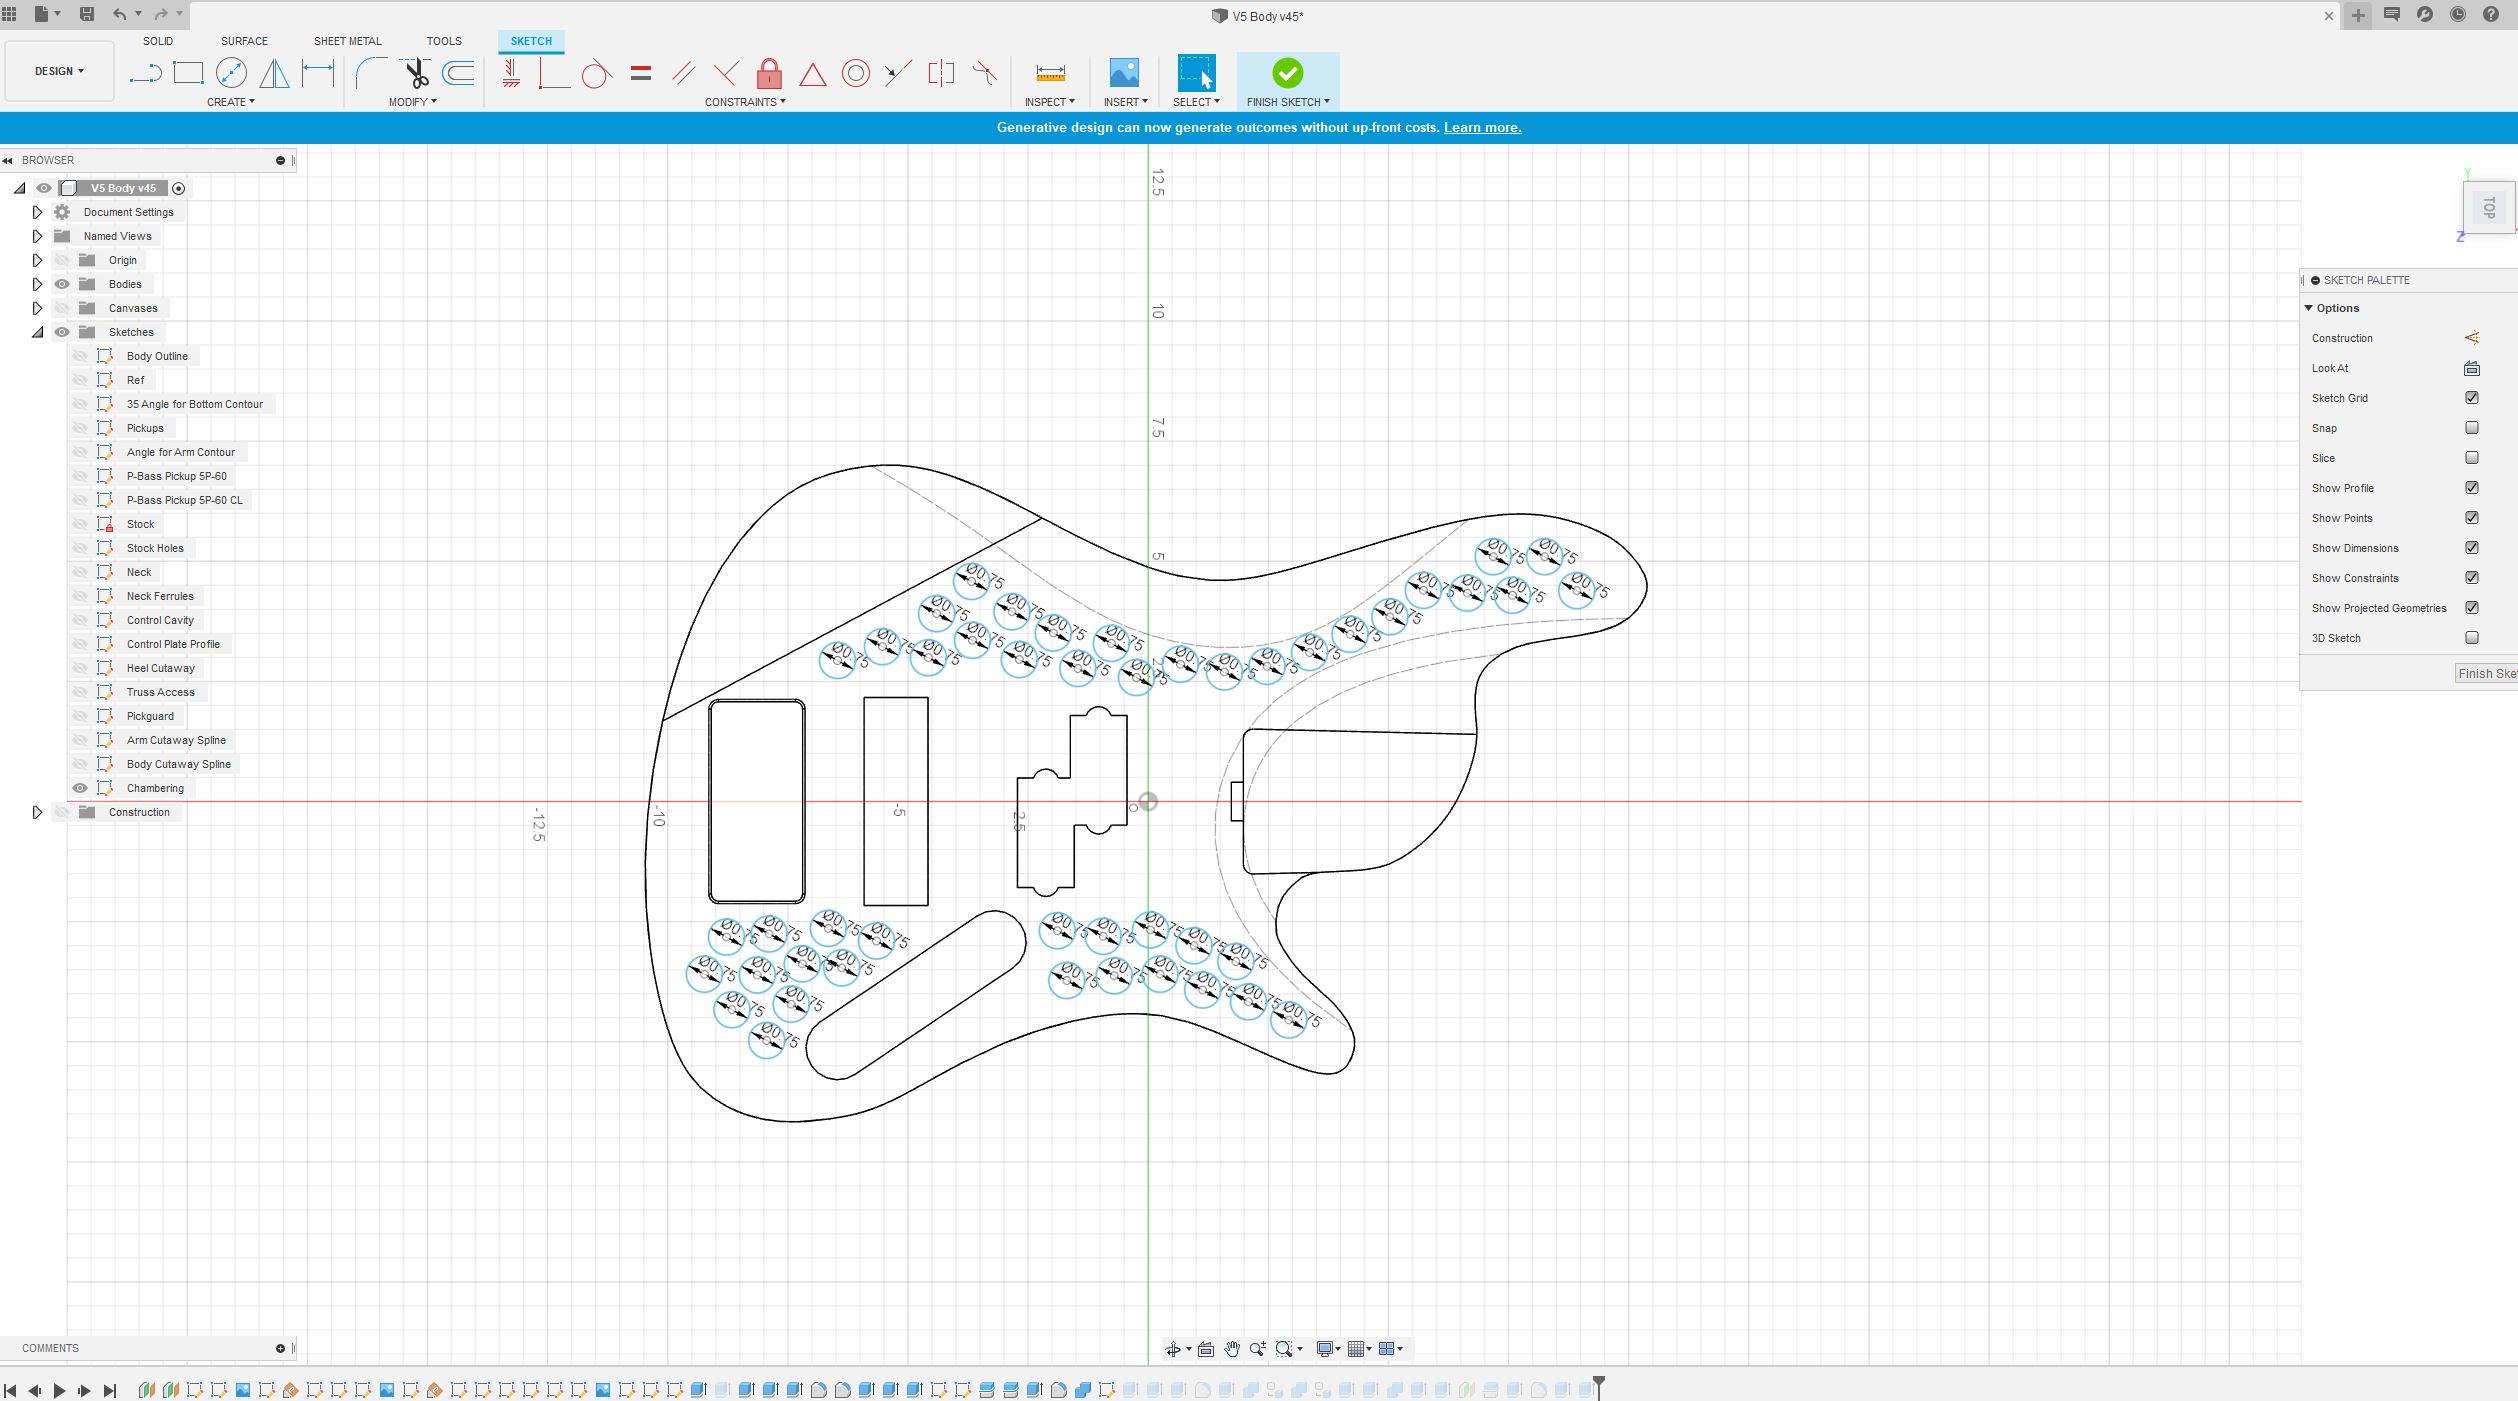
chambering.jpg

TypeV_render.jpg
 
After gluing the top, I gave it a few passes through the drum sander to a final thickness of about 0.3"
FD2F73D7-0CE8-4759-A571-E76945D8EE1D.gif


For the fretboard I resawed a 1" roasted maple blank. I will end up with 2 3/8" fretboard blanks after a few passes on the jointer and planer.
F9305C09-28D7-4D38-9A93-399C67EAEB22.jpeg
535F4F44-46A4-4FE7-9D51-904607A64E71.jpeg


After planing my neck blank as well to 0.8", I have all the ingredients ready for the CNC.
1C19D85D-4148-4FC6-8B4C-D58E3E3ACA11.jpeg


Finally, it's time to glue the top onto the chambered body. Similar to a fretboard, I drill small holes through the top and insert side for material to act as an alignment pin. This also stops the top from sliding around when the glue is wet. Although it's not as critical on this one, it's very handy when lining up bookmatched tops with 2-piece bodies, etc.
B2DE7F78-B213-43E3-949E-8E00B4ECB5DC.gif


Here is the top glued up overnight. The cauls I used have been shaped to bow down just slightly in the middle. That helps me ensure the middle gets good pressure when clamping the ends.
5F5DB650-4314-4BC8-82DB-47EA6AB87CBA.jpeg
 
2020 called and wants it's bass back
74AF9E6E-915E-4B55-8F8E-4409301CCBAD.jpeg


Completely my fault, after adding the chambering and the top lam to the design, I just regenerated the gcode without double checking it, and splitting the body into 2 pieces (top laminate) caused... difficulties.

It's a shame too because otherwise the top glue up and body came out beautifully.
371059A2-26A2-4E55-909D-F0FC1B210390.jpeg

DEEDEB4A-B0CF-4FCE-93E2-C4F22F063838.jpeg


On the positive side, I took a scrap neck, fretboard, and this body and now I have some wall art!
A9E91698-7CB8-4A39-A2D3-FA6BF7901332.jpeg


Oh well, lesson learned. Time to mill another blank and top, glue up, etc etc etc.
 

Attachments

  • 74AF9E6E-915E-4B55-8F8E-4409301CCBAD.jpeg
    74AF9E6E-915E-4B55-8F8E-4409301CCBAD.jpeg
    42.6 KB · Views: 52
Last edited:
Fill that slot with some coloured resin, and you got yourself a "feature"! Its actually really interesting and unique from my perspective. :thumbsup:

Actually I feel like the slot would be fairly easy to repair since I'm painting the body anyway. Those weird little curls on the edge next to it are the harder bit. I might be able to cut a square shape out and inlay more ash then file/sand it flush. Hmmmmm more to come
 
Those weird little curls on the edge next to it are the harder bit. I might be able to cut a square shape out and inlay more ash then file/sand it flush. Hmmmmm more to come
That sounds like a lot of work. It looks like they only cut in a fraction of an inch, I would just reshape the top and end of the body a bit so that part gets cut off.

Edit: had it turned out how you wanted I would have been sad to see paint go on given how nice the wood looks.
 
  • Like
Reactions: turindev
If I were going to salvage that body I'd cut off the whole portion and then glue in some new wood with some contrasting wood stripes. Maybe some walnut or ebony, something dark to look like racing stripes. The last bit of the forearm contour looks alright, so I'd try and keep that portion too .
 
Part 2: The Repair
So thanks to encouragement from the fine folks here and my buddy at Vine Guitars, I decided to save this one. The general approach was to fill the slot with a piece of the same wood, with the grain oriented in the same direction. The small curly bits on the side will be filled with epoxy using some tape to form a dam.

Here is a look at the ash added to repair the slot:
59F6A4B6-FFA2-4B4D-9810-EC1F4EFD96AA.jpeg


After gluing it in, I shaped it to match the arm cutaway with a block plane:
5AA4ACB2-6AFA-4544-93A8-F835DA949A08.jpeg


After filling the tearout and some gaps, I sanded it and added the roundover. I am really happy how it came out, and Im confident that the surface will come out great once it is painted now
E61931EF-6176-42C5-9D20-0CBD87EA6B4A.jpeg


Thanks to everyone here for encouraging me to save it, definitely the right call. Sometimes I think it's good to get over the initial depression after disaster to think with a clear head and move forward. :thumbsup:
 
Last edited:
Now that the repair is complete, it's time for the sanding, sealing and grain filling regime on this open pored ash. I use Crystalac sanding sealer and grain filler. Typically I raise the grain with an initial sealer coat, then follow it up with 1-2 coats. For Ash it typically takes 2-3 coats of filler that I work into the pores with a lint free cloth then squeegee. I block sand after each coat to remove residue on the surface. The result is a great surface for finish.

2470FA23-9C12-464C-9302-2AD5C883AF2E.jpeg

C53B55FA-F26E-483B-99A7-6C99FEBC012D.jpeg

B5653D0E-CE78-4A76-B0E7-4E9A326FAC01.jpeg
37E68FD9-538E-4ADA-BE33-2C4B842BAF8D.jpeg
 
Considering the title of this thread, it's about time for some roasted maple wouldn't you say? Here is a shot of the neck after facing operations as well as the truss channel.
68ED45A6-ACA1-494B-8873-3A409EF995C3.jpeg

A07925B2-FE8B-4E20-B24F-4A352D1ABB25.jpeg

I mark small indents for the tuner holes and the logo inset with a 1/8" endmill. I'll go back and cut the holes on the drill press with a forstner bit later.

Speaking of forstner bits, I use a 1" forstner to cut the recess for my inset molded logos:
846AE4C2-FFA8-40D1-88EE-516F15FAFA1C.gif


My neck/fretboard workflow might be a little different than some. I sand the entire neck from 120 up to 240 except the sides of the neck, which will be finish sanded once the fretboard is glued. Similarly I sand the fretboard and inlay prior to glue up. After glue up I clean up the glue joint with a scraper and sand to 220 as well. Here is a look prior to glue up:

4455B59B-208B-465A-BCC1-FDFAA0E4299F.jpeg


And of course we have the obligatory test fit of the logo
0B6161C4-1D82-4F00-9415-D2A1943A16FC.jpeg


Next up is the fretboard. I'm running into a bit of a dilemma though. I was planning on using luminlay for the side dots, but apparently they still aren't shipping to the US. I might use some leftover MOP instead, but Im not 100%. I'll make the call this week and go from there I suppose.
 

Attachments

  • D102DBE6-ACC9-4522-B12E-427FB9C9A1DB.jpeg
    D102DBE6-ACC9-4522-B12E-427FB9C9A1DB.jpeg
    46.7 KB · Views: 48
Fretboard cutting & inlay glue up! Absolutely love this roasted maple.
D8290BC4-30DB-48EA-AD68-725E4E13A9B6.gif


83A7A1CB-CEC9-42A6-816A-0F3CE9D3E0DD.jpeg


Because my inlay stock is only 0.075" thick, the bottom profile of the inlay recess has the same radius as the fretboard (otherwise it won't be thick enough in the middle for the radius at the first few frets. When I inlay wood i just use a flat bottom.

To glue up the inlay, I use medium thick CA in the fretboard, and spray activator on the back of the inlay. I then hold it in place for about a minute or two with spring clamps.
B41A07C9-8F17-40A9-AF38-065357F1E0F7.jpeg

04951E78-6150-4A03-8A6A-72DDF9C14BC6.jpeg


The fretboard is now ready for sanding tomorrow
F9EDBC65-DC73-4211-87BB-6ED205537DBC.jpeg
 
Fretboard cutting & inlay glue up! Absolutely love this roasted maple.
View attachment 3999242

View attachment 3999244

Because my inlay stock is only 0.075" thick, the bottom profile of the inlay recess has the same radius as the fretboard (otherwise it won't be thick enough in the middle for the radius at the first few frets. When I inlay wood i just use a flat bottom.

To glue up the inlay, I use medium thick CA in the fretboard, and spray activator on the back of the inlay. I then hold it in place for about a minute or two with spring clamps.
View attachment 3999246
View attachment 3999247

The fretboard is now ready for sanding tomorrow
View attachment 3999248

I think you just ended the debate over white vs black inlays on roasted maple. Those white block inlays look great!
 
  • Like
Reactions: turindev