• TalkBass has been independent since 1998. Add your voice.
    Create a free account to reply to discussions, view embedded media, and browse with fewer display ads.
    Join freeLog in
    Want zero display ads or expanded classifieds tools? Compare plans.

5-string PJ build - Roasted Maple goodness

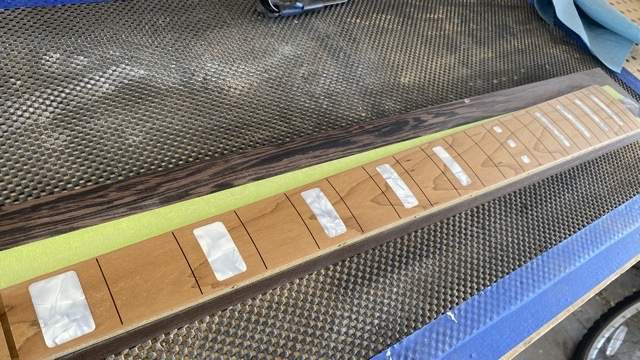
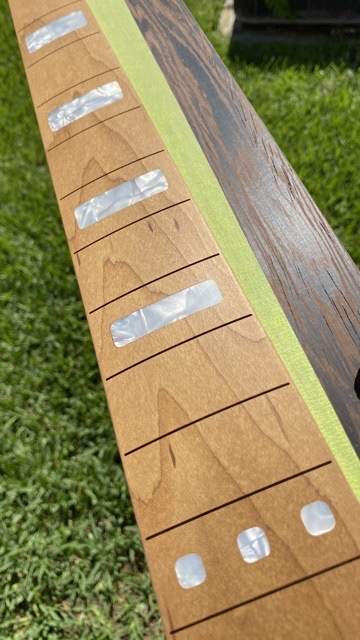
Sanded the fretboard today and installed side dots. I can't glue up the neck until the CF rods come in, should be mid week. Everything is on hold until then for the most part, so I'll post a few pictures of where it stands now.
91D8A081-654D-4931-A46B-33659B823FFB.jpeg

4F8BD458-DD87-42E1-8931-B42C42E5C4B6.jpeg
 
And now a long overdue update!

One of the things I have hated during the build process in the past is pickup screws. It's like this things are made to strip. I recently started using hex head socket cap machine screws (M2.5) which solved that problem. I wasn't totally happy with it, so I'm trying an additional step on this build by adding inserts.
0F88F322-217C-47F5-A0D3-153BFDE3C268.jpeg


The pickup screws I'm using are only half threaded, so I'm going to have to recess the insert a bit on this one. I've ordered full threaded screws for future builds. I epoxied them in the body and did a test fit, I think I like it!

I used the pickups as a template to mark holes with a brad point:
E0DFA468-5982-441D-AD0D-31FD3AC2BE35.jpeg

A14485C8-4C68-49F4-9675-70866C91AAE7.jpeg


Drilled the holes on the press:
27639B25-219F-4C49-8AD2-644666AE488D.jpeg


E4AD4F3F-CF3C-4E16-9BF4-AF00ABCC1E2B.jpeg


Fretboard: 2 problems here. The CNC I use had an alignment issue, which caused the slots to be too wide (.01" too wide). Also, the same alignment issue caused some of my inlay cutouts to be a bit larger than normal, and I don't like the gaps. With that said, I'm going to cut a new fretboard and do that process again. (Booooo)

On the body front, the blue silver metallic has been sprayed, and man is she pretty. Here are some pics.

E6617C89-16DC-448F-9A64-39A356B08D9A.jpeg
3EAA9637-D750-4565-8DE0-2D4BFFE23C4A.gif
AB10996D-D8E9-4E9E-95B4-0DB419B3EB85.gif


Next up is the fretboard redo, pickguard, and neck glue up.
 
Been a bit since the last update. I have been really grinding hard on my paint process over the past month. I sprayed the silver blue metallic, but had some contamination in it that I have been fighting like crazy.
3EAA9637-D750-4565-8DE0-2D4BFFE23C4A.gif


The color looked great, but up close some of the mica flakes kind of clumped up and looked bad. I should have sanded back then, but since I'm a glutton for punishment, I went ahead and sprayed clear on it to see how it would look under the clear.
21E9AA4C-3A07-4B16-B241-233D0367D3AB.jpeg


The clear was looking nice! Buuuut, as expected, it was like putting a big magnifying glass on the defects.

So I sanded back and sprayed again. And same problem. After a lot of digging I determined maybe it was my spray system. I was using a 4-stage turbine that sprays 12 PSI (Fuji). One of the downsides of turbines is they spray hot, and I was also spraying at half the recommended pressure for createx auto air. So I bought a new spray rig, a DeVilbiss Finishline:
97BAA296-64FA-4EE5-9360-BCAF809E40A8.jpeg


Now I can spray at 20 PSI, and not quite so hot. I gave it another try and.... more clumping. After a few choice words, I decided maybe I should try another paint. I went with the createx pearl product, but since they don't have the same colors, I had to mix some silver and dark blue to get the color. It's not quite the same, but I think I like it.
C8C5C74F-C9ED-4C3B-A2CE-848BD00EB91E.jpeg
 

Attachments

  • 70443A46-BEAE-4448-9038-AD06E35E8197.jpg
    70443A46-BEAE-4448-9038-AD06E35E8197.jpg
    20.6 KB · Views: 34
  • D5014CBE-9C1B-4A3A-B54E-7AED4511553C.jpeg
    D5014CBE-9C1B-4A3A-B54E-7AED4511553C.jpeg
    14.5 KB · Views: 32
  • 2C6E0583-ABE1-4751-AB37-A4FF2B1A9B62.jpeg
    2C6E0583-ABE1-4751-AB37-A4FF2B1A9B62.jpeg
    14.5 KB · Views: 45
  • 45BA04EE-23E2-49C1-8863-FDAB9938C9E9.jpeg
    45BA04EE-23E2-49C1-8863-FDAB9938C9E9.jpeg
    40.3 KB · Views: 31
Moving on to the neck, I glued up the fretboard/neck, and installed the luminlay side dots.
EE9F1A19-8629-45CA-8BF7-38A5AF0F33F7.jpeg


Here is the neck after applying some sealer
A8C9905E-071D-434E-8C82-7B74C2E34BB4.jpeg


And here we are ready to spray!
C50F7696-83E9-4F18-AB43-0A43924B51E9.jpeg


Next up is level sanding and buffing the body, then final assembly.
 

Attachments

  • E8DDC971-FCD7-4768-AD67-11F53F8F2F5A.jpeg
    E8DDC971-FCD7-4768-AD67-11F53F8F2F5A.jpeg
    21.6 KB · Views: 36
Last edited:
Quick sneak peek at the paint color in some natural sunlight. The original color was a blue silver, but on my last repaint I ended up mixing blue, silver, and white to get this custom color. I'm waiting for the tuners to come in, then we should be all wrapped up. I'm planning on making some sound clips as well.

DAD29A75-34D9-43A6-8F7A-8F96A7D6AA8E.jpeg
36E1468F-ABCC-452D-9E62-19A238E074DB.jpeg
A72A1FEE-239C-4F59-9F02-1052667AFFDC.jpeg
E013297E-F8A1-4E6E-A9A8-885BE0CCFE9E.jpeg
 

Attachments

  • 31E20120-C6B4-48CD-BF8C-9C6C8B440895.jpeg
    31E20120-C6B4-48CD-BF8C-9C6C8B440895.jpeg
    99.5 KB · Views: 30