

Enjoy the benefits of a premium membership!
Upgrade Account
-
TalkBass has been independent since 1998. Add your voice.
Create a free account to reply to discussions, view embedded media, and browse with fewer display ads.
Join free Log in
Want zero display ads or expanded classifieds tools? Compare plans.
You are using an out of date browser. It may not display this or other websites correctly.
You should upgrade or use an alternative browser.
You should upgrade or use an alternative browser.
Double Bass Advice Needed Re: Height/Shape of EUB Bridge
- Thread starter GKon
- Start date
More options
Who Replied?

Interesting idea, @carl h.Generally the string slot is lubricated to keep the strings from binding and pulling the bridge over, but maybe you could put a bit of rosin in the slots. It would require regular adjustments as the strings stretch, but I prefer that to tying the bridge to the tailpiece.
I lubricated the string slots with pencil graphite but realized, after the fact, that that was likely not necessary and maybe making things worse so I should likely remove it. Replacing it with rosin didn't dawn on me.

Sorry, the pencil probably came from me; it is common practice for normal DB's. But this instrument seems to operate at a lower breakover angle, and you've put very low tension strings on.
Yes you could put a cord between the heart of the bridge & the TP, but when it gets tensioned it may act a bit as a drone string, which you don't really want. It's a possibility, and at least it prevents the bridge from flying through the through the room (or stage...).
From your description, and from this pic:
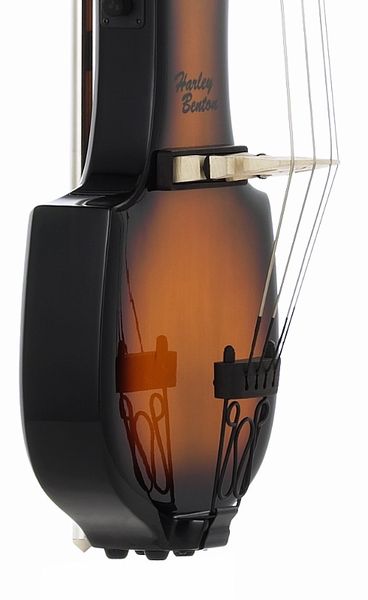
the cause of the problem seems to be poor bridge balance. Seen from the side, for stability the bridge should bisect the angle of the lines the strings make when bending over the bridge. If yours is like in this pic, the angle in the feet is wrong; the crest of the bridge should be more downwards in it's stable position. Typically the tailpiece side of the bridge should be perpendicular to the top. If left like this, with stronger strings, your bridge will warp in due time. (Is that common with these instruments?)
Two possible solutions along this structural line:
Yes you could put a cord between the heart of the bridge & the TP, but when it gets tensioned it may act a bit as a drone string, which you don't really want. It's a possibility, and at least it prevents the bridge from flying through the through the room (or stage...).
From your description, and from this pic:
the cause of the problem seems to be poor bridge balance. Seen from the side, for stability the bridge should bisect the angle of the lines the strings make when bending over the bridge. If yours is like in this pic, the angle in the feet is wrong; the crest of the bridge should be more downwards in it's stable position. Typically the tailpiece side of the bridge should be perpendicular to the top. If left like this, with stronger strings, your bridge will warp in due time. (Is that common with these instruments?)
Two possible solutions along this structural line:
- cut/file/sand off the TP-side of the soles a bit, equal on both sides, till the desired angle is achieved. This needs to be done accurately & is not necessarily easy. As the bridge stands directly on top of the PU, you'll need to ensure a proper contact across the entire surface of the soles.
- make a single wedged strip of wood (spruce), which is flat on both sides, but of which one side (pointing towards the FB) is a bit higher than the other side. Put that between the bridge & PU (or maybe even below the PU, if that is possible). Or make a single strip, the width of 2x the width of one foot (+ a bit) & cut is in 2, and put one below each foot. The advantage of the wedges approach is that you won't damage the bridge, and you can always go back. You can trial with a cork from a wine bottle or so.
Sorry, the pencil probably came from me; it is common practice for normal DB's. But this instrument seems to operate at a lower breakover angle, and you've put very low tension strings on.
Yes you could put a cord between the heart of the bridge & the TP, but when it gets tensioned it may act a bit as a drone string, which you don't really want. It's a possibility, and at least it prevents the bridge from flying through the through the room (or stage...).
From your description, and from this pic:
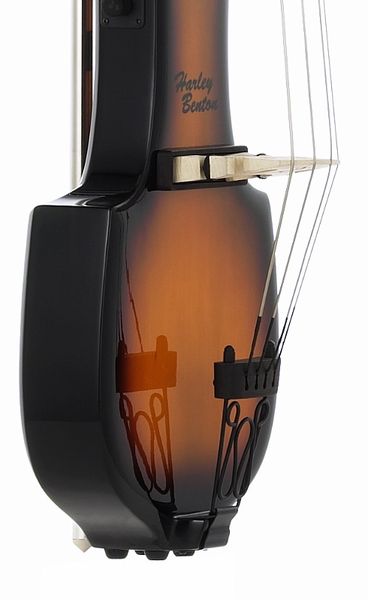
the cause of the problem seems to be poor bridge balance. Seen from the side, for stability the bridge should bisect the angle of the lines the strings make when bending over the bridge. If yours is like in this pic, the angle in the feet is wrong; the crest of the bridge should be more downwards in it's stable position. Typically the tailpiece side of the bridge should be perpendicular to the top. If left like this, with stronger strings, your bridge will warp in due time. (Is that common with these instruments?)
Two possible solutions along this structural line:
- cut/file/sand off the TP-side of the soles a bit, equal on both sides, till the desired angle is achieved. This needs to be done accurately & is not necessarily easy. As the bridge stands directly on top of the PU, you'll need to ensure a proper contact across the entire surface of the soles.
- make a single wedged strip of wood (spruce), which is flat on both sides, but of which one side (pointing towards the FB) is a bit higher than the other side. Put that between the bridge & PU (or maybe even below the PU, if that is possible). Or make a single strip, the width of 2x the width of one foot (+ a bit) & cut is in 2, and put one below each foot. The advantage of the wedges approach is that you won't damage the bridge, and you can always go back. You can trial with a cork from a wine bottle or so.
Thanks for the info @Ortsom The lead pencil tip came from several sources, so no need to say sorry.

My bridge does sit like the one in the pic. Added to that, the extension at the adjusters, and the poor-ish construction of the attaching point of the adjuster into the bridge, also cause a slight bend at that location, or so it seems.
I'm not a big fan of trying to lasso the bridge down to the tailpiece. Your comment about it possibly acting as a drone string adds to that lack of desire to do it that way.
I want a cleaner solution.
I am not at a point where I feel confident enough to sand the bridge feet, but I did consider, as you point out, adding some sort of wedged shim underneath.
Currently, there is a piece of bicycle inner tube under each foot, cut the same size as the bottom of the foot. This is a common mod to these EUB's, giving the bass a more mellow, upright tone (it works wonders). I though about adding a second piece of rubber, but cut to about 1/2 the width of the foot, perhaps 1/3, and installing it on just the fb side of the bridge feet.
This may achieve a better angle to the bridge. It won't have a wedge shape, however. Or, the same concept, but with a piece of sheet cork. What do you think?
There is a chance that a second piece of rubber will muddy the sound transferred to the bridge a bit too much, so I could also try removing the piece of rubber that is currently there which covers the entire foot, and replace it with a piece that is only half as wide as the foot, and install that on the fb side. That should still offer some of the sound modifying benefits of the rubber, as well as giving the bridge a bit of tilt.
If that doesn't work, I can try to add a small wedge of wood as you suggest directly to the bridge foot, and then the inner tube rubber under that.
It's almost Xmas eve, maybe try a bottle of wine. Drink wine, enjoy company, eat a bit, but keep the cork.What do you think?
When you get round to it, make 2 wedges from the cork & try those below the feet, without rubber initially. I suspect that with the double pieces of rubber, the load on the piezo will be uneven, but of course that too you can try. Rubber will dampen the highs, and too much of that is not a good thing.
In a light set-up like this, you can 'feel' where the balance point is, particularly if you have enough rubber below the feet. It is that position, where it is just as easy to push the bridge crest down, as it is to pull it up. Once you have found it, measure your scale (or make stick which exactly fits in-between the end of your FB & the bridge crest, like Upton recommend). These nylon strings keep on stretching for a long time, and also below the bridge. Then when you tune-up, you pull the bridge crest upwards a bit each time, that's why the crest continues to come up over time, even when at the balance point initially. So keep checking for that.
On that pic, I think the feet are either reversed or on the wrong leg of the bridge. The feet on mine weren't exactly perfect, but no where near as off as the feet in the pic. Just get the TP side of the bridge at a 90 degree angle to the top of the instrument. The feet should have a 90 to one side, put that side to the tailpiece.
On that pic, I think the feet are either reversed or on the wrong leg of the bridge. The feet on mine weren't exactly perfect, but no where near as off as the feet in the pic. Just get the TP side of the bridge at a 90 degree angle to the top of the instrument. The feet should have a 90 to one side, put that side to the tailpiece.
The feet on mine are nice and square as they should be, nothing like in the pic. It came marked from the factory, showing which foot goes where and in which direction.
And it's sat just fine till now, with the higher tension, steel strings on it. The bridge will not stay at 90 to the TP. I can push it by hand, when under tension and at pitch,
and I can see the bridge readjusting itself towards the FB. We're only talking a little bit, lets say it's at 92 to the TP (I'm guessing), but just enough to see that it's not at
90, and just enough to make me nervous.
Once I start learning to slap on this thing, I don't want to worry about slapping too hard, lifting the E off the bridge and having the bridge fly across the room. It might take someone's
eye out!

I can see that the bit that it leans towards the FB is about the thickness of the inner tube rubber. The easiest thing to try first would be to cut the width of the rubber under the feet to half or slightly smaller and see if that shims it properly. The rubber is soft enough that it should compress and I should still get full contact along the width of the entire foot to the piezzo.
Changing the bridge feet angle may result in a slip of the bridge feet, at least without rubber in between, but vibration might let the bridge slip slowly.
Better would be to put the angle at the bottom and fixed to the body. I did this with my Clevinger solid body, but have no idea for the Palatino.
Simply remove the pencil graphit with sandpaper, set the bridge angled to the tailpiece at the beginning and adjust a bit below pitch.
Another solution would be a raised saddle to get equal angles with a perpendicular positioned bridge.
Better would be to put the angle at the bottom and fixed to the body. I did this with my Clevinger solid body, but have no idea for the Palatino.
Simply remove the pencil graphit with sandpaper, set the bridge angled to the tailpiece at the beginning and adjust a bit below pitch.
Another solution would be a raised saddle to get equal angles with a perpendicular positioned bridge.
Merry Christmas, Happy Hannukkah, and Happy Holidays to all!
I had some time before eating, drinking, and making merry to continue working on my bridge modifications.
I started by removing the bridge to deal with the loose fit of the bridge adjusters into the top of the bridge. The bass side hole had gotten loose enough to allow the top part of the bridge to be able to tilt a bit. The treble side was starting to follow suit. For the time being, my fix was to put a small wrap of duct tape around the top of the threads and then screw the adjusters into the top portion of the bridge.
It works for now, snugging up the fit, although I assume it may damp some of the vibration into the piezzo.
In the future, I plan to find a threaded insert that matches the threads of the adjuster and install that into the bridge. I may have some helicoils that are the proper size.
I then used some 400 grit sandpaper and a very light touch to remove the graphite from the bridge notches. I also used some rubbing alcohol to remove any graphite residue that may have been left on the strings.
Next step was to create a wedge to help the bridge lean more towards the tailpiece and perpendicular to the body.
I went with my idea of removing half of the inner tube rubber that I had installed on the bottom of the feet. This appears to have worked out well enough, although I may change it in the future.
I removed the rubber on the TP side, which allowed the bridge to tilt just enough to remain perpendicular to the bass body but, although the edges of the feet on the TP and FB side are making contact, there is a tiny space where the rubber is cut that there is no contact at all. I will wait to see if, after some time and under tension, the rubber compresses enough to make contact. If not, I will look into making a small wedge out of wood, installing that on the bottom of the bridge feet and then reinstalling another piece of rubber that covers the entire bottom of the foot.
One other modification I did was suggested by @carl h. , to put some rosin on the bridge notches to help keep the bridge from slipping. This worked brilliantly. Thank you, Carl h.! I actually put some rosin on the strings where they contact the bridge, as well as in the bridge notches. I was surprised at just how much resistance this actually offered! It was not easy to reposition the bridge when necessary.
After all was done, I put the bridge in place, reinstalled the strings, and tuned up to pitch. Between the rosin and the rubber wedges, the bridge comfortably sits at its proper, perpendicular position. I'm not sure just how much of it is the rosin keeping things in place and how much is the rubber wedges. Again, I will revisit this over time.
After some tweaking of the bridge position, I played for a while and was quite happy and satisfied with the sound, the feel and with the bridge staying put. I will consider this part a success! Thanks again to all for your input and advice.
I had some time before eating, drinking, and making merry to continue working on my bridge modifications.
I started by removing the bridge to deal with the loose fit of the bridge adjusters into the top of the bridge. The bass side hole had gotten loose enough to allow the top part of the bridge to be able to tilt a bit. The treble side was starting to follow suit. For the time being, my fix was to put a small wrap of duct tape around the top of the threads and then screw the adjusters into the top portion of the bridge.
It works for now, snugging up the fit, although I assume it may damp some of the vibration into the piezzo.
In the future, I plan to find a threaded insert that matches the threads of the adjuster and install that into the bridge. I may have some helicoils that are the proper size.
I then used some 400 grit sandpaper and a very light touch to remove the graphite from the bridge notches. I also used some rubbing alcohol to remove any graphite residue that may have been left on the strings.
Next step was to create a wedge to help the bridge lean more towards the tailpiece and perpendicular to the body.
I went with my idea of removing half of the inner tube rubber that I had installed on the bottom of the feet. This appears to have worked out well enough, although I may change it in the future.
I removed the rubber on the TP side, which allowed the bridge to tilt just enough to remain perpendicular to the bass body but, although the edges of the feet on the TP and FB side are making contact, there is a tiny space where the rubber is cut that there is no contact at all. I will wait to see if, after some time and under tension, the rubber compresses enough to make contact. If not, I will look into making a small wedge out of wood, installing that on the bottom of the bridge feet and then reinstalling another piece of rubber that covers the entire bottom of the foot.
One other modification I did was suggested by @carl h. , to put some rosin on the bridge notches to help keep the bridge from slipping. This worked brilliantly. Thank you, Carl h.! I actually put some rosin on the strings where they contact the bridge, as well as in the bridge notches. I was surprised at just how much resistance this actually offered! It was not easy to reposition the bridge when necessary.
After all was done, I put the bridge in place, reinstalled the strings, and tuned up to pitch. Between the rosin and the rubber wedges, the bridge comfortably sits at its proper, perpendicular position. I'm not sure just how much of it is the rosin keeping things in place and how much is the rubber wedges. Again, I will revisit this over time.
After some tweaking of the bridge position, I played for a while and was quite happy and satisfied with the sound, the feel and with the bridge staying put. I will consider this part a success! Thanks again to all for your input and advice.
I've had a chance to let the strings settle in (they are STILL stretching), reset the bridge height so the strings are where I want them, and to see what, if any, changes may have happened to the bridge after letting it settle in a bit.
All in all, it's working out well! The bridge has retained it's perpendicular stance to the body, even after detuning and retuning several times to adjust the bridge adjusters to get the height I want on the strings. The trick of putting rosin in the bridge notches, and on the strings where they meet the notches worked really did the trick!
Sound is quite good! At one point, the E and A were sounding very weak compared to the D and G. A slight tap on the bass side of the bridge got it to sit properly on the piezzo pickup and the sound was magically back!
The wedge of rubber I put on the bottom of the feet to help the bridge tilt in the correct direction is doing it's job well. Not only is it angling the bridge towards the tailpiece, it is also still doing the job of making the sound of the strings a bit more mellow, like an upright. However, there is still a teeny tiny gap where the center of the bridge foot should touch the piezzo. As I couldn't angle the rubber into a wedge shape, this makes sense. I'll continue to leave it alone for now and see how it works out.
All in all, it's working out well! The bridge has retained it's perpendicular stance to the body, even after detuning and retuning several times to adjust the bridge adjusters to get the height I want on the strings. The trick of putting rosin in the bridge notches, and on the strings where they meet the notches worked really did the trick!
Sound is quite good! At one point, the E and A were sounding very weak compared to the D and G. A slight tap on the bass side of the bridge got it to sit properly on the piezzo pickup and the sound was magically back!
The wedge of rubber I put on the bottom of the feet to help the bridge tilt in the correct direction is doing it's job well. Not only is it angling the bridge towards the tailpiece, it is also still doing the job of making the sound of the strings a bit more mellow, like an upright. However, there is still a teeny tiny gap where the center of the bridge foot should touch the piezzo. As I couldn't angle the rubber into a wedge shape, this makes sense. I'll continue to leave it alone for now and see how it works out.
After letting my EUB500 settle in to the mods I did to it a few days ago, as well as playing it every day,
I decided to go back in for some minor surgery.
The strings were sounding a bit dead. I also happen to be at a point in my exercise books that I'm playing a lot
of harmonics. The G and D sounded good, but the A so-so, and the E was just dead. Nothing but a thump for a harmonic.
Upon further inspection, I noticed that the bridge was holding its position quite well with the application of rosin to the
bridge notches and to the strings where they contact the notches, but my installation of only half a piece of rubber to the
FB side of the bottom of the bridge feet was angling the bridge a tiny bit towards the TP rather than perpendicular to the body.
The half piece of rubber also was not allowing the bridge feet to fully contact the piezzo which I'm sure contributed to the
dead sound and lack of good harmonics.
Today, I removed the bridge from the body and added a piece of rubber to cover the entire bottom of each foot of the bridge to
allow full contact to the piezzo as well as allowing it to sit flush. I reinstalled it and reset the bridge to be perpendicular
to the body. I noticed a big difference. The sound of each string was loud and full, and I could get a nice harmonic on the E.
Just to experiment a little, I tapped the bridge so it would angle ever so slightly towards the TP as it was before, and once again
the sound deadened and the harmonic on the E was a dead thump. The tiniest readjustment back to perpendicular made the sound full
and strong again, as well as livening up the harmonic on the E.
This definitely has been an adventure. I'm enjoying making my EUB even better with such simple modifications, and the learning process
has been enjoyable.
Now it's time to keep playing it.
I decided to go back in for some minor surgery.
The strings were sounding a bit dead. I also happen to be at a point in my exercise books that I'm playing a lot
of harmonics. The G and D sounded good, but the A so-so, and the E was just dead. Nothing but a thump for a harmonic.
Upon further inspection, I noticed that the bridge was holding its position quite well with the application of rosin to the
bridge notches and to the strings where they contact the notches, but my installation of only half a piece of rubber to the
FB side of the bottom of the bridge feet was angling the bridge a tiny bit towards the TP rather than perpendicular to the body.
The half piece of rubber also was not allowing the bridge feet to fully contact the piezzo which I'm sure contributed to the
dead sound and lack of good harmonics.
Today, I removed the bridge from the body and added a piece of rubber to cover the entire bottom of each foot of the bridge to
allow full contact to the piezzo as well as allowing it to sit flush. I reinstalled it and reset the bridge to be perpendicular
to the body. I noticed a big difference. The sound of each string was loud and full, and I could get a nice harmonic on the E.
Just to experiment a little, I tapped the bridge so it would angle ever so slightly towards the TP as it was before, and once again
the sound deadened and the harmonic on the E was a dead thump. The tiniest readjustment back to perpendicular made the sound full
and strong again, as well as livening up the harmonic on the E.
This definitely has been an adventure. I'm enjoying making my EUB even better with such simple modifications, and the learning process
has been enjoyable.
Now it's time to keep playing it.


