• TalkBass has been independent since 1998. Add your voice.
    Create a free account to reply to discussions, view embedded media, and browse with fewer display ads.
    Join freeLog in
    Want zero display ads or expanded classifieds tools? Compare plans.

Baltic birch semi-hollow Jaguar

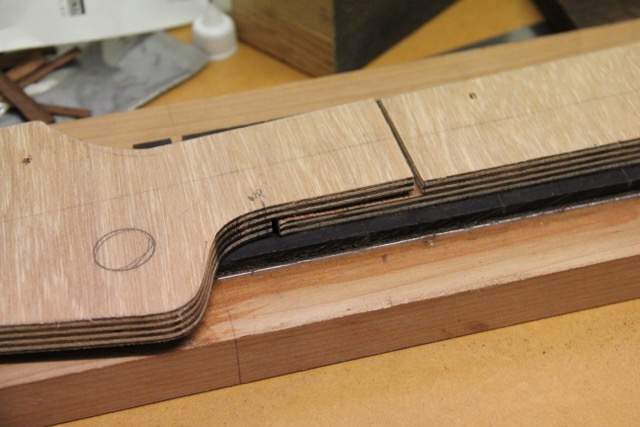
As mentioned earlier I made a neck template using a 34” scale Fender Jazz neck. So the section between the nut and 1st fret has to be removed to bring it to 32.092” scale. When I was younger and more foolish I would have used a butt joint, then gone on to use profanity when it broke at an inopportune moment.
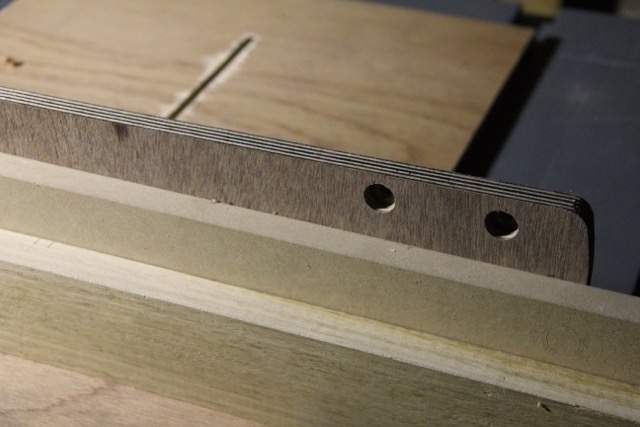
neck_jig_mdf_small.jpg


Using a piece of MDF with parallel edges, I attached it to the neck using the centreline as a reference. Then I used a crosscut jig in the table saw to cut it at the first fret.
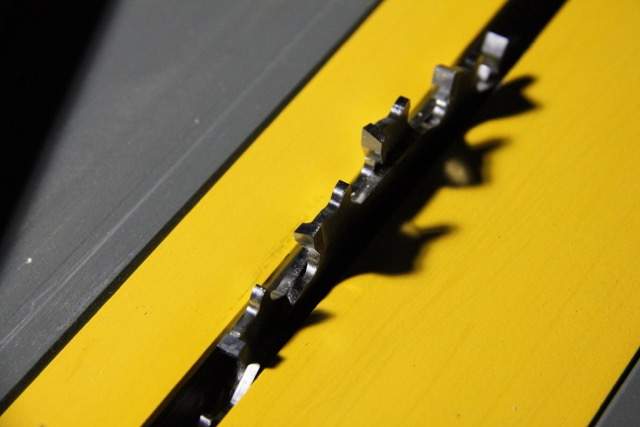
freud_dado_small.jpg


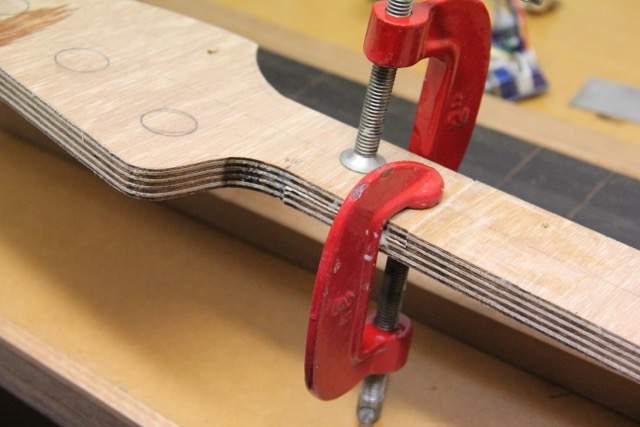
From there I put the dado blade in the table saw to form a lap joint. I have another crosscut table I use for finger joints that is set up for use with the outside blades only. Not wanting to alter it, I just made a number of passes at half the total thickness of the plywood until it was the length of the distance between the 1st fret and the witness point of the nut.
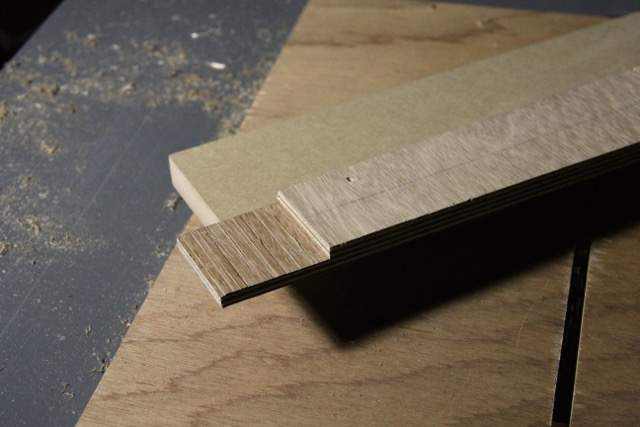
neck_lap_joint_small.jpg


Then I removed the MDF from the neck portion and re-attached it with a nail gun to the headstock. Rinse and repeat.
neck_jig_lap_joint_small.jpg


neck_joint_glue_small.jpg


That's all for today.
 

Attachments

  • headstock_dado_small.jpg
    headstock_dado_small.jpg
    27.5 KB · Views: 37
  • headstock_mdf_small.jpg
    headstock_mdf_small.jpg
    20.3 KB · Views: 29
Interesting. My usual approach is separate templates for the neck and the headstock, fairing them in together by hand. I've never tried a template for the entire neck before.

Nice work!
 
Interesting. My usual approach is separate templates for the neck and the headstock, fairing them in together by hand. I've never tried a template for the entire neck before.

Nice work!

Thanks!

What are the advantages of using separate templates? I've seen it done both ways but have not read the pros and cons of doing it one way over another...
 
When I put together the router table I was more concerned with getting the Ebay insert to fit at all rather than thinking carefully about getting it sitting nice and level. So I added some screws later in each corner that I could adjust precisely before re-attaching the insert.

router_insert_leveling_screw_small.jpg

router_insert_leveled_small.jpg


This was important because I was about to try rudy4444’s method of putting a radius to the fingerboard. My Jasper jig was a little too small so I drilled a 1/8” hole in the router planer jig to make a 10 ½” radius.

router_radius_jig_small.jpg


Then I made two small jigs – one to fit the end of the neck and one that would sit a little bit back from the other end of the fingerboard. The idea is to rock the whole assembly over the router bit to create the curvature.

neck_radius_jig_small.jpg

neck_radius_jig_router_table_small.jpg


I started very tentatively at one side of the fingerboard, gently rocking it over the router bit. I’m not sure if there was not enough stability to the final assembly or if I simply did not understand something about this method because I was unable to get a consistent cut. Occasionally I would end up with circular gouges that seemed random and inconsistent with the amount of pressure I placed on the assembly. I tried running the length of the fingerboard instead with seemed to give a better result. But still, I stopped short of trying for a complete radius and left a flat at the crown.

router_marks_fingerboard_small.jpg


Instead, I finished the radius with an Ali Express sanding block and various grades of sandpaper double stick taped to the block. Doing it the manual way was much more pleasant than using the router table. Ebony does not smell nearly as nice as torrefied maple though.

radius_fingerboard_small.jpg


Looking forward to cutting this on the bandsaw...
 

Attachments

  • ali_express_sanding_block_small.jpg
    ali_express_sanding_block_small.jpg
    21.4 KB · Views: 53
  • ikea_radius_small.jpg
    ikea_radius_small.jpg
    15.6 KB · Views: 28
I wasn’t happy with the transition between the fingerboard and headstock on one side of my neck jig. So I made a dam out of packing tape and filled it with some West System epoxy. It’s the first time using the fast hardener which has a stronger odor than the slow one. Later, I used a spindle sander to make a smoother transition.

neck_jig_epoxy_small.jpg

epoxy_fill_neck_small.jpg


As a bandsaw virgin it was a little daunting to use for the first time, but ended up being very tame experience. The main takeaway was to make certain that the marked line is very clear. One side wasn’t and ended up looking like I’d had a few too many drinks before making the cut.

bandsawn_neck+jig_small.jpg


With the machine screws at the heel I believed that the neck jig would self-align on that end. I used some double stick carpet tape along the rest of the length, then used a router pattern bit to make the first pass. So far so good. Then, removing the jig I took a pass at the remaining material.

first_pass_small.jpg

clean_up_small.jpg


Knowing that the StewMac fingerboard was precisely 2 ½” wide it appears that the jig at the heel end was slightly misaligned as some material came off the opposite side of the fingerboard while this side remained untouched. Still, a pretty satisfying result to hold something that finally feels like a neck!

truss_rod_adjustment_access_small.jpg

rough_neck_shape_small.jpg
 

Attachments

  • router_table_pattern_bit_neck_smal.jpg
    router_table_pattern_bit_neck_smal.jpg
    25.5 KB · Views: 55
  • spindle_sander_neck_curve_small.jpg
    spindle_sander_neck_curve_small.jpg
    33.4 KB · Views: 56
  • bandsaw_fingerboard_small.jpg
    bandsaw_fingerboard_small.jpg
    34.4 KB · Views: 63
  • bandsaw_first_cut_small.jpg
    bandsaw_first_cut_small.jpg
    20.3 KB · Views: 83
  • neck_jig_packing_tape_dam_small.jpg
    neck_jig_packing_tape_dam_small.jpg
    73.4 KB · Views: 59
Went to the local shop to buy a 2mm drill but ended up with a whole set, which is good because I’m tired of sorting through a plastic bag to find the right size. I was a little paranoid when the Luminlay material came since it looked so short. Rather than calculate the length I would need instead I just drilled holes that were a mere 3mm deep. Used some Zap-A-Gap CA then cut the ends with a flush cutting wire trimmer.

luminlay_zap-a-gap_small.jpg


luminlay_sanded_small.jpg


luminlay_illuminated_small.jpg


Meanwhile, the Ebay 17mm brad point drill turned up so I cut a test hole in some scrap. Hipshot fit perfectly.

hipshot_test_fit_small.jpg


I’m dreading the neck shaping step so I’ve read up everything I could find. Thinking about making a dummy neck to practice on first. Thanks for the "likes" - they keep me going!
 

Attachments

  • brad_point_drill_small.jpg
    brad_point_drill_small.jpg
    49.3 KB · Views: 34
Yep, neck carving is quite fun and very rewarding. Just go slow. It’s a lot easier to carve a little more away later than to replace already carved wood... :woot:
 
  • Like
Reactions: mnats
Thanks for the encouragement. But here's where I'm stuck: if you put a Fender neck on a bench both the heel and the headstock will sit virtually flat against that surface. Around the 12th fret it will be about 1/8" above that surface while at the headstock end it will be closer to 3/16".

neck_heel_end_gap_small.jpg


neck_headstock_end_gap_small.jpg


After I had planed the neck blank to the correct thickness and before I had radiused the fingerboard my intention was to use the router jig to put this gradual slope at the back of the neck. But I forgot about that step. Now the the fingerboard is radiused and the basic 2D outline is cut it will be much more difficult to do this in the router jig.

Aside from Hiscock's book where he carves the transition areas at each end first, I have not seen this slight angle addressed in most of the descriptions of the facet method. Most say just to mark out the facets without taking this line into account at all.

How does this work if you start with the facets rather than the transitions? I don't have a round rasp yet; I was going to start with the Shinto on the straight facets first...
 
I haven't ever carved in an angle on the back of a neck like that, my necks have always been a consistent thickness. But if I was where you are at I would either carve the profile, then manually file the angle into the back with a shinto and smooth out the profile, or I would secure the neck on blocks cut with the same radius as the fretboard and use a router sled then carve the profile.
 
  • Like
Reactions: mnats and chinjazz
If I had a motto, it might be “why do something the easy way when you can do it the hard way”. I took the last option that Jisch suggested after reading what was mentioned in the first sentence of the second paragraph of this post. I just could not work out in my brain how a line drawn on the back of the blank was the equivalent of a line drawn on the true thickness of the neck from the first to eleventh fret. Maybe once I get more experience I could dial in the taper by hand.

neck_fingerboard_support_jig_small.jpg


I made four blocks to match the fingerboard radius then used a ramp double stick taped to the underside of the supporting board. Measured for a 16th inch drop from the 1st to the 11th fret. Then ran a wide router bit over it. Even though I was dead set on doing it this way it was surprising how different the angle of the first facet was after re-drawing the lines.

neck_profile_route_last_cut_small.jpg


neck_profile_route_heel_end_small.jpg


neck_profile_route_headstock_end_small.jpg


neck_facet_cut_start_small.jpg


After it got too dark to continue Shintoing I turned to drilling the machine head holes, using the neck jig to drill pilot holes.

tuning_machine_holes_cut_small.jpg


Think I'll get a round rasp to rough out the transitions - very wary of cutting a divot at those hard lines where the router finished.
 

Attachments

  • tuning_machine_hole_cut_small.jpg
    tuning_machine_hole_cut_small.jpg
    21.2 KB · Views: 66
  • tuner_pilot_hole_jig_small.jpg
    tuner_pilot_hole_jig_small.jpg
    21.9 KB · Views: 64
  • neck_profile_route_first_cut_small.jpg
    neck_profile_route_first_cut_small.jpg
    26.7 KB · Views: 75
  • jig_ramp_small.jpg
    jig_ramp_small.jpg
    19.3 KB · Views: 26
Today will be a mixed bag of incremental updates. Finally bought a half round rasp made in Brazil by Nicholson. Was in full paranoia mode when I decided to use a stainless steel ruler to keep the vicious looking teeth from ruining the routed line down the back. I’m finally starting to understand how satisfying the step of neck shaping can be as I work these transitions. Roasted maple looks a lot like torn cardboard when you use rasps.

transition_shaping_with_ruler_small.jpg


Ebay piezos are starting to trickle in. Today’s was an under $4 sent from Laos with a round shape similar to the Kynar that the DTAR came with and the Mighty Mite that I’ve been playing lately.

bendable_piezo_for_acoustic_small.jpg


Unfortunately it is made for acoustic guitar and is a little too short for my saddle. It is even shorter than the Mighty Mite that it most closely resembles. I’ve found that if the piezo material does not span the same length under the string it detects that string will be lower in volume and so this one was. Having said that, the overall sound was not much different from the Mighty Mite, which was something like $16 on sale. Remember that I like the Mighty Mite even more than the original DTAR Kynar piezo because it seems to give a greater output subjectively and so has lower noise.

ebay_piezo_short_small.jpg


Here are some of the other candidates:

mighty_mite_yamaha_ebay_piezos_small.jpg


The Mighty Mite is on the left as reference followed by a Yamaha from the SLG200 and another Ebay purchase with integrated saddle. Due to the shapes of the other two, new bridges will have to be constructed to try them out. But so far it seems as though output level is the main difference between piezos and the frequency response is “whales to bats” as Rick Turner has put it. Given the wide response of piezo material at all it's not hard to imagine that it is fairly flat in the audio range. This only reinforces for me that the mechanical aspect of the bridge/saddle assembly is the most important part of a piezo pickup system.

west_system_hardener_pump_leakage_small.jpg


Has anyone else experienced this issue with West System hardener pumps? I thought I was being careless when hardener seemed to drip on various things on my bench. But I observed a ring of hardener surrounding the cap and a pool that had formed under the bottle. The resin pump seems fine, tight and leak-free. I’ve read that there is a hole present in the hardener pump that the resin pump does not have. For me – between this leakage and the inconvenient quantities dispensed – makes the pump a poor value for money.
 
Today will be a mixed bag of incremental updates. Finally bought a half round rasp made in Brazil by Nicholson. Was in full paranoia mode when I decided to use a stainless steel ruler to keep the vicious looking teeth from ruining the routed line down the back. I’m finally starting to understand how satisfying the step of neck shaping can be as I work these transitions. Roasted maple looks a lot like torn cardboard when you use rasps.

View attachment 3034104

Ebay piezos are starting to trickle in. Today’s was an under $4 sent from Laos with a round shape similar to the Kynar that the DTAR came with and the Mighty Mite that I’ve been playing lately.

View attachment 3034108

Unfortunately it is made for acoustic guitar and is a little too short for my saddle. It is even shorter than the Mighty Mite that it most closely resembles. I’ve found that if the piezo material does not span the same length under the string it detects that string will be lower in volume and so this one was. Having said that, the overall sound was not much different from the Mighty Mite, which was something like $16 on sale. Remember that I like the Mighty Mite even more than the original DTAR Kynar piezo because it seems to give a greater output subjectively and so has lower noise.

View attachment 3034107

Here are some of the other candidates:

View attachment 3034105

The Mighty Mite is on the left as reference followed by a Yamaha from the SLG200 and another Ebay purchase with integrated saddle. Due to the shapes of the other two, new bridges will have to be constructed to try them out. But so far it seems as though output level is the main difference between piezos and the frequency response is “whales to bats” as Rick Turner has put it. Given the wide response of piezo material at all it's not hard to imagine that it is fairly flat in the audio range. This only reinforces for me that the mechanical aspect of the bridge/saddle assembly is the most important part of a piezo pickup system.

View attachment 3034106

Has anyone else experienced this issue with West System hardener pumps? I thought I was being careless when hardener seemed to drip on various things on my bench. But I observed a ring of hardener surrounding the cap and a pool that had formed under the bottle. The resin pump seems fine, tight and leak-free. I’ve read that there is a hole present in the hardener pump that the resin pump does not have. For me – between this leakage and the inconvenient quantities dispensed – makes the pump a poor value for money.
As someone who has yet to dive into lutherie but who nonetheless has grand ideas, your write-ups of your thoughtful reasonings, hopes, and fears are invaluable. Massive, colossal thanks for spending your time and energy to share all this with me/us :)
 
Has anyone else experienced this issue with West System hardener pumps? I thought I was being careless when hardener seemed to drip on various things on my bench. But I observed a ring of hardener surrounding the cap and a pool that had formed under the bottle. The resin pump seems fine, tight and leak-free. I’ve read that there is a hole present in the hardener pump that the resin pump does not have. For me – between this leakage and the inconvenient quantities dispensed – makes the pump a poor value for money.
Well, no, but that's because I'm the sort of over-researcher who figured out before buying that pumps were likely a poor fit for my use of epoxy (mostly small and infrequent) so I don't have any. There are some production-minded pumps that seem to be made to a higher standard, but they are also so far past my budget and needs that they might as well be in orbit. I do have disposable glue applicator syringes which can also be used as small-scale measuring devices, and those fit my needs better.

It's not that the West System stuff isn't fine for its purpose, but its purpose (whatever we use it for) is best expressed as folks mostly buying gallons to build/repair boats. A bit of slop in the mixing area is par for the course, and the convenience value of pumping out "shots" is considerable, and not so frequently a vast amount more in one shot than is needed for a particular task as it is in general wooddork or luthierie.
 
As someone who has yet to dive into lutherie but who nonetheless has grand ideas, your write-ups of your thoughtful reasonings, hopes, and fears are invaluable. Massive, colossal thanks for spending your time and energy to share all this with me/us :)

I'm happy that this thread has been useful, although much of it is simply my implementation of what I've read mostly here on Luthier's Corner. It's also good therapy to write this stuff down so it helps me at least as much as it might help others, I think. Looking forward to your grand ideas!
 
The fractional gram scale arrived with handy application hints printed on the box.

ebay_scale_box_small.jpg


Best part is that it will prevent the fate of the previous scale since the integrated cover will protect the LCD from epoxy drips. On the left is the locally purchased one at $49 and on the right the one that cost $4.34 delivered.

old_and_new_scale_small.jpg


Following rough shaping of the neck transitions with the rasp I wanted a finer file to refine the shape. Came home with a half-round bastard and a half-round second-cut file. Working in overcast daylight is not ideal as it disguises imperfections.

transition_shaping_bastard_file_small.jpg


Using an LED work light instantly showed the areas that needed more work. It was startling how quickly the neck went from roughly faceted, to refined faceted to a pleasing and nearly final shape. Some 80 grit used shoeshine style, and then more sanding with the grain produced an entirely satisfactory result.

transition_shaping_artificial_light_small.jpg


sanded_neck_reverse_small.jpg


In the end the shape is less like a Fender and more like an Ibanez, which suits me fine. It’s nothing like the baseball bat shape that seems to be common with first neck attempts. Oh, and the second-cut file never got used – probably missed that post.

The decking material I used for the lines left a few gaps – no surprise I guess. Who uses decking for a lined fretless? Decided to fill the gaps with some West System. The new scale comes in very handy for measuring. Then I smeared and squeegeed.

epoxy_squeeged_small.jpg


Used some tape to dam up a gap at the edge. Getting closer...
 

Attachments

  • line_gap_small.jpg
    line_gap_small.jpg
    23 KB · Views: 33
  • fractional_gram_scale_small.jpg
    fractional_gram_scale_small.jpg
    20.8 KB · Views: 63
When it comes to making the “swoop” of the headstock to the fingerboard on a Fender neck there was not a lot of information I could find. But of the few explanations I did find the one that seemed to make the most sense was to use a spindle sander with a fence to get the curve.

The plan was to use the router planing jig to get the headstock thickness established first, then use a spindle sander where it was truly needed. But the router makes a lot of noise and silence was a better option at home so I went to use the bandsaw at the local shop. Could swear that I took pictures of the bandsawing but nothing this time. It was nerve wracking to use due to the minute thickness that needed to be removed – the depth of the headstock in relation to the fingerboard is deceptively shallow.

bandsawn_headstock_small.jpg


The cut ended up being slightly uneven but the more worrisome issue was that it seemed as though I might have cut too deeply where the transition occurs (note the ridge at the transition). But since quite a lot of thickness still had to come off the far end to make it level I just worked it slowly down bit by bit until it was nearly there.

headstock_curve_shaping_small.jpg


It wasn’t until I was nearly done that I noticed that the sander had dug a nice, deep cylindrical groove right at the transition. I’ve never heard of spindle snipe before and could not work out why it happened, given that the headstock was always held firmly against the fence.

headstock_sniping_small.jpg


So I stopped there, went home and used a hard block with 80 grit to remove material from the headstock to bring it close to level. Fortunately I had the foresight to leave it a little thicker than required.

headstock_sanding_small.jpg


Gave the rest of the neck a sand down to 320 then shot a little oil based poly. That’s when I noticed there were a few more rough spots that I’d missed. I’ll need to use some better light while sanding. There’s also a tiny nick at the swoop. Torrified maple chips fairly easily.

one_coat_headstock_small.jpg


It is tempting just to stick the nut and tuning machines on then bolt it to the body, but then it might never get finished properly.
 

Attachments

  • three_coats_neck_back_small.jpg
    three_coats_neck_back_small.jpg
    9.8 KB · Views: 61
  • headstock_transition_small.jpg
    headstock_transition_small.jpg
    18.1 KB · Views: 74
  • heel_signed_small.jpg
    heel_signed_small.jpg
    22.2 KB · Views: 35
  • fingerboard_masked_small.jpg
    fingerboard_masked_small.jpg
    16.1 KB · Views: 66
  • transition_line_small.jpg
    transition_line_small.jpg
    33.3 KB · Views: 33
Last edited:
  • Like
Reactions: astack
Lately I’ve been doing a dive into piezo technology while I apply and wait for coats of finish on the newly sanded neck. Glad I took the time to sand out the rasp marks I’d missed earlier, but I really should have put some mineral spirits on the neck before applying the first coat as it would have shown the flaws like the oil based poly did without having to wait so long before being able to do anything about it. Live and learn.

resanded_neck_first_coat_small.jpg


I’ve referred to the DTAR timber-line piezo pickup as Kynar which I knew was a brand name. Those who remember wire wrap know that Kynar wire was used in that application. It is polyvinylidene fluoride and according to this website (where coincidentally I read about faceting a neck) all coaxial piezo transducers are made of this material. Mouser sells piezo coax in 1 meter lengths under part number 1005801-1.

Here is the Mighty Mite piezo next to the DTAR. Spot the difference:

mighty_mite_dtar_piezo_pickups_small.jpg


Couldn’t help think that if I removed the heat shrink tubing from the DTAR its performance with regard to output might be improved. Did so, and sure enough the output seemed closer to the Mighty Mite.

mighty_mite_dtar_modified_piezo_pickups_small.jpg


There might be good acoustical or coupling reasons why they put heat shrink on the DTAR (one of the EBay piezos has a thinner clear heat shrink while the other does not).

dtar_rewiring_small.jpg


But after modification its noise level (buzz) was still much higher than the Mighty Mite even after rewiring to shorten considerably the plain shielded coax that connected it to the preamp. I left that issue for another day.

piezo_buffer_hpf_bottom_small.jpg


Earlier, I’d built up one of the simple buffer/high pass filter boards that OSH Park had made for me. The DTAR timber-line preamp has a gain of 14dB while mine has a gain of 6dB so with mine the voltage is doubled. Have a look at this – when you flick your finger across a piece of piezo coax it looks like this:

coaxial_piezo_flick_small.jpg


When you do the same to the integrated saddle pickup it looks like this:

integrated_piezo_saddle_flick_small.jpg


I believe the integrated one has four ceramic type piezos below the saddle:

integrated_saddle_piezo_pickup_small.jpg


No idea if when it is mounted on an instrument the compression of the piezos allows for a negative swing of the signal as the string vibrates. But given that it is likely to be a different material altogether I’m curious about the difference in sound. Speaking of sound, both the Mighty Mite and the original DTAR piezo elements are indistinguishable when connected to either my or the DTAR timber-line preamp when the latter is set flat, aside from the gain difference of course.

Since quickly bashing out that buffer and apropos of the lengthy thread on the Amps and Cabs forum it occurred to me that having both an HPF and LPF would be handy especially for a piezo because of its extended frequency response. So I decided to make a better buffer.

buffer_hpf_lpf.png


I found that reverse log dual 100k pots are currently available from Mouser so I scaled the values around those pots so each section is intuitively adjustable rather than the awkward reverse legends you sometimes see. There is an impedance switch mainly for testing and in/out switches for the filter sections as well as pots to adjust the frequencies but I’d guess that once the basic adjustments were made there would be little reason to fiddle with them afterward.
 
Last edited:

Latest posts