• TalkBass has been independent since 1998. Add your voice.
    Create a free account to reply to discussions, view embedded media, and browse with fewer display ads.
    Join freeLog in
    Want zero display ads or expanded classifieds tools? Compare plans.

Building: Tools, Fixtures, Jigs & Templates

Yes, those are all good qualities for the job, but doesn't mean other woods won't work as well.
oh no doubt! i was just quibbling with the notion that rosewood's use was some sort of "marketing gimmick"; that wood has very much earned its place in musical instrument construction.
 
oh no doubt! i was just quibbling with the notion that rosewood's use was some sort of "marketing gimmick"; that wood has very much earned its place in musical instrument construction.

P7221449.JPG


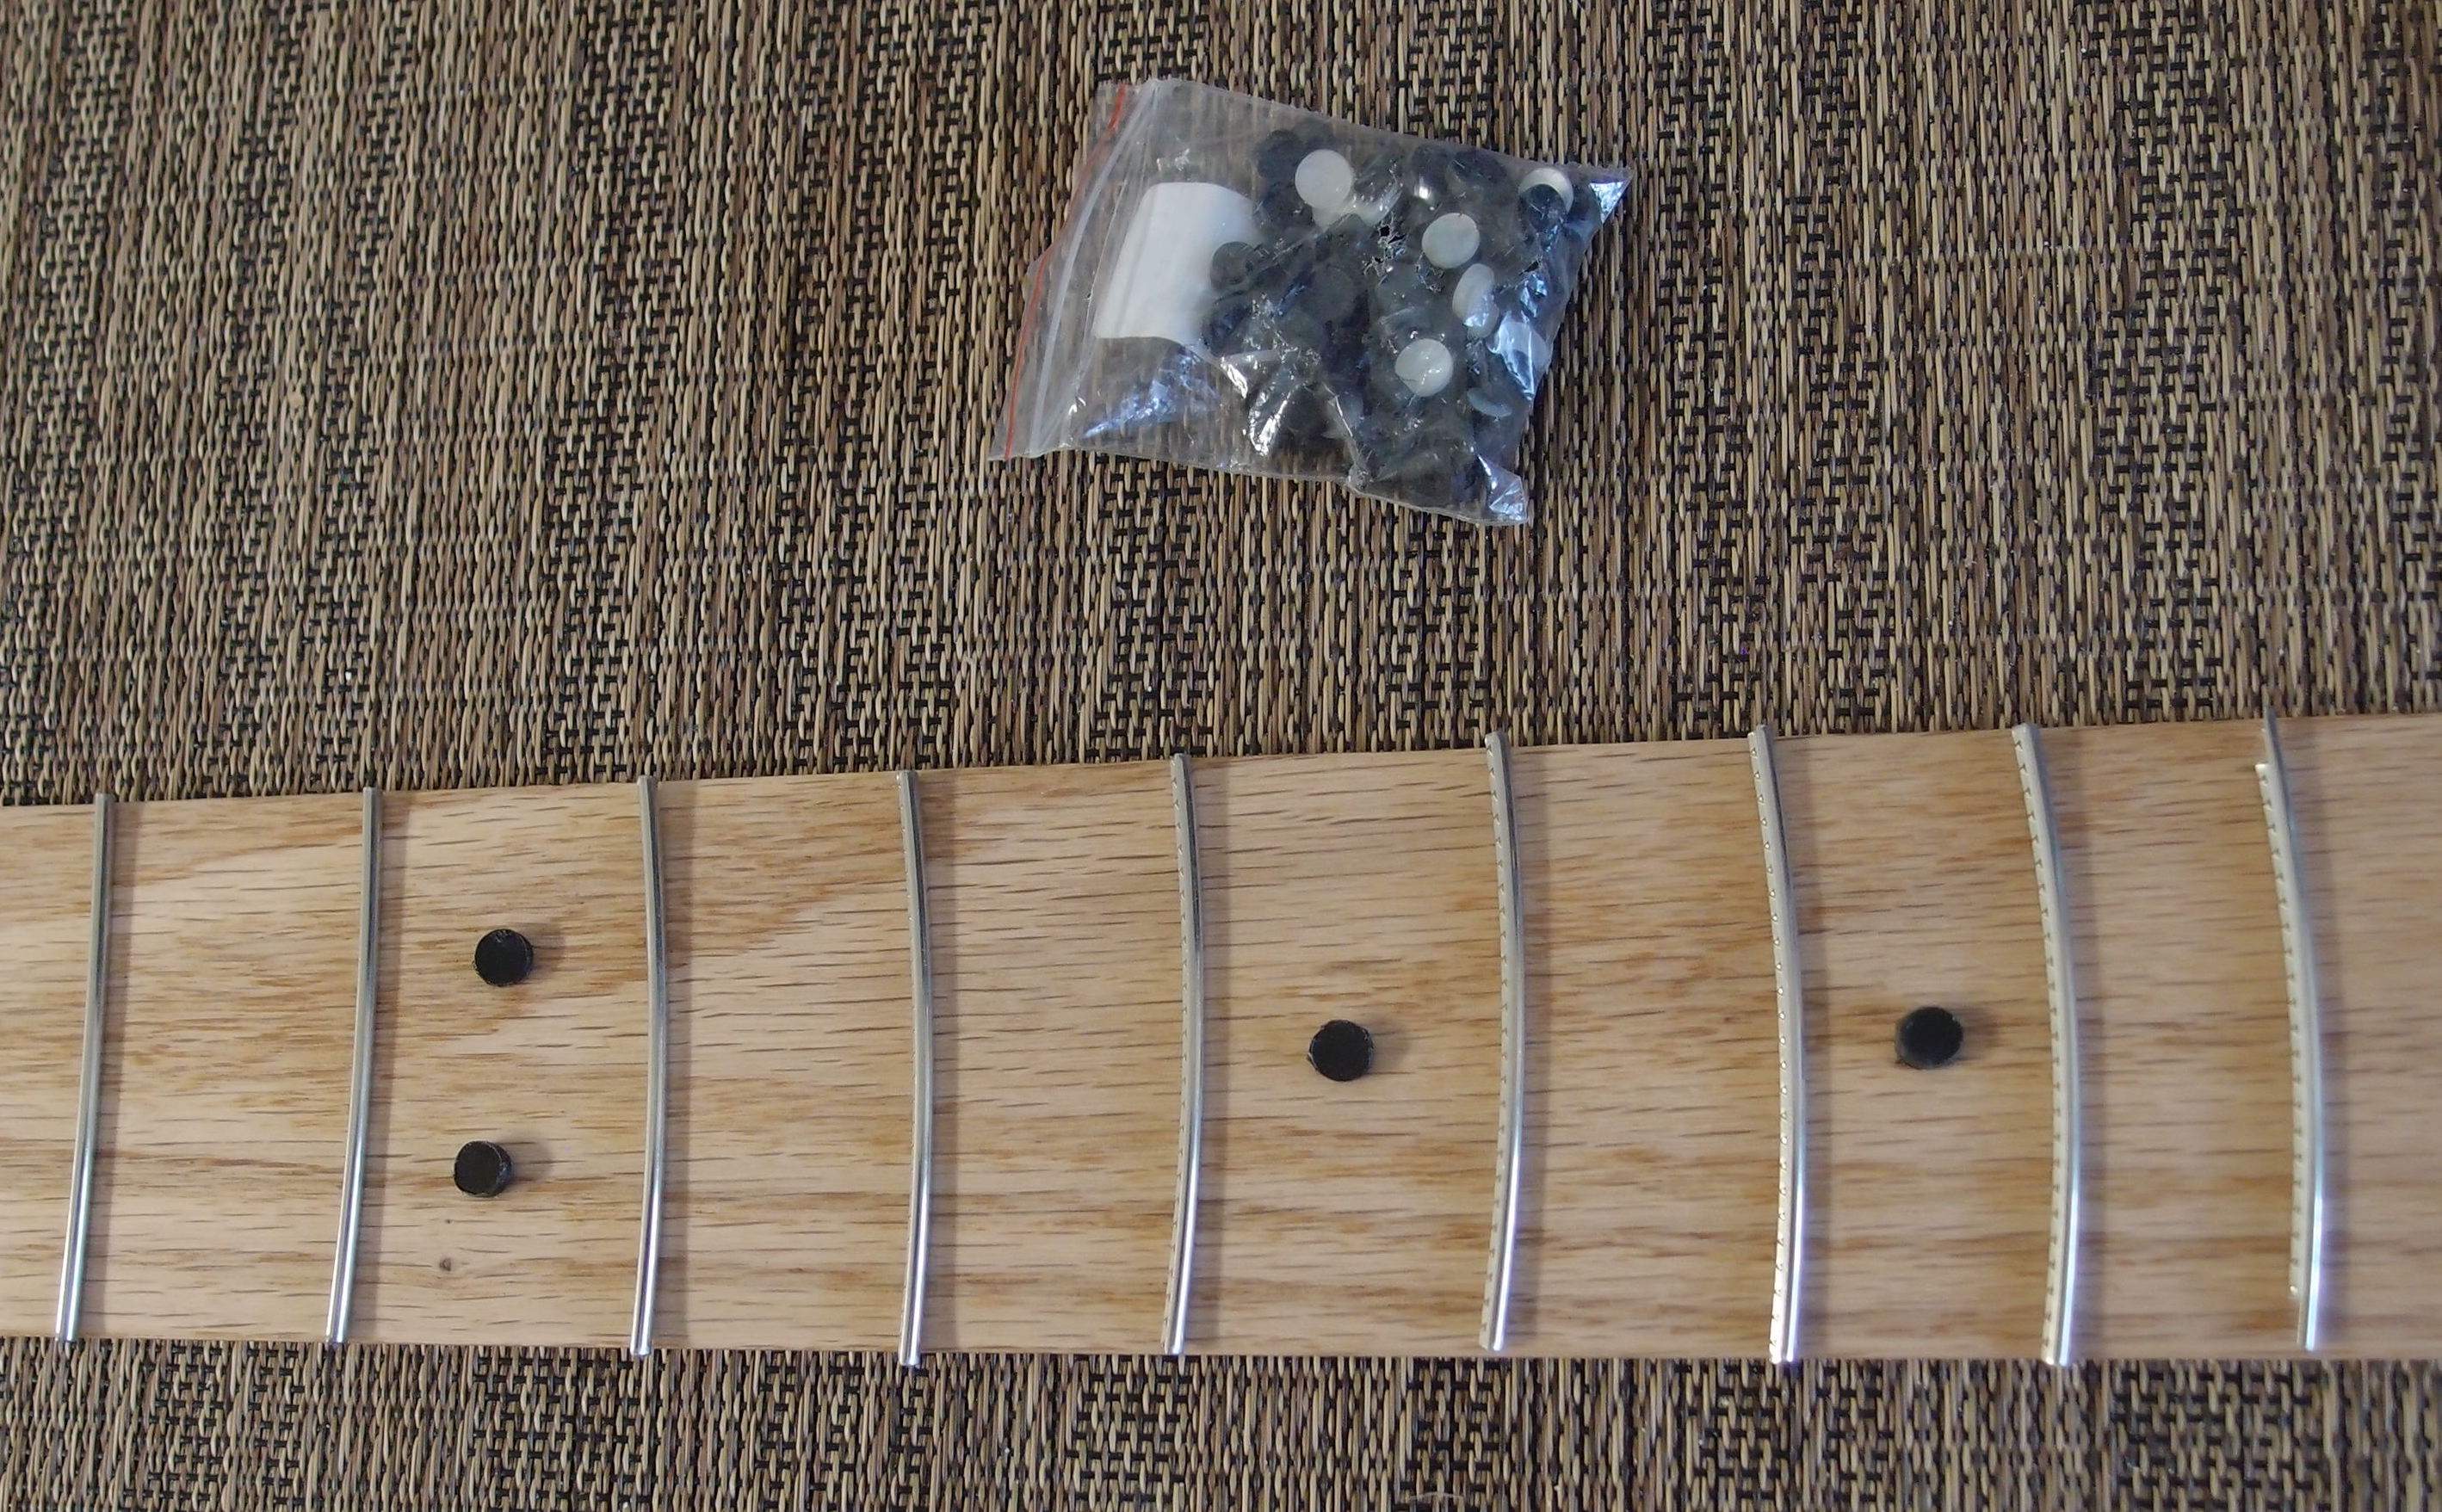
Here is that piece of oak again. I grain-filled it with several coats of water-based ( non-yellowing ) poly, sanding in between until it is as smooth as plastic, which it now is in a way. I used that because that was the first can a laid my hands on. This finish is dull, it could be polished. Before and after fretting, I will probably apply a couple of coats of satin spray poly, which will yellow it a bit. I laid some frets and black dots on it to get an idea how it will look as a neck. I think it looks great, a lot more interesting than maple, with all the little freckles and the much more pronounced grain. And at a fraction of the cost of a piece of tropical wood - you're looking at about two dollars there. Of course, there is a lot of work done to it already, to get it all shaped and finished, and a lot more before it is a guitar, but I count the labor and time as a hobby.

The dots are cut from scraps of solid black pickguard material with an inexpensive 1/4" plug cutter (eBay) on the drill press. You can cut dots from just about any material you have, it is rumored that Fender made them from surplus floor tiles. To cut dots from scrap fretboard material, drill the cutter most of the way through the material, but not all the way. Then put a piece of tape over the top of the material and stick it down good. Sand away the bottom on a belt sander, pressing a fingertip lightly on each dot until you feel it let go, the tape will keep it from being shot across the room. With practice, you can get 90% or better results. I have made black, white, rosewood, maple, bubinga, and purpleheart dots. You can only use solid materials, so three-ply and other types of pickguard scrap will not work. Solid pearl material is expensive, and the process is wasteful, so I bought a nice bag of 200 pearl dots from a supplier on eBay for a silly price. StewMac sells nice dots as well, but at their price-per-dot, I could make them out of gold. Their side marker material is a good value and very easy to use.

Oak has been called 'furniture-y', and I would agree with that, I would not use it for a body for the following reasons:
  1. Oak is very hard, it would be hell to work with, and quickly dulls tools and sandpaper.
  2. Oak has uneven hardness across the different grain areas. This means that the more you sand it to get a flat surface, the more wavy it will become. To get true flat, you need to surface-plane or scrape it. This is true of other woods as well, but oak is especially bad.
  3. The open grain of common Red Oak will need to be filled. That's a real bother, although no worse than ash. White Oak has a closed grain, if you can find it.
  4. Oak has a pronounced sensitivity to humidity, more-so than even maple. This causes it to swell and shrink across the grain with the season, which could crack some finishes, and for a large thick piece, could result in warping and cracking of the piece itself. This is much less of a problem for a small piece.
  5. Oak is heavy - density of 45-50 pounds per cube, vs 30 for alder or poplar, 35-40 for ash. Maple is almost as heavy as oak, which is why Rics are so thin and/or chambered.
  6. A piece that big will come out looking like furniture. Or like Ash, but even heavier.
There are many other materials that are available are lumber yards and hardware stores that can be used for a guitar body, including poplar, maple, pine, cherry, plywood and masonite. Oak would be my last choice.

P7221452.JPG


Here is the other half of that same 48" piece of red oak, after soaking in a trough of steel wool / white vinegar solution for a couple of hours. Some earlier test swatches show that the process eventually results in a jet black color, with no brown at all. Normally, the solution is brushed-on like a dye, and forms a surface layer only. That would not be useful for this application, as there is still cutting and sanding to be done before it is a finished product. I am going to let this soak for at least a week, to see how deep the reaction will go. The porous grain of the oak will no doubt help.

Soaking like this might also work with a dye, but a stain would not penetrate past the surface no matter how long you soak it. A stain is a suspension of solid particles of pigment that lodge in the pores of the wood, a dye is liquid chemical pigment. That is why stains tend to be more color-fast than dyes. That is also why stains don't penetrate very deeply, and can be sanded off. This solution is neither a stain nor a true dye, but causes a chemical reaction with the tannins in the wood, which oak has lots of. This is the same reaction that makes indelible black rings on furniture where you put a cold glass down without a coaster, just taken to the extreme. ( White rings on furniture are different - they result from water penetrating under a lacquer finish. Lacquer just sucks - don't use it for anything. )

With long enough exposure, my hope is that a thin piece like this can be blackened right through. Other things I am investigating are: can the board be dried without warping, and how permanent is the coloring? For the first, I think clamping it between a couple of straight boards in the hot attic for a few weeks should do the trick, and for the second, I have seen every indication ( on the internets ) that the color lasts forever. ( Don't have a hot attic? In the summer, you're car is practically an autoclave - put it in the trunk. ) This is going to take a while, but if it works like I hope, I can turn oak boards from Home Depot into Invalid Link Removed at less than 1/10 the price. The trough is made from a scrap of rain gutter and $3 for end caps. The solution costs pennies, and is re-useable.

Am I really such a cheapskate? I've built plenty of nice guitars out of the 'right' materials, and I've bought a lot of expensive parts. That's not interesting any more. I want to see what else I can do, and see just how much can be squeezed out of the cost of a build. So ... wood from the lumberyard ... flooring boards ... dumpster plywood and masonite ... anything that is not 'luthier'. Inexpensive parts from China - you can always upgrade the tuners later, no need to blow $50 on Gotohs when the cheapies work well enough for experimenting. That goes for most of the hardware, and a lot of the cheap stuff is actually good enough that you wouldn't need to replace it ever. I have a box with a huge tangle of strings in it that I have been assembling perfectly good sets out of, they just need a little cleaning. I even learned how to make my own active buffer circuits, for almost nothing. Eventually I will run out of things to try, and quit.

Come to think of it, the groundwater around here has such a high iron content that I probably could have fetched a gallon from a nearby stream and just used that. The whole stream is rust colored, and it's not pollution, it has always been that way.

P7221453.JPG


A piece of scrap and a few minutes work, and you can make some nice dot markers. These rosewood ones look great on a maple 'board, they darken under a finish, and give a nice woody look. I even align the grain when installing them. Likewise, maple markers look great on a rosewood 'board. You can see why I say the process is wasteful, each dot sits in a much larger crater, but it's just scrap that would be thrown away.

If you drill the material clear through, you end up having to pry the dot out of the bit, which is a pain. Much easier to drill them part-way like this, and then release them by sanding off the back, using tape on the front to keep them from flying away. With thinner plastic materials, you may have no choice but to drill right through.

No precision is needed here. When installing, drill your holes with a forstner bit such that the dots will protrude, then level them with a file. The thicker you can make your dots, the less precise you can be drilling the holes for them. StewMac's pearl dots are very thin and fussy to install.
 
Last edited:
Home-made Ebony

P7231455.JPG


Here is that piece of oak after soaking overnight. On the left is the natural-finish piece, and on the right is the 'ebonized' piece. Both are halves of a 48" six dollar piece that I split. I did a little digging on the back with a razor knife, and it was just as black no matter how deep I cut. It has also swelled considerably across the grain, a good indication that it has waterlogged, meaning the color-changing solution has penetrated the entire piece as I had hoped. That happened a lot faster than I expected, but I will soak it a few more days just to be sure.

Making the solution out of warmed white vinegar and steel wool took about a day. A substantial hank of steel wool reduced to a small ball. Make sure the container is vented or it will burst from the pressure. I filtered out the iron bits with a folded paper towel inside a funnel before using it. You don't want rust speckles.

Assuming the piece can be dried without warping or splitting, I see no reason why it can't be filled and finished exactly the same way as the natural piece. I will use my radiused clamping cauls to secure it to a piece of 2x4, and put it in the attic. When it shrinks back down to the size of the other piece, I'll know it's done. The non-porous areas will probably make nice black dots.

This same reaction should also work well on walnut, and my walnut test fret shows no sign of loosening. Oak is a lot harder than walnut, only slightly softer than maple, and should make a fine fingerboard, in your choice of color !!! Imagine what that black piece will look like with silvery frets and pearl dots !!!

On another subject, I just ordered a bunch of bulk fret wire from eBay. The stuff is available in a variety of sizes, and I see no difference between the bulk wire and pre-cut Fender frets, except the cost - you can fret a neck for less than half the price. It is really not much more work, especially if you are doing a bound neck that requires a lot of fussing.

You can radius it yourself with your fingers, you just want it to be over-curved, so that the middle pushes down on the ends. The opposite would be bad. The first batch of wire I had was radiused ( coiled ) about 6 inches, and I used it just like that, it worked fine. Fret wire is not that stiff, and all the fussing that is made over correctly radiusing it before jamming it down into the wood is silly. That is my mechanical engineer's opinion, backed up by a lot of experience. As long as there are no actual kinks in it, almost any curve will do.

BTW, I make all my fretboards 12 inches, guitar or bass, fretted or fretless. I just like that, and also, it doesn't matter that much as long as you stay away from the extremes. 12 inches is a nice comfortable curve for chording on, and also doesn't require as much work and mess to carve as a smaller radius. I find it is a good compromise overall. I can make a 12 inch radius from flat pretty successfully with just a sanding block. StewMac's pre-radiused boards are 16 inches, and are quick and easy to re-radius to 12. Although I made tooling for everything from 7 to 16, I don't use any of it. Luckily, I made extra tooling for 12 inches before I broke down the manufacturing plant.

I cannot recommend StewMac's sanding blocks, as they are too narrow and too short. I made my blocks from scraps of 1"x4" maple ( 3/4" x 3-1/2" actual ) and backed them with scraps of pine for a better grip. The 9" length matches a half-sheet of sandpaper, which wraps around the sides so you can hold it in place. When the paper is dull, you can get a bit more out of it by turning it 90 degrees to use the unused strips at the edges.

I put the workpiece on a scrap of 2x4, and use the edges to guide the block. I recommend wearing leather work gloves, 80 grit doesn't do nice things to your hands. You can go through a lot of sandpaper with some tropical hardwoods. It is best to radius a board before cutting to length, as the ends invariably come out a little off, and when you remove them, you'll have a perfect piece. I do most of the work with 80 grit, then intermediate finishing with 100. After the board has been slotted and glued on and the neck fully shaped and bound, I do final radiusing before installing the markers, then polish up afterwards with finer grits. This assures a nice smooth flat fretboard to install the frets on, with little to no fret dressing required.

I haven't screwed up a neck build in a long time. For me, neck building is an enjoyable art, from the truss rod right out to the finish. OTH, building bodies for my necks is drudgery, and I use prebuilt bodies wherever possible, there are lots of them on eBay.

P7231458.JPG

These are almost finished
 
Last edited:
Gluing a Neck

P7281459.JPG


I originally made this little table-like thing out of scrap pine to glue up headstock joints, like the one in the picture. But it is is good for gluing on fingerboards as well. It could be a little longer, but it is good enough. I laid the radiused clamping cauls on it, then the fingerboard face down, then the neck on top, and clamp the whole mess firmly. The neck is roughly shaped, while the fingerboard is uncut rectangular. This lets me align everything easily, simply eyeballing the neck against the fingerboard, while aligning the nut end of the fingerboard against a mark on the side of the neck. This is much easier than trying to align centerline marks from the other side.

Note that the clamps are in pairs along the edges, to make sure that there is no gap when the glue is dry. You can't use too many clamps. For a job like this, I like these little screw-type clamps better than springs. plenty of glue squeeze out all around. Nothing special about this jig, cost nothing and took 5 minutes to make, no fasteners, just glue. The point is how much better and easier you can make a job with a little forethought and the right tooling.

The wood is purpleheart, really cool.
 
Fret Saw

Invalid Link Removed

This is the saw I use for cutting fret slots - a Zona 35-380 dovetail saw. It has the correct kerf of 0.022" for a fret slot, and has an 8" long blade, is long enough to work with my slotting jig. ( StewMac's saw is 0.023". ) The spine on the back engages the jig to set the cutting depth. Well, actually, I got the saw first, and built the jig around it.

These are available from many hobby supplies sites for about $10 + S&H. Get several, as they do wear out. While a slot might take 30 strokes to finish in maple, it can take twice that in ultra-hard tropical hardwoods. It is less a matter of the teeth going dull than wearing down sideways - the outer corners wear off. I can even feel it with my fingers. The result is that the cut gets narrower, and eventually the saw binds in hard woods, at which point it may still be useful for a lot of things, but not for fretting any more.

I am down to my last good saw. The one I've been using a lot now measures as little as 0.19" in the center, 0.020" at the end, and still 0.022" by the handle, which is hardly used. I noticed when trying to insert 0.020" plastic strips for marker lines on a fretless, and they wouldn't go. That's only 3 thousandths of an inch, but the saw is already one thousandth narrower than a 'real' one, and 0.004 / 0.022 = 18% error. The heel of the blade won't slide through the slot you just cut, although I've been using it to widen them out to spec.

A too-narrow fret slot in a very hard wood could introduce excessive compression in the fretboard, which could cause the neck to back-bow. Depending on the truss rod, this can be an irrecoverable disaster. On the other hand, I left the narrow slots in an experimental walnut board I'm making, as walnut is softer and can probably use the extra grip. I'll keep the current worn-down saw for experimenting with oak, walnut, and maple, and use a new one on the Jatoba I've been using, which is noticeably harder than rosewood. A third one of these saws that is completely ruined for fretting is still handy for all sorts of small cutting jobs in soft woods.

You can get 3 of these little saws for the price of one 'luthier's' saw, and they work great. The $30 saw is not likely to last any longer than the $10 one, and certainly not as long as 3 of them ! Time to order a couple more. The Zona 50-350 saw will also work in a pinch, but with a shorter blade with fewer coarser teeth, it will wear out faster. It is also a different height than the 50-380, so you can't go back and forth between them without adjusting the jig for depth.

Continued ... I just measured a bunch of different frets, and got readings from 0.017-0.018 for Fender frets to 0.022-0.023 for the bulk wire I've been using lately. Two conclusions from that: measure your frets and pick the right saw for them - that 'worn out' saw doesn't seem so worn out now. And obviously, it is the little teeth on the tang that are doing most of the work, because those Fender frets are much narrower than the slots I've cut for them over the years, but they are in nice and tight.

The little teeth on the fret tang measure 0.037" on the Fender wire, and 0.044" on the bulk wire. Both of these are enough to bite into the wood around a 0.022" slot. That is what holds the frets in place. Glue will fill any gap between the tang and the slot, and solidify the assembly. What you don't want to do is shove a 0.023" tang into a 0.010" slot, which you would get from most razor saws. That would be a sure recipe for fretboard compression and back-bow. A couple of thousandths of interference is probably a good thing, but not too much. I need to get some feeler gauges and measure some actual slots. I vaguely remember calculations for interference fits ( 'press fits' ) between metal parts from college. Of course, wood is going to be more forgiving than metal - it is softer.

And another conclusion: glue your frets in. White glue is good enough most of the time, and cleans up easily with water. CA works on hard cases, but gets all over your fingers and everything else. I used CA to set the lines on a fretless board, but then I sanded away all the mess - not an option on a fretted board.

I've done quite a few fret jobs and some re-frets, and never considered any of this before. I always used a 0.022" saw, and it just worked. There's a lot to be said for 'it just works,' and that saw has worked with every kind of fret in every kind of wood, installed with both a hammer and a press. I guess the old engineer in me awoke my curiosity.

Here's another bit of advice that should be obvious by now: if you really want to know what is going on down to a thousandth of an inch, get yourself a digital measuring caliper. They're so cheap and readily available nowadays, and a little six-incher is all you need for guitar work. I also used a caliper to lay out the holes in the fret spacing guide.

It turns out that Fender really has just one scale - 34" 32" 30.3" 28.5" 27" 25.5" 24" 22.5" 21.5" are all just different spots on the same guide. Extending Gibson's 24.75" scale into bass territory, we get useful 35" 33" 31.2". Doing the same for 25" yields 33.4" 31.5" 29.8". A guide like that would include both the Danelectro/Martin 25" guitar, and the Rickenbacker 33.25" bass. In other words, a guide that has a base scale of 35" would include a Gibson guitar, while a guide that has a base scale of approximately 33.4" would include Rickenbacker, Danelectro, and Martin. A base scale of 34" covers everything Fender ever made, and that's no accident.

How accurate does a fret guide need to be? A guitar is an equally tempered instrument, meaning that except for a few oddballs, all the notes are approximate. In addition, all the frets are a compromise across multiple strings. Most notes are close enough to true ( a few cents ) that it is not noticeable. If you have really fine pitch, the worst note ( furthest-out in relation to the root ) is the third and can be audible. So basically all the notes are wrong to begin with. Then there is the effect of the mass and stiffness of the strings, which is compensated by adjusting intonation, yet another kludge.

So if your frets are just a smidge off, it is not going to matter much. Gibson's Les Paul frets are a lot more than smidge off, and the error is so entrenched that they won't even fix it. But you still want to be as accurate as you possibly can be, and since there is a well-known mathematical formula for equally-tempered fret positions, I can calculate them to the thousandth of an inch. I can try to measure those thousandths with the caliper, and mark, punch, and drill them as accurately as possible.

The fret guide I made produces neck scales from 36" down to 21.5" with no tuning issues that I can detect, either by ear or with a digital tuner, so I suppose my best effort was good enough. I would guess my locations no worse than +/- 0.010", a hundredth or 10 thousandths, and that is a lot more accurate than you could possibly get away with. You could probably do a good enough job with a finely divided ruler, but I wouldn't.

This subject is now officially beaten to death.
 
Last edited:
  • Like
Reactions: Gilmourisgod
Side Markers

P8071464.JPG


In addition to my alternative marker dots, I's also looking for 'non-luthier' alternatives to side markers, and here is one. These are bits of 3/32" brass rod, set in a piece of scrap maple as a test. Foot-long lengths of 3/32" and 1/16" rod are available from hobby shops for around a buck; they are used by model builders. I pre-drilled the holes, tapped the rod in like a nail and cut it off slightly proud. Working the brass is just like dressing fret ends, in fact you could do it at the same time. I also found some aluminum rods on eBay. At the size of a dot, aluminum should come out looking just like pearl. This is like Danelectro used to do back in the '60s. Steel would be much harder to work, and also prone to corrosion, so I wouldn't use ordinary nails, but small brass ones would work. Always pre-drill hardwoods. I pushed in a dimple with a pointed scribe, then deepened it with a spring punch before drilling. Chuck the drill bit so just a 1/4" protrudes. That will keep it from flexing, which can be a problem at these sizes.
 
Last edited:
  • Like
Reactions: Gilmourisgod
Field Guardian 120 ft. 14-Gauge Aluminum Wire-AF14120 - The Home Depot

This is what Danelectro was using, has to be. In the 60s, this stuff was used for electrical wire, you could buy it anywhere. Caused more than a few fires, mainly because people treated it like copper, and you can't do that.

Don't know why I didn't think of this before. I was fixated on the word 'rod', and forgot that at these sizes, 'wire' is more appropriate. ( Now let's see if there are any adults on this board who can pass that one by ... heh heh ... ' he said ... ')

Speaking of copper, I have lots of 14 gauge copper scrap from house-wiring, so I can add that to my luthiery kit as well. Copper should look nice under a clear-coat to prevent oxidation, or let it turn green - why not?

So, from the hardware/hobby store:

  • brass (golden)
  • aluminum (silvery)
  • copper (coppery)
  • 'aged' copper (green)
  • wood dowels & toothpicks

and in real luthiery supplies:

  • white plastic
  • black plastic
  • glow-in-the dark plastic
  • real pearl

BTW:

  • 1/16" = 0.06250" ~ 14 gauge wire = 0.06410" diameter ( exact drill size 51, 0.064" )
  • 5/64" = 0.07813" ~ 12 gauge wire = 0.08080" diameter ( exact drill size 46, 0.081" )
  • 3/32" = 0.09375" ~ 10 gauge wire = 0.10190" diameter ( exact drill size 38, 0.102" )
These are all common drill sizes, and the wire should be a good press-fit - no glue needed. The exact-size bits are something only a machinist would have, and not necessary for this, I just thought I'd add them.

Another idea I've seen is to use those little red straws that come with spray cans, and fill the hole with white spackle or caulk, for a little bull's-eye. I just measured one, and it comes out to 0.0845" ~ 5/64".

Aluminum welding rod also comes in 1/16" and other sizes, if you know someone you can get a couple of pieces from, otherwise it is only sold in bulk. In fact, almost anything that will match up with a 1/16" or 5/64" or 3/32" drill bit.

So many choices, and so many of them cheap and easy.

Real pearl is a waste of money - they're expensive and too small to tell the difference.

P8111465.JPG


In addition to the 3/32" brass, I've added a 3/32" aluminum, and a 1/16" copper that I scrounged out of the electrical parts box. Just drill the hole maybe 1/4" deep, and push in as much wire as will go. No messy glue. Clip it off, file smooth and polish.

Mind you, this picture is in no way finish-quality. I just drilled some quick holes in a piece of maple scrap, jammed some wire in and gave it a cursory smoothing. Inked the wood with a Sharpie for contrast. On a guitar, I would do a much better job.

I really like the copper. Going to Home Depot tomorrow to see what I can find. Website shows solid bare copper wire 10 gauge for 39 cents a foot. Home Depot is the best luthiers supply on earth.

I also got some 1/8" aluminum. That might look interesting on the front of a fretboard, instead of regular dots.

statue_liberty.jpg


This is what 'aged' copper looks like. Not sure how long it takes to turn completely green. The green patina can also be induced artificially, but most of the chemicals involved would probably mar the wood. Brass and aluminum should stay shiny forever.
 
Last edited:
  • Like
Reactions: Arsafraz
@alder
Thanks for the post. A subject of great interest to me as I am approaching the point in my build where I have to decide how to finish it. I'm sure you are aware of the Water Based finish thread in progress on TB, fascinating stuff, and some builders getting great results with spray guns, particularly @Bruce Johnson using Parks Pro Finisher on his Ampeg basses. I find myself in a rut of indecision for what will probably be my only painted bass build. I generally much prefer oil finishes, and simply can't justify the expense of a compressor and gun for a one-off paint job. I've used automotive laquer for a little light auto body work, and it is indeed nasty stuff. I've also done my share of rattle-can enamel spray jobs, though not on guitars. I've discounted traditional nitro laquer as too fragile and too toxic. I'd like to use all water based finishes if possible, but the color coat part of the process has me stumped. Rustoleum makes Varathane water borne clear poly in spray cans, but from what I've read, most or all of the water borne color paints are not hard-drying enough to use as color coat. You mention black poly, what brand? Do you have any advice as to best approach for a one-time paint job?
 
Yes, those are all good qualities for the job, but doesn't mean other woods won't work as well.
Work as well, or work also?

In the double bass field, rosewood was at one time considered a cheaper alternative to ebony for fingerboards. Maple was considered to be vastly inferior to both and was dyed to look like ebony. I think Fender started using maple boards as a cheaper alternative to rosewood. So it's kind of a downward qualitative spiral from that standpoint.

Over the last few decades, more and more woods have been explored as alternatives to the conventional woods. Some are more acceptable than others, and some have been resisted by the buying public for reasons that are not related to mechanical suitability. Oak has generally been shunned. Morado, Pro Ferro has met some resistance, though I think it a superior alternative to some of the rosewood I have seen over the last while. Bubinga made a decent board, but it has now been restricted, so we won't see much more of it.

And speaking of CITES, more and more species are bound to be listed, and it will become increasingly important for builders to find alternative species to use in instrument fabrication. I suspect that many of the woods that are tried will be met with a lot of resistance from the buying public. Let the games begin.
 
As far as the fretboard affecting the tone, sorry, I don't believe that any more than the nonsense about thin nitro finishes. The only time you really need a super-hard fretboard is for a fretless with metal strings, since they are bearing directly on the wood and would eat it up. (bold 202dy) I have a fretless neck from purpleheart waiting for a body. Judging by how long it took to cut the 'fretless' slots, and what it did to the saw, I'd say that is the hardest stuff I've used yet. That's another reason to avoid all those exotic woods - they eat up tools.

Did you see the trick I discovered using 'natural' stain on 'rosewood' - comes out looking like ebony, and it is permanent. I also prefer linseed oil over lemon oil - it is much longer-lasting, lemon oil is gone in a week.

And it's almost impossible to get quality old-growth masonite nowadays.

Super hard is almost always very stiff. The fingerboard contributes to the stiffness of the neck. Stiff necks resist the pull of the strings better than less stiff necks. Less work for the truss rod. More sustain, if that's a goal.

Some would say it sounds better. Or different. As far as tone goes, Turnaround is right. Some people hear a difference. Some don't.
 
Last edited:
Maple boards do sound brighter to me unplugged, but I can't hear any difference amplified. I just prefer a dark board, and don't like them lacquered, which is mandatory with a maple board. I do love a jet black ebony board visually, sets off inlays nicely. I actually like the ebanol boards on the Squire VM fretless, definitely a tone difference there where the strings touch the FB.
 
Alder
I tried some Polyshades on furniture a few years ago, the problem with it is that the stain stays in suspension in the poly, and never penetrates the wood, so in the case of a transparent finish, any chip goes right back to bare wood. I also found it very fragile. They use some variant of this stuff on the Ibanez SR500 "Brown Mahogany" basses, and it universally chips out where you rest a thumb or under finger contact. I suppose if you applied enough coats to make it opaque, you'd have a decent film thickness, and it would be a tougher finish.

I assume you would agree that fingerboard wood does have some direct effect on tone in the case of a fretless bass? That seems self evident, as the characteristic "mwah" of a fretless is the sound of the string "fretting out" on the fingerboard. How much of that translates into amplified tone is another debate, but ebony or ebanol boards sound a lot brighter to my ears than a rosewood fretless board.

I'm surprised you are so down on the water-based finishes. Some pro and amateur builders on TB have had really good results with WB Varathane floor finish and Parks Pro Finisher used through a spray gun as sealer, base, and finish coats.
@Bruce Johnson is tinting it on his Ampeg Scroll Bass builds, and it looks really good. Apparently dries pretty hard too, and in much less time than Poly or Laquer. I'd love to try it, but can't justify the investment in a compressor and gun setup for one or two paint jobs.

Interesting series of mini-blogs, please continue!
 
Some people imagine a difference. If the fretboard affects the tone, then what about the frets? You never hear obsessive discussions about fret alloys. Oh, but you really can't see that, can you? Some people hear with their eyes.
What - You haven't heard the discussions about the difference in tone in fret alloys? It's been discussed o death. There's the stainless steel vs nickel silver vs bell bronze vs 18% vs 12%NS, hardened vs non-hardened ad nauseum. Lots of folks who claim to hear a difference.

When it comes to fretboard wood, I have conducted some blind tests and I know some folks can hear a difference.
 
Actually, the mwah comes from using roundwound metal strings directly against the unfretted surface, someone correct me if I'm wrong. Flatwounds are much kinder to fretless instruments, but no mwah.
My fretless sings like crazy with mwah using flats on an ebony board. No epoxy, no frets, no fret lines.
 
A stain is actually a liquid suspension of microscopic particles of color that lodge in the pores of the wood, darkening it. In the natural stain, the particles are not colored, but clear ( I'm guessing ) and when they lodge in the wood, they have the same effect as the oil - drawing more light in. And since they are solid, they don't evaporate like oil.
Actually most commercial "stains" are a combination of pigments and dyes. Dyes don't have suspended particles whereas pigments are entirely suspended particles.
 
I'm glad to see your interest in actually testing things, but for your experiment to be valid you would have to have a guitar where the fretboard could be removed and replaced without disturbing any other part of the instrument, including the strings ( and by your own argument, the frets, ) and you would have to play it exactly the same way for every test. Using two different guitars completely invalidates your experiment. Your subjects may have discerned differences, but those were differences between two different guitars and two different sessions. The effect of the fretboard would be impossible to pick out from the overall differences, and the test could probably go the other way for two other instruments, or by simply repeating it with the same instruments.

Even swapping out the neck on the same instrument would not make a valid experiment, as the two necks are two different pieces of wood, truss rods, frets, thin nitro finish, etc, and it would require re-stringing the instrument and a new setup. Clearly, it is impossible to construct an experiment that would isolate the effect of the fretboard, and so we are back in the realm of religion. Believe what you will. There's no way I'm ever going to convince you, or you me.
You don't actually have to do testing the way you describe to get valid results. When the sample size is large enough you can draw some conclusions that are statistically relevant. For example, if 90% of the people polled feel the same way about one product over another, there clearly is a perceived difference. This has relevance since the opinion is clearly one-sided. If the difference of opinion was 45/55%, you could say the perceived difference is not likely to translate into a real difference.

But in our case, we are only talking about a perceived difference anyway.