• TalkBass has been independent since 1998. Add your voice.
    Create a free account to reply to discussions, view embedded media, and browse with fewer display ads.
    Join freeLog in
    Want zero display ads or expanded classifieds tools? Compare plans.

Building: Tools, Fixtures, Jigs & Templates

Fretwork

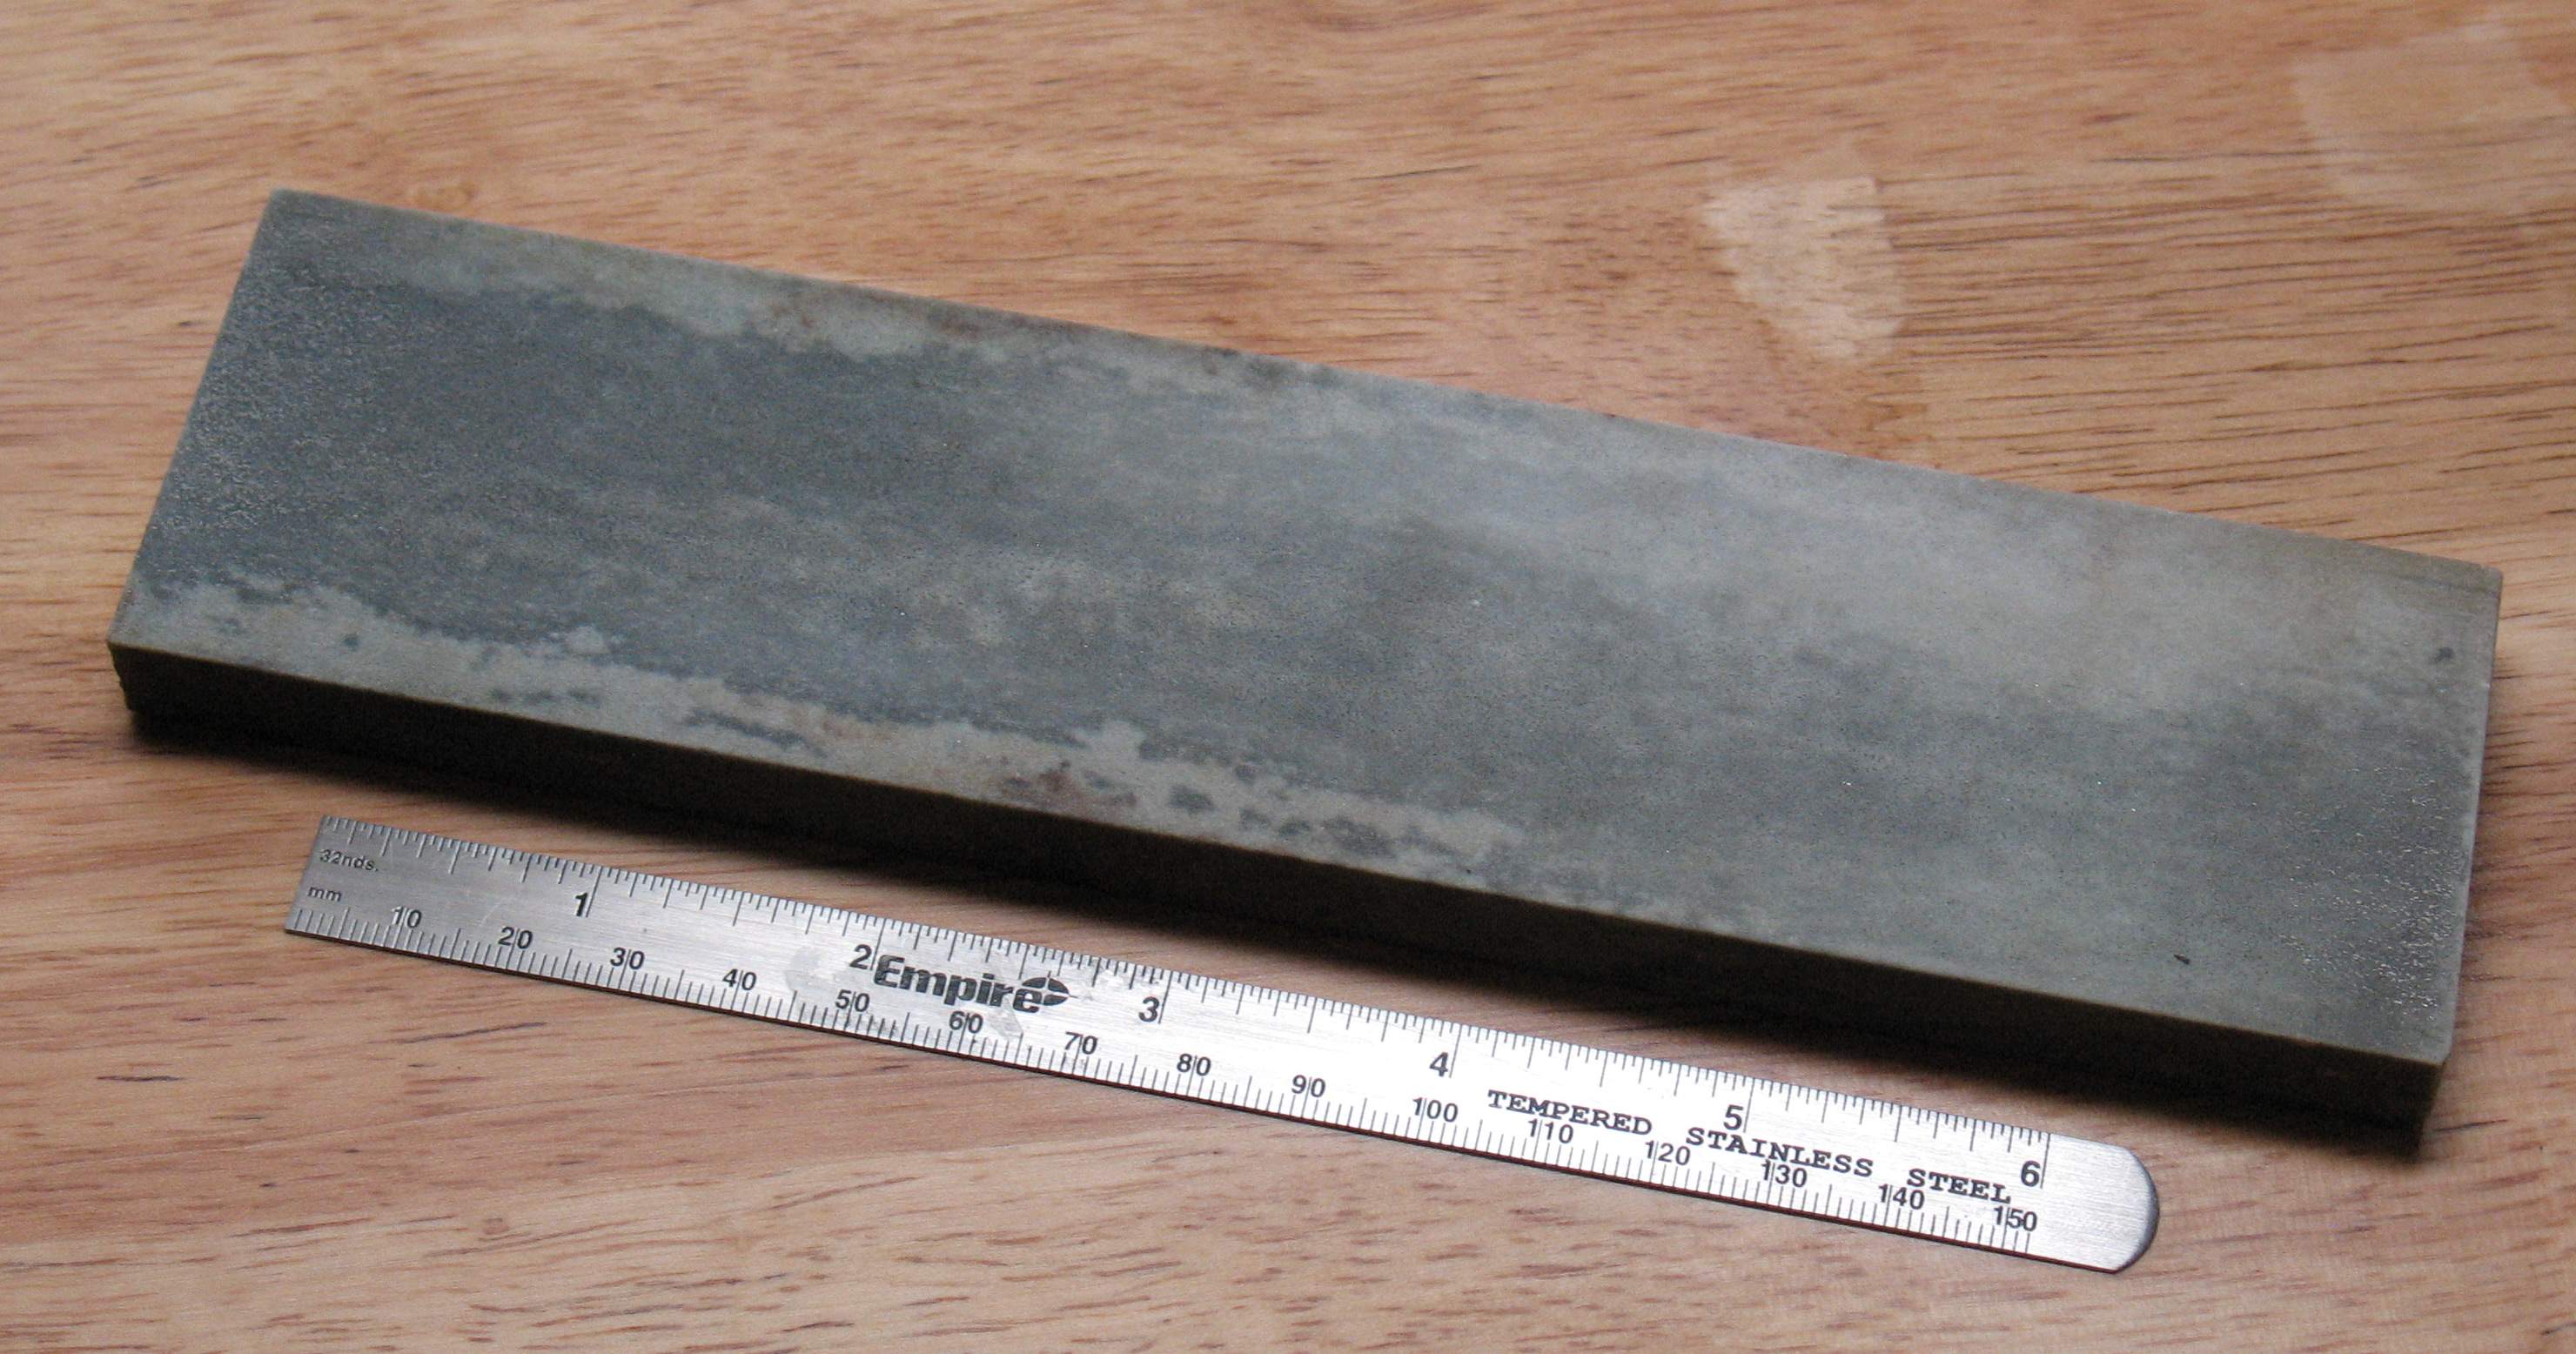
IMG_2322.JPG


This is an Arkansas oilstone. These are normally used for sharpening knives and such, but they are also very useful for fretwork. Use it as you would normally use a file. Note the size of this one - you can run it up and down the neck to level frets without the risk of over-cutting like a file, and it leaves a much finer polished surface. Unlike a knife blade though, soft fret metal will gum up the stone - you can see a little shining near the ends. This can be cleaned off from time to time with brillo. Any kind of sharpening stone can be used, natural or artificial, it doesn't have to be exactly this. You can get a stone like this at better sporting goods stores, I think I got this one at Dick's many years ago for sharpening fillet knives. The bigger, the better. I just had this one out to sharpen a kitchen knife, which gave me the idea to post it here. A good stone will last a lifetime if you are careful and don't break it.
 
Last edited:
Trying a new kind of construction

IMG_2324.JPG


The wings are 5/4" pine from Lowes. Nice wood that is all ready to be joined into guitar-sized pieces, but soft. You wouldn't want to attach a neck to it. So I made a hard core from 1/2" maple, sandwiched with 1/8" mahogany, you can see the stripe. The trick was cutting through between the horns, which I did with the miter saw and a good eye. Finally, it will be capped front and back with 1/4" plywood, for a total thickness of about 1-1/2". The solid wood core back to the bridge mounting should make it extremely strong. I will use a modified Fender-style neck mounting. The pine makes a quite attractive edge when clear-coated, and the maple plywood give a hard damage-resistant surface.

Update

This project is cursed. This body was scrapped - the plywood I used for the front splintered all around the edges. The basic design is sound, I was sabotaged by the material, and it was not a cheap piece of plywood either, it was expensive finish-grade stuff. I got totally disgusted, and started to route the offending piece off, but I slipped with the router and ruined it. So I traced the outline on an alder blank I had lying around, and in 40 minutes I was back where I started, but still disgusted. This one will still make a good template for future projects.

That makes three bodies for this project. The first one was similar in design to this one, but I used an odd neck attachment that I ended up not liking, and also it was too small. So I scaled it up to this one, which would have worked if not for defective materials. Chalk it up to experience, I learned how to do bindings on the first one too, and the second one was not so far along that it was a great loss. The third one better work, though, or I will make a fire of the whole mess.

Update

P5171383.JPG

I'm really diggin' this alder body. I haven't decided if the front should be a 1/2" radius or bound. I'll probably do a three-tone sunburst.

Meanwhile, I took another look at the hollow pine body, and it looks salvagable. I've already ground off the front, and found a nice piece of maple plywood for a new one. So it's good that I didn't throw it in the fireplace.
 
Last edited:
  • Like
Reactions: Gilmourisgod
Danelectro Binding Jig has more uses than I thought

P5141381.JPG


Gluing up two more angled neck blanks. The binding jig is little more than a raised surface that you can clamp to and use as a guide. I don't know why I didn't think of this before I made the neck gluing jig, which is basically the same but shorter. Once more, tin foil keeps from gluing the piece to the jig. One clamp holds the tail down, three clamps provide even pressure on the joint, especially at the feathered edges, and one more clamp acts to pivot the two pieces together tightly. Straightness is eyeballed against the edges of the jig.

The angle here is 15 degrees. Construction uses a short piece of 4" wood, and a long piece of 3" wood ( in this case curly ) which minimizes cost and waste. Provided the gluing is done properly, this is probably the strongest possible way to build an angled headstock. Wood grain runs in the best direction in every part, and the headstock is sandwiched for about 3 inches between the back and fingerboard. The headstock is then thinned to the final thickness on the back side, leaving the joint well up the neck and away from the nut slot.

The final version of the scarf joint angle cutting jig is fantastic. Some test cuts and minor adjustments, and the pieces came out near-perfect, and I could have made a dozen of them without fussing - once it is dialed-in, repeatability is excellent.
 
Last edited:
Woodworking Trick

Minor dings in bare wood can often be popped-out by applying a bit of boiling water, which will swell the grain. If water doesn't work, try heated acetone. Place a small container of acetone in a large container of hot water to heat it, away from any ignition source. Steam will also work - to fix up large areas, use an iron on low over a damp towel. I have even gotten the hot water trick to work through a finish, but there is no telling what the result may be, and I don't recommend trying it.

It may take several applications to get the full benefit. The softer the wood, the better this trick works. Poplar, alder and pine can often be repaired completely. Maple responds less well. Always do this trick before sanding, if you do it after, you'll actually end up with a raised bump where the ding was !
 
  • Like
Reactions: Gaebrial
Minor dings in bare wood can often be popped-out by applying a bit of boiling water, which will swell the grain.
the classic method is wet paper towels hit with a soldering iron right over the spot, to apply the resulting steam just where you want it.
If water doesn't work, try heated acetone. Place a small container of acetone in a large container of hot water to heat it, away from any ignition source.
that sounds scary to me, highly flammable acetone is already volatile and quickly evaporating just at room temp.
 
the classic method is wet paper towels hit with a soldering iron right over the spot, to apply the resulting steam just where you want it.

that sounds scary to me, highly flammable acetone is already volatile and quickly evaporating just at room temp.

I don't think so, I don't worry about it. You're just heating it with hot water. I'm talking about a teaspoon of acetone in a test tube. Now if you put a pot of acetone on the stove, that would be scary. Suicidal, more like. I found out how acetone works while stripping some lacquer off a damaged neck. When I was done, the damaged wood had completely restored itself.

I hadn't heard of the soldering iron trick. Kind of hard on the iron, isn't it? I would worry about burning through.
 
Some More Sanding Blocks and Experiments

P5241389.JPG


Here is an example of the same stain on the same wood (poplar,) applied raw on the left and pre-treated on the right. Note the difference in color, from the same stain out of the same can. Staining is an art, and any stain job should be preceded by a lot of testing on scrap until you determine how to get the result you want. The color on the can is bullsh!t.

At the right of the picture are some custom sanding blocks I made ( which I also stained, just for the hell of it. ) One has an overall symmetric curve that matches the inside of the horn on something I'm building. With a coarse paper, it can be used to smooth out the bumps that the spindle sander leaves behind, and with a fine paper it can be used for finishing. The other block has a 3/8" radius on one end, and 3/16" radius on the other. These are perfect for tight spots. I also made a third block with a variable-radius curve, like an airplane wing. I ground out all three of them from yellow pine scrap on the belt sander.

When you add in the padded flat blocks and all the fretboard radius blocks I've made, I have quite a collection of sanding blocks now, mostly made from scrap wood. Don't be afraid to make a custom block for a particular job - it can save you a lot of work, and give you a much better result.
 
Last edited:
Pre-stain is an important step for those looking for a good looking result. A pre-stain was referred to as a mordant in the past, but you don't hear that term much these days. I work with stains and dyes and I always use a mordant. In some cases it's also worth while using a dilute sealer before applying the stain, especially with woods that are very absorbent. Tends to even out the stain and avoid blotchiness.
 
Templates

IMG_2335.JPG


I decided to step back and take stock of my Audiovox project ( here. ) These are all ( ? ) the templates I have used. The upper row, from left to right:
  • neck pocket template, 1/4" acrylic, StewMac
  • Stratocaster pickup sound hole, 3/4" mdf
  • Stratocaster pickup, 1/4"acrylic, StewMac, resting on body route template, 3/4" plywood
  • Lipstick pickup, 1/4" acrylic, resting on top-mount body route template, 3/4" plywood
  • mini humbucker template, 1/4" acrylic, resting on a spare piece of 3/4" plywood
  • battery box template, 1/4" acrylic, resting on a spare piece of acrylic
  • guitar neck, Stratocaster heel & scale ( to be used someday )
  • bass neck, short scale, scrapped & sanded flat on both sides
Notice how I have scribed centerlines, perpendiculars, and angles on the pickup templates.

Below those are all the Audiovox-specific templates, stacked, from the bottom up:
  • body master, 1/4" mdf, for tracing
  • pickguard master, 1/4" mdf, for tracing
  • pickguard routing template, 3/4" plywood
  • cavity template, 1/4" mdf, for tracing
Next to that is the Audiovox headstock template, with marker holes for various bass and guitar tuners.

Finally, my bridge placement template. To use, mark the scale length and centerline on the body ( that's where the necks come in handy ) and site the intersection through the hole marked 'scale'. The just mark through for whatever bridge you are using, guitar or bass. It is dead-nuts accurate, takes all the mystery out of things. Hey StewMac - copy this thing, in nice laser-etched acrylic, and sell a million of them !!!

In general, if you are going to do something just once, go ahead and free-hand it, but otherwise, templates can save a lot of time and trouble. Also, you never know what you might use a template for in the future - like the Strat soundhole, which is from another project. Making a template gives you a good opportunity to really think about what you are doing, and once you get it right, it will be right every time you use it.
 
Last edited:
New Toy

This post was written over the course of several days ...
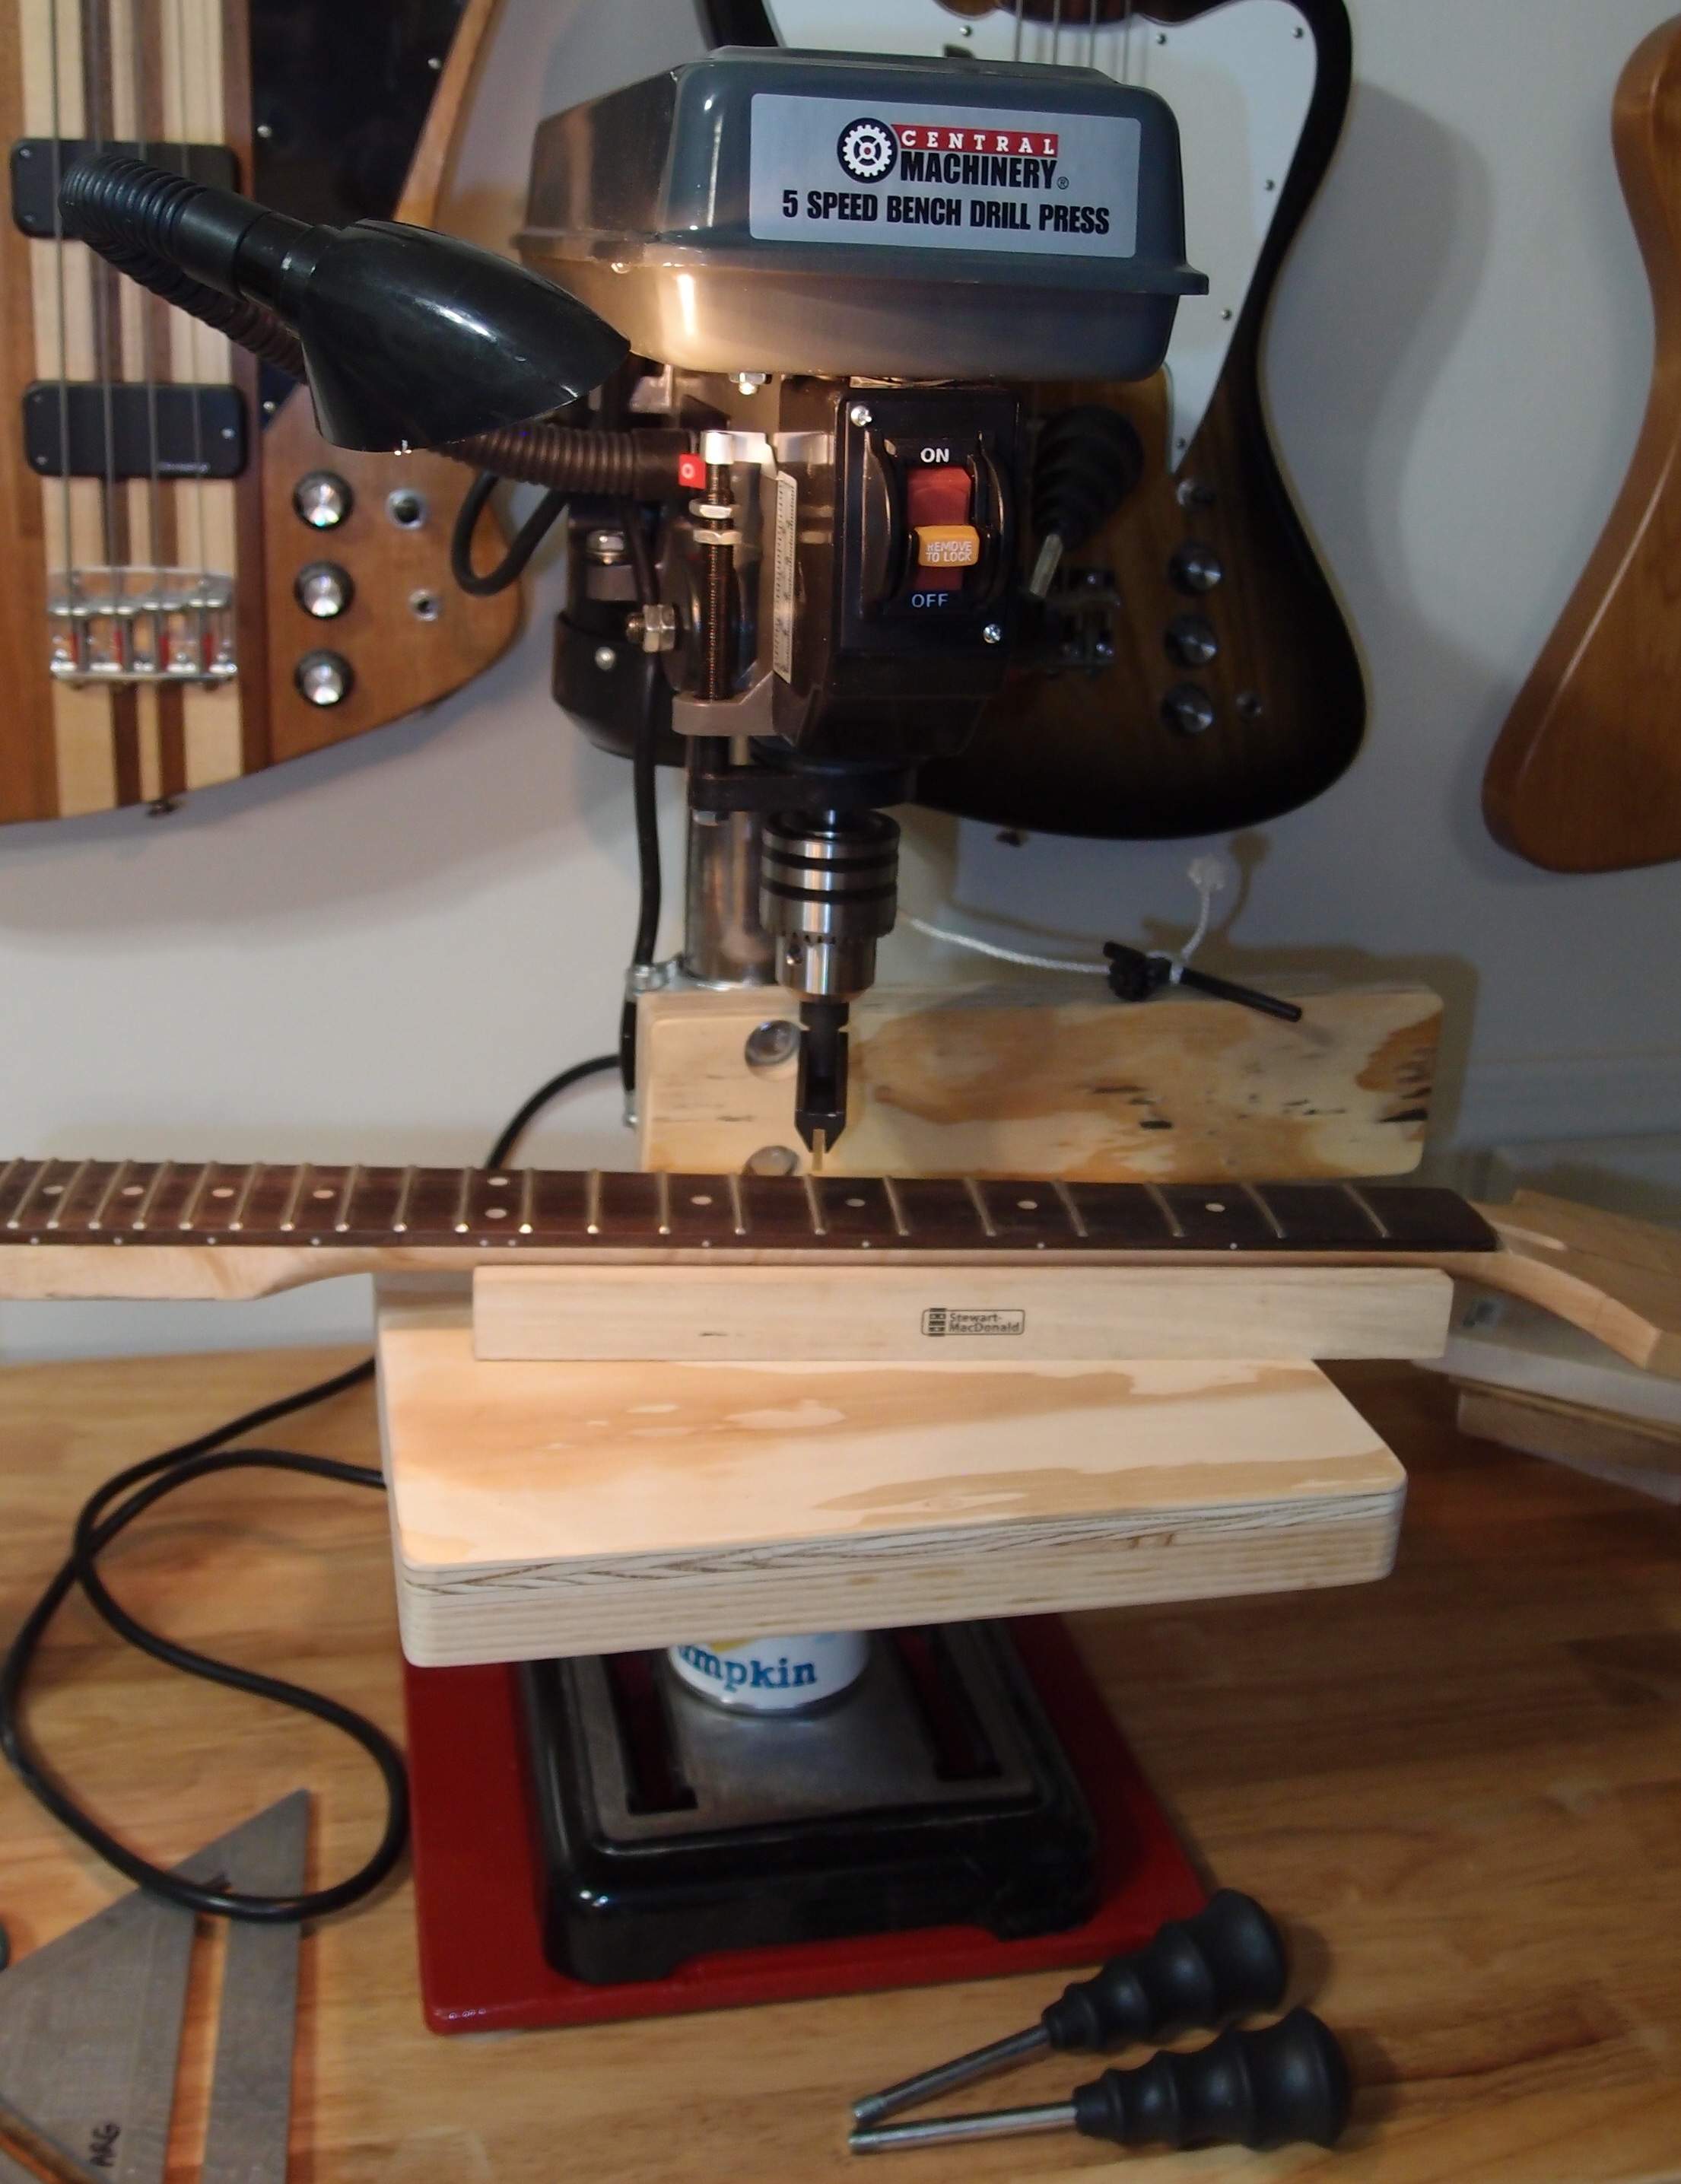
P7041409.JPG


Took a drive over to Harbor Freight - purveyor of fine Chinese tools & hardware - and picked up this little drill press. With a coupon, it cost me just over fifty bucks. This is not what I would call a good drill press, in fact it is pretty crappy. The base and the table are stamped, not forged, and small. The quill travel is a measly two inches, parts that should be steel are aluminum, parts that should be aluminum are plastic, vibration is excessive, and the 3/8" chuck has a disconcerting wobble to it. I knew all that when I bought it, and I never would have if I did not already have a much better one, or at least a decent one. What I wanted from this drill press is small size and light weight, so I can add it to my inside workstation, and not have to leave the heat/ac to go drill a hole in the garage. This press weighs well under 40 pounds, and doesn't take up too much space on my inside workbench. My 'good' drill press is not something you'd want to move around a lot.

At this size and price point, I was not expecting great quality, but rather hopefully something that I could build on to be useful. The first thing I did was disassemble the table pivot and grind the flange so the table sits square in pitch vs the column. Then I aligned it in roll against the column with a square, and locked it in tight. I never use the angle adjustment of the table, if I want to drill something on an angle, I clamp it or shim it or something. I built the little table extension in the picture from scrap wood. It slides on and off from the front, and wedges in place tight without fasteners. Then, I built the sort-of fence dealy from more scrap and some pipe clamps. The fence mounts to the column and pivots around it, so you can move it in as close to the bit as you like. It gives you a guide to vertical for edge drilling, and swings out of the way or removes when you don't need it. This drill press is so small, a conventional fence would hardly fit. Finally, I built a non-marring base extension, which cures all the tipping tendencies of such a small lightweight tool, and ran out an old can of red paint on it. Total out-of-pocket for upgrades, maybe four dollars.

Some testing, and it's not half bad. With care it can drive my largest Forstner bit, and the wobble settles down once you start drilling - holes are clean and accurate, at least in wood. Plastic and aluminum should be ok, but I'd use the bigger press to drill steel. The other thing I want this for is my StewMac fret press, which is mounted in the picture. You can make out the can I used as a support for the table when testing this, and it seems like it should work. It should also be useful for light-duty sanding and grinding. This is the first time I've ever bought a power tool from Harbor Freight, so I am curious to see how it will work out. For making necks, pickguards, and other small parts, this might be just the thing. It will certainly drill a straighter and more precise hole than I could by hand.

So what's my point? A tool like this can open up a huge range of capabilities for the DIYer. It doesn't cost a lot, or take up a lot of space, you can use it on your kitchen table and keep it in the closet. Good workmanship comes much more from the operator than the tool. A craftsman with a cheap tool will get better results than a hack with an expensive tool. * Set it up right ( better than it left the factory, ) take your time and do a lot of test pieces before you try the real thing, and you'd be surprised what you can do.

* My ex-brother-in-law was living proof of that - thousands of dollars worth of the finest tools his wife could afford, and f'ed up every job he ever touched.

P7041412.JPG


Here's a better shot of the table, fence, and base. You can see how the pipe clamps hold the fence to the column. For very little added cost, these simple additions vastly improve the base tool. I like the light, especially now that I've installed a much brighter fluorescent bulb and extended the shade with a piece of manila folder. The can is the perfect size for pressing operations, the support is not needed for drilling or sanding. Also, notice the lanyard for the chuck key - no more "Where did I put that $%#@%^$ thing?"

You really don't need an entire workshop of power tools to build a guitar. The baby router I mentioned earlier, a hand drill, a small sander, a jigsaw and belt sander, and a drill press like this, pretty much covers it. Here in this thread, I've outlined a lot of useful jigs you can make yourself. You can also get a lot of things pre-made, like fretboards already slotted, etc etc. I knew someone in high school who built a decent Telecaster with not much more than a coping saw and a lot of determination.
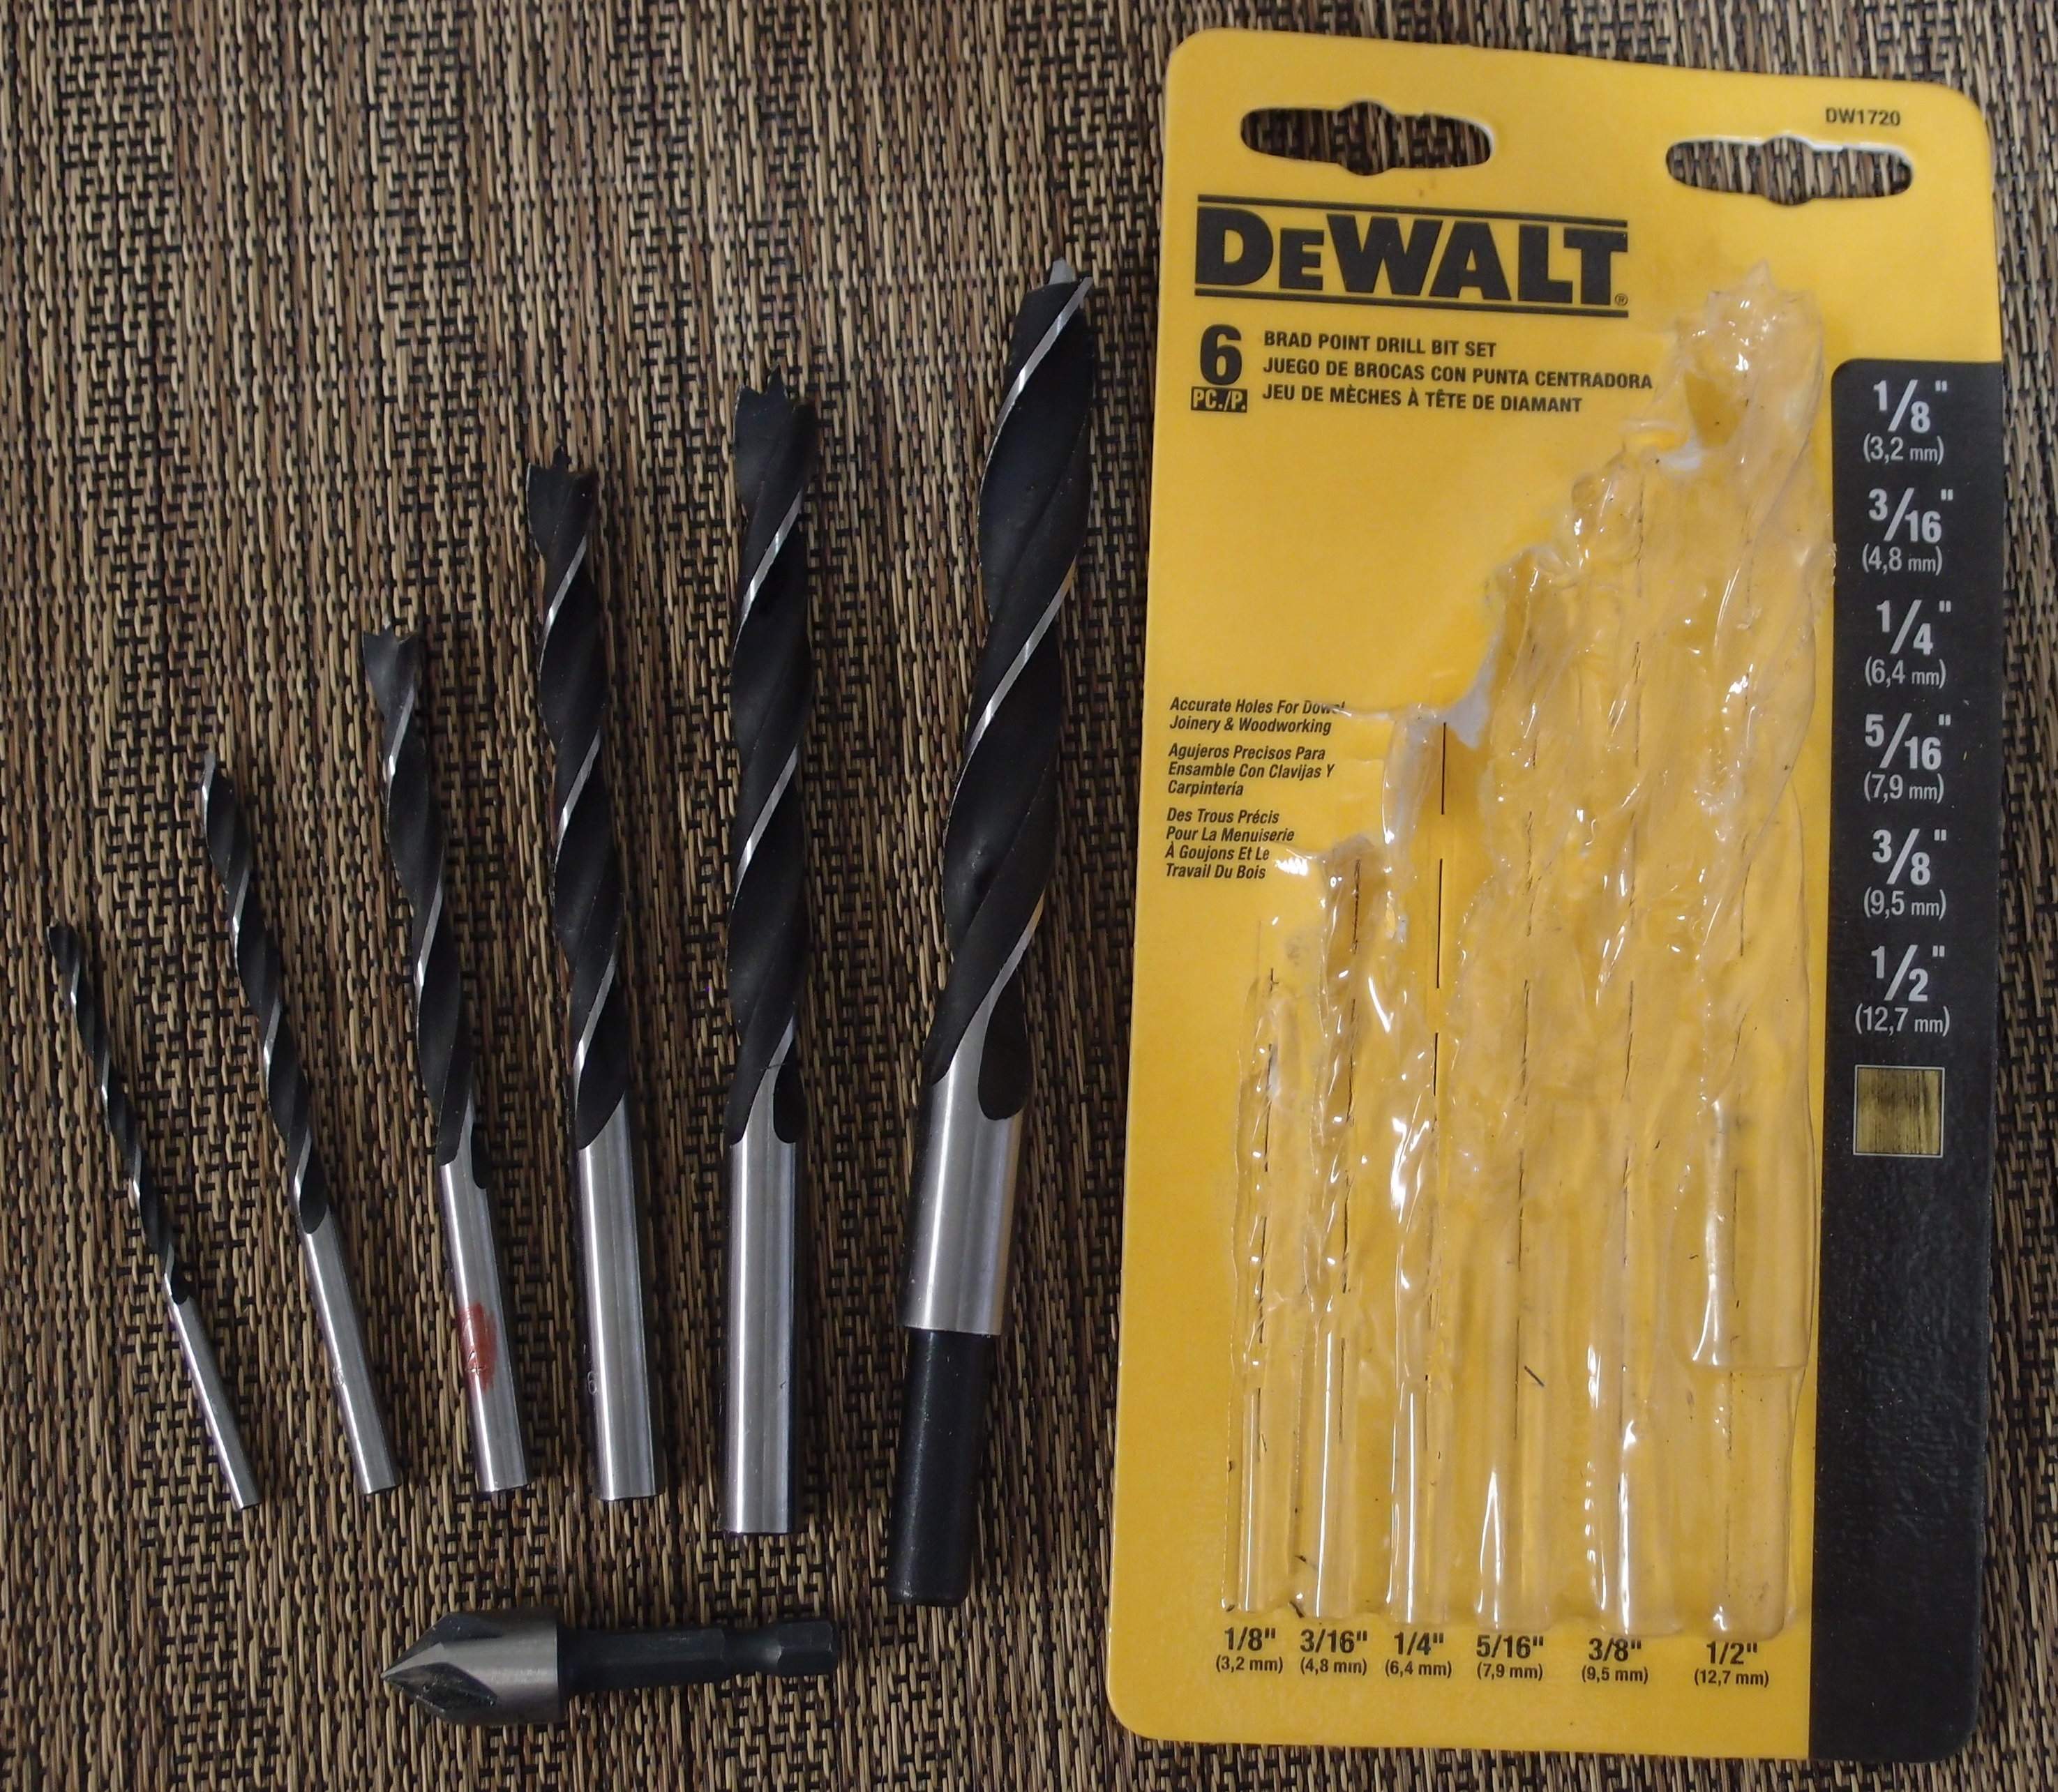
P7051413.JPG


While fitting out the new setup, I picked up this set of brad-point drill bits, which Home Depot sells for just ten bucks. You can't beat that. Brad points are only for wood and plastic, I wouldn't even use them on aluminum, but they are much better than regular drill bits. You put the tip on your mark, and the bit follows, much like a Forstner. Better yet, punch a dimple in the workpiece and drop the point into it. Also, a two-dollar countersink from Harbor Freight, that, after a little sharpening, works better than my other more expensive ones.
P7051414.JPG


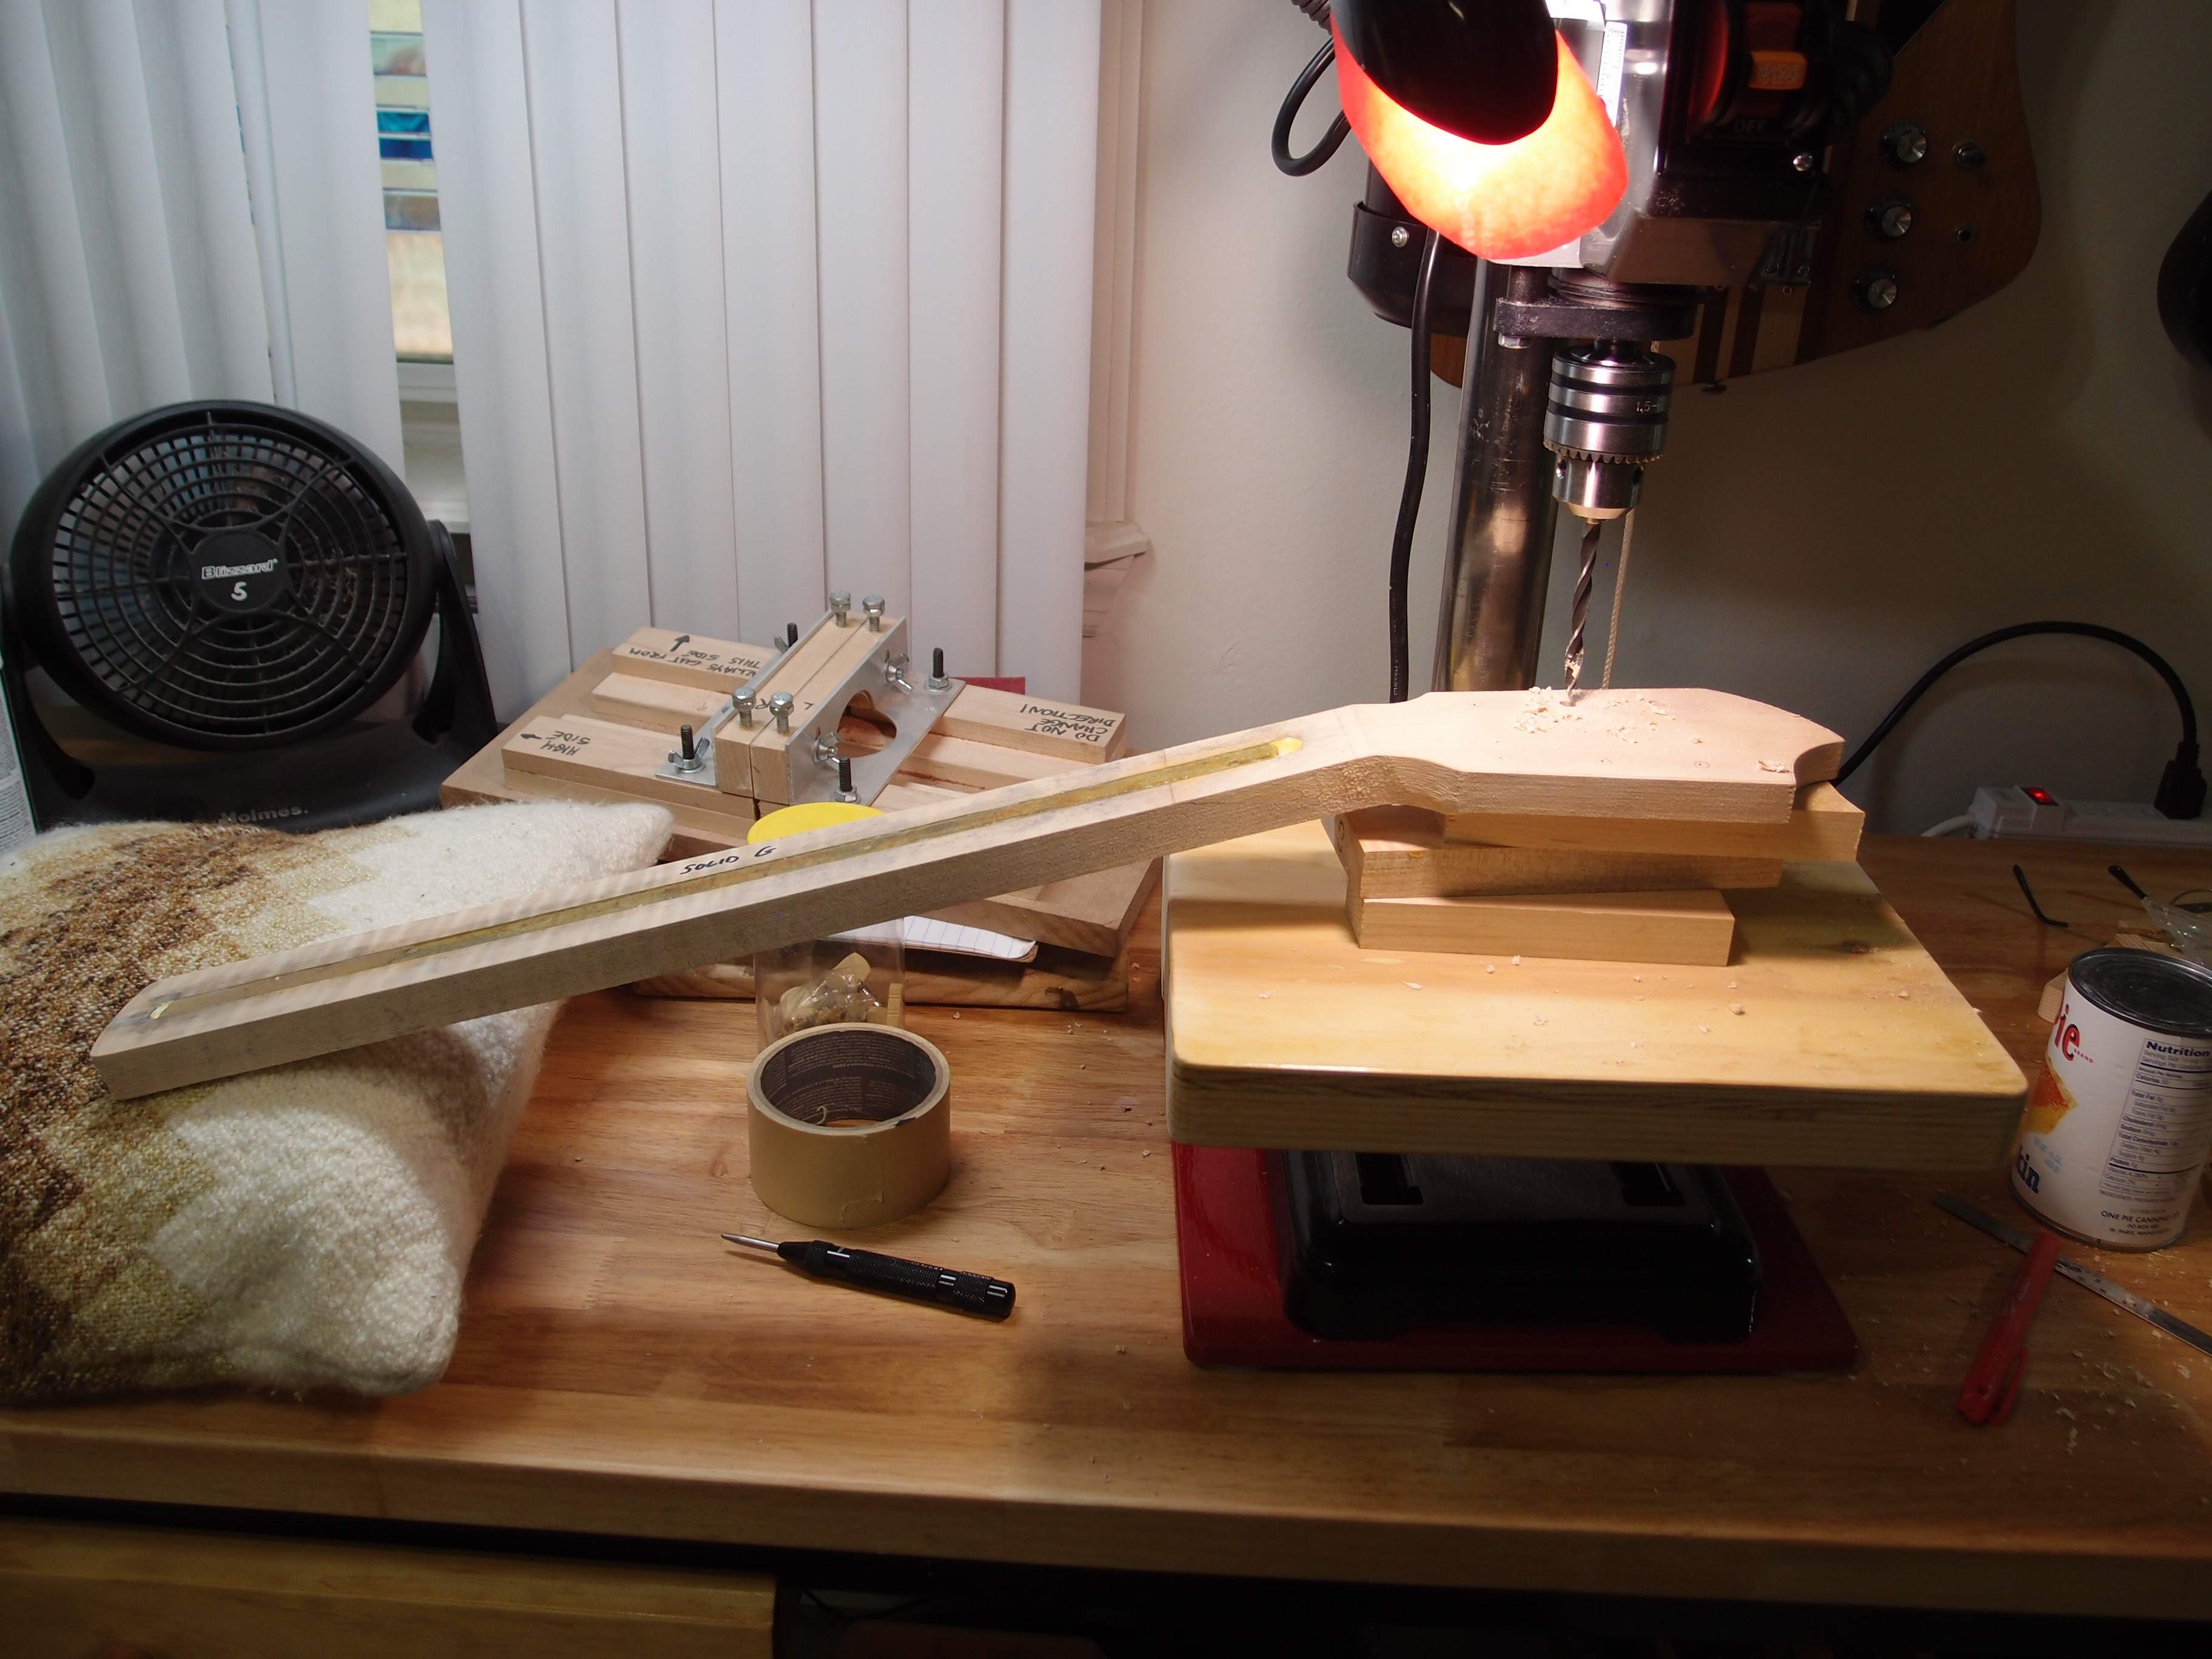
Putting it all together, drilling tuner holes for my Audiovox project. The angled headstock is already thicknessed and smoothed enough to lie flat on the stack of scrap blocks that make clearance for the neck. The pillow partially supports the other end, so you don't have to hold the whole weight with your left hand. It is working very well so far. Remember, these holes will be reamed-out for bushings later, so they don't have to be super-precise now, but it always pays to be as neat and clean as you can. You can see the steel bar glued into the neck for a truss rod, and the geometry of the angle joint.

P7051416.JPG


Here's the hat trick: drilling side tuners for the 12. The holes need to be centered and perpendicular to the edge. My little fence contraption is not as accurate as a proper fence, but it is strong enough to use as a guide. Each hole is set up individually with shims and clamps, checking for square in all dimensions. The tape on the drill bit marks the depth of the hole.

P7051418.JPG


And the final result: 108 tuner holes drilled, from 1/16" to 9/16", no mistakes, no excitement, and all done air-conditioned. For a crappy little drill press, it worked just fine, and its work is far from finished. Its next test will be some fretwork. If you are building a workshop, a good drill press should be your first investment.

P7061420.JPG


Having gotten that done, it's time to glue up some necks. First I radius-sanded the fretboards to 12 inches with my DIY sanding block. The StewMac board started with a 16" radius, which was easy to do. The other board started flat, and was a lot of work to do entirely by sanding, not to mention a mess of nasty rosewood dust. For a flat board, better to rough it out with a router, and then finish by sanding. I'm not much of a cook, but the little kitchen timer has a thousand uses.

The same little jig that I glued up the angled headstocks on is perfect for gluing fretboards. I used matching 12" radius cauls that I made the same way as the sanding block, and lots of clamps, on both sides. Clamping the center is not good enough - you want to clamp the edges, and you can't use too many clamps. Finally, after the glue is set up, I radius-sanded the fretboards again, this time to get them perfectly straight. Sighting with a ruler against the light will show you the low and high spots. Scribble over the surface with a pencil, then erase the pencil marks with the sander. Eventually, you'll get it near to perfect, and the rest can be fixed with a little fret dressing.

I want to glue the fixed trussrod in tight, but not the adjustable one. A strip of cellophane tape over the truss rod slot will keep the glue out. At least, I think it will, I'd have to destroy the neck to find out for sure. Cellophane tape is about as thin as you can get, and although it may grab the rod at first, it is pretty weak stuff and will let go in time.

Some final fitting and I find that the guitar neck is 1/4" too long for the bridge mounting in the body. Don't know how the hell I did that, but too long is easily fixed. The bass neck is spot-on, so I'm not a complete idiot.

Back to testing the drill press, I made some test pits in hard maple with a 1/4" Forstner bit, for marker dots. I pre-punched dimples in the wood, and let the bit find its own center. The result is perfect, as good as my big drill press. I got a big bag of 1/4" pearl marker dots from an eBay seller in Taiwan for the price of a dozen of them from StewMac. The Taiwan dots are actually thicker and better than StewMac's.

A final test is drilling for side marker dots, which is always a fussy business. I scribed a line on the edge of a piece of scrap, and reinstalled my fence. In this case, being exactly square is not important. I chucked a 1/16" drill bit so just 1/4" protruded, adjusted the fence to hit the line, and had at it. Again, excellent results, and the same with a 3/32" bit.

I am more and more pleased with this thing, it is turning out to be a great guitar-building workstation. I had good reason to be leery of it, but it exceeds all expectations. The gooseneck light is much more useful than the idiotic 'lasers' on my other press, which are just a good way of quickly drilling off-center, and are kind of blinding when they're on, so you can't even see what you're doing. I'm sure the guys in marketing thought it was a great idea, though.

I'm going to pick up some new drums for the old sanding kit that I've had lying around for years, and see how that works for small jobs. I also found a small grinding wheel at the bottom of the tool cabinet, a wire wheel, polishing wheel, and a few other things. I'm gathering all these parts in a tool box to keep handy by the new press. The little press and a box of accessories will eventually give about 90% of the capability of the big press in the workshop. Similarly, I have a cheap little B&D drill in addition to my massive DeWalt concrete smasher. For light jobs the little drill does just fine, especially overhead, when the DeWalt gets pretty heavy pretty fast.

I also ordered an inexpensive 1/4" Forstner bit to add to the kit, so I don't have to continually strip the one out of my main set - that's a good way to lose it. That is a part that will see plenty of use - lots of guitar tuners and marker dots - so it is worth five bucks to have a spare. In a pinch, the 1/4" brad point will do the job, but the Forstner gives a nicer flat-bottomed hole. The larger Forstner bits see much less use and cost more, so one of each will do.
 
Last edited:
This ain't pretty, but it should work

P7091422.JPG


Cutting nut slots ( the slot for the nut, not the slots in the nut for the strings ) has always been a pain in the ass. I've done it with the table saw, with the fret slotting jig, and freehand with a file, and it is always more adventure than I like. There has to be a better way, and this contraption is it. ( The gray clamp is not part of the jig, it is just there to keep the router from tipping off. )

P7091421.JPG


Here you can see a neck clamped firmly in place, aligned to the front edge and the the long axis of the jig. A follower attaches to the router base using the holes for the binding guide, and is adjusted so a 1/4" bit will cut flush. Set the depth of the bit, and make one pass. Couldn't be easier.

The whole thing is made from scrap wood and fasteners from the Big Screw Box. The front clamp is wide enough to allow the necessary sliding room for the router. The back clamp is just wide enough to fit the heel. Two strips of yellow binding scrap allow for the curvature of the fretboard. The bearing surfaces are hard maple, the rest is pine or whatever, I think there may be a piece of poplar in there as well.

This thing went through a number of evolutions. Much of the design was driven by whatever bits of scrap I had handy. Then it got cut up and put back together, because I didn't really know what I needed at first. So it is a cobbled-up mess.

At first I thought to use a guide bearing on the router, but that proved too difficult to set up accurately. The follower works like a fence, and is a no-brainer to set up. I also went around with the clamping arrangement until I came up with something that is easy to set up and adjust, and solid. The clamps work from the top with wing nuts, and the whole thing has a tendency to stay together as you adjust it, as opposed to falling apart. When not in use, the follower can be clamped into the jig so it doesn't get lost.

I also cut up a carriage bolt to make a 1/4" shaft that I can chuck in the router as a setup guide. The bolt diameter is actually 0.244", close enough for woodwork. The follower can be fine tuned with the wiggle room of the screws, and/or masking tape. I also scribed a line on the router base for a starting point. I could cut the other side of the follower to do a 3/16" Fender-style nut slot.

Seems like a whole lot of bother to make one little cut, but I'm looking at 8 of these to do, so it is worth investing the time in a jig. Also, this may be a small cut, but it is a critical step that is pretty late in the build - screw it up, and you lose everything you've done, including an expensive rosewood board. It's too late to try it tonight, tomorrow I'll make some test cuts in scrap, and if it works, I'll do some necks.
 
Last edited:
Walnut Fretboard

P7111423.JPG


This photo speaks for itself. I got this nice piece of 1/4" walnut at the local hobby shop. They have lots more like it. Walnut is softer than hard maple - 1010 vs 1450, but otherwise similar in strength - 1.7 vs 1.8. I've read a lot on the internets about walnut fretboards, and come to the conclusion that 90% of it is BS - know-nothings stating their suppositions as facts, or repeating standard luthier nonsense.

It seems that in cases where walnut is actually used, it works fine. For comparison, the tropical hardwoods that are commonly used as fretboards have hardnesses from around 2000 to well north of 3000. But that may all just be increasing levels of overkill. There must be some threshold of hardness that makes a wood suitable for a fretboard. Maple is the softest wood that is commonly used, but Fender pioneered maple fretboards solely for cost reasons, it had nothing to do with material properties. If there has been much work done with other woods, it is poorly reported. ( As if luthiers are scientists ! They're the opposite. Luthiery has more in common with alchemy than carpentry. )

So I freehand-cut a slot in the end of the board, and hammered in a piece of fret wire, with no glue. The wire had a pretty strong curve to it, and the board is flat, so there should be a lot of stress there trying to pry the wire out of the wood. It is in there nice and tight now; I will let it sit and see what happens. This is the harshest test I can make - if it was a real guitar, I would do everything much better. I'll bet that piece of wire stays right where it is, until I pull it out.

One thing I would do with walnut is put a finish over it, like you would with maple. Walnut is not naturally oily like rosewood, and might suffer in the long run. Several coats of polyurethane prior to fretting, and one or two afterwards, should seal it up good. In addition to walnut, the hobby shop also has cherry and mahogany, in many thicknesses. I wouldn't consider either of those for a fretboard, but any of them can be used to make a neat decorative stripe under a maple fretboard, and at the same time build up the thickness of a standard 3/4" piece of maple if needed.

Brian May used oak for the fretboard on his "Red Special" in the 1960s, and he is still playing it today. Oak has a hardness around 1300, between maple and walnut. I also have a piece of red oak from the hardware store that I plan to try someday. Oak can be blackened by soaking in a solution of white vinegar and steel wool, a stronger version of what happens when you set a cold glass on it without a coaster.

If anyone has any direct experience with this, I'd like to hear it. Not interested in what you may have read or heard somewhere, I've probably already seen it and discounted it. But if you've actually ever done something like this, or have an old instrument you could report on, then please chime in.
 
Last edited:
  • Like
Reactions: aetheriac
Neck Binding

P7111425.JPG


I decided that two of my Audiovoxen should have bound necks to go with the bound bodies, because binding is really super classy. So here I'm routing the edges for that. I've taped two strips of scrap binding to the top of the fretboard to act as guides, since it is already radiused and otherwise the router would rock on the curve. The neck is stuck onto a piece of 2x4 for clearance, and the whole arrangement is inside a big box to catch most of the mess. You want to go in one long smooth run rather than nibble at it; you're not taking such a big bite that you can't do it in one pass. Those same pieces of binding are going to get glued on later. Notice that the neck still has a square back. This is actually a pretty easy job, and would be even easier if it was done prior to radiusing the fretboard. Set the height of the cut to just remove all the rosewood, so the binding butts against the maple. The depth of the cut is not fussy, as there is still a lot of contouring to do.

P7111426.JPG


At this point it would be really bad to screw up, I would lose all the work so far, plus the expensive rosewood. So I didn't. Screw up, that is. It gets a little tricky at the ends, I stopped short and did them by hand with a file, then used the file to do some final smoothing and straightening. The flat side of a half-round file works best, as it has a narrow edge and is fairly coarse - better for woodwork. The little nib in the lower neck will get routed off at a later stage. You can see how I used a regulation Fender neck heel with overhanging square corners for an old-timey look. Also another shot of my binding jig, which is really classy.

Binding also complicates the fret installation a bit, as you need to nip all the fret tangs to fit. You can make a fret tang nipper from a sheet metal nibbler, or buy one from StewMac for like a thousand bucks.
 
Last edited:
Another Quick & Easy DIY Tool

P7141435.JPG


This is a fret slot cleaning tool that I made from my old favorite steel packing strap in about 5 minutes. Once again, the inspiration is the StewMac catalog, where their tool is much nicer, and about $15. I ground the strap to a hooked point on the bench grinder, and made the handle from popsicle sticks and tape. My tool is double-ended, very similar to my binding scrapers. The material is nearly the right thickness, a few passes on a file and it was perfect. The edges are all square, so the tip is a tiny chisel.

For an unbound neck, you can easily clean out the fret slots with your fretting saw. But that won't work on a bound neck. You can see how much gunk I dug out of that slot, and I thought I had already cleaned them all pretty well with an Exacto knife. The hook lets you get right up to the inside edge of the binding and dig out the cement that squeezed into the slot. The curved back of the hook can be used as a fulcrum.

It is important to get the fret slots cleaned out good, because if the frets are too tight a fit in the slots, it can induce a back bow on the neck, which can be a disaster if you have a single-acting truss rod.

P7131431.JPG


Also: look at that rosewood, how dark and even it is, even all dirty like this. While I was applying some 'natural' stain to the back of the neck, I decided to try it on the rosewood, and that is the result. It was almost like ebony when it was clean, and it appears to be permanent. No reason you couldn't repeat the procedure, or oil over it, but lemon oil seems kind of pointless and slimy when you can do this so easily.

P7161436.JPG


Here is the nut slotting jig, with all the details finally worked out. Behind is the router with the guide attached, and a 15/64" router bit that almost exactly matches the width of the nuts I am installing. The guide is adjustable by the bolt in one end, which carries a nylon cap nut, much like my binding guide. However, this guide only needs to make a short straight cut, using the adjustable part and the other corner against the edge of the jig.

P7161439.JPG


And here is the last report on the little drill press. Using StewMac's fret press arbor and neck support caul, I fretted two necks with no problem. The force required to set a fret is really not that much, and well within what the little drill press could do. In front is a fret cutter and fret tang nipper, made from standard inexpensive tools. The tang nipper is just a sheet metal nibbler with a strategically placed slot ground into the face to fit a fret. The cutter is simply a set of dykes with the face ground down flush. A smaller version of the same makes a fret puller.

I also got a chance to try out the sanding drum to do some touch-ups on a headstock, which worked perfectly. You're not going to make a whole neck on a drill press, for that a real belt sander is needed, but for minor adjustments it is very handy. Substituting a small grinding stone or cutting wheel allows light metalwork. This little drill press has already become indispensable, and I'm sure I'll find other uses for it as well.
 
Last edited:
Fretboard Woods

Over the last few days, I decided to bang out a bunch of fretboard blanks - every piece of wood I had lying around - so I would not have to come back to it again for a long time. It was a lot of exercise.

P7211445 copy.JPG


Here is an assortment of woods that would be hard to put together. All of these are radiused to 12", sanded to 100, and liberally coated in Minwax Natural stain to make the grain and colors pop. They are all 2-1/2" wide, and started out 1/4" thick. These are:

1-3:

Flamed hard maple from Lowes. I love this stuff, and always look through the pile to see if there are any pieces that are special. You might also find birdseye.

4:

Plain hard maple from Lowes. This one is as plain as you can get - the grain looks like it was drawn with a ruler. You can always find a usable piece. Maple has a fine closed grain, but needs finishing to stay clean.

5:

Would you believe this beautiful piece is cheap Red Oak from Home Depot? I had to rip it to width. Didn't look like much until I hit it with the stain, then wow! Like yellow rosewood - I can't wait to try this for something. I have another piece I'm going to try blackening. The open grain will need filling and finishing. Oak is slightly softer than maple, but very hard compared to most woods.

6-9:

Jatoba, or "Brazilian Cherry", from WoodCraft.com. This is a very inexpensive wood that is often used for flooring. Very hard, open grained, like rosewood, but not oily, so will need a finish.

10-11:

Bubinga(?) from WoodCraft.com. I've had bad luck with Bubinga, it seems to warp in storage, and some of the pieces I received were so ugly that I complained and they refunded me. The short piece is one of those that I cut the worst off of. I have trouble believing this stuff is Bubinga.

12:

Purpleheart from WoodCraft.com. Wow! Very hard and abrasive wood, you can feel that as you sand it. Close grained, even and straight, and not all that expensive. All of WoodCraft's pieces are 3" wide, I ripped them down, and I took the Purpleheart scrap and make a bunch of really neat dot markers.

13:

Black Walnut from the hobby shop around the corner. Walnut is a hard wood, not as hard as Oak or Maple, but a lot harder than Cherry of Mahogany. This is another experiment, I think it will work fine. The other commonly available hardwood is Poplar, which is in reality not hard at all. Other woods like Cherry are likewise probably too soft.

14-16:

"Rosewood" from StewMac and eBay. The piece on the left turned almost ebony with the stain. Nowadays "Rosewood" can be almost anything.

The tropical woods are about twice the hardness of the domestic woods. My feeling is that degree of hardness is complete overkill. When spec'ing out the Les Paul for production with Gibson, Les Paul felt that a guitar should be made with 'fine woods', which is probably how rosewood got started. Funny how he also considered Mahogany to be a fine wood, when it is actually cheap bulk crap. That's why Gibson used it, although they certainly charge a premium price for it. The same goes for Korina. On the Fender side, Alder is basically just firewood - a trash tree that grows all over California. My point is, these woods are used in luthiery for all the wrong reasons, or no good reason at all, and I doubt you really need a Janka hardness over 3000 to hold a fret in place.

The maple, walnut, and oak are all available locally in 1/4" thickness. They are very inexpensive, and I can hand-select my piece. You might be able to source Jatoba from a flooring supplier, but you'll have to plane it down. You can get almost anything from Woodcraft, StewMac, or eBay, but you have to buy it sight-unseen, which can be hit or miss. I like being able to pick my pieces.

I also found another way to radius these pieces. The rough-in can be done on a bench belt sander. Since the workpiece is longer than the sander, you must keep it moving constantly, if you stop, the rollers will dig a gouge in that spot. You want to hold the board nearly flat and grind off most of the material to make the curve you want, then finish with a sanding block. This requires just the right touch, it is really an art, and I was surprised that I was able to pull it off. Most of the boards were roughed-in with my radius jig and a router, then finished with one of my sanding blocks.

My sanding blocks are completely better than StewMac's because they are a full 3-1/2" wide. StewMac's blocks are exactly the width of a 2-1/2" blank, which means you have to guide them more accurately than is humanly possible, and I've never had a piece turn out good. With my block, I put the workpiece atop a scrap of 2x4, which matches the width of the block, making a natural guide, and I've never had a piece turn out bad.
 
Last edited:
Just one thing about Mahogany - it varies a lot. Like Rosewood there are many varieties, and some that are called Mahogany aren't really Mahogany at all (such as Philippine Mahogany, also called Lauan).
I have a rare piece of true Mahogany harvested almost 200 years ago in Central America, reportedly Cuba. It is really hard and really heavy - I mean REALLY heavy. I also have some well-aged Honduras mahogany and its quite soft and light. And some Asian variant of mahogany that's almost like balsa.

So I think it's misleading to call mahogany "cheap bulk crap". For instruments it ranges from poor to excellent, dependent upon the particular variety.
 
Just one thing about Mahogany - it varies a lot. Like Rosewood there are many varieties, and some that are called Mahogany aren't really Mahogany at all (such as Philippine Mahogany, also called Lauan).
I have a rare piece of true Mahogany harvested almost 200 years ago in Central America, reportedly Cuba. It is really hard and really heavy - I mean REALLY heavy. I also have some well-aged Honduras mahogany and its quite soft and light. And some Asian variant of mahogany that's almost like balsa.

So I think it's misleading to call mahogany "cheap bulk crap". For instruments it ranges from poor to excellent, dependent upon the particular variety.

Yes, I tend to overstate things, but the truth is that any wood that is available in factory quantities today is going to be common as dirt somewhere. Korina is the best example. Gibson makes a big deal about it. In Africa, it is one of the most common lumber trees on the continent. They saw it up into 2x4s for building construction, much the same way we use fir. Ship it to North America, and somehow it becomes magical. I wonder if the same is true for 'rosewood' - that it is purely a marketing gimmick, and a lot of other common woods will work just as well. I'm going to try some.

As far as your old piece of mahogany, don't try to sell it in the US, the wood police will come after you !!!
 
I wonder if the same is true for 'rosewood' - that it is purely a marketing gimmick, and a lot of other common woods will work just as well. I'm going to try some.
that seems unlikely, typical guitar rosewood is obviously denser and harder than most common woods and nicely oily so it doesn't need a finish; not a gimmick at all.