
My favorite way is to coat both the cabinet and the back of the tolex with a diluted solution of yellow glue and water. A small roller or a paint brush does the job just fine. Allow both to dry. Place the tolex on the cabinet with a piece of heavy craft paper on top. Using a clothes iron to activate the glue, move the iron over the paper with medium pressure. It creates an instant bond. No solvents, no dry time.

Enjoy the benefits of a premium membership!
Upgrade Account
-
TalkBass has been independent since 1998. Add your voice.
Create a free account to reply to discussions, view embedded media, and browse with fewer display ads.
Join free Log in
Want zero display ads or expanded classifieds tools? Compare plans.
You are using an out of date browser. It may not display this or other websites correctly.
You should upgrade or use an alternative browser.
You should upgrade or use an alternative browser.
Building: Tools, Fixtures, Jigs & Templates
- Thread starter alder
- Start date
More options
Who Replied?
Thanks for all your suggestions. It would be difficult to use an iron around the curves of a guitar body, but heating the glue first is something I didn't think of. I will do some testing with hot white glue and see what happens. I did some reading, and white glue becomes more-or-less permanent after a month or so, so the issue with it is really the setup time.
Heating white glue is probably a bad idea. Try it and let us know. Heating cured white glue reactivates it. Since it cools rapidly in this usage it is essentially a very easy to use "contact" cement. By the way, white glue can be heated, released, and re-bonded several times.
The open time for white glue is seven minutes. Cure time varies but overnight/twenty four hours is a good rule of thumb. Clamps can usually be removed after four hours.
Permanence is relative. White and yellow glues are water soluble and sensitive to heat. Ever see what happens to an acoustic guitar left in a automobile trunk for a couple of summer days? One guitar goes in the trunk today, one guitar kit comes out tomorrow. Assembly required!
The open time for white glue is seven minutes. Cure time varies but overnight/twenty four hours is a good rule of thumb. Clamps can usually be removed after four hours.
Permanence is relative. White and yellow glues are water soluble and sensitive to heat. Ever see what happens to an acoustic guitar left in a automobile trunk for a couple of summer days? One guitar goes in the trunk today, one guitar kit comes out tomorrow. Assembly required!

Finishing
Finishing is a subject I am absolutely no expert on. I have gotten some very nice results, but it always seems like it is an inordinate amount of work, with too many mistakes and touch-ups and do-overs. Those of you that are good at this, please share your experience.

This is a hollow JazzMaster body I've been working on. After black primer I sprayed about an ounce of Black MinWax PolyShades one the body edge as a base. So you might ask, how much blacker could it get, and the answer is - none more black. Then I sanded off the overspray and glued the top on. There are 23 clamps there. I need a few more; those metal ones are something I just found at Home Depot - very strong, and won't break in the cold like the plastic ones.
The headstock now has nice laser-printed faux Fender decals ( I signed it as well, not trying to perpetrate a fraud, just like the look. Please don't sue me, Fender. Come on - I'm prototyping for you ! ) There is a thick coat of polyurethane over the decals that will get sanded flat, and then a thin finish coat of satin. I like satin for necks, it is slippery like bare wood, not sticky like gloss, and also very easy to get a nice result.
The MinWax PolyShades black is my new secret weapon. It will spray through my PreVal airbrush undiluted at about 40 psi. You can see a can of MinWax "Fast Drying" poly next to it. That is essentially the same stuff without pigment. Both are oil-based. I have messed around with a number of different polyurethanes, with mixed results. The water based ones are awful. I wouldn't use them for anything except refreshing the top of the workbench. The oil-modified ones are a mixed bag. The good ones are ok, but most of them are no better than the water-based junk, and I can't find the good kind any more. Considering that the usual advice is that water based formulations are better for spraying than oil, they spray horribly, and adhesion is very poor.
I think for airbrushing purposes like this, the gloss works best, as it does not contain any of the 'flatting agents' that the semi-gloss and satin do. These are generally just very fine grit particles that the sprayer probably wouldn't like much. If I want a final satin finish, I can always spray it from a rattle can. These same finishes are also available in aerosol cans.
Both these MinWaxes are readily available at Home Depot, and work great with a sprayer. The PreVal is a terrific unit, also available at Home Depot, although it is expensive. It is an airbrush on steroids, half-way to a touch-up gun. The fact that you can push this goop through it undiluted is kind of incredible. Next step will be mixing up some red from clear poly and pigment, and spraying the sunburst. Then more black to finish the burst, and some clear to protect it. I will dilute the sunburst coats to get a nice fade. Once everything is good and hard, I will route the edges and install the binding, then finish with enough clear to smooth everything out.
This is the reverse of usual binding installation, but I don't see why you should spray the color coats over the binding and then scrape it off. I've never done this before, can anyone tell me why it would be a horrible mistake?
This was also my first test of my scuba tank spray system. There's a lot of clean dry filtered air in a 3000 psi scuba tank. I use an old scuba regulator that I no longer use for diving. That outputs about 150 psi, and drives a second regulator that steps it down to 20-80 psi; the airbrush works well at 40 psi, sometimes temporarily popping it up to 60 to get the siphon going. The flow rate is more than adequate, and I used about 1/5 of the tank for this and another project. Oh, I should mention and the wonderful quiet - no compressor roaring in the background.

The big gauge shows tank pressure. The small gauge is the pressure regulator for the airbrush, which is set with the big red knob. The special inflator adapter between the scuba hose and the regulator can be found on eBay, the rest is all Home Depot. The PreVal is on the floor, with a one ounce jar attached, it also takes much larger ones. Hard to see, but it also has the fan cap attached rather than the usual smaller airbrush cap. The old scuba mouthpiece serves as a bleed valve when you're finished. The tank is 100 cubic foot, and I won't be needing it again until spring. Air fills are under ten dollars. Considering how little it cost to set this up, I am really pleased with it. And yet, I may not need it much longer - I'm waiting for a much smaller ( and hopefully quieter ) compressor that I recently got for free. It won't run the spray gun, but it should be more than adequate for the airbrush, tires, etc.
What about lacquer finishes? All I can say is - just don't. It is easy to get absolutely gorgeous results with lacquer, but they won't last. Lacquer is attacked by just about everything. Spill alcohol on it - it will dissolve. Set it on a guitar stand, it will stick to it. Hang it on the wall - same thing. It never really dries or completely hardens - anything that touches it will leave a mark, there is no way to store it except perhaps in a very loose-fitting hard case with a really fluffy lining, and even that would probably make marks after a while. And God forbid anthing vinyl should touch it - vinyl devours lacquer. Nitrocellulose is the worst, if you must use lacquer, get the acrylic kind from the auto parts store. And never mix the two.
What can you do with a guitar that can't be touched? I hate hangar queens. I have a couple of Danelectro-style guitars that I built and finished in acrylic lacquer, and they are ok because they rest on the tape edge binding and the polyurethaned neck. But a gorgeous Silvertone bass has been hanging from a tuner for years and still can't be touched. At some point, it came in contact with a vinyl bench, and now has an ugly scar. I think eventually I wil strip it and reshoot it in poly. Ughh, but that's the only good thing about lacquer - you can get rid of it with just acetone and rags. ( BTW, getting that neat Danelectro edge binding to adhere to lacquer is a losing proposition as well - it is vinyl, and if that wasn't bad enough, the solvent-based contact cement that is typically used attacks the lacquer as well. Inevitably the whole thing comes apart in a gooey mess. ) LACQUER SUCKS - DON'T USE IT.
I have also done some oiled wood finishes. Danish oil is easy to use, but can take a very long time to dry and harden-off, and provides very little protection for the wood. Getting a guitar-quality finish can take a very long time. I have one idea that I would like to try someday, and that is to not try to get a fine finish at all. Build a body out of pine ( probably a Telecaster, southern yellow pine or radiata, white pine is too soft ) and finish it with a belt sander. Just leave the entire surface covered with 80-grit scratches along the grain, and oil it up. It is surprising how nice this can come out, and it is easily repaired - just sand out any mars and re-oil. I've done a lot of nice furniture this way - works great if you're not hung up on fragile high-gloss finishes. The dog can jump all over my living room set; every couple of years I just sand it over ( by hand ) and re-oil - like new !
Of course, the easiest way to get around finishing is to just buy a finished body on eBay and modify it to suit. I've done a pile of these, with beautiful thick tough polyurethane three-tone sunburst bodies and custom necks and hardware. Compared to a body, getting a nice finish on a neck is trivial. It is easy to create a very unique and personalized instrument this way, and I cheat as often as I can.
Finishing is a subject I am absolutely no expert on. I have gotten some very nice results, but it always seems like it is an inordinate amount of work, with too many mistakes and touch-ups and do-overs. Those of you that are good at this, please share your experience.
This is a hollow JazzMaster body I've been working on. After black primer I sprayed about an ounce of Black MinWax PolyShades one the body edge as a base. So you might ask, how much blacker could it get, and the answer is - none more black. Then I sanded off the overspray and glued the top on. There are 23 clamps there. I need a few more; those metal ones are something I just found at Home Depot - very strong, and won't break in the cold like the plastic ones.
The headstock now has nice laser-printed faux Fender decals ( I signed it as well, not trying to perpetrate a fraud, just like the look. Please don't sue me, Fender. Come on - I'm prototyping for you ! ) There is a thick coat of polyurethane over the decals that will get sanded flat, and then a thin finish coat of satin. I like satin for necks, it is slippery like bare wood, not sticky like gloss, and also very easy to get a nice result.
The MinWax PolyShades black is my new secret weapon. It will spray through my PreVal airbrush undiluted at about 40 psi. You can see a can of MinWax "Fast Drying" poly next to it. That is essentially the same stuff without pigment. Both are oil-based. I have messed around with a number of different polyurethanes, with mixed results. The water based ones are awful. I wouldn't use them for anything except refreshing the top of the workbench. The oil-modified ones are a mixed bag. The good ones are ok, but most of them are no better than the water-based junk, and I can't find the good kind any more. Considering that the usual advice is that water based formulations are better for spraying than oil, they spray horribly, and adhesion is very poor.
I think for airbrushing purposes like this, the gloss works best, as it does not contain any of the 'flatting agents' that the semi-gloss and satin do. These are generally just very fine grit particles that the sprayer probably wouldn't like much. If I want a final satin finish, I can always spray it from a rattle can. These same finishes are also available in aerosol cans.
Both these MinWaxes are readily available at Home Depot, and work great with a sprayer. The PreVal is a terrific unit, also available at Home Depot, although it is expensive. It is an airbrush on steroids, half-way to a touch-up gun. The fact that you can push this goop through it undiluted is kind of incredible. Next step will be mixing up some red from clear poly and pigment, and spraying the sunburst. Then more black to finish the burst, and some clear to protect it. I will dilute the sunburst coats to get a nice fade. Once everything is good and hard, I will route the edges and install the binding, then finish with enough clear to smooth everything out.
This is the reverse of usual binding installation, but I don't see why you should spray the color coats over the binding and then scrape it off. I've never done this before, can anyone tell me why it would be a horrible mistake?
This was also my first test of my scuba tank spray system. There's a lot of clean dry filtered air in a 3000 psi scuba tank. I use an old scuba regulator that I no longer use for diving. That outputs about 150 psi, and drives a second regulator that steps it down to 20-80 psi; the airbrush works well at 40 psi, sometimes temporarily popping it up to 60 to get the siphon going. The flow rate is more than adequate, and I used about 1/5 of the tank for this and another project. Oh, I should mention and the wonderful quiet - no compressor roaring in the background.
The big gauge shows tank pressure. The small gauge is the pressure regulator for the airbrush, which is set with the big red knob. The special inflator adapter between the scuba hose and the regulator can be found on eBay, the rest is all Home Depot. The PreVal is on the floor, with a one ounce jar attached, it also takes much larger ones. Hard to see, but it also has the fan cap attached rather than the usual smaller airbrush cap. The old scuba mouthpiece serves as a bleed valve when you're finished. The tank is 100 cubic foot, and I won't be needing it again until spring. Air fills are under ten dollars. Considering how little it cost to set this up, I am really pleased with it. And yet, I may not need it much longer - I'm waiting for a much smaller ( and hopefully quieter ) compressor that I recently got for free. It won't run the spray gun, but it should be more than adequate for the airbrush, tires, etc.
What about lacquer finishes? All I can say is - just don't. It is easy to get absolutely gorgeous results with lacquer, but they won't last. Lacquer is attacked by just about everything. Spill alcohol on it - it will dissolve. Set it on a guitar stand, it will stick to it. Hang it on the wall - same thing. It never really dries or completely hardens - anything that touches it will leave a mark, there is no way to store it except perhaps in a very loose-fitting hard case with a really fluffy lining, and even that would probably make marks after a while. And God forbid anthing vinyl should touch it - vinyl devours lacquer. Nitrocellulose is the worst, if you must use lacquer, get the acrylic kind from the auto parts store. And never mix the two.
What can you do with a guitar that can't be touched? I hate hangar queens. I have a couple of Danelectro-style guitars that I built and finished in acrylic lacquer, and they are ok because they rest on the tape edge binding and the polyurethaned neck. But a gorgeous Silvertone bass has been hanging from a tuner for years and still can't be touched. At some point, it came in contact with a vinyl bench, and now has an ugly scar. I think eventually I wil strip it and reshoot it in poly. Ughh, but that's the only good thing about lacquer - you can get rid of it with just acetone and rags. ( BTW, getting that neat Danelectro edge binding to adhere to lacquer is a losing proposition as well - it is vinyl, and if that wasn't bad enough, the solvent-based contact cement that is typically used attacks the lacquer as well. Inevitably the whole thing comes apart in a gooey mess. ) LACQUER SUCKS - DON'T USE IT.
I have also done some oiled wood finishes. Danish oil is easy to use, but can take a very long time to dry and harden-off, and provides very little protection for the wood. Getting a guitar-quality finish can take a very long time. I have one idea that I would like to try someday, and that is to not try to get a fine finish at all. Build a body out of pine ( probably a Telecaster, southern yellow pine or radiata, white pine is too soft ) and finish it with a belt sander. Just leave the entire surface covered with 80-grit scratches along the grain, and oil it up. It is surprising how nice this can come out, and it is easily repaired - just sand out any mars and re-oil. I've done a lot of nice furniture this way - works great if you're not hung up on fragile high-gloss finishes. The dog can jump all over my living room set; every couple of years I just sand it over ( by hand ) and re-oil - like new !
Of course, the easiest way to get around finishing is to just buy a finished body on eBay and modify it to suit. I've done a pile of these, with beautiful thick tough polyurethane three-tone sunburst bodies and custom necks and hardware. Compared to a body, getting a nice finish on a neck is trivial. It is easy to create a very unique and personalized instrument this way, and I cheat as often as I can.
Last edited:

Alder;
You should read through our thread about the water-based Varathane floor finish:
Using water based products for instrument finishing, Target Coatings 9000 6000 and Varathane WB
I've been using the Varathane for more than a year now and, to me, it's the best instrument finish available for small builders and hobbyists. Once you learn a few tricks for working with it, it's very easy to spray, sand, and buff out. I use it now for all my base coats, color coats, and clear top coats. With the right tints, it can look almost identical to nitro lacquer. It can be put on thin or thick, satin or high gloss. It can be sprayed with guns or airbrushes, or even wiped on. Whatever you prefer. It's rock hard and very abrasion resistant, and is fully cured for sanding and buffing in a few hours. No fumes, no fire hazard, no real need for a spray booth. And it's relatively cheap and available locally ($48/gallon at Lowe's). What more can you ask?
You should read through our thread about the water-based Varathane floor finish:
Using water based products for instrument finishing, Target Coatings 9000 6000 and Varathane WB
I've been using the Varathane for more than a year now and, to me, it's the best instrument finish available for small builders and hobbyists. Once you learn a few tricks for working with it, it's very easy to spray, sand, and buff out. I use it now for all my base coats, color coats, and clear top coats. With the right tints, it can look almost identical to nitro lacquer. It can be put on thin or thick, satin or high gloss. It can be sprayed with guns or airbrushes, or even wiped on. Whatever you prefer. It's rock hard and very abrasion resistant, and is fully cured for sanding and buffing in a few hours. No fumes, no fire hazard, no real need for a spray booth. And it's relatively cheap and available locally ($48/gallon at Lowe's). What more can you ask?

This is a fascinating read, but a bit frustrating for a beginner like me in that some of your opinions run counter to equally well explained and strongly held beliefs and "accepted" practice. Without a lot of trial and error practical experience, its hard to know which path to follow. Like most beginners, I pore through the Stewmac catalog, and then go hunting for less expensive options without really knowing how much difference there is in in quality for lower prices. I know I'm getting soaked, just not how bad. Your notes about the Rickenbacker designs are pretty telling, they seem to have enshrined some pretty basic engineering flaws and successfully packaged them as selling points. I'm building a 4001 clone, and ended up using a modern double-action rod and two graphite stiffeners, which in your opinion might sound like I "drank the coolaid". Time will tell, I suppose. I like your common sense hardware store approach, I'm realizing that a lot of this can be done more cheaply.
Your Home Depot and Lowes must be better than mine, they don't have any hardwoods other than poplar or red oak, and with a lot of junk mixed in. I've never seen maple in either one, maybe its regional. There are some decent lumber yards with in 1 hour drives, but prices are high and wood is often stored in unheated warehouses, so I have no idea how dry it is.
I just recently took a crack (badly) at trying to build my own binding jig based on some I've seen online. Yours looks elegantly simple, but why a handheld router solution vs a router table version that seems safer and more stable? This is a Stewmac case in point, outrageous prices, but a borrowed set of their binding cutter and roller bearings cut a complex two-step binding ledge in one step with no problems. My jig worked, but not for every grain orientation. What kind of cutter is that in your jig, shear cut rabbet?
I really appreciate your effort in all this, a huge amount of information and ideas that will make for good repeated reading. For the visually minded among us, might I suggest more photos? One picture being worth at least several hundred words in my case.
Your Home Depot and Lowes must be better than mine, they don't have any hardwoods other than poplar or red oak, and with a lot of junk mixed in. I've never seen maple in either one, maybe its regional. There are some decent lumber yards with in 1 hour drives, but prices are high and wood is often stored in unheated warehouses, so I have no idea how dry it is.
I just recently took a crack (badly) at trying to build my own binding jig based on some I've seen online. Yours looks elegantly simple, but why a handheld router solution vs a router table version that seems safer and more stable? This is a Stewmac case in point, outrageous prices, but a borrowed set of their binding cutter and roller bearings cut a complex two-step binding ledge in one step with no problems. My jig worked, but not for every grain orientation. What kind of cutter is that in your jig, shear cut rabbet?
I really appreciate your effort in all this, a huge amount of information and ideas that will make for good repeated reading. For the visually minded among us, might I suggest more photos? One picture being worth at least several hundred words in my case.
Thanks for a well thought-out reply
Luthiery is rife with superstitions and outright lies when it comes to electrics. Most of what is true and essential for acoustic instruments is completely irrelevant for electrics. From an engineering point of view, an electric guitar is simply a beam that is strong enough to support the string tension. Structurally, everything else is decoration. Electric tone comes from strings, pickups, electronics, and most of all you. Woods and finishes have little to nothing to do with it. But it would be hard to sell a new Les Paul for $3000 with that attitude.
For me, the only wood for necks is hard maple, because it is the strongest, yet also cheapest and most readily available material, at least here in the east. It is also relatively easy to work, once you get the hang of it. You can build a body out of anything. There is a video on YouTube of a guy playing a six-string electric cinderblock, and it sounds fine. Here is my latest project, made entirely out of found plywood and ( I think it is ) cabinet facing. Only the larger stores around here carry maple, although they all carry oak and poplar. Poplar can sometimes be found in pieces 1-1/2+" x 13+", which is enough for many guitar bodies. A blank like that will cost under $20, versus over $50 for a 'luthier grade' piece of California firewood, and poplar is very easy to work with, especially if you are going to paint it.
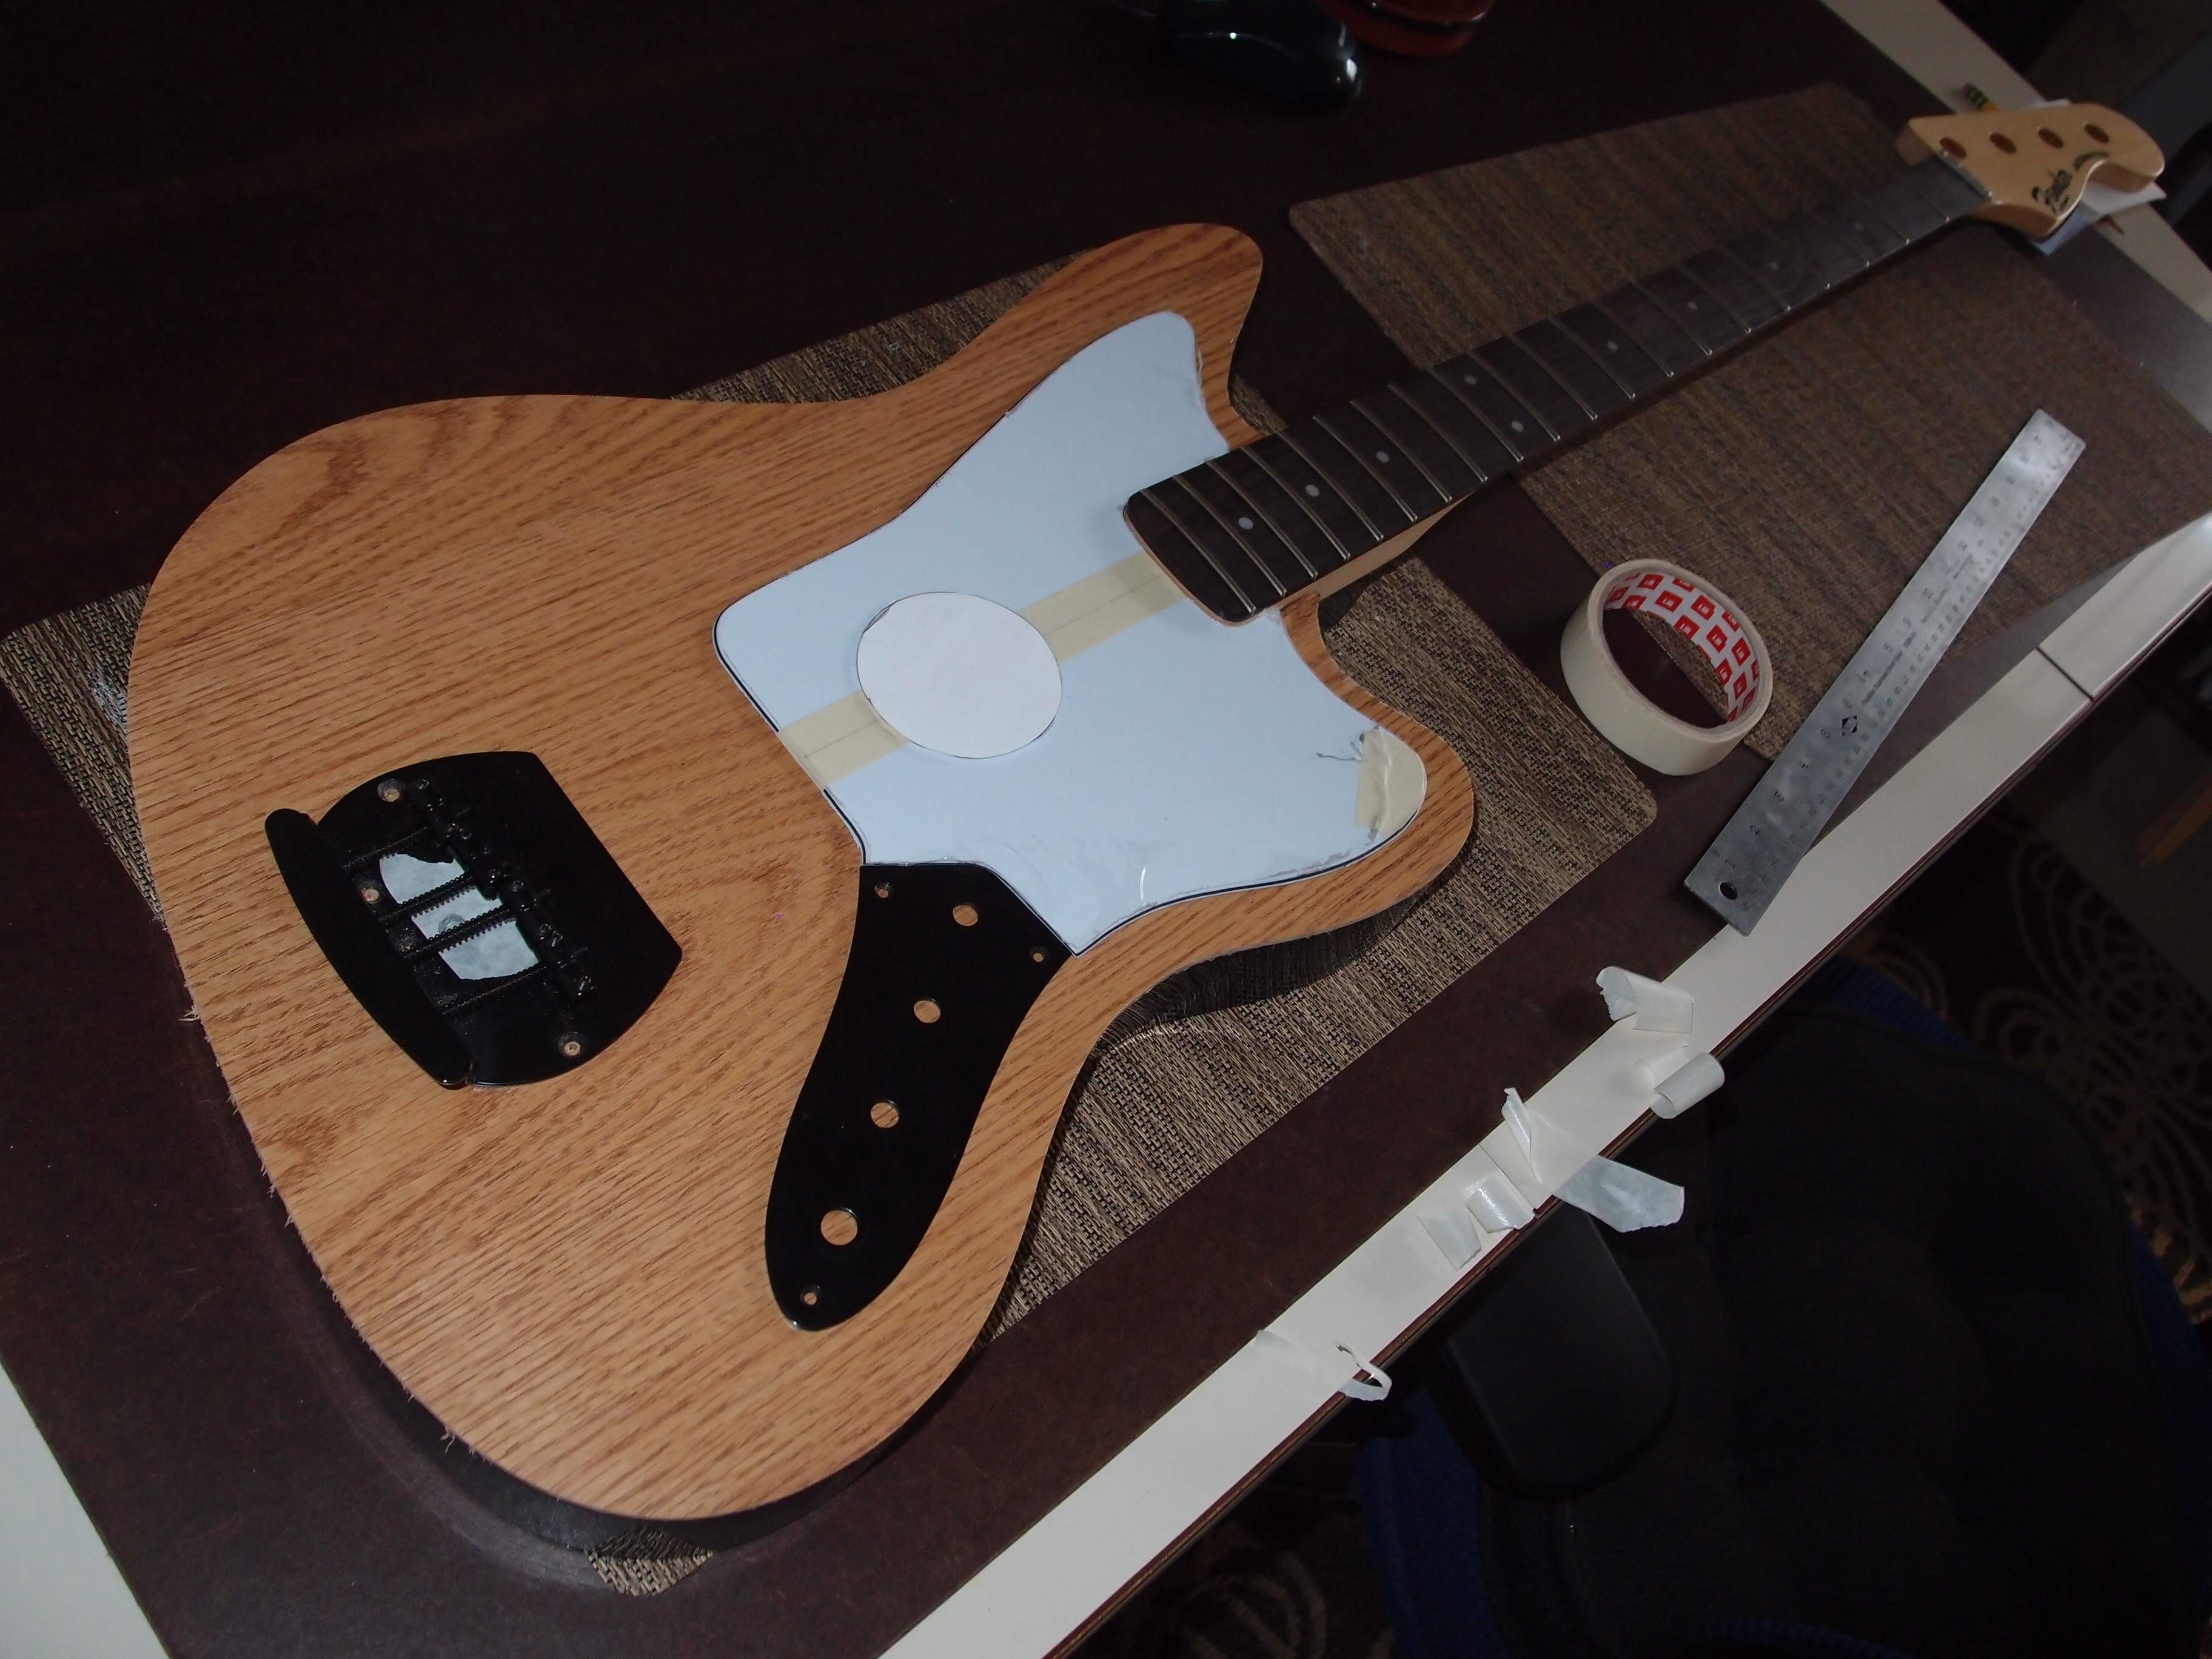
Right now, I call this finish "1970's Den", but it will look better after I 'burst it.
Graphite stiffeners will certainly do no harm. What people don't understand is that graphite is only stronger than steel on a weight basis. On a volume basis, steel is much stronger, and it is also much cheaper. Gives a nice heft to the piece.
The problem I see with StewMac's binding jig is that the base is too small, the follower is too big, and a dremel is underpowered. I see it wobbling, and also unable to do things like inside horns. I don't doubt that in good hands it can be made to work, but it could be a lot better. I have never actually used it, it might actually be much better than it looks to me, you seem to bear that out. But I will stick with my jig, which is much cheaper and much more versatile.
For a flat-topped guitar, my jig has maximum contact with the top and is incapable of tilting or wobbling. The follower was made specifically to fit tight curves, and the little DeWalt router has power to spare - I hardly ever touch the big router any more. Also, my jig is strong enough that if I ever wanted to, I could build a base for it to do arch-tops, although I've never even contemplated building one. And if I clamp it upside-down in the bench vise, it is a mini router table. In the picture above, I just did the neck pocket and edges with the little router ( without the binding follower, just roller-bearing bits. ) Binding will come later.
As far as safety goes, for many jobs it is necessary to remove the guard from the router table, at which point it is just waiting for you. And often a router table forces you to work blind, cutting the other side of the piece where you can't see it. As long as I have the bit in sight, I keep my fingers away from it !
Luthiery is rife with superstitions and outright lies when it comes to electrics. Most of what is true and essential for acoustic instruments is completely irrelevant for electrics. From an engineering point of view, an electric guitar is simply a beam that is strong enough to support the string tension. Structurally, everything else is decoration. Electric tone comes from strings, pickups, electronics, and most of all you. Woods and finishes have little to nothing to do with it. But it would be hard to sell a new Les Paul for $3000 with that attitude.
For me, the only wood for necks is hard maple, because it is the strongest, yet also cheapest and most readily available material, at least here in the east. It is also relatively easy to work, once you get the hang of it. You can build a body out of anything. There is a video on YouTube of a guy playing a six-string electric cinderblock, and it sounds fine. Here is my latest project, made entirely out of found plywood and ( I think it is ) cabinet facing. Only the larger stores around here carry maple, although they all carry oak and poplar. Poplar can sometimes be found in pieces 1-1/2+" x 13+", which is enough for many guitar bodies. A blank like that will cost under $20, versus over $50 for a 'luthier grade' piece of California firewood, and poplar is very easy to work with, especially if you are going to paint it.
Right now, I call this finish "1970's Den", but it will look better after I 'burst it.
Graphite stiffeners will certainly do no harm. What people don't understand is that graphite is only stronger than steel on a weight basis. On a volume basis, steel is much stronger, and it is also much cheaper. Gives a nice heft to the piece.
The problem I see with StewMac's binding jig is that the base is too small, the follower is too big, and a dremel is underpowered. I see it wobbling, and also unable to do things like inside horns. I don't doubt that in good hands it can be made to work, but it could be a lot better. I have never actually used it, it might actually be much better than it looks to me, you seem to bear that out. But I will stick with my jig, which is much cheaper and much more versatile.
For a flat-topped guitar, my jig has maximum contact with the top and is incapable of tilting or wobbling. The follower was made specifically to fit tight curves, and the little DeWalt router has power to spare - I hardly ever touch the big router any more. Also, my jig is strong enough that if I ever wanted to, I could build a base for it to do arch-tops, although I've never even contemplated building one. And if I clamp it upside-down in the bench vise, it is a mini router table. In the picture above, I just did the neck pocket and edges with the little router ( without the binding follower, just roller-bearing bits. ) Binding will come later.
As far as safety goes, for many jobs it is necessary to remove the guard from the router table, at which point it is just waiting for you. And often a router table forces you to work blind, cutting the other side of the piece where you can't see it. As long as I have the bit in sight, I keep my fingers away from it !
Last edited:
Alder;
You should read through our thread about the water-based Varathane floor finish:
Using water based products for instrument finishing, Target Coatings 9000 6000 and Varathane WB
I've been using the Varathane for more than a year now and, to me, it's the best instrument finish available for small builders and hobbyists. Once you learn a few tricks for working with it, it's very easy to spray, sand, and buff out. I use it now for all my base coats, color coats, and clear top coats. With the right tints, it can look almost identical to nitro lacquer. It can be put on thin or thick, satin or high gloss. It can be sprayed with guns or airbrushes, or even wiped on. Whatever you prefer. It's rock hard and very abrasion resistant, and is fully cured for sanding and buffing in a few hours. No fumes, no fire hazard, no real need for a spray booth. And it's relatively cheap and available locally ($48/gallon at Lowe's). What more can you ask?
Thanks, I skimmed over your thread last night, I will definitely read it more closely. Beautiful guitars, by the way.
For the visually minded among us, might I suggest more photos? One picture being worth at least several hundred words in my case.
That much, eh? Ok, here's the binding jig in detail. First, the whole kit:
This shows the stock small base plate ( which you'll notice has not a scratch on it, ) and my own ( well-used ) base plate, built from 1/4" polycarbonate and maple scrap. The polycarbonate material is typically used for templates. A piece this size is not nearly stiff enough for this job, hence the maple braces. You could also use a piece of phenolic, masonite, or even plywood, or just about anything will do if you brace it adequately.
Of course, all the fasteners on the underside are countersunk. The countersinks for the router base bolts are flat-bottomed, drilled with a forstner bit, and everything was drilled on a drill press. If you don't have one of those, you need one, you can't do anything this precise with a hand drill. Mine is a cheap little Skil, but more than adequate for this sort of work.
You can also see an array of bits and pieces, the edge-follower attachment, and the kick-ass little DeWalt 611 router. I go for this little router much more often than the big one now. There are other little routers ( or laminate trimmers ) that you could use, but I think this DeWalt is the best, and will do 90% of what a real router will do, including everything you need to build a guitar.
Q: Why didn't you make it a little wider and not have to relieve the braces to fit the router?
A: I didn't realize how flexible the plastic was until after I cut it from the main piece.
I turned the router base around. I just did all this edge routing and the neck pocket with this rig. It is the length and rigidity of the base plate that makes this setup so much more stable than a regular router. Instead of a heavy two-handed router resting on half its base plate or less, I have one hand guidind the li'l router, and the other holding almost a foot of base plate against the work piece.
Here is the edge follower attached to the base plate, with a binding slot that was just cut. The bit is just an ordinary 1/2" straight bit. I use the highest speed and move slowly, and it seems to work fine.
Finally, here is the edge-follower close up:
The body is 3/4" maple scrap from a neck project. I shaped it on the belt sander - be careful when doing small parts like this !
The attachment bolts are 10-32, while the follower bolt is 1/4-20 with a nylon cap nut for a non-marring bearing. All the holes were drilled and tapped as though for metal. Maple is so hard that I wouldn't think about trying to just force the threads in. The follower bolt is a very tight fit so that it doesn't move; if it loosens, I take it out, run a drop of Mr Crazy's glue into the wood threads, let it dry, and then put the bolt back. The bolts are all stainless because I like stainless.
The goal in building this was to keep it as compact as possible. The problem with StewMac's is that it is too wide to fit inside a horn. I had the Telecaster there next to me as I made this, and made sure that would not be a problem, it will fit easily into any cutout. Here are a couple more pics to get the general dimensions:
When using this jig, it is important that you keep it perpendicular to the side you are cutting, otherwise it will cut too deep, although you have to get pretty crooked for it to be noticeable. StewMac's version is functionally identical, and has the same problem. You'll need some scrap wood to hack on while you adjust the router and the follower for the binding - make a short test cut, check the fit, adjust, repeat, until it is perfect.
So that's it. Anybody could build this, but you're going to need some ( more than ) basic tools first, you can't start from zero with just a hand drill. So far I've mentioned drill press, forstner bits, belt sander, and tap & die set. You'll also need to make fairly precise cuts in polycarbonate and wood. And you'll need the router itself, if you don't already have it.
Last edited:
I was just at my favorite luthier's supply - Home Depot - and found some really nice tonewoods.
First, a piece of 48"x48" 5mm 'underlayment'. This is some sort of cheap plywood that is obviously meant to 'underlay' something, where it would ostensibly be out of sight. By picking through the pile, I found a piece that is just gorgeous. I have no idea what kind of wood it is, but it has a beautiful flawless grain in three colors, exotic looking, I can't wait to see what it looks like finished. You can't actually hear the tone now, but you would, though, if it were playing. I had them rip it into 3 roughly 16" sections, each of which will make a top and a back. $8.97
Then I found an 8 foot piece of 3/4" x 3" ( 2.5" finished ) rock maple, flamed from end to end, for $1.54/foot. That will make three necks. They had some nice bird's-eye too, but enough is enough. Finally, I needed some toneful bracing for the inside of my Jazzmaster: primed pine shoe moulding fit the bill, for 39 cents a foot. At that price, it's not worth the bother to get out the table saw and rip my own from scrap. I think the primer will help accentuate the low notes.
The shopping cart was positively shimmying with tone as I left the store ( or could it have been that left front wheel? )
First, a piece of 48"x48" 5mm 'underlayment'. This is some sort of cheap plywood that is obviously meant to 'underlay' something, where it would ostensibly be out of sight. By picking through the pile, I found a piece that is just gorgeous. I have no idea what kind of wood it is, but it has a beautiful flawless grain in three colors, exotic looking, I can't wait to see what it looks like finished. You can't actually hear the tone now, but you would, though, if it were playing. I had them rip it into 3 roughly 16" sections, each of which will make a top and a back. $8.97
Then I found an 8 foot piece of 3/4" x 3" ( 2.5" finished ) rock maple, flamed from end to end, for $1.54/foot. That will make three necks. They had some nice bird's-eye too, but enough is enough. Finally, I needed some toneful bracing for the inside of my Jazzmaster: primed pine shoe moulding fit the bill, for 39 cents a foot. At that price, it's not worth the bother to get out the table saw and rip my own from scrap. I think the primer will help accentuate the low notes.
The shopping cart was positively shimmying with tone as I left the store ( or could it have been that left front wheel? )
Last edited:
It really helps to make full-sized drawings before you start a guitar project. But finding guitar-size paper can be a problem. My Home Depot has big rolls of brown wrapping paper outside that are a good size, I tore off a few yards. Below, I've drawn a plan on a nice big piece of cardboard I saved that was the backing for something. But how do you transfer these plans to wood? I don't want to cut up my master, I need some extra-large tracing paper. So I went to Staples, but the closest thing they had was still too small, and $20. So I went to the supermarket next door, and found this:
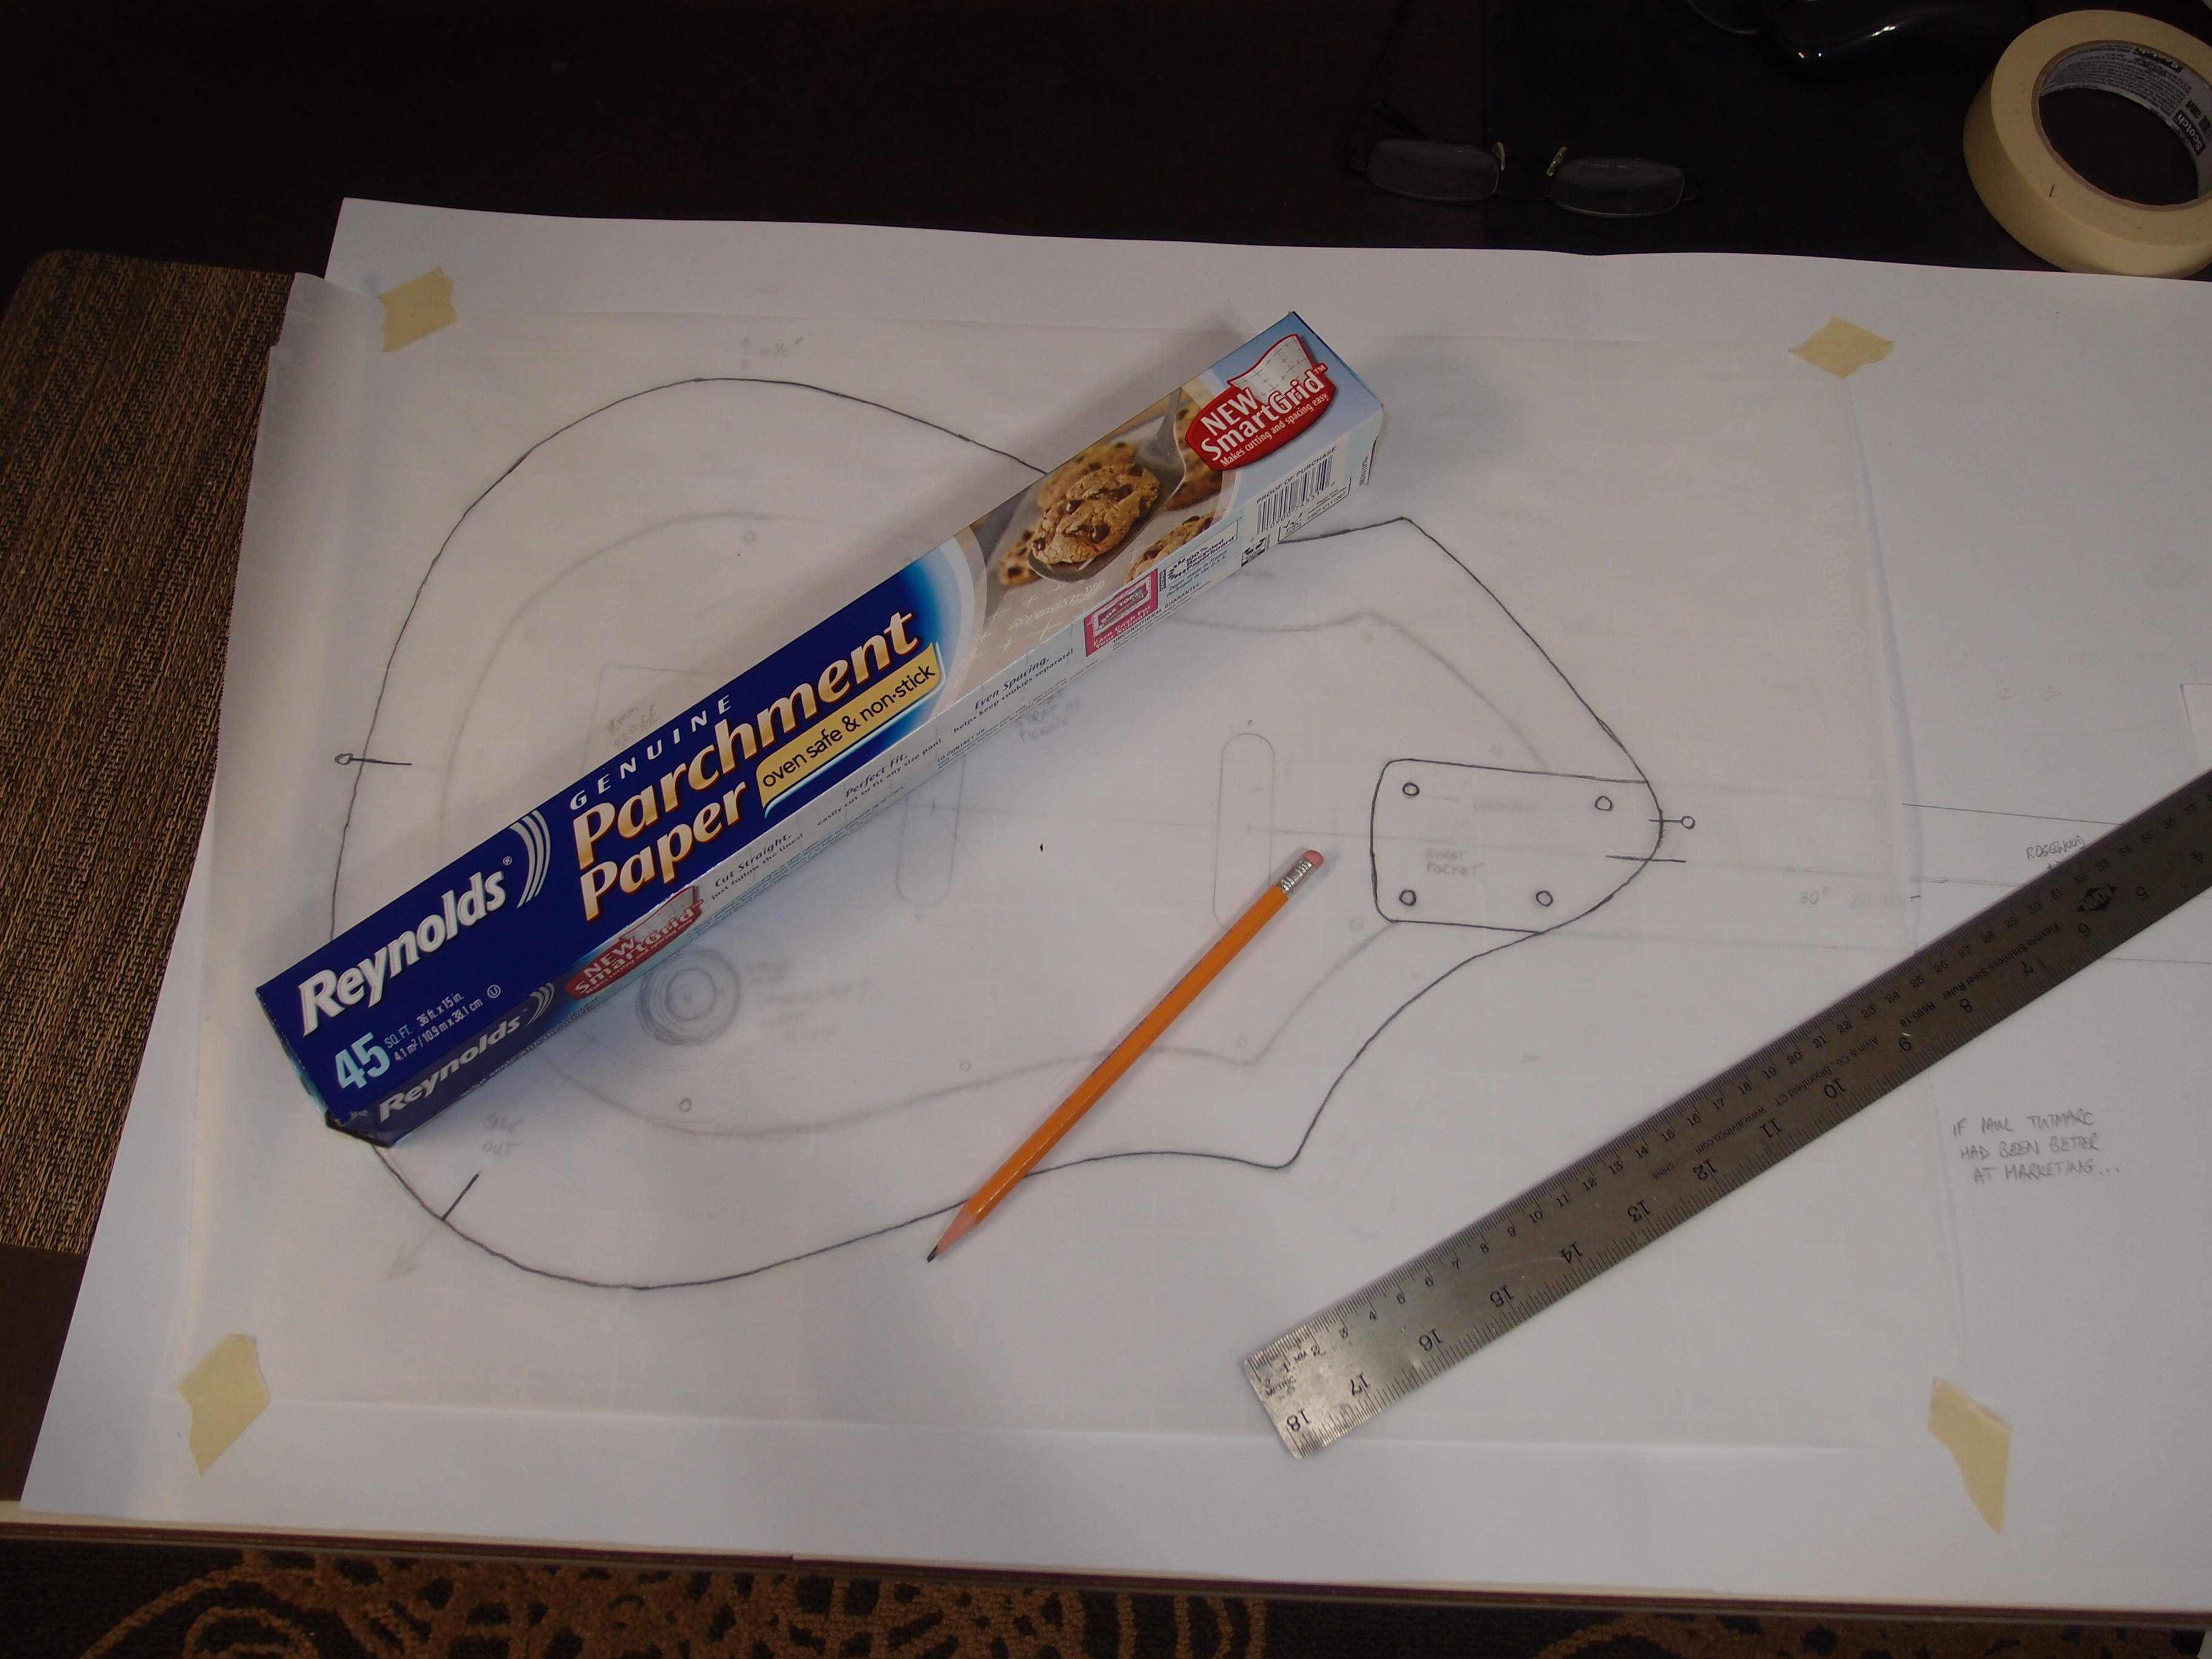
This is baking paper, 15 inches wide and as long as you need and nearly transparent. You can see I have traced only the outline, with the rest of the plan showing through. This paper takes pencil very well, and even has a grid on it that might be useful. It is a little slippery and doesn't like tape, but for FOUR BUCKS a roll, I can put up with that. Now I can cut out the tracing and copy it to the wood, and still have my master completely intact. Sweet.
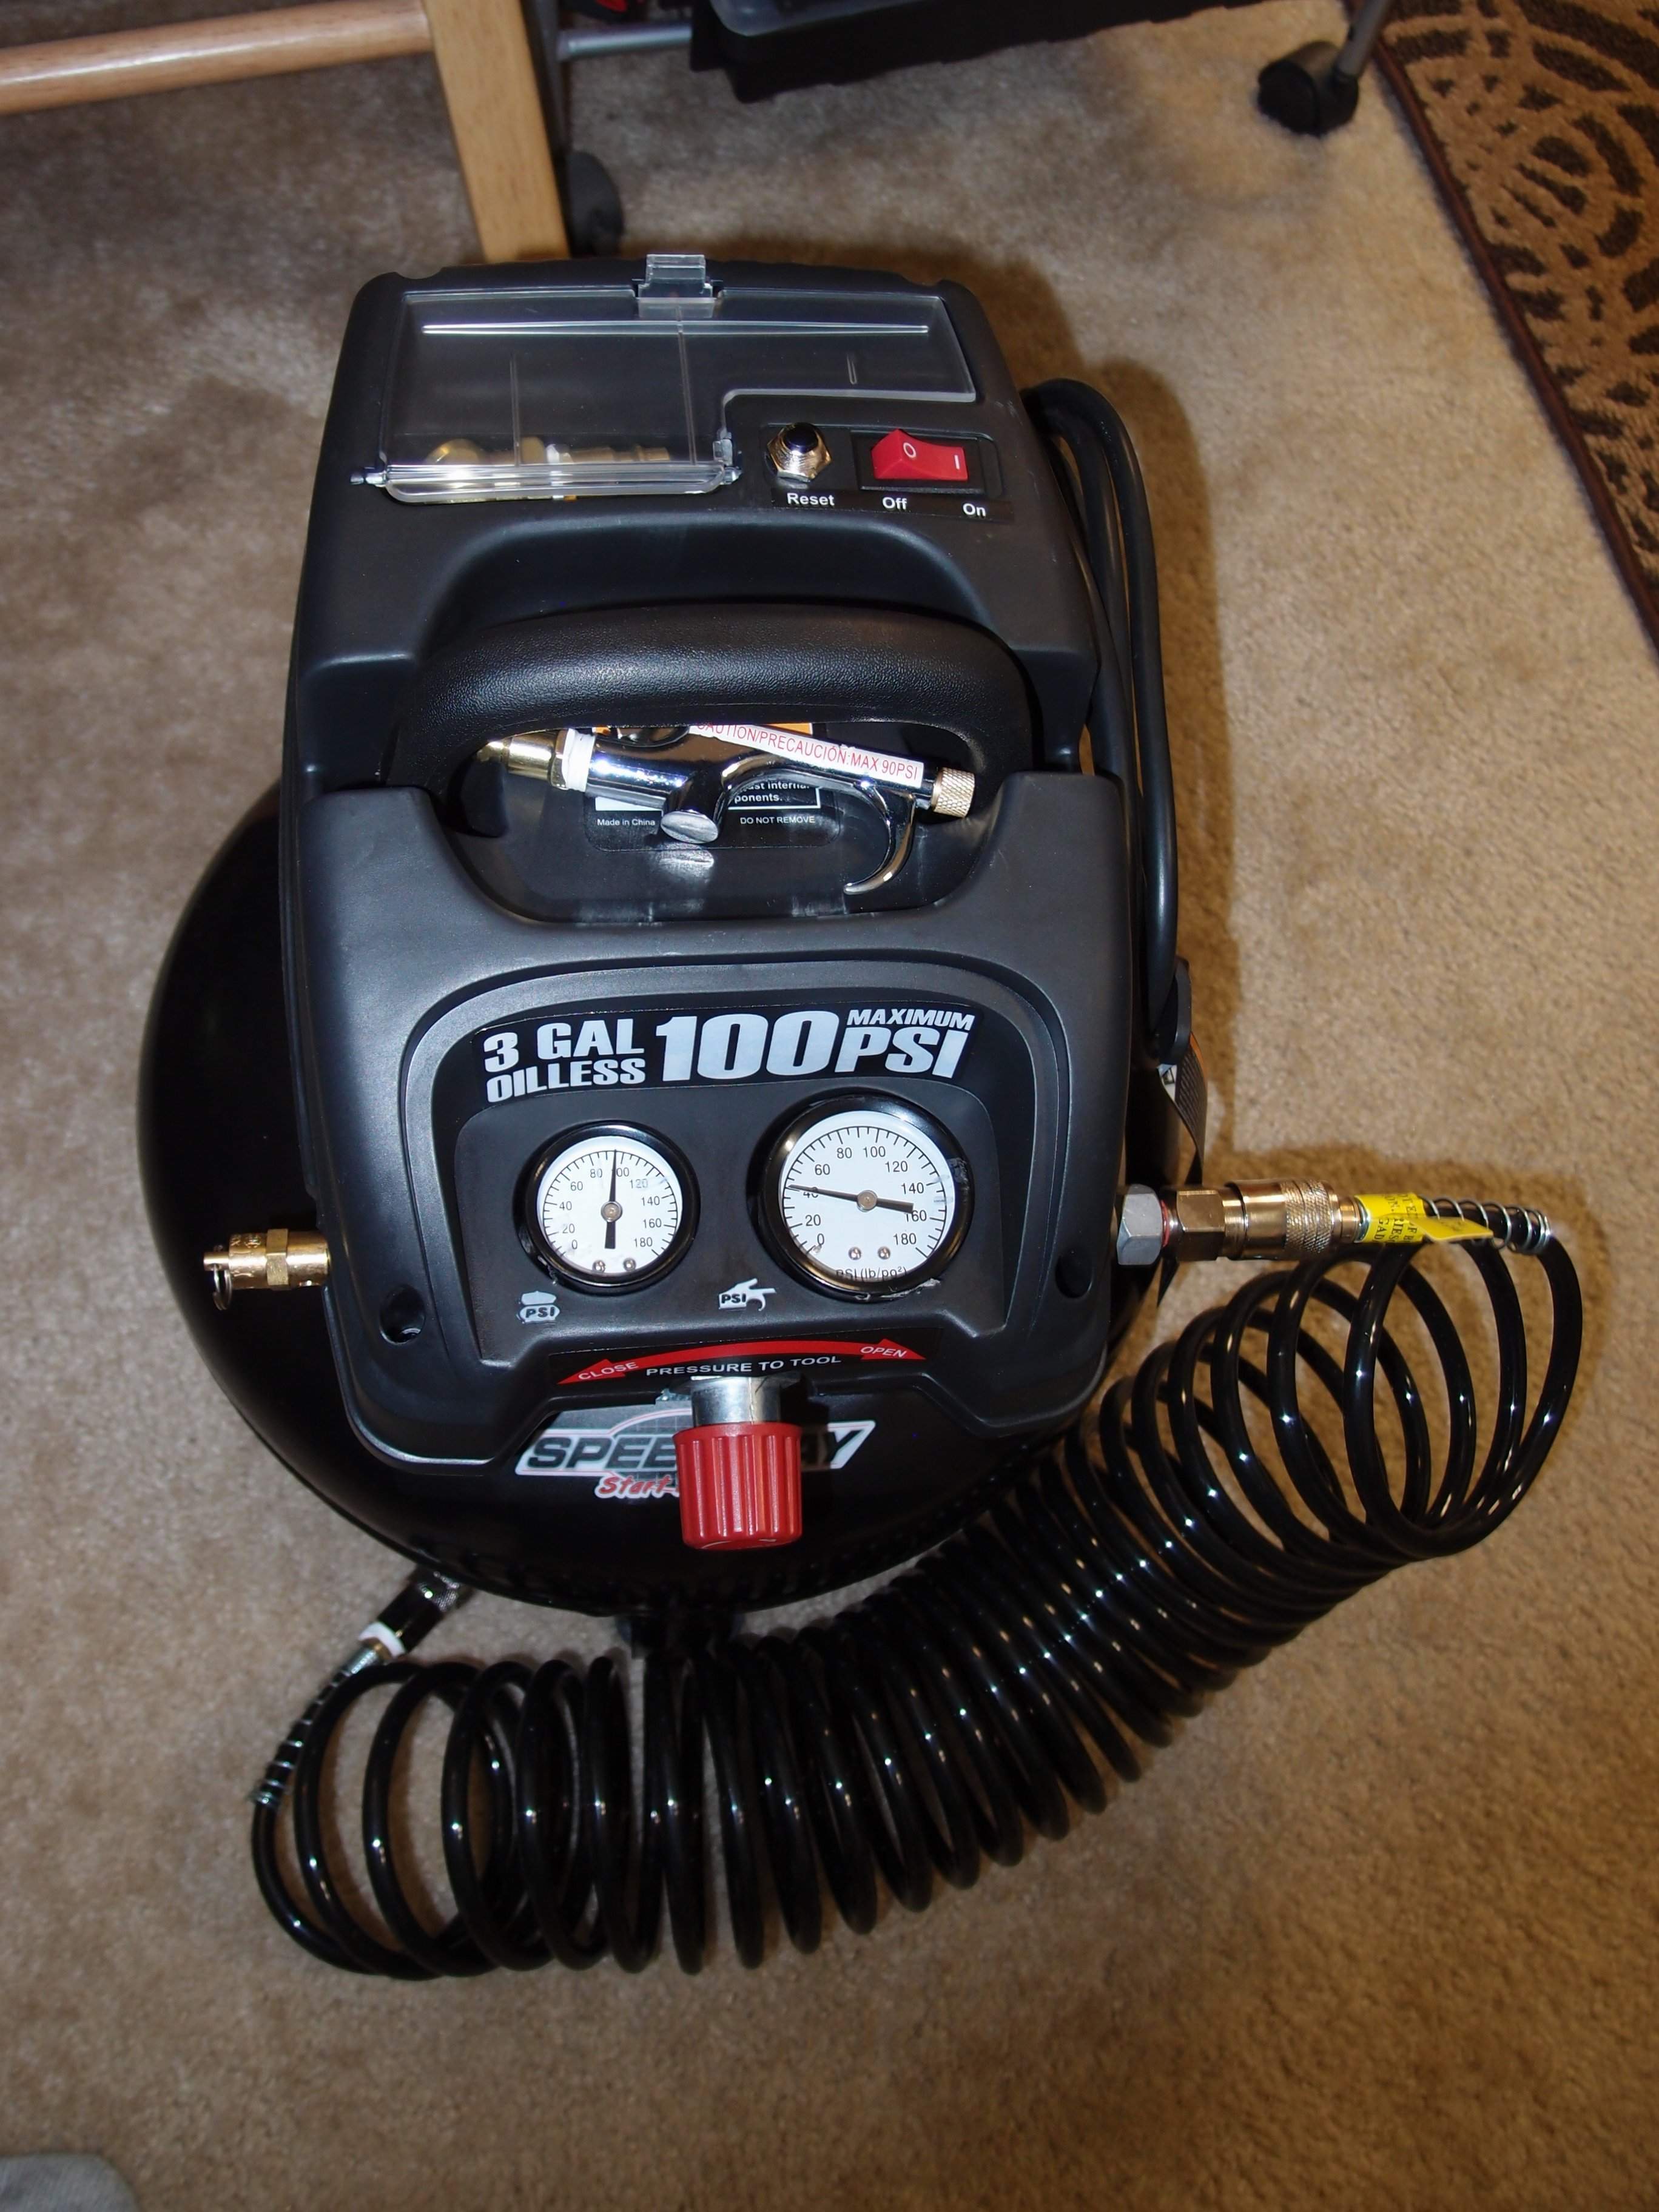
Here is another compressor I got to evaluate from Home Depot ( they are so great like that. ) Cute, isn't it? It came complete with everything in the picture, and is really not that noisy for a compressor. I think it should drive the airbrush with no problem, and the small paint gun in bursts with suitable pauses, which is pretty much the way you paint a guitar anyway. We shall see.
This is baking paper, 15 inches wide and as long as you need and nearly transparent. You can see I have traced only the outline, with the rest of the plan showing through. This paper takes pencil very well, and even has a grid on it that might be useful. It is a little slippery and doesn't like tape, but for FOUR BUCKS a roll, I can put up with that. Now I can cut out the tracing and copy it to the wood, and still have my master completely intact. Sweet.
Here is another compressor I got to evaluate from Home Depot ( they are so great like that. ) Cute, isn't it? It came complete with everything in the picture, and is really not that noisy for a compressor. I think it should drive the airbrush with no problem, and the small paint gun in bursts with suitable pauses, which is pretty much the way you paint a guitar anyway. We shall see.
Binding Scrapers
After making a muddle of things with a razor blade and several other implements that proved to be less than satisfactory, I decided I needed to have the right tool - something roughly pencil-sized that can be handled with precision and ease, with a proper scraper edge. I took a look at StewMac, and found their binding scraper - exactly what I was thinking of. But with shipping it would cost $15, and I'd have to wait a week for it, and after all, it's just a piece of steel. So I started thinking, and remembered I have some 1/2" steel binding strap material. This is the stuff that is used around very large heavy boxes. It is a fairly hard and springy type of steel that would probably make a good tool. So I got busy in the shop, and made three scrapers:

Don't get caught in prison with one of these
The first one is double-ended, one end cuts lefty, the other end cuts righty, that's why it is labeled. The ends are as blunt as they could be, in case you slip. The second one has a wicked point on it for tight spots, seemed prudent to make that single-ended. The third one is not for binding, it is just a small rounded scraper for whatever. I cut the material with sheet metal snips, and shaped it on the bench grinder. The material is rather flexible on its own, so I added handles from popsicle sticks and tape. StewMac's website will tell you how to sharpen them.
They work pretty well, at least the first one, I haven't really tried the other two. They don't hold an edge as long as a real scraper, but that's alright, just a swipe over the file and it's sharp again. I'm sure StewMac's is better, and the price is not outrageous, but I was impatient. StewMac's other scrapers are well worth the price, especially their 'Ultimate' scrapers, which are terrific. Their scraper burnisher is also well worth having, to resharpen your scrapers; it is not all that difficult. For neck building, I have also tried a spoke-shave, but I found it was difficult to use on hard maple. Routing is likewise problematic on maple, the best ways to work with it are sanding and scraping.
After making a muddle of things with a razor blade and several other implements that proved to be less than satisfactory, I decided I needed to have the right tool - something roughly pencil-sized that can be handled with precision and ease, with a proper scraper edge. I took a look at StewMac, and found their binding scraper - exactly what I was thinking of. But with shipping it would cost $15, and I'd have to wait a week for it, and after all, it's just a piece of steel. So I started thinking, and remembered I have some 1/2" steel binding strap material. This is the stuff that is used around very large heavy boxes. It is a fairly hard and springy type of steel that would probably make a good tool. So I got busy in the shop, and made three scrapers:
Don't get caught in prison with one of these
The first one is double-ended, one end cuts lefty, the other end cuts righty, that's why it is labeled. The ends are as blunt as they could be, in case you slip. The second one has a wicked point on it for tight spots, seemed prudent to make that single-ended. The third one is not for binding, it is just a small rounded scraper for whatever. I cut the material with sheet metal snips, and shaped it on the bench grinder. The material is rather flexible on its own, so I added handles from popsicle sticks and tape. StewMac's website will tell you how to sharpen them.
They work pretty well, at least the first one, I haven't really tried the other two. They don't hold an edge as long as a real scraper, but that's alright, just a swipe over the file and it's sharp again. I'm sure StewMac's is better, and the price is not outrageous, but I was impatient. StewMac's other scrapers are well worth the price, especially their 'Ultimate' scrapers, which are terrific. Their scraper burnisher is also well worth having, to resharpen your scrapers; it is not all that difficult. For neck building, I have also tried a spoke-shave, but I found it was difficult to use on hard maple. Routing is likewise problematic on maple, the best ways to work with it are sanding and scraping.
Last edited:
Angled Headstock Jig
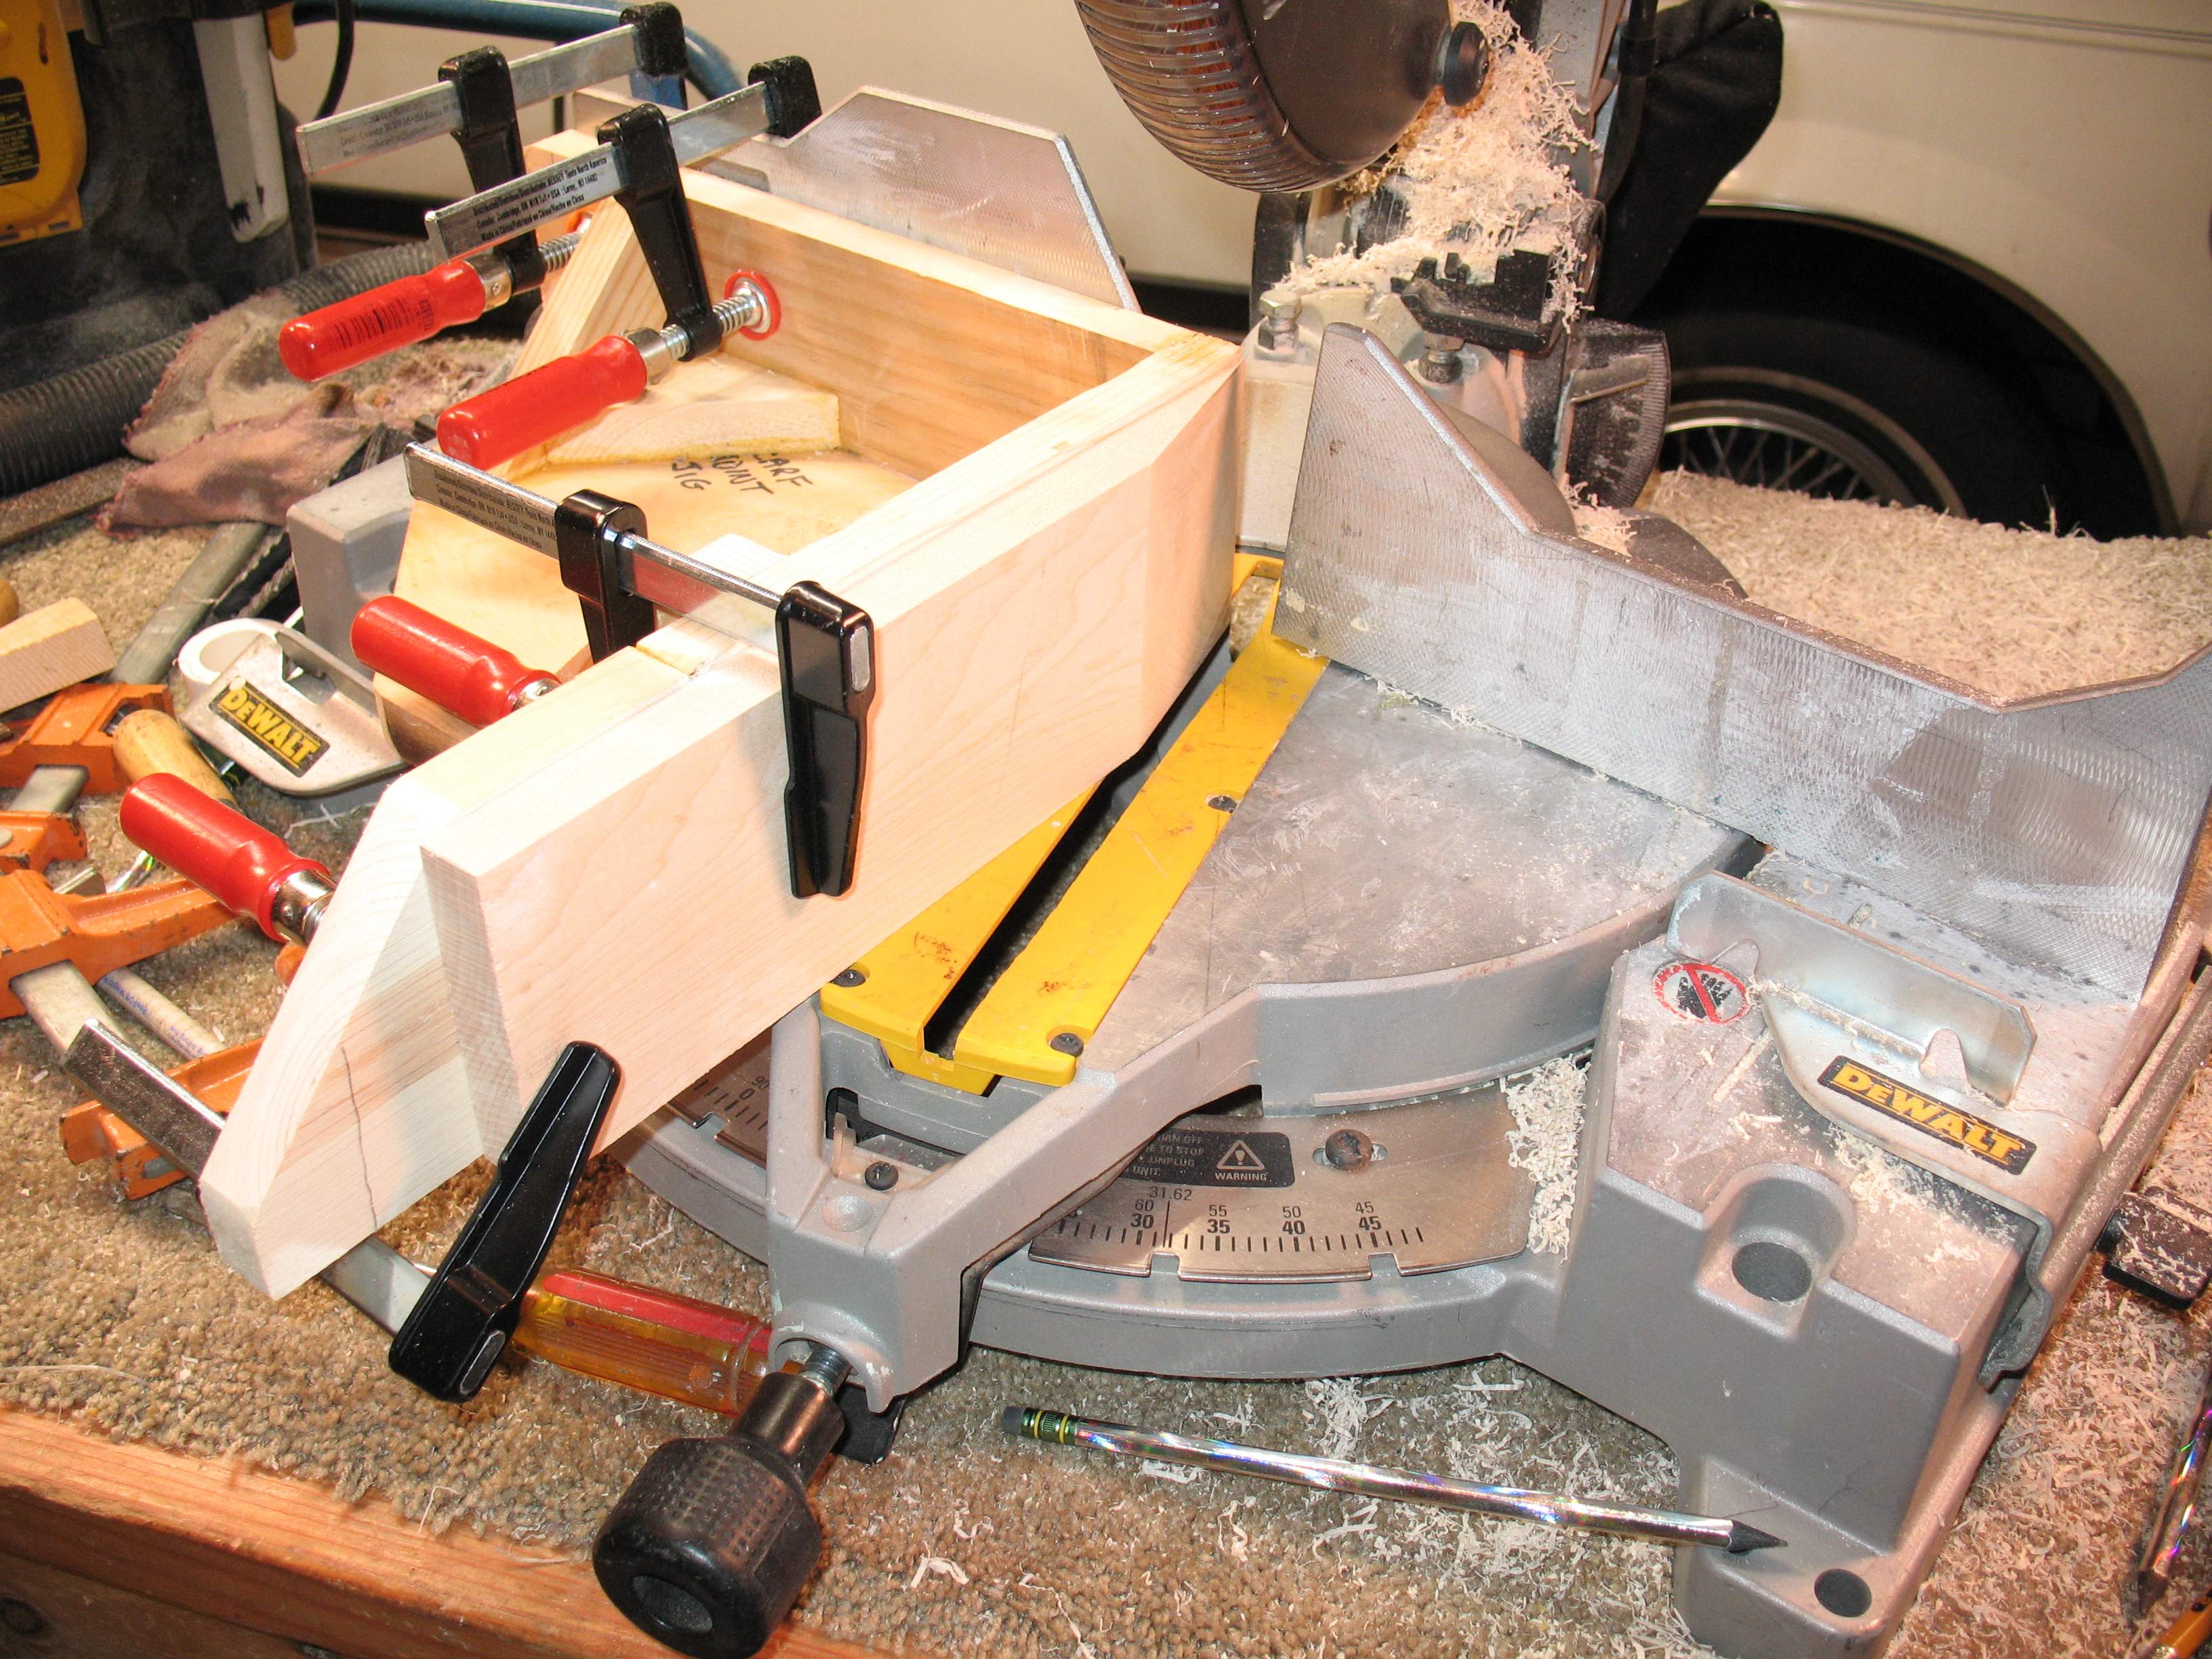
This is the angled headstock jig I built from pine scrap, with an already-cut piece of 5" Home Depot maple headstock material attached with clamps. Basically, this jig is a 90 degree square brace, as precise as I could build it. It is square in all three dimensions, the most important being the vertical direction. The final stage of construction of the jig was to smooth all the surfaces on the sander, true up the saw, and then true-up the jig face by shaving it with the saw. You can see that the angle of the headstock is easily selected on the saw. The accuracy of this angle is not critical, as long as you are in the ballpark, anything will work.
This jig builds a 'scarfed' neck joint. A scarf joint is one that uses an angled cut to mate two pieces of wood with fasteners or glue. Scarf joints have been used in shipbuilding and woodworking for thousands of years for their strength and simplicity. You can see a number of them in the picture below. When the neck is complete, the fingerboard laps the scarf join, so the headstock is actually captured between the fingerboard and the neck. This is an incredibly strong joint, and preserves the grain direction in both pieces. I have heard of them failing, but that is rare and always a result of a bad glue job.

A scarf joint is the right way to make an angled wood joint, nothing like a Gibson angled headstock, which is simply carved from the same piece of wood as the neck. This makes a weak transition from neck to headstock ( especially since Gibson refuses to use a volute to reinforce it ) and mis-aligns the grain in the headstock, which is both unsightly and weak. The end result of that is Gibson's famous self-destructing headstocks. Gibson veneers and paints their headstocks to cover up the ugliness that results. It is ironic that Fender necks never break, but are easy to replace, while Gibson necks are famously fragile, and impossible to replace.
The scarf joint is also more economical than a one-piece neck, allowing the use of a narrow neck piece with a wide headstock piece for less wasted wood than a one-piece Fender-style neck. Rickenbacker economizes a flat headstock by gluing walnut wings to a maple core, which turns an ugly glue line into a decorative feature that they can charge extra for. The scarf joint does make a curving line on the back of the neck if clear-coated. Of course, a solid paint job will cover up anything.
Oddly, the cut comes out slightly crooked when everything is perfectly aligned. My guess is that the saw is just not made to rip hard maple at such an angle, and the blade flexes slightly. Initially I corrected it by adjusting the saw, but later modified the jig to be adjustable, which works much better, and is also repeatable, an important feature for any tooling. Here is another shot showing the adjusters, which are simply 1/4-20 machine bolts threaded into the wood. You can also see where I added extensions to the jig which allow for better clamping to the saw, and also allow the work piece to be secured with clamps rather than double-sided tape, which is much more accurate, and also saves on tape. I re-cut a number of pieces with the modified jig, and they came out much better.
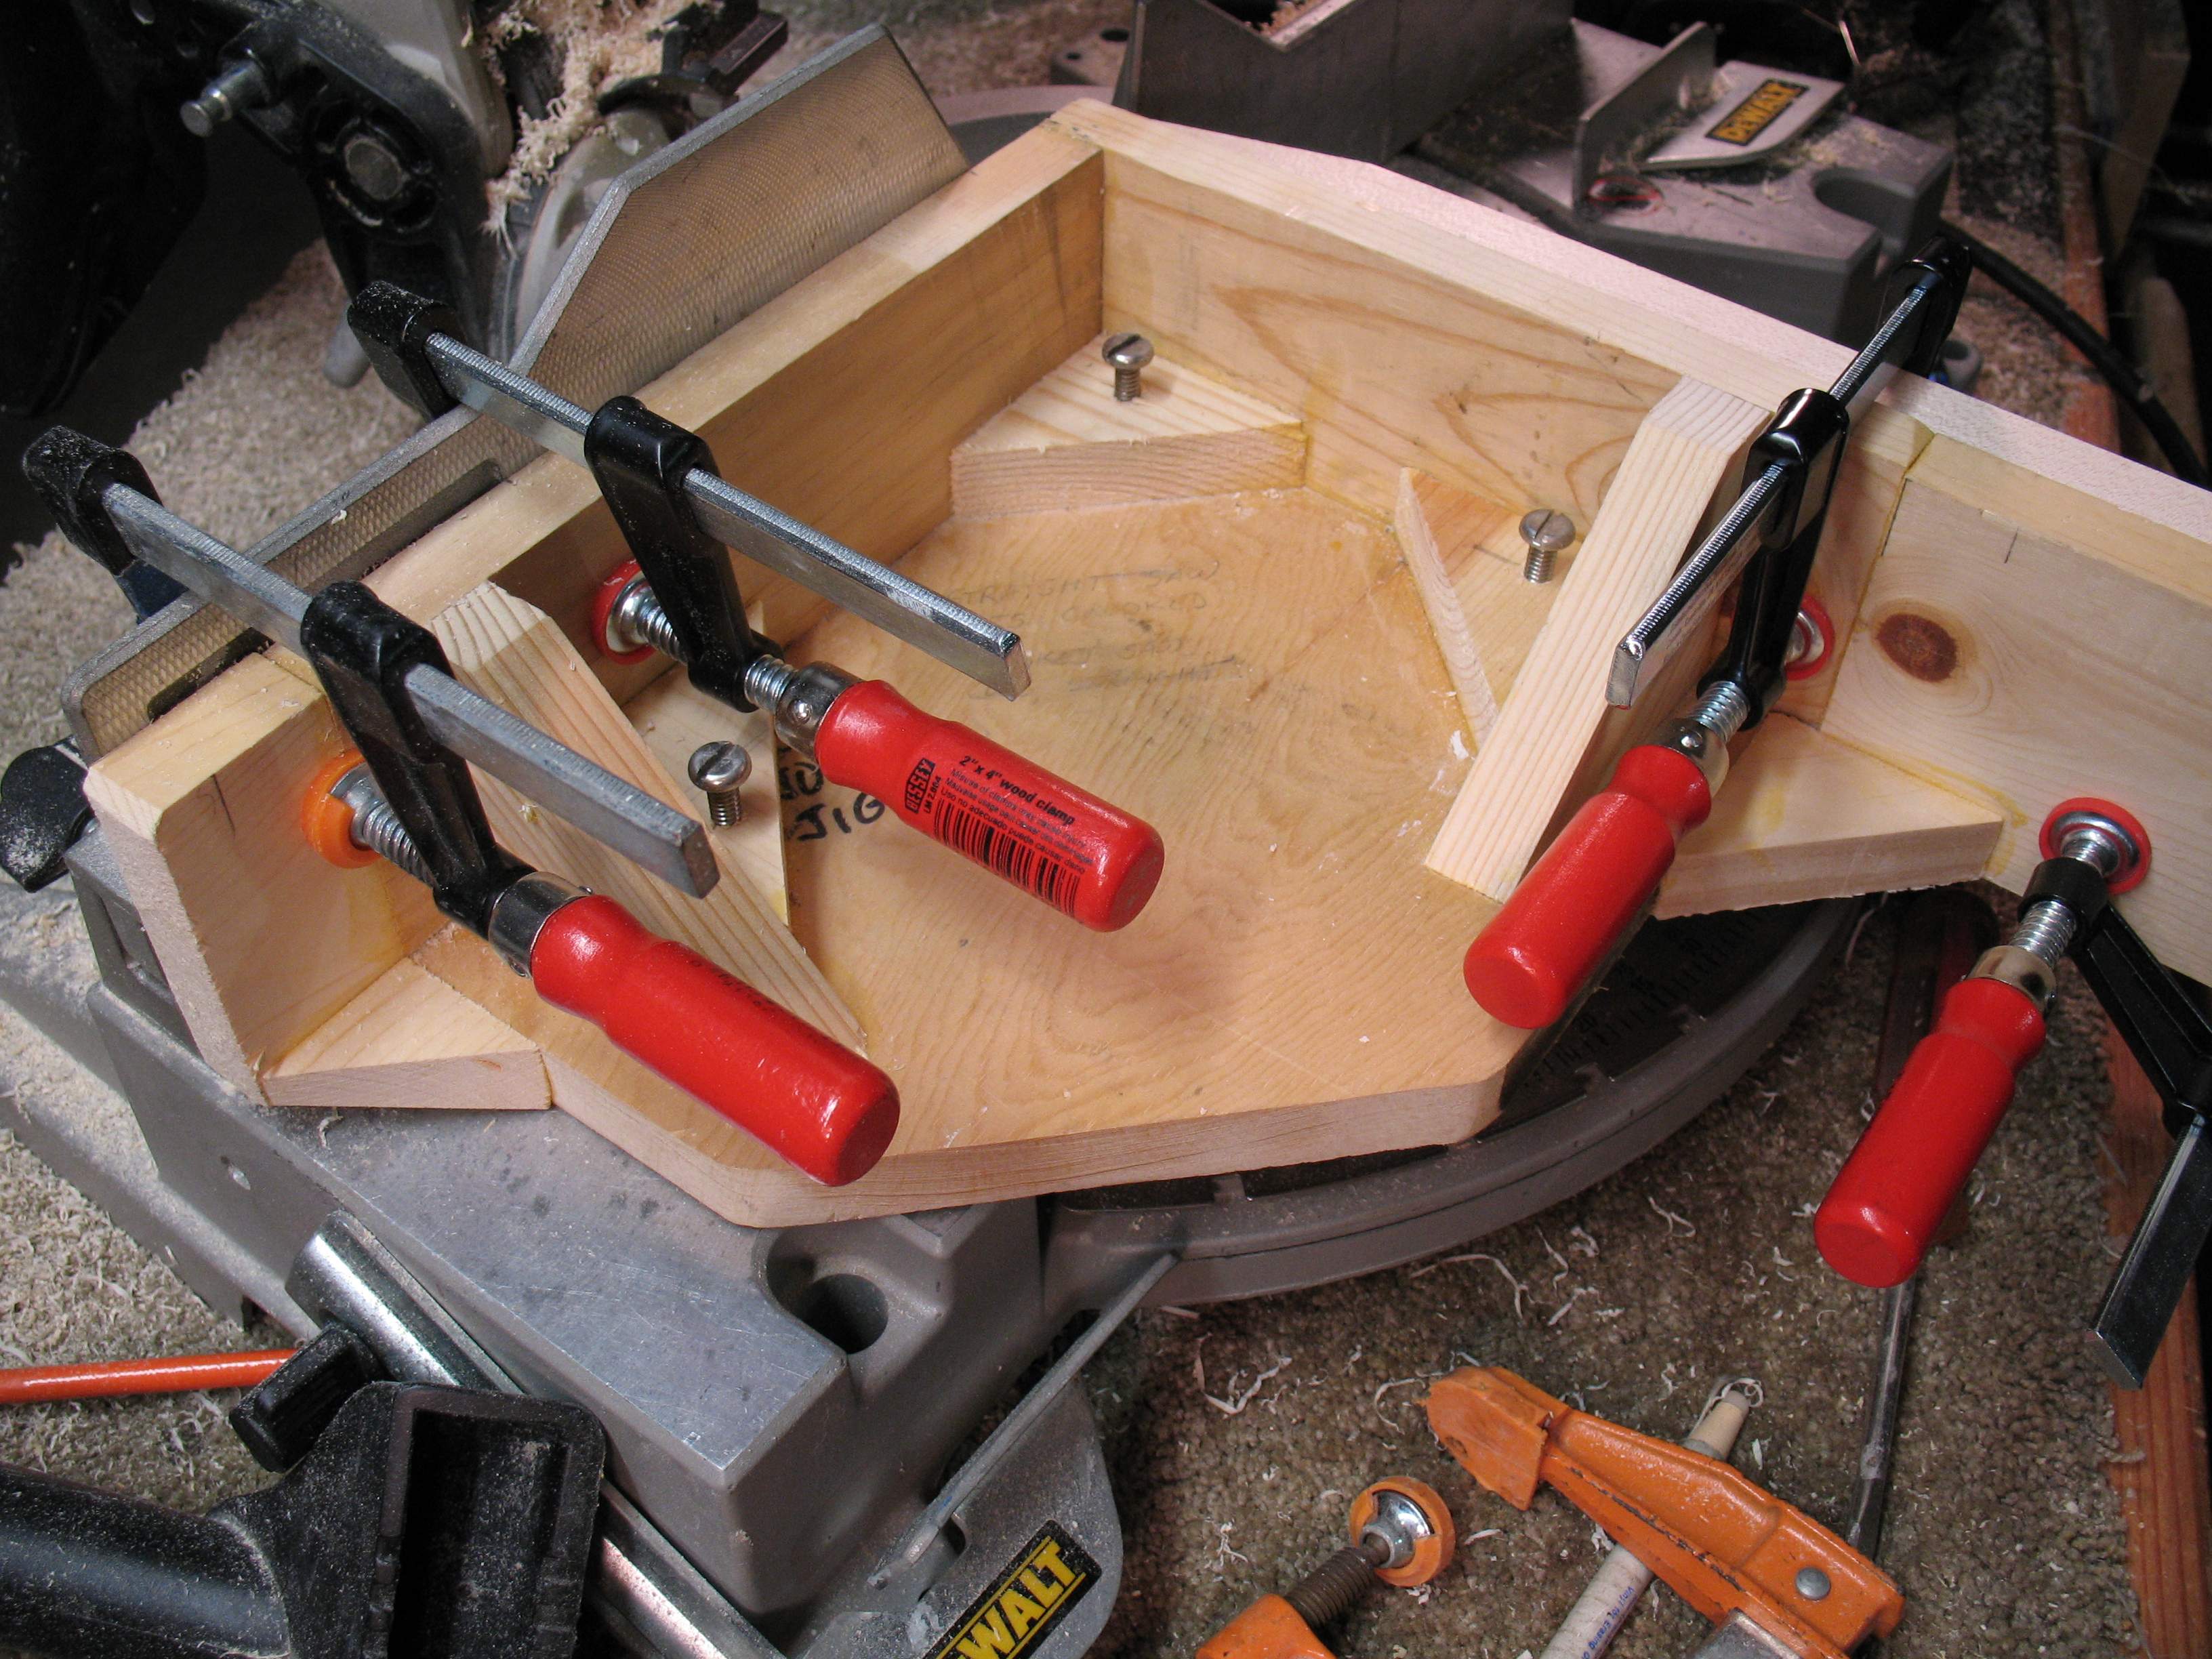
The saw is a DeWalt 12" mitre saw that has seen a lot of use doing crown mouldings, flooring, etc. I get this tool out for just about anything it might do, but this is one use for it that I never expected. The saw was also used to build the jig. The nice thing about this model is that it is not so heavy, so it is easy to lug around, unlike a 100 pound slide-mitre. For mouldings and other long pieces, I made a cutting table from an old door, with end supports that match the height of the saw bed. The table has some extra bracing so it does not flex at all, and when set up on a pair of sawhorses, provides a nice lightweight portable work surface on which the saw can be slid from side to side as needed.
They say "If you have a hammer, then everything looks like a nail." Well, if you have a mitre saw, then everything looks like a mitre. Ha !
Back to guitars ... turns out that gluing the two pieces is not exactly easy, glue is slippery, and everything goes out of alignment when you try to clamp it down tight. My first attempt was to use the waste pieces ( you can see one in the pics above ) as angled shims, so that the clamping force is exactly perpendicular to the joint. That was a step in the right direction, but not enough. So I ended up making another jig for gluing:
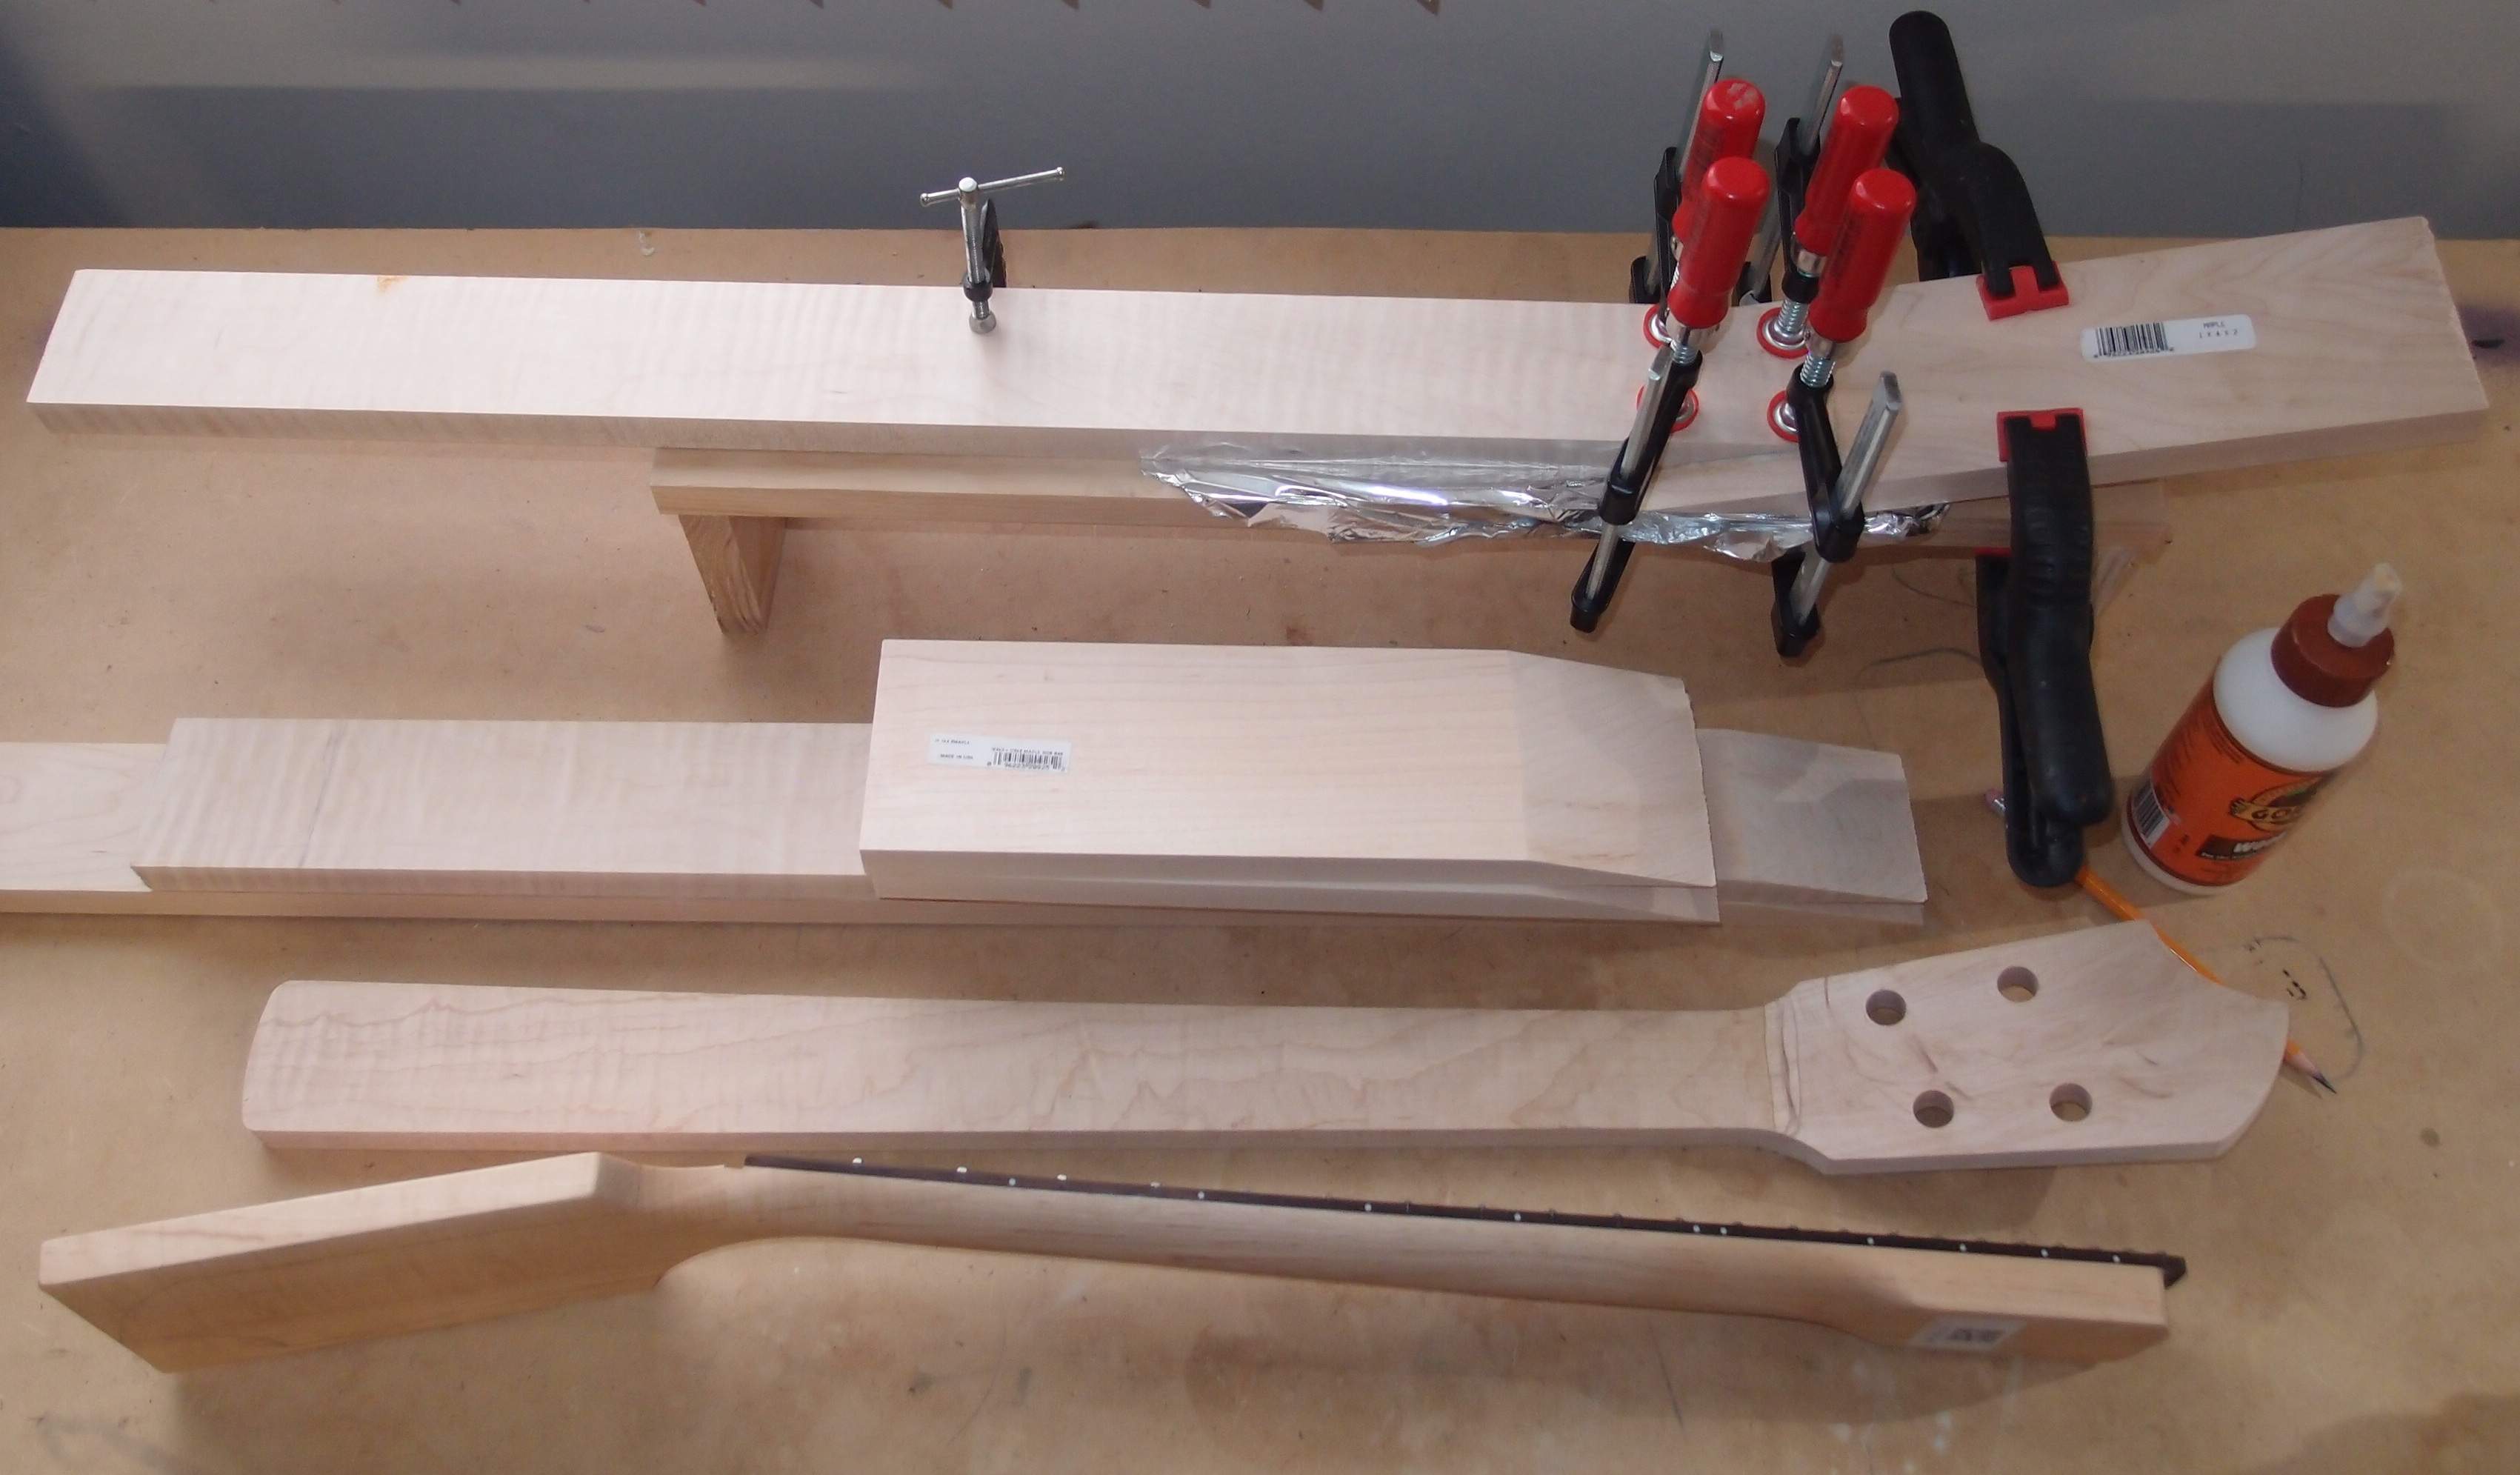
So simple, it plumb evaded me ...
This jig is little more than a piece of scrap pine with a couple of legs attached. It matches the width of the headstock material. The legs allow you to get clamps underneath, and gives you something to align the parts to. First clamp down the neck piece and align it, then stick the headstock under it and trace the outline. Put glue on the headstock, and stick it back under, align and clamp. All alignment is by Mk. I eyeball. The tinfoil is to keep from gluing the workpiece to the jig. Note how the spring clamps are up the headstock. This makes it pivot into the neck for a tight joint. Also note how the headstock has the same cut as the neck, but is flipped over to make the final angle. The headstock piece is about a foot long, the neck piece is about two feet, the end result should make a 20-24 fret 30" neck.
You can also see a partially finished neck that was glued with this jig, some extra parts, and a guitar neck that I bought, to see how it was made. That is where I got the 15 degree angle, I had previously messed around with 10-13 degrees. You can see how the fingerboard is part of the joint, and how far up the neck the joint is. A standard headstock is 9/16" thick, so if you use 3/4" lumber from the hardware store, it will have to be thinned 3/16". Careful inspection of the bought neck shows that the thinning is done on the back of the headstock, not the front as you might expect. That StewMac Safety Planer I sprang for a while back is going to come in handy, and then it's going to be some tricky shaping on the spindle sander. 15 degrees gives a really good break-over angle for the strings. The reason Gibson uses less is that the lousy way they make necks, if they used 15 degrees, half of them would break in the factory. Much better if it breaks after they sell it to you. Better for them, anyway.

And here is my first go at it. Not perfect, but strong, and I think it will clean up on the belt sander. The headstock is deliberately a bit off to one side. The fingerboard will extend up to the corner, the truss rod slot will be as in the bought neck, and should present no problem for my truss rod jig. I could also use binding to cover up any small gaps.
This sort of a neck could use a heel-adjusting truss rod, but it is a natural for a headstock adjustment, which is what I will use. A cheap Chinese truss rod can easily be sawed-off to any length and brazed back together much faster than building a custom-length rod. As long as the adjustment is accessible without removing the neck.
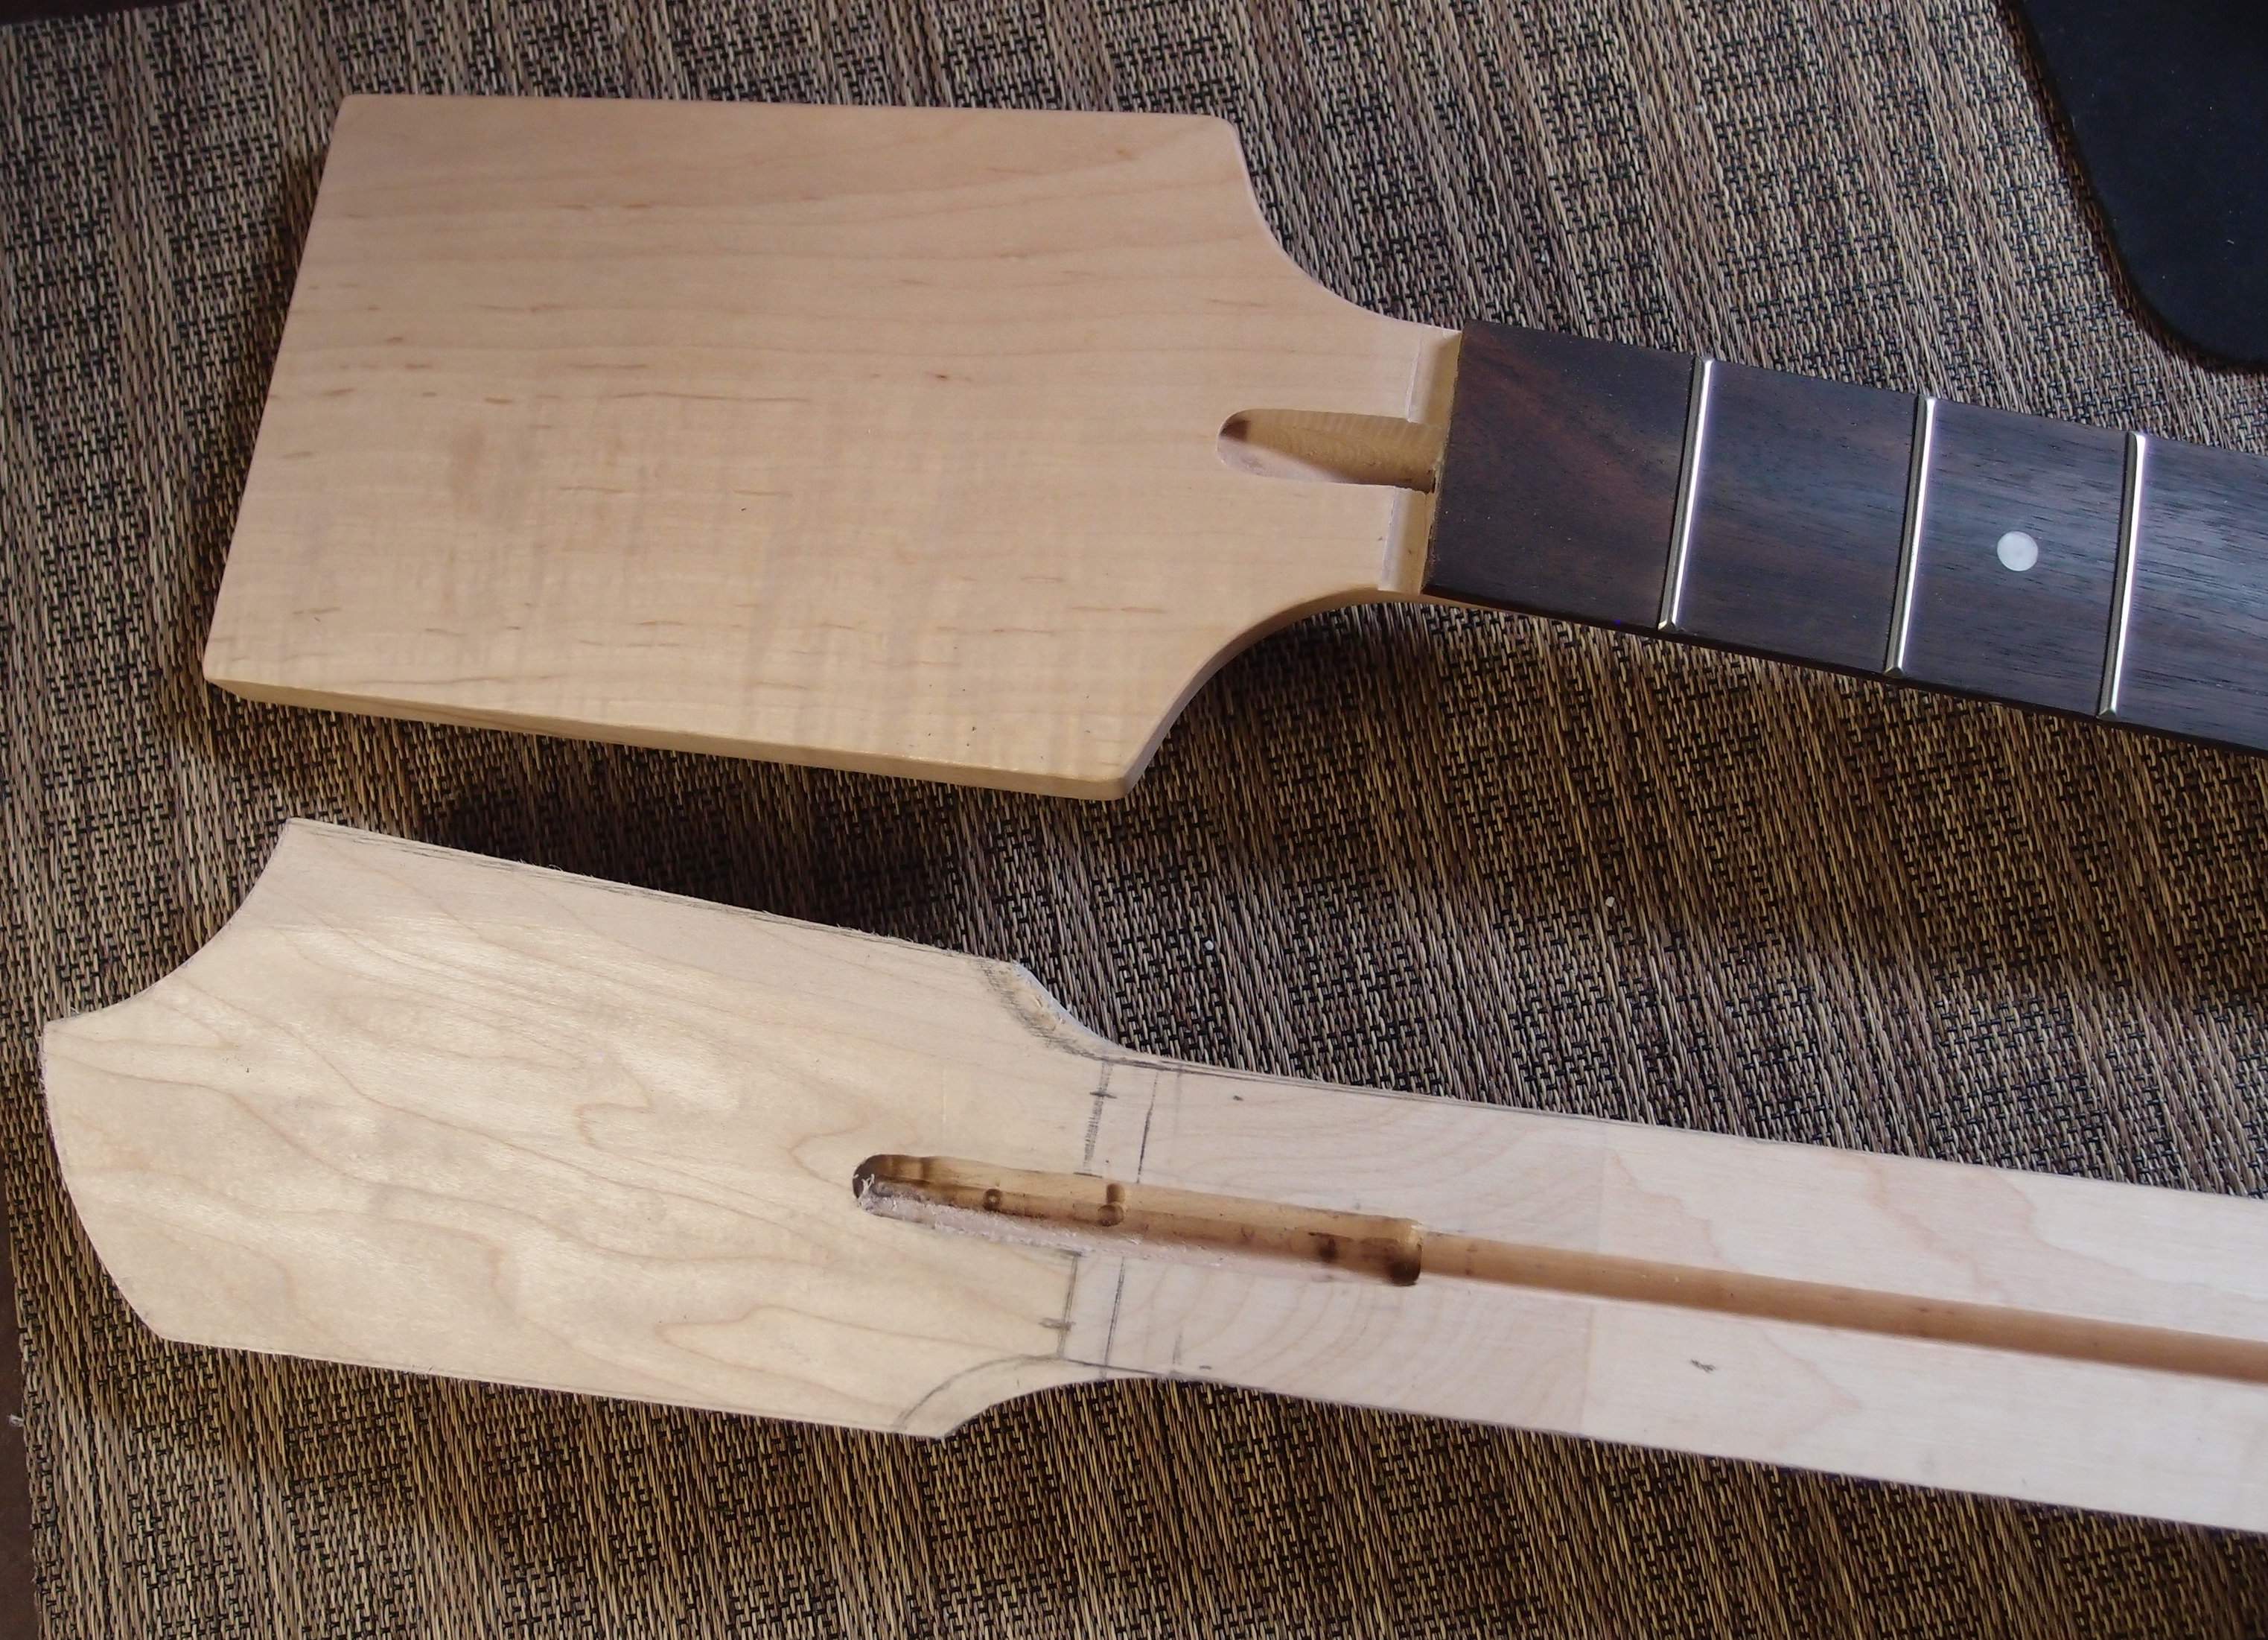
See the wacky grain pattern on the angled cut section of the headstock part? That's what a Gibson headstock would look like if you could see it.
Even though I didn't do the best job gluing it, the joint came out tight and cleaned up well on the sander. It's always nice when the first try comes out usable. I've also routed the truss rod slot. Now I need to shorten up a truss rod to fit.
This is the angled headstock jig I built from pine scrap, with an already-cut piece of 5" Home Depot maple headstock material attached with clamps. Basically, this jig is a 90 degree square brace, as precise as I could build it. It is square in all three dimensions, the most important being the vertical direction. The final stage of construction of the jig was to smooth all the surfaces on the sander, true up the saw, and then true-up the jig face by shaving it with the saw. You can see that the angle of the headstock is easily selected on the saw. The accuracy of this angle is not critical, as long as you are in the ballpark, anything will work.
This jig builds a 'scarfed' neck joint. A scarf joint is one that uses an angled cut to mate two pieces of wood with fasteners or glue. Scarf joints have been used in shipbuilding and woodworking for thousands of years for their strength and simplicity. You can see a number of them in the picture below. When the neck is complete, the fingerboard laps the scarf join, so the headstock is actually captured between the fingerboard and the neck. This is an incredibly strong joint, and preserves the grain direction in both pieces. I have heard of them failing, but that is rare and always a result of a bad glue job.
A scarf joint is the right way to make an angled wood joint, nothing like a Gibson angled headstock, which is simply carved from the same piece of wood as the neck. This makes a weak transition from neck to headstock ( especially since Gibson refuses to use a volute to reinforce it ) and mis-aligns the grain in the headstock, which is both unsightly and weak. The end result of that is Gibson's famous self-destructing headstocks. Gibson veneers and paints their headstocks to cover up the ugliness that results. It is ironic that Fender necks never break, but are easy to replace, while Gibson necks are famously fragile, and impossible to replace.
The scarf joint is also more economical than a one-piece neck, allowing the use of a narrow neck piece with a wide headstock piece for less wasted wood than a one-piece Fender-style neck. Rickenbacker economizes a flat headstock by gluing walnut wings to a maple core, which turns an ugly glue line into a decorative feature that they can charge extra for. The scarf joint does make a curving line on the back of the neck if clear-coated. Of course, a solid paint job will cover up anything.
Oddly, the cut comes out slightly crooked when everything is perfectly aligned. My guess is that the saw is just not made to rip hard maple at such an angle, and the blade flexes slightly. Initially I corrected it by adjusting the saw, but later modified the jig to be adjustable, which works much better, and is also repeatable, an important feature for any tooling. Here is another shot showing the adjusters, which are simply 1/4-20 machine bolts threaded into the wood. You can also see where I added extensions to the jig which allow for better clamping to the saw, and also allow the work piece to be secured with clamps rather than double-sided tape, which is much more accurate, and also saves on tape. I re-cut a number of pieces with the modified jig, and they came out much better.
The saw is a DeWalt 12" mitre saw that has seen a lot of use doing crown mouldings, flooring, etc. I get this tool out for just about anything it might do, but this is one use for it that I never expected. The saw was also used to build the jig. The nice thing about this model is that it is not so heavy, so it is easy to lug around, unlike a 100 pound slide-mitre. For mouldings and other long pieces, I made a cutting table from an old door, with end supports that match the height of the saw bed. The table has some extra bracing so it does not flex at all, and when set up on a pair of sawhorses, provides a nice lightweight portable work surface on which the saw can be slid from side to side as needed.
They say "If you have a hammer, then everything looks like a nail." Well, if you have a mitre saw, then everything looks like a mitre. Ha !
Back to guitars ... turns out that gluing the two pieces is not exactly easy, glue is slippery, and everything goes out of alignment when you try to clamp it down tight. My first attempt was to use the waste pieces ( you can see one in the pics above ) as angled shims, so that the clamping force is exactly perpendicular to the joint. That was a step in the right direction, but not enough. So I ended up making another jig for gluing:
So simple, it plumb evaded me ...
This jig is little more than a piece of scrap pine with a couple of legs attached. It matches the width of the headstock material. The legs allow you to get clamps underneath, and gives you something to align the parts to. First clamp down the neck piece and align it, then stick the headstock under it and trace the outline. Put glue on the headstock, and stick it back under, align and clamp. All alignment is by Mk. I eyeball. The tinfoil is to keep from gluing the workpiece to the jig. Note how the spring clamps are up the headstock. This makes it pivot into the neck for a tight joint. Also note how the headstock has the same cut as the neck, but is flipped over to make the final angle. The headstock piece is about a foot long, the neck piece is about two feet, the end result should make a 20-24 fret 30" neck.
You can also see a partially finished neck that was glued with this jig, some extra parts, and a guitar neck that I bought, to see how it was made. That is where I got the 15 degree angle, I had previously messed around with 10-13 degrees. You can see how the fingerboard is part of the joint, and how far up the neck the joint is. A standard headstock is 9/16" thick, so if you use 3/4" lumber from the hardware store, it will have to be thinned 3/16". Careful inspection of the bought neck shows that the thinning is done on the back of the headstock, not the front as you might expect. That StewMac Safety Planer I sprang for a while back is going to come in handy, and then it's going to be some tricky shaping on the spindle sander. 15 degrees gives a really good break-over angle for the strings. The reason Gibson uses less is that the lousy way they make necks, if they used 15 degrees, half of them would break in the factory. Much better if it breaks after they sell it to you. Better for them, anyway.
And here is my first go at it. Not perfect, but strong, and I think it will clean up on the belt sander. The headstock is deliberately a bit off to one side. The fingerboard will extend up to the corner, the truss rod slot will be as in the bought neck, and should present no problem for my truss rod jig. I could also use binding to cover up any small gaps.
This sort of a neck could use a heel-adjusting truss rod, but it is a natural for a headstock adjustment, which is what I will use. A cheap Chinese truss rod can easily be sawed-off to any length and brazed back together much faster than building a custom-length rod. As long as the adjustment is accessible without removing the neck.
See the wacky grain pattern on the angled cut section of the headstock part? That's what a Gibson headstock would look like if you could see it.
Even though I didn't do the best job gluing it, the joint came out tight and cleaned up well on the sander. It's always nice when the first try comes out usable. I've also routed the truss rod slot. Now I need to shorten up a truss rod to fit.
Last edited:
I just tried this, and it worked great:
The A string on the fretless Strat was rattling in the nut when I hit it hard, as I am prone to do. First I tried slanting the slot back with a file, but that did no good, the break-over angle is just too flat, or the slot is too wide. So I tried something different. I lifted the string up, put a drop of Crazy Glue in the slot, and put the string back. After a minute, I broke the string loose from the glue, which had set around it. That makes a slot that is now form-fitting to the string, and voila - not more rattling. I did the same thing on the E, which had a slight problem, and fixed that too. Then I put a bit on the extra windings, which looked like they could be tighter. Locks them into place. You could clean the extra glue off the playing part of the string with acetone ( nail polish remover ) afterwards, but I don't think a tiny bit of hard plastic in the windings at the nut makes any difference. I'm sure if I was a better luthier, I would hear the extra craziness in the tone though.
The A string on the fretless Strat was rattling in the nut when I hit it hard, as I am prone to do. First I tried slanting the slot back with a file, but that did no good, the break-over angle is just too flat, or the slot is too wide. So I tried something different. I lifted the string up, put a drop of Crazy Glue in the slot, and put the string back. After a minute, I broke the string loose from the glue, which had set around it. That makes a slot that is now form-fitting to the string, and voila - not more rattling. I did the same thing on the E, which had a slight problem, and fixed that too. Then I put a bit on the extra windings, which looked like they could be tighter. Locks them into place. You could clean the extra glue off the playing part of the string with acetone ( nail polish remover ) afterwards, but I don't think a tiny bit of hard plastic in the windings at the nut makes any difference. I'm sure if I was a better luthier, I would hear the extra craziness in the tone though.
Last edited:
Unwinding Strings
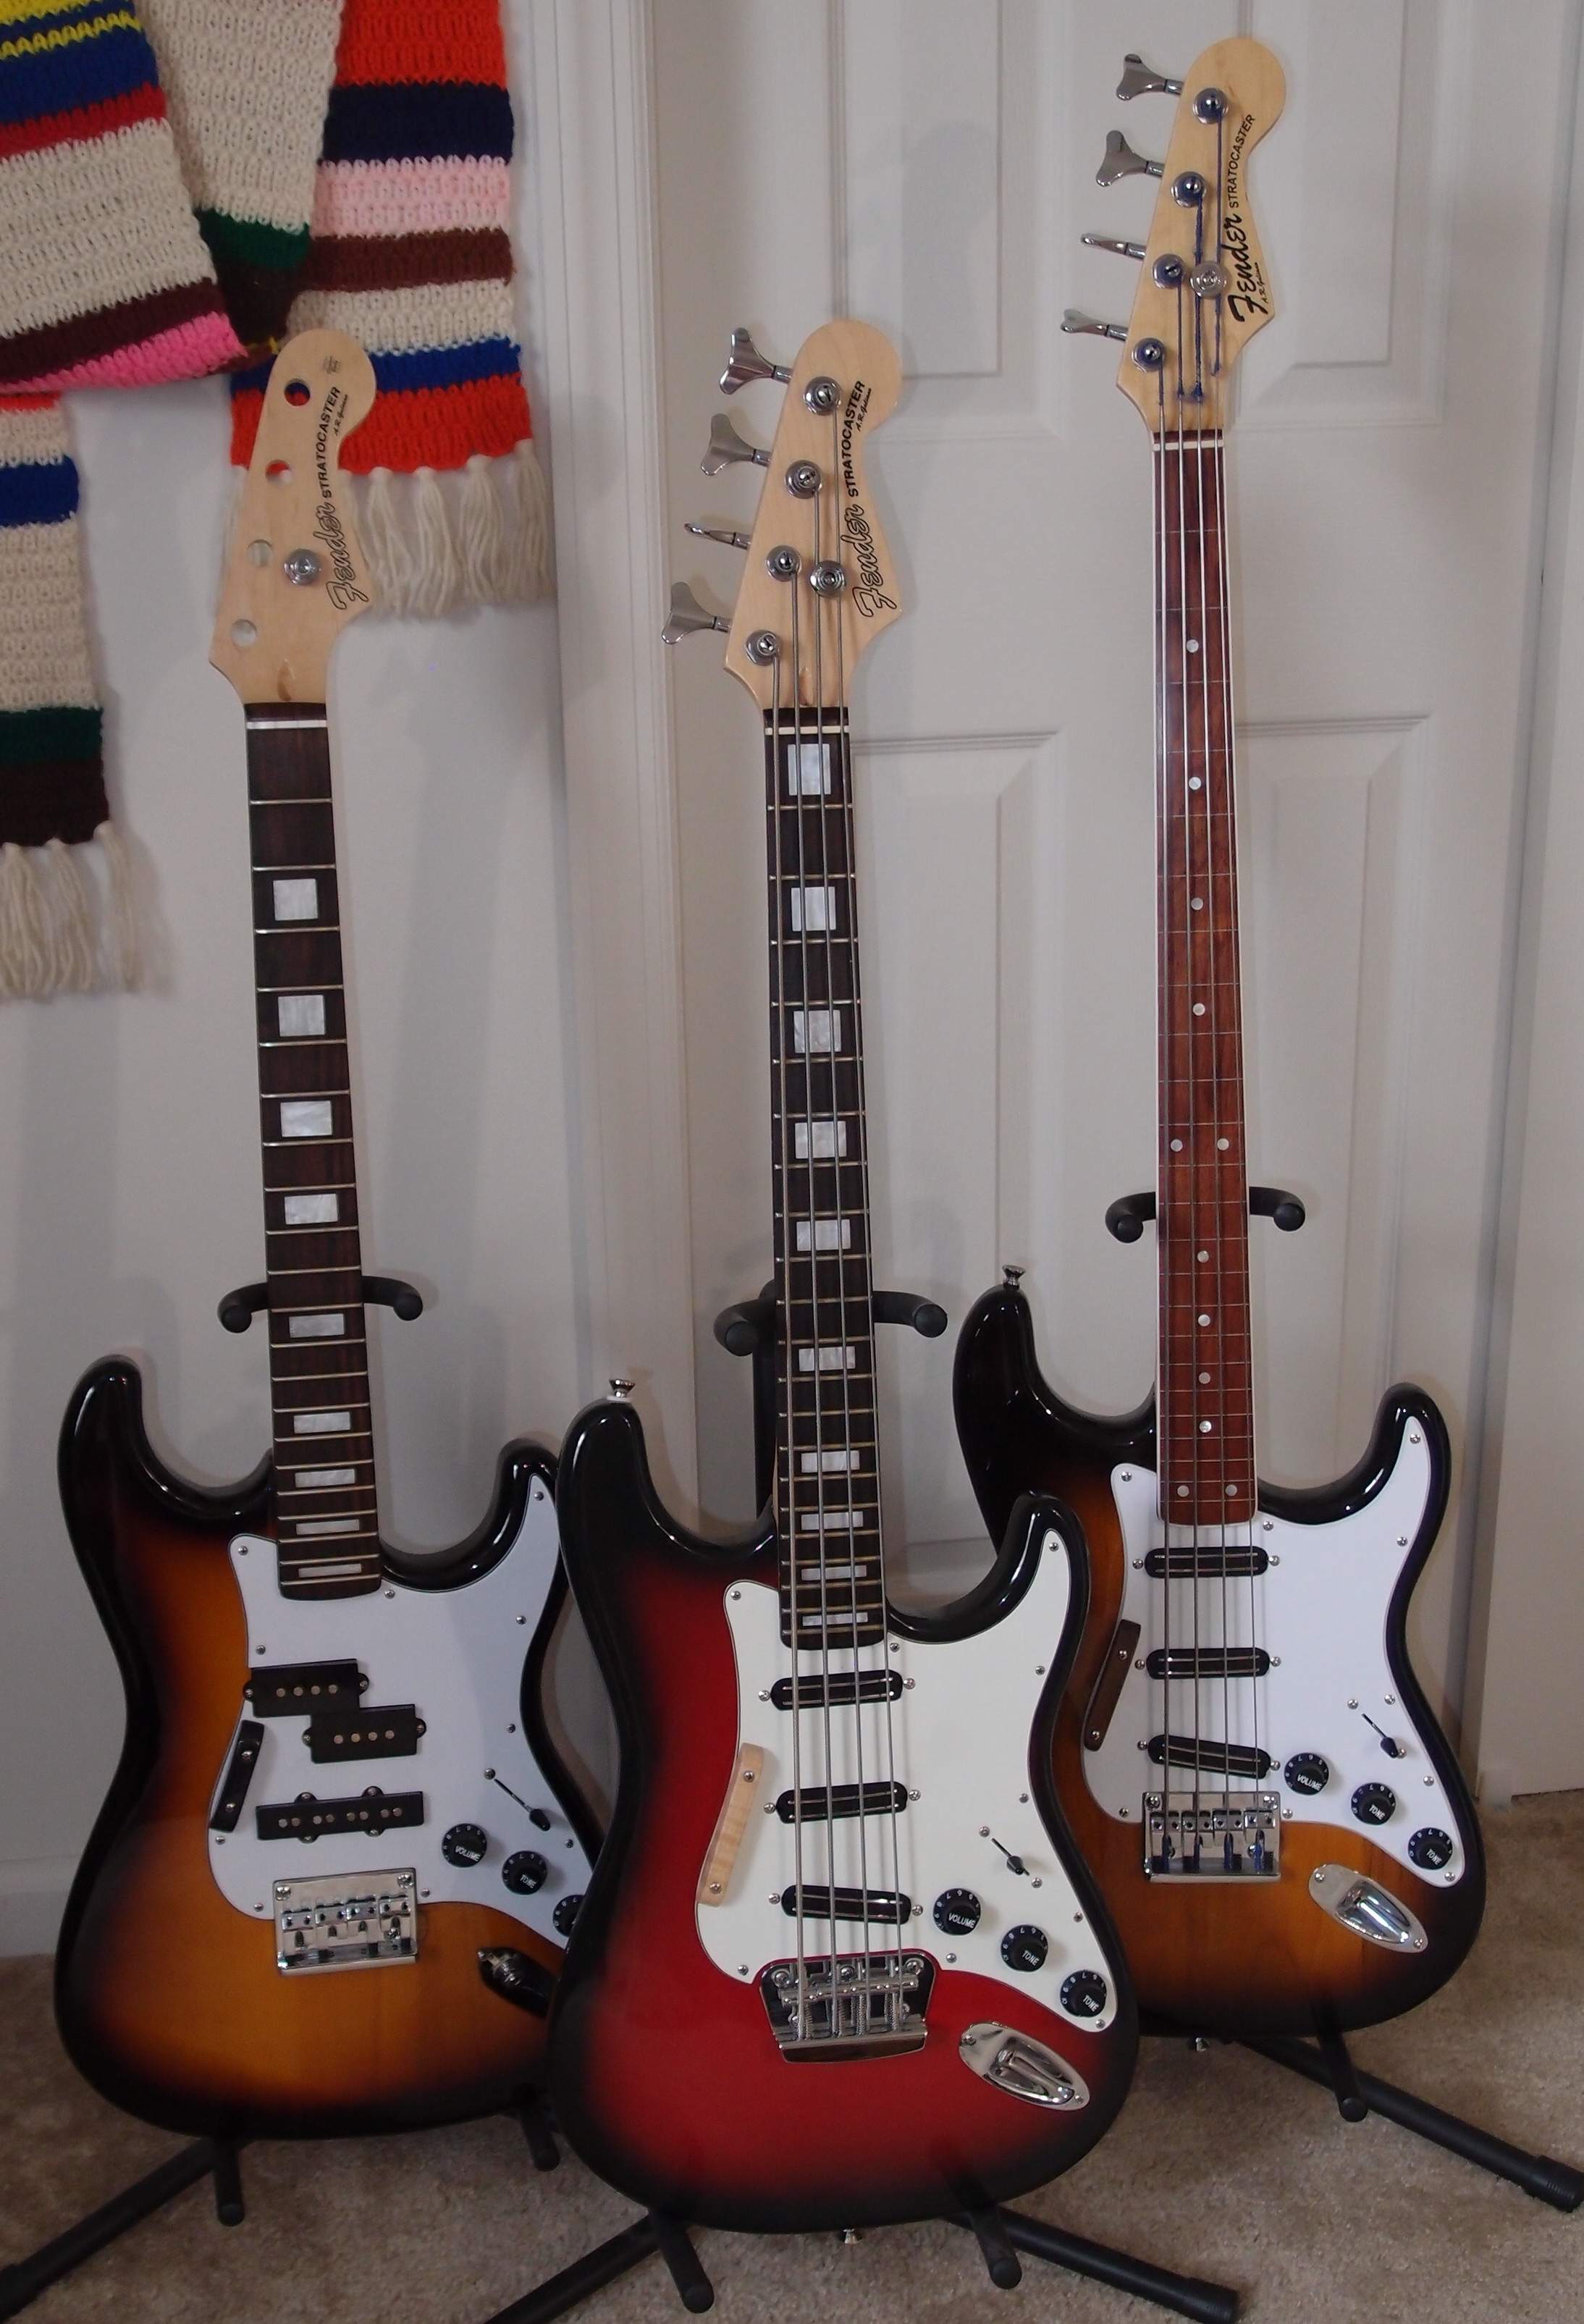
I like to build short-scale basses, Unfortunately, the manufacturers don't like to make short-scale strings, and stores don't like to stock them. And some lengths, like 25" 'pico', simply don't exist. However, you can make your own from readily-available long-scale sets.
Unwinding a string to any length is easy. Put it on the guitar and figure out what length you need, or where you need to unwind to. Saturate the inch below that point with Crazy Glue to fix it in place, just a couple of drops will do. Cut off the excess string, then unwind the outer windings, but not the inner windings, enough to give you a tail to wrap on the tuner post.
Try not to twist the entire string, that could ruin it, grip it tightly at the Crazy Glue as you unwind. It will take a while, and you will end up with a surprising pile of spiral spaghetti wire when you are done. Finally, smooth-in the cut winding and Crazy Glue it down so you don't leave a sharp point sticking out. I have found that unwinding is necessary on strings larger than 085". That size and smaller will wrap on a bass tuner post without modification.
Most long-scale string sets will work fine down to 30". Shorter than that, and things get sloppy, heavier strings are necessary. You can experiment yourself by capo-ing a standard scale bass at various frets and then re-tuning it to EADG. On a 34" bass, the first fret makes 32", second makes 30", etc, 5th makes 25". See for yourself if you like how it plays.
To make a 25" pico-scale string set, start with a light 5-string set. Remember, an EADG pico is the same as a BEADG 5-string, capo'ed at the 5th fret, minus the G string. An off-the-shelf D'Addario light 5-string set is something like 125 100 080 060 045. I don't recommend a heavier set, as when you shorten a heavy B/E string it gets a very stiff feel, a 125 feels much better. Anything in the ballpark will work; if I was to spec a custom set, I would try 120 100 080 060, or 115 095 075 055, but going with a standard set will save you money, and it doesn't make that much difference.
Once you can do this, you can make any length of string you want out of anything that is available. 25" half-rounds? 30" flats? 27"? No problem. In my case, I have a box full of long-scale strings just waiting to be re-purposed as shorts. Individual 125 strings are also commonly available at reasonable prices. So start exploring the world of custom-scale basses - it's fun !!!
Some More ...
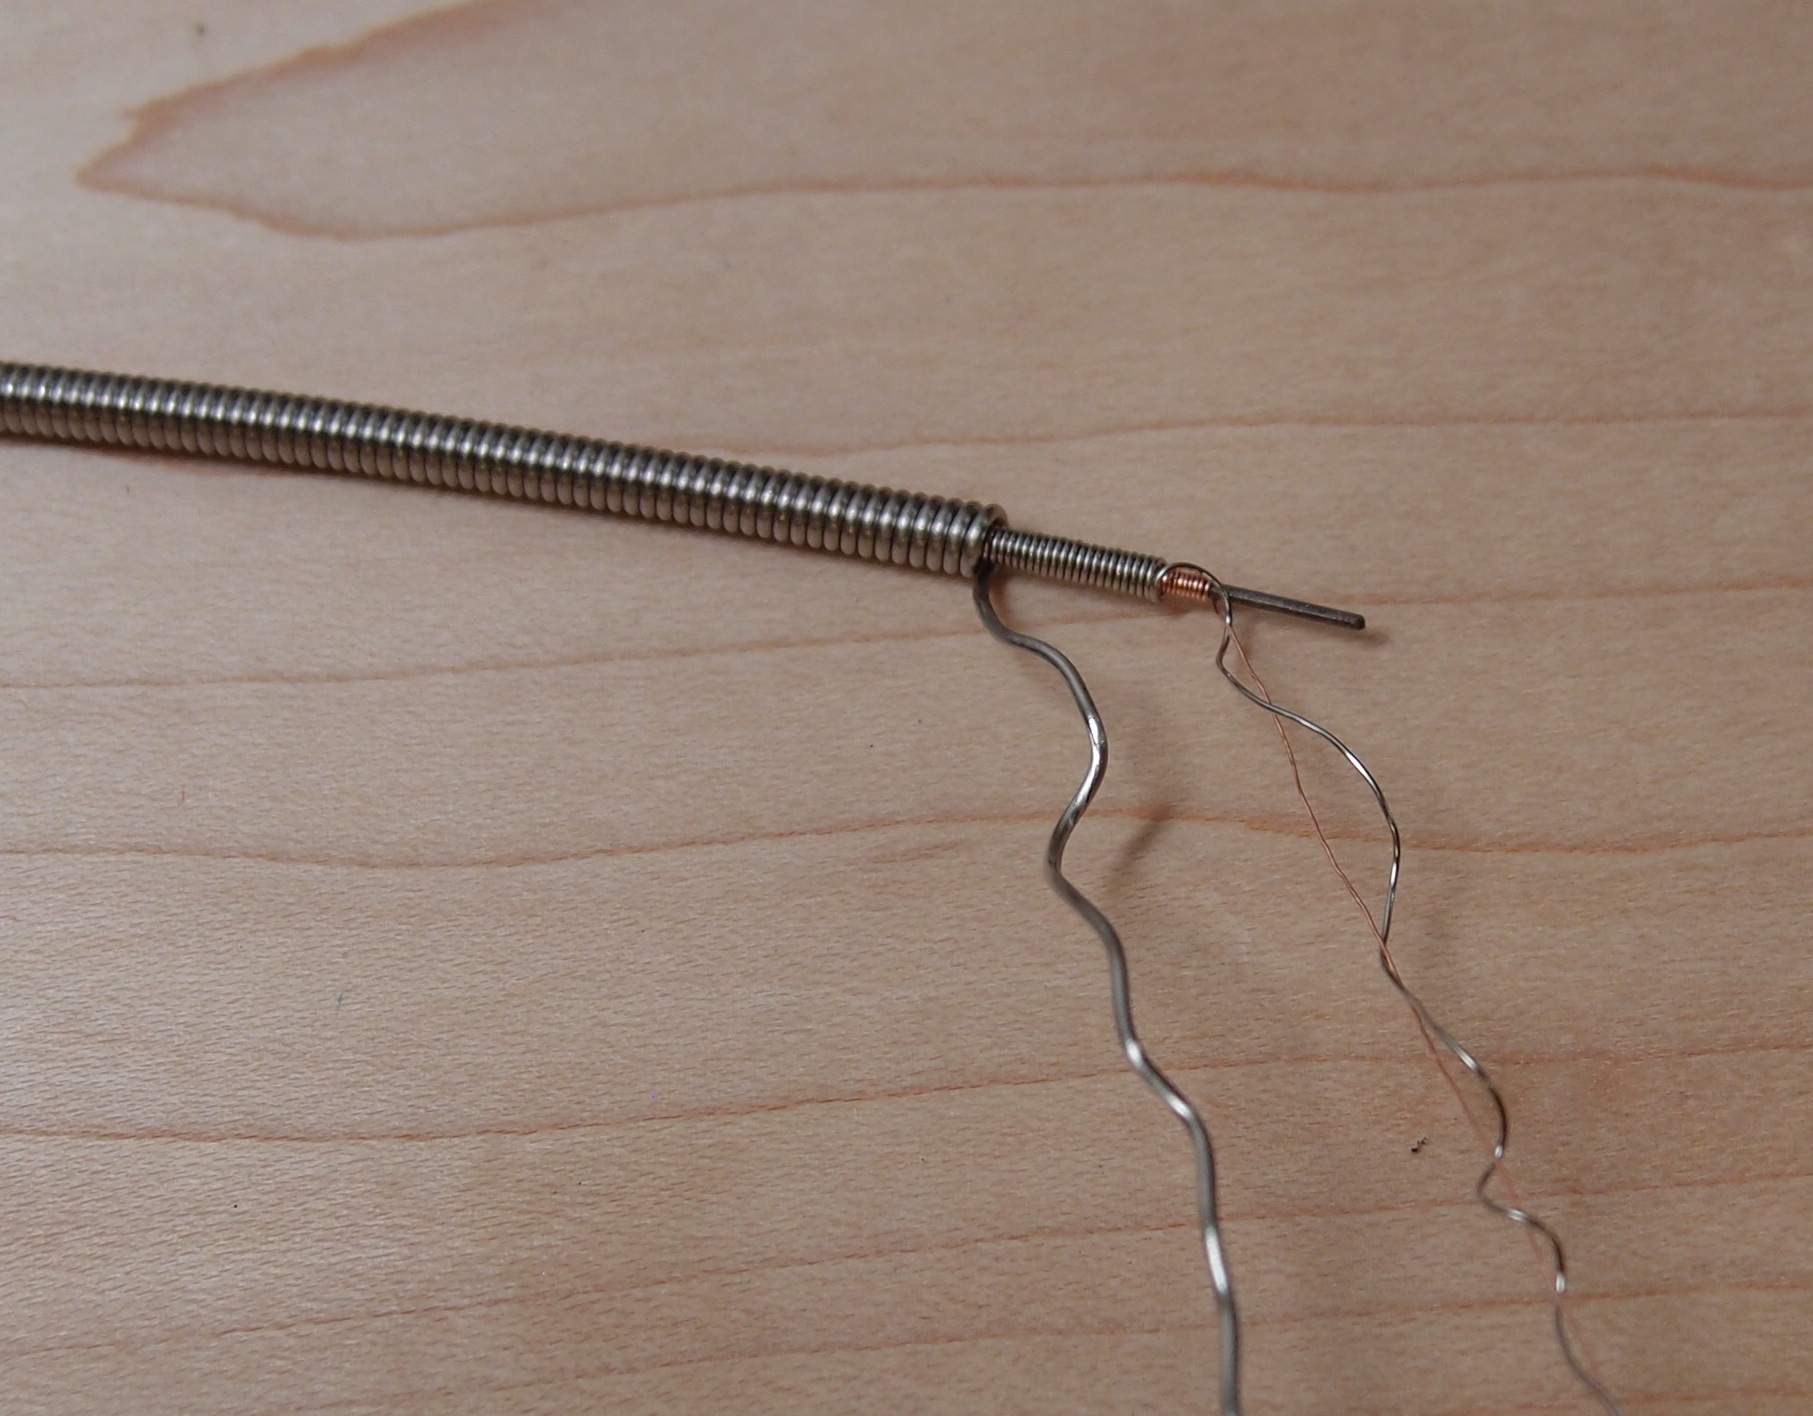
This is the scrap part of a 0.125 low-B from a 5 string set. You can see a core of steel wire, with three layers of wrapping. The innermost looks like copper, surprised me, I've not seen that before. Then is a silvery layer of ( I suppose ) nickel, and then the outermost wrapping. The 105 string had the same copper layer and outer layer, omitting the middle layer. Since I didn't want the copper to show, I just crammed the 105 into the tuner rather than unwrapping it, but there is no way you could do that with the 125. I guess it is a good idea to do a test unwrapping on a piece of scrap before you do the real string.
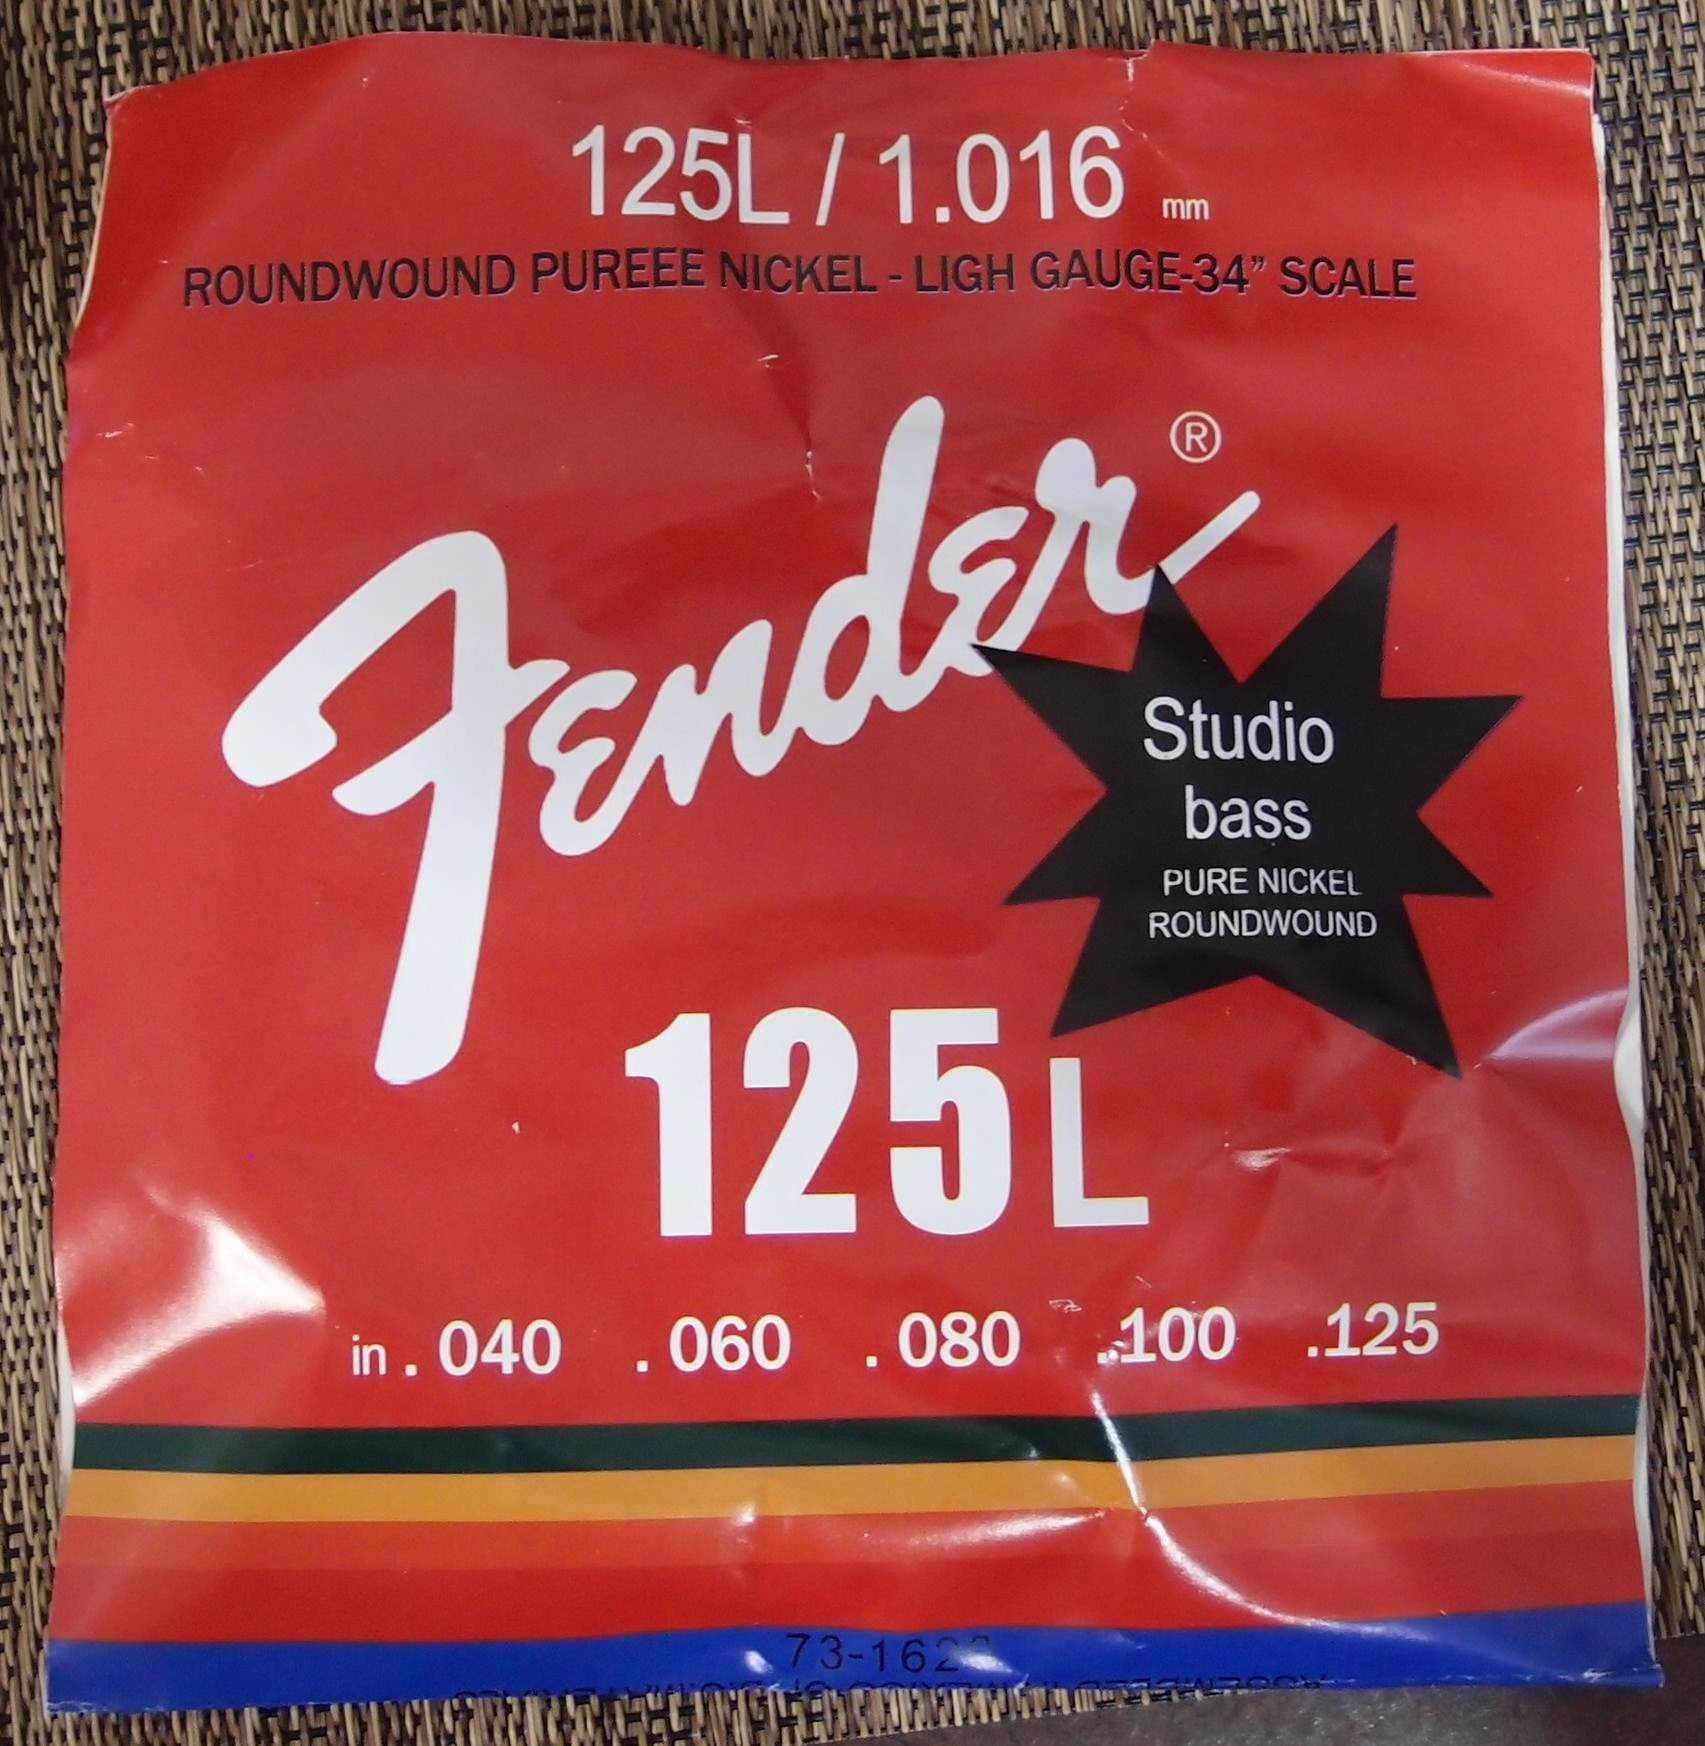
And these are the strings, which came straight to my door from the other side of the world for only $9.99, thanks to the miracle of the eBays. "Pureee Nickel" "Ligh Gauge" - me thinkee someone at Fender's China division no speakee goo Ingrish. The back has several other languages, looks like French, Spanish, and German. The fold actually says "Fender Musical Instruments, Chula Vista CA 91911" and "Assembled in Mexico of US Materials." And then sent to Fender's warehouse in China, so they could be distributed to the world! I thought Fender moved to Arizona years ago. Nonetheless, these are clearly authentic Fender strings, no doubt about it, no siree !!! If you believe that, you wanna buy a bridge ?
Anyway, curiosity got the better of me, so what do they sound like? Well, actually, they're not the worst strings I've ever had, but that's about the nicest thing I can say. The don't have the zing of a brand-new set of roundwounds, not at all. Personally I don't care for that anyway, I prefer the sound of a broken-in set. They're strong and even, but dull, almost like flats. Even unplugged, they are much deader than the strings on the other pico, more-so than I think could be explained by different bodies.
I recently also tried a set of inexpensive Darcos, which I found to be quite acceptable for just a few bucks more, and would even recommend for the budget-conscious. Multi-packs of D'Addarios can also get down almost into this price range. These strings are not really a bargain, and I would probably not get another set. I have a box full of old bass strings that I can re-purpose to get the same effect for free. But like I said, they're are not completely terrible, and I will probably leave them on. I was half expecting to be immediately stripping them off and into the trash can, which may yet happen.
The worst bass strings I ever saw were the factory set on my Rondo SX Precision. Considering the whole thing cost $109, you really can't expect a $30 set of strings, but those were so bad that they were practically strangling the instrument. They barely registered in the pickup. As soon as I replaced them with a good set, it woke up and sounded fine. Ultimately, I also replaced the pickup with a USA Fender, and did a super-fine fret dressing and setup, at which point it sounded and played as well as any real Precision. Those strings did go straight in the trash can.
The other thing that can go wrong with a wrapped string is that the wrappings are not tight to the core. Such a string will buzz and rattle. I got a string like that on the incredibly cheap Brownsville violin bass I picked up on a whim one day at Sam Ash. With a good set of strings and a setup, it is a fine instrument, as good as an Icon for a fraction of the price. Then I dolled it up with pickguard and other trappings to look like Sir Paul's. Sort of. If you squint. With a nice set of flats on it, it does have that famous woody thump. I once saw a kid playing slap-and-pluck style on a violin. It was awful.
Both these cases illustrate the fact that many inexpensive instruments can be made great with some simple upgrades and a good setup. Learning the ins and outs of setting up a guitar yourself is invaluable. They never come from the factory set up right, no matter if it is a $99 Squire or a $3000 Gibson custom shop. It takes time to really set up a guitar, both the hours spent twiddling the bits and playing the result, and the weeks or months it takes for a new instrument to settle in. It just can't be done at the factory, and having it done at a shop will never be as good as what you could do yourself once you know how.
I like to build short-scale basses, Unfortunately, the manufacturers don't like to make short-scale strings, and stores don't like to stock them. And some lengths, like 25" 'pico', simply don't exist. However, you can make your own from readily-available long-scale sets.
Unwinding a string to any length is easy. Put it on the guitar and figure out what length you need, or where you need to unwind to. Saturate the inch below that point with Crazy Glue to fix it in place, just a couple of drops will do. Cut off the excess string, then unwind the outer windings, but not the inner windings, enough to give you a tail to wrap on the tuner post.
Try not to twist the entire string, that could ruin it, grip it tightly at the Crazy Glue as you unwind. It will take a while, and you will end up with a surprising pile of spiral spaghetti wire when you are done. Finally, smooth-in the cut winding and Crazy Glue it down so you don't leave a sharp point sticking out. I have found that unwinding is necessary on strings larger than 085". That size and smaller will wrap on a bass tuner post without modification.
Most long-scale string sets will work fine down to 30". Shorter than that, and things get sloppy, heavier strings are necessary. You can experiment yourself by capo-ing a standard scale bass at various frets and then re-tuning it to EADG. On a 34" bass, the first fret makes 32", second makes 30", etc, 5th makes 25". See for yourself if you like how it plays.
To make a 25" pico-scale string set, start with a light 5-string set. Remember, an EADG pico is the same as a BEADG 5-string, capo'ed at the 5th fret, minus the G string. An off-the-shelf D'Addario light 5-string set is something like 125 100 080 060 045. I don't recommend a heavier set, as when you shorten a heavy B/E string it gets a very stiff feel, a 125 feels much better. Anything in the ballpark will work; if I was to spec a custom set, I would try 120 100 080 060, or 115 095 075 055, but going with a standard set will save you money, and it doesn't make that much difference.
Once you can do this, you can make any length of string you want out of anything that is available. 25" half-rounds? 30" flats? 27"? No problem. In my case, I have a box full of long-scale strings just waiting to be re-purposed as shorts. Individual 125 strings are also commonly available at reasonable prices. So start exploring the world of custom-scale basses - it's fun !!!
Some More ...
This is the scrap part of a 0.125 low-B from a 5 string set. You can see a core of steel wire, with three layers of wrapping. The innermost looks like copper, surprised me, I've not seen that before. Then is a silvery layer of ( I suppose ) nickel, and then the outermost wrapping. The 105 string had the same copper layer and outer layer, omitting the middle layer. Since I didn't want the copper to show, I just crammed the 105 into the tuner rather than unwrapping it, but there is no way you could do that with the 125. I guess it is a good idea to do a test unwrapping on a piece of scrap before you do the real string.
And these are the strings, which came straight to my door from the other side of the world for only $9.99, thanks to the miracle of the eBays. "Pureee Nickel" "Ligh Gauge" - me thinkee someone at Fender's China division no speakee goo Ingrish. The back has several other languages, looks like French, Spanish, and German. The fold actually says "Fender Musical Instruments, Chula Vista CA 91911" and "Assembled in Mexico of US Materials." And then sent to Fender's warehouse in China, so they could be distributed to the world! I thought Fender moved to Arizona years ago. Nonetheless, these are clearly authentic Fender strings, no doubt about it, no siree !!! If you believe that, you wanna buy a bridge ?
Anyway, curiosity got the better of me, so what do they sound like? Well, actually, they're not the worst strings I've ever had, but that's about the nicest thing I can say. The don't have the zing of a brand-new set of roundwounds, not at all. Personally I don't care for that anyway, I prefer the sound of a broken-in set. They're strong and even, but dull, almost like flats. Even unplugged, they are much deader than the strings on the other pico, more-so than I think could be explained by different bodies.
I recently also tried a set of inexpensive Darcos, which I found to be quite acceptable for just a few bucks more, and would even recommend for the budget-conscious. Multi-packs of D'Addarios can also get down almost into this price range. These strings are not really a bargain, and I would probably not get another set. I have a box full of old bass strings that I can re-purpose to get the same effect for free. But like I said, they're are not completely terrible, and I will probably leave them on. I was half expecting to be immediately stripping them off and into the trash can, which may yet happen.
The worst bass strings I ever saw were the factory set on my Rondo SX Precision. Considering the whole thing cost $109, you really can't expect a $30 set of strings, but those were so bad that they were practically strangling the instrument. They barely registered in the pickup. As soon as I replaced them with a good set, it woke up and sounded fine. Ultimately, I also replaced the pickup with a USA Fender, and did a super-fine fret dressing and setup, at which point it sounded and played as well as any real Precision. Those strings did go straight in the trash can.
The other thing that can go wrong with a wrapped string is that the wrappings are not tight to the core. Such a string will buzz and rattle. I got a string like that on the incredibly cheap Brownsville violin bass I picked up on a whim one day at Sam Ash. With a good set of strings and a setup, it is a fine instrument, as good as an Icon for a fraction of the price. Then I dolled it up with pickguard and other trappings to look like Sir Paul's. Sort of. If you squint. With a nice set of flats on it, it does have that famous woody thump. I once saw a kid playing slap-and-pluck style on a violin. It was awful.
Both these cases illustrate the fact that many inexpensive instruments can be made great with some simple upgrades and a good setup. Learning the ins and outs of setting up a guitar yourself is invaluable. They never come from the factory set up right, no matter if it is a $99 Squire or a $3000 Gibson custom shop. It takes time to really set up a guitar, both the hours spent twiddling the bits and playing the result, and the weeks or months it takes for a new instrument to settle in. It just can't be done at the factory, and having it done at a shop will never be as good as what you could do yourself once you know how.
Last edited:
On tuners and other hardware
( I posted this on another thread, and immediately got spammed by some troll who had nothing intelligent to say; funny how those people always have the biggest mouths. So I'm moving it here. The discussion was originally on tuners. )
... That's exactly right, under static conditions it is impossible for a ring gear to drive a worm gear - one of them will strip first. However, you are neglecting the fact that on a guitar, and especially on a bass, things are not static, everything is vibrating. That changes matters considerably. Say the worm gear has a 50-50 chance of being shaken to a new position, either tighter or looser. If it tries to turn tighter, it is opposed by the ring gear, but if it turns looser, the ring gear will go with it. Now you have a mechanism for tuners that don't hold. Can this be eliminated with better design and manufacturing tolerances? I don't know. Does this actually even happen? I don't know. However, my guess as an engineer is that the answer to both these questions is yes. What I can tell you without guessing is my experience with many different tuners across the whole price spectrum.
Starting with open-gear or 'elephant ear' tuners: the expensive ones are smoother and tighter. The mid-priced tuners from GFS feel the same as expensive real American Fenders or Schallers, they are quite nice. But cheap $12 ones from China do the job well enough. These are roughly equivalent to what you find on Squiers. There is an adjustment you can make to any of these tuners that will tighten them up and make them feel better, and it is especially useful for the cheapies. If you disassemble the tuner, you will find a flat tensioning spring under the gear. It actually bears on the worm gear. This spring is often not tight enough. Give it a bit more bend and then re-assemble the tuner. Also, don't forget lubricant - a drop of oil on the gears, or a bit of grease can do a lot to smooth it out. Also note that it is easy to change one of these tuners from left to right - just put the worm gear in the opposite way.
In compact sealed tuners, the best I've used are Gotohs. These are smooth and tight, and since I was deliberately installing several of them backwards ( so the post would pull the gears apart instead of together ) that was important. The $10 cheapies from China are nowhere near the same quality - they are rough and downright sloppy. However, once you get string tension on them, they tighten up and perform just fine, and I've used lots of them. I would not even consider mounting one backwards like I did to several of the Gotohs. I have not used them, but the Pings and Dragonfires look exactly like the cheapies, and probably are, just at a higher price. In the mid-range, Wilkinsons are a better bet.
A problem with the Chinese cheapies is that they are poorly assembled, and tend to come apart internally, at which point the post will just wag around loose without actually falling out. This is repairable. The round cover on the back of the tuner is press-fitted into the cast housing. With a very sharp tool and some patience, you can pry it out without marring the whole thing too badly. I use the sharp point of a new razor knife, and dig it into the crack. Once you get that cover off, you'll find a loose screw. Pluck it out, and clean away any metal shavings. Then put a drop of Crazy Glue on the threads ( like they should have done in the factory ) and tighten it down. While you're in there, put a small drop of 3-in-1 oil on the gears. This will be fixed forever. ( So, do vibrating threads undo themselves? Absolutely ! ) You don't even need to take the tuner off the guitar, although you do need to slack the string. Finally, tap the cover back into place, I use a fret hammer, you can use the wrong end of a screwdriver.
Lately I am seeing a third kind of bass tuner on the eBays, sort of a hybrid semi-closed. These are quite attractive, with medium-sized chrome ears, big vintage-sized posts, and black resin bodies. They feel alright, but I have yet to finish a guitar that uses them, so I can't say how they work in real life. Although they disassemble much like open-gears, they are not reversible.
I like to build a lot of experiments, and one way I keep the costs down is to use $10 tuners instead of $50 or $100 tuners. They work just fine for my purposes, and can always be upgraded down the road. One more difference between cheap and expensive hardware is the finish. The chrome on the Gotohs and Schallers is much better - thicker, smoother, lustrous and beautiful, whereas the chrome on the cheapies is barely there - thin, underlying roughness showing through, and sometimes even scratched right out of the box. You can't complain for the price. I've also used guitar tuners on a bass. I wouldn't recommend that, but you can get away with it.
In general, Japanese ( or German ) parts are the best, but very expensive. Korean-made ( and Taiwan ) parts are less expensive but often just as good. The rest - China, India, Indonesia, Vietnam, etc - are the cheapest, and run the gamut from perfectly adequate to complete junk. This is not just tuners, but pickups, switches, bridges, everything. Some things, like strap buttons, are hard to screw up, and there's no sense paying ten dollars for a "USA" set when the 99 cent ones from Hong Kong work just as well ! I've been using the term 'Chinese' a lot, and I don't mean to pick on them, but most of the cheap parts do come from there. I don't mean it in a derogatory way.
For a mechanical part like a guitar tuner, a certain level of manufacturing precision is required for the part to be functional. Beyond that, greater precision will not result in a part that actually functions better. Back in the sixties, the level of precision required to produce a really good guitar tuner was expensive, and cheaper tuners were clearly inferior. But thanks to improvements in technology - materials, casting, forging, stamping, machining gears, etc - the level of precision necessary to produce good guitar tuners nowadays seems to be unavoidable - everything is just better. So even the cheapest ones are good enough, at least from a functional point of view.
In terms of suppliers, I like GFS stuff - the pickups, electronics, and other hardware are very nice, at great prices. I got one neck from them, and it had a crooked heel that I fixed myself on the belt sander. Their service is also excellent. AllParts is generally top quality, but expensive; I would say the same for StewMac and WD. The real game-changer has been eBay - you can find pretty much anything there, including sellers who specialize in 'parting-out' guitars, so you can find good used parts there as well.
New strings are never tuning-stable. One way to hasten the break-in of a new set is to tune them all up, then grab each one at the 12th fret and pull it up no more than an inch. Check it, and you will find it has gone flat, re-tune and repeat until it stops changing. You are actually stretching the metal, re-aligned the crystals in the wire until they are optimal, and also tightening the wrappings on the tuner post and setting the bridge end. You can get a brand new set of strings to stabilize in just a few minutes with this method. Don't pull too hard though - you can easily break a string this way if you are not careful.
( I posted this on another thread, and immediately got spammed by some troll who had nothing intelligent to say; funny how those people always have the biggest mouths. So I'm moving it here. The discussion was originally on tuners. )
... That's exactly right, under static conditions it is impossible for a ring gear to drive a worm gear - one of them will strip first. However, you are neglecting the fact that on a guitar, and especially on a bass, things are not static, everything is vibrating. That changes matters considerably. Say the worm gear has a 50-50 chance of being shaken to a new position, either tighter or looser. If it tries to turn tighter, it is opposed by the ring gear, but if it turns looser, the ring gear will go with it. Now you have a mechanism for tuners that don't hold. Can this be eliminated with better design and manufacturing tolerances? I don't know. Does this actually even happen? I don't know. However, my guess as an engineer is that the answer to both these questions is yes. What I can tell you without guessing is my experience with many different tuners across the whole price spectrum.
Starting with open-gear or 'elephant ear' tuners: the expensive ones are smoother and tighter. The mid-priced tuners from GFS feel the same as expensive real American Fenders or Schallers, they are quite nice. But cheap $12 ones from China do the job well enough. These are roughly equivalent to what you find on Squiers. There is an adjustment you can make to any of these tuners that will tighten them up and make them feel better, and it is especially useful for the cheapies. If you disassemble the tuner, you will find a flat tensioning spring under the gear. It actually bears on the worm gear. This spring is often not tight enough. Give it a bit more bend and then re-assemble the tuner. Also, don't forget lubricant - a drop of oil on the gears, or a bit of grease can do a lot to smooth it out. Also note that it is easy to change one of these tuners from left to right - just put the worm gear in the opposite way.
In compact sealed tuners, the best I've used are Gotohs. These are smooth and tight, and since I was deliberately installing several of them backwards ( so the post would pull the gears apart instead of together ) that was important. The $10 cheapies from China are nowhere near the same quality - they are rough and downright sloppy. However, once you get string tension on them, they tighten up and perform just fine, and I've used lots of them. I would not even consider mounting one backwards like I did to several of the Gotohs. I have not used them, but the Pings and Dragonfires look exactly like the cheapies, and probably are, just at a higher price. In the mid-range, Wilkinsons are a better bet.
A problem with the Chinese cheapies is that they are poorly assembled, and tend to come apart internally, at which point the post will just wag around loose without actually falling out. This is repairable. The round cover on the back of the tuner is press-fitted into the cast housing. With a very sharp tool and some patience, you can pry it out without marring the whole thing too badly. I use the sharp point of a new razor knife, and dig it into the crack. Once you get that cover off, you'll find a loose screw. Pluck it out, and clean away any metal shavings. Then put a drop of Crazy Glue on the threads ( like they should have done in the factory ) and tighten it down. While you're in there, put a small drop of 3-in-1 oil on the gears. This will be fixed forever. ( So, do vibrating threads undo themselves? Absolutely ! ) You don't even need to take the tuner off the guitar, although you do need to slack the string. Finally, tap the cover back into place, I use a fret hammer, you can use the wrong end of a screwdriver.
Lately I am seeing a third kind of bass tuner on the eBays, sort of a hybrid semi-closed. These are quite attractive, with medium-sized chrome ears, big vintage-sized posts, and black resin bodies. They feel alright, but I have yet to finish a guitar that uses them, so I can't say how they work in real life. Although they disassemble much like open-gears, they are not reversible.
I like to build a lot of experiments, and one way I keep the costs down is to use $10 tuners instead of $50 or $100 tuners. They work just fine for my purposes, and can always be upgraded down the road. One more difference between cheap and expensive hardware is the finish. The chrome on the Gotohs and Schallers is much better - thicker, smoother, lustrous and beautiful, whereas the chrome on the cheapies is barely there - thin, underlying roughness showing through, and sometimes even scratched right out of the box. You can't complain for the price. I've also used guitar tuners on a bass. I wouldn't recommend that, but you can get away with it.
In general, Japanese ( or German ) parts are the best, but very expensive. Korean-made ( and Taiwan ) parts are less expensive but often just as good. The rest - China, India, Indonesia, Vietnam, etc - are the cheapest, and run the gamut from perfectly adequate to complete junk. This is not just tuners, but pickups, switches, bridges, everything. Some things, like strap buttons, are hard to screw up, and there's no sense paying ten dollars for a "USA" set when the 99 cent ones from Hong Kong work just as well ! I've been using the term 'Chinese' a lot, and I don't mean to pick on them, but most of the cheap parts do come from there. I don't mean it in a derogatory way.
For a mechanical part like a guitar tuner, a certain level of manufacturing precision is required for the part to be functional. Beyond that, greater precision will not result in a part that actually functions better. Back in the sixties, the level of precision required to produce a really good guitar tuner was expensive, and cheaper tuners were clearly inferior. But thanks to improvements in technology - materials, casting, forging, stamping, machining gears, etc - the level of precision necessary to produce good guitar tuners nowadays seems to be unavoidable - everything is just better. So even the cheapest ones are good enough, at least from a functional point of view.
In terms of suppliers, I like GFS stuff - the pickups, electronics, and other hardware are very nice, at great prices. I got one neck from them, and it had a crooked heel that I fixed myself on the belt sander. Their service is also excellent. AllParts is generally top quality, but expensive; I would say the same for StewMac and WD. The real game-changer has been eBay - you can find pretty much anything there, including sellers who specialize in 'parting-out' guitars, so you can find good used parts there as well.
New strings are never tuning-stable. One way to hasten the break-in of a new set is to tune them all up, then grab each one at the 12th fret and pull it up no more than an inch. Check it, and you will find it has gone flat, re-tune and repeat until it stops changing. You are actually stretching the metal, re-aligned the crystals in the wire until they are optimal, and also tightening the wrappings on the tuner post and setting the bridge end. You can get a brand new set of strings to stabilize in just a few minutes with this method. Don't pull too hard though - you can easily break a string this way if you are not careful.
Last edited:
Fix That StewMac Neck Template
I mic'ed a bunch of Strat-style necks, including some very good ones, and came up with an average width of 2.20 inches at the highest fret, with a range from 2.18" to 2.21". My measured neck dimensions already include the finish. Those are real-world numbers. The spec is 2-3/16", or 2.19". Nowadays, these things are made very precisely by CNC machine. A spec is a spec. Either you're on it or you're not. There is nothing worse than out-of-spec tooling, everything it produces will be wrong.
The StewMac Stratocaster neck template is 2.24 inches, too wide. 0.04" doesn't seem like much, but when you consider that the router always seems to cut a bit wide, the StewMac template is way out of spec. While guitar side of the template is pretty bad, the bass side is twice as bad. This is a great tool, the length, transparency, and scribed centerline make aligning neck pockets easy. But they sized it all wrong, and give some malarky about putting tape on the sides to make it fit right.
Bu!!sh!t. That just doesn't work right. The tape comes loose and gets in the router bit, and also ruins the nice flat surface that the template is supposed to make for the router to rest on. If you're lucky you catch it in time and just end up with a gummed-up router bit, otherwise you can ruin the workpiece.
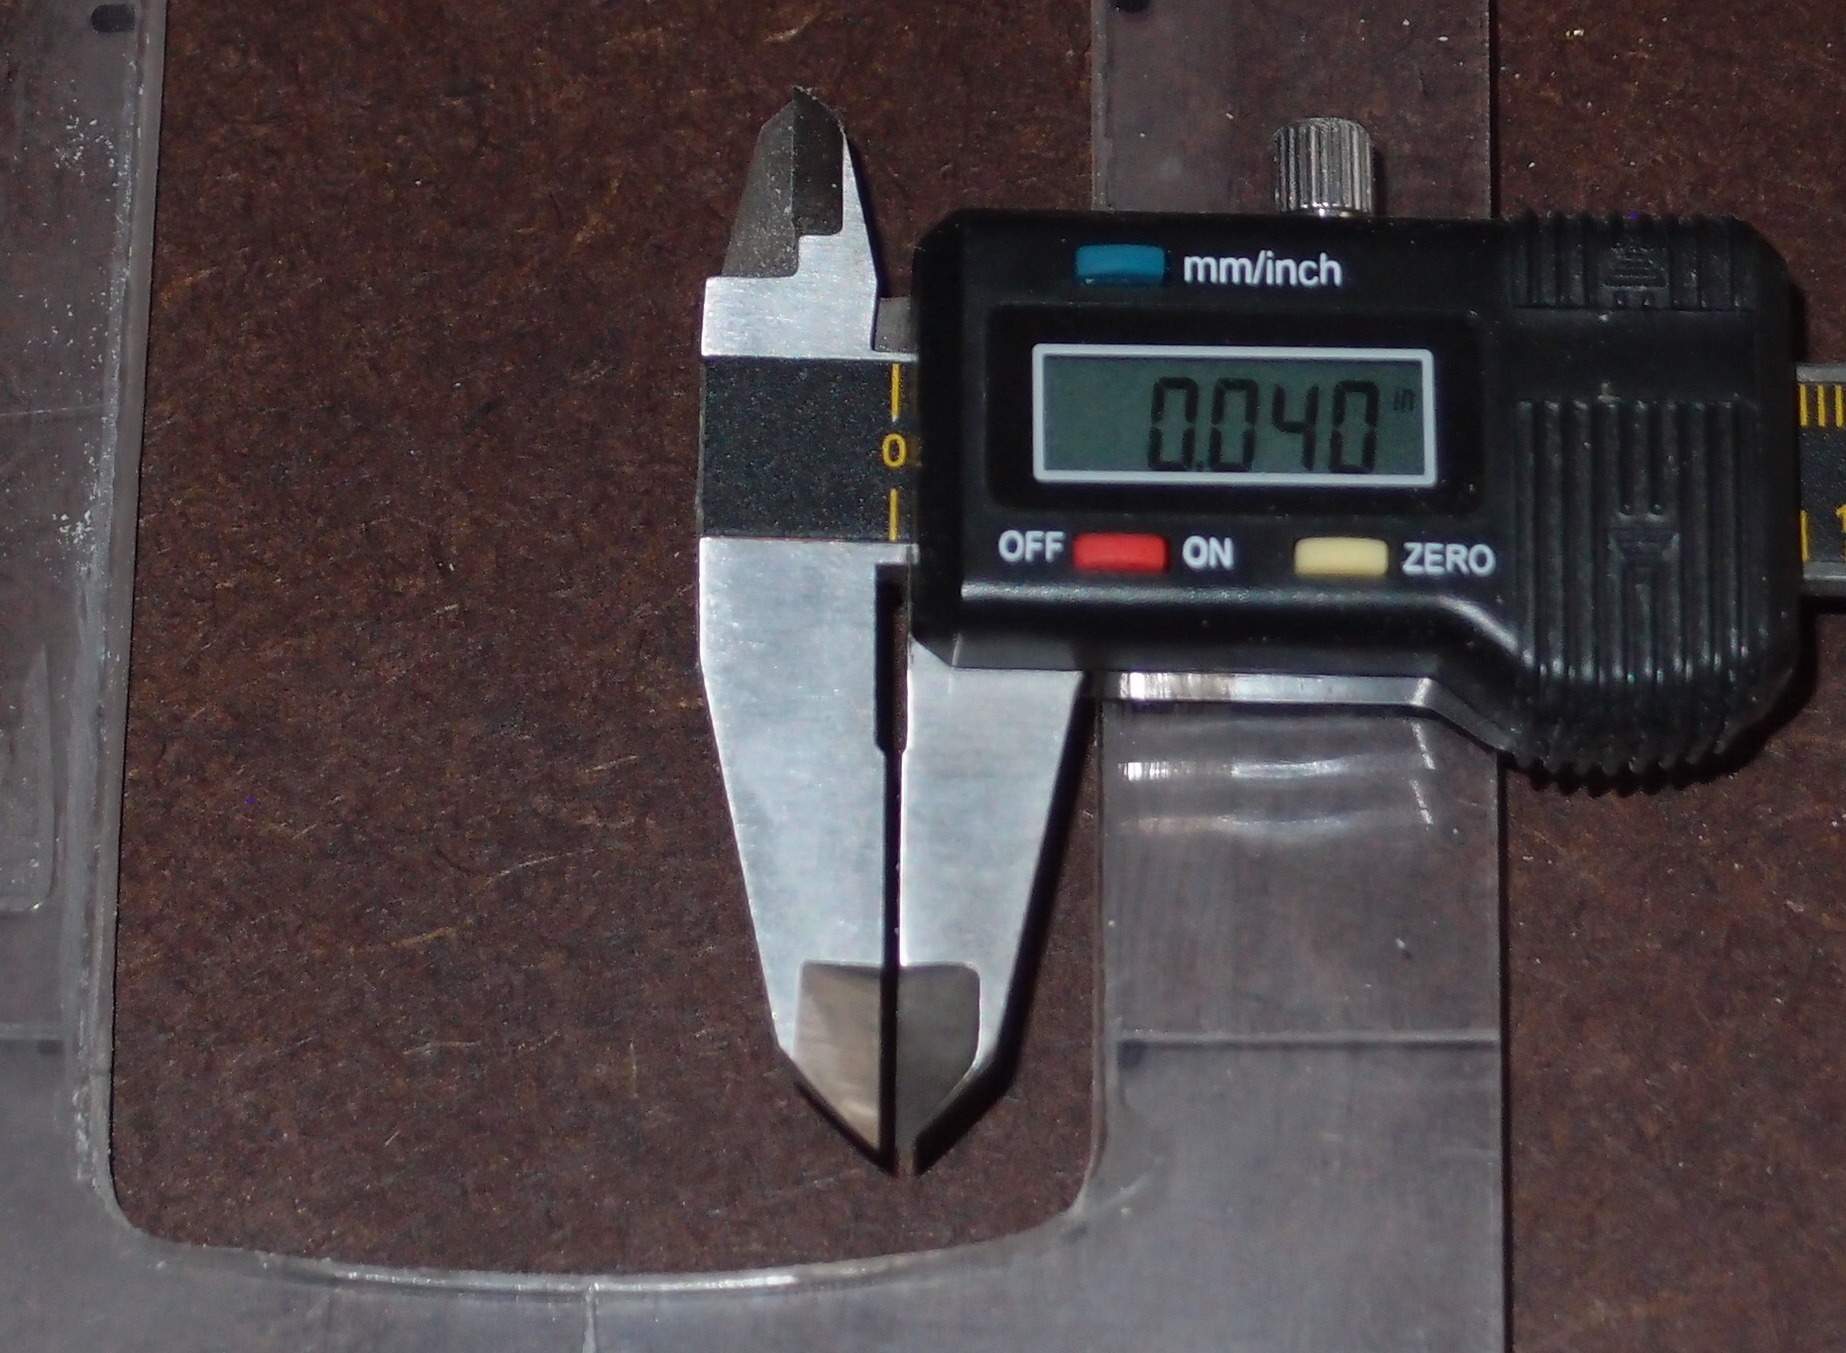
This is what that 0.04" gap looks like. If you subtract the neck finish from my measurements, it would be even wider. My neck finishes are exceedingly thin, especially at the heel, and the inside of the neck pocket gets little more than overspray, if I don't bother to mask it off. There is nothing that is going to fill in that gap, in fact, it is HUGE. This is just sloppy and inexcusable; the cheapest Squire is better than this. I could do much better cutting freehand, in fact I have.
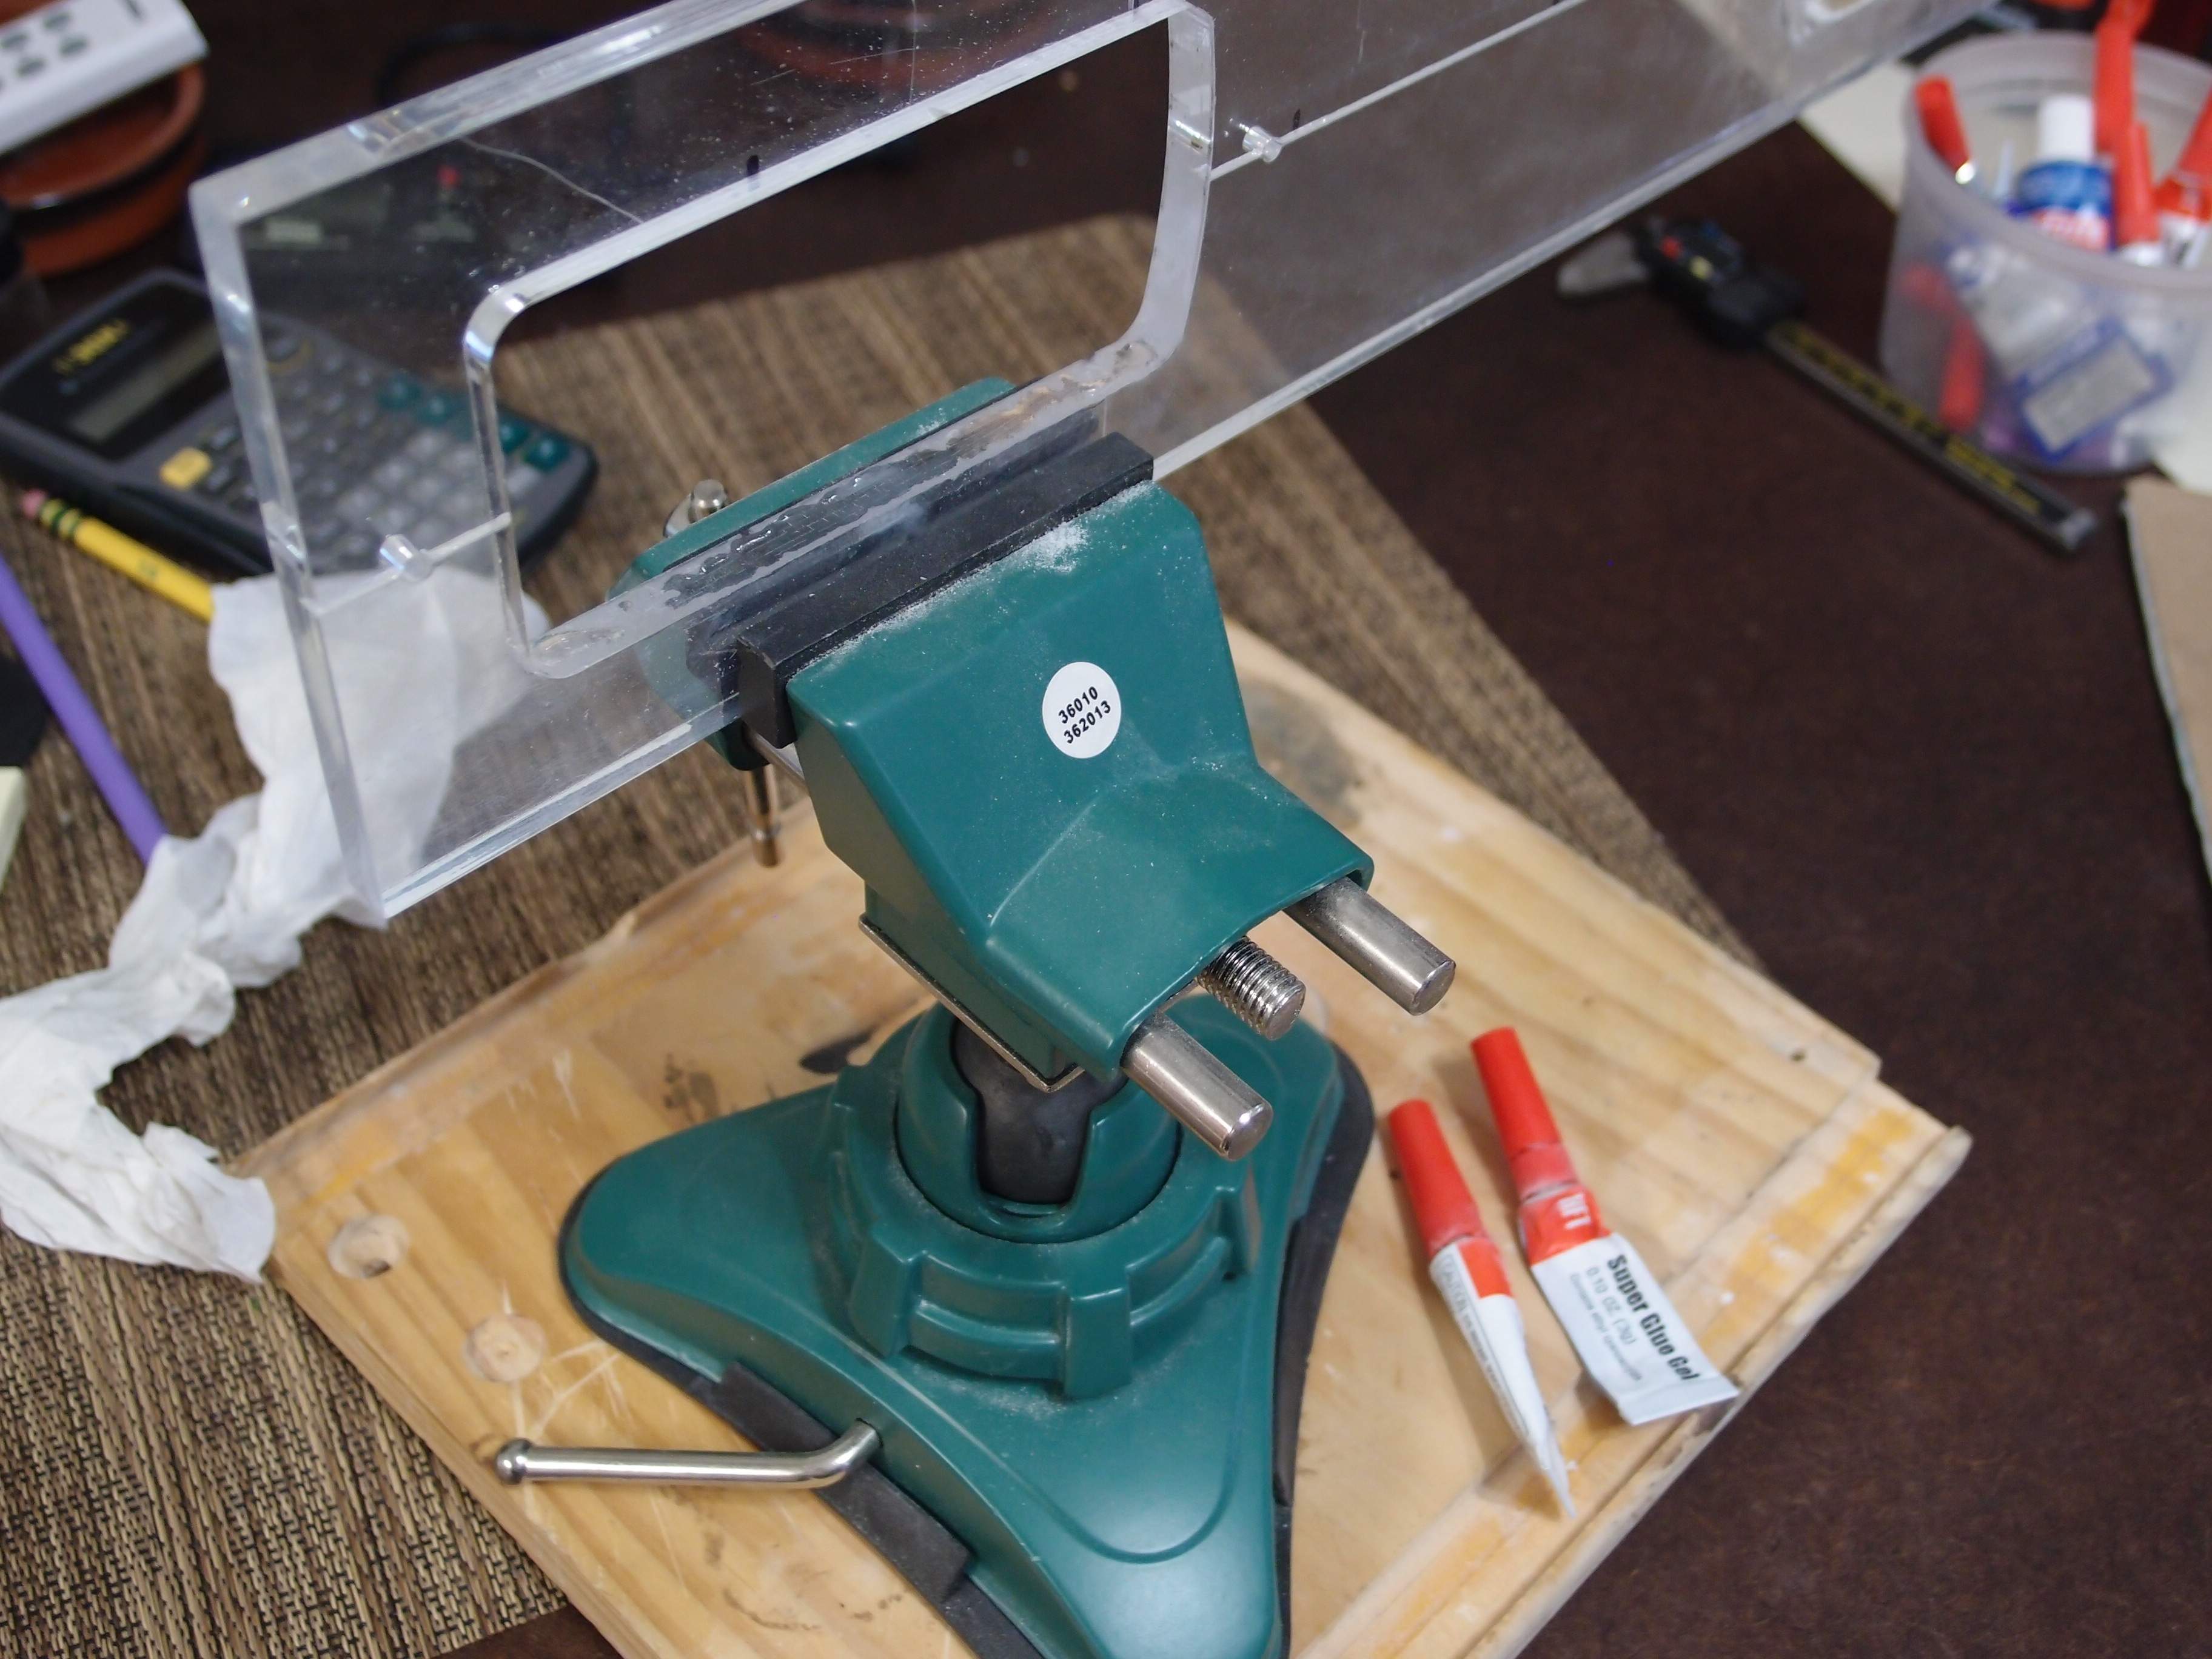
Here you can see how I am fixing my StewMac neck template. I scratched up the sides of the cutout with 80 grit, then covered them with a layer of Super Glue gel, then covered that with a layer of regular Super Glue and let the whole thing flow out. You can see the glue drying in from the edges. Smells good, makes your eyes water.
When it is dry, I will flip it over and do the other side. When everything is good and hard, I'll mic it again, and repeat until I bring it in to something like 2.16". Then I will take a file and file the edges out smooth, square, and straight, finishing at about 2.18", which should then cut a nice snug pocket that can always be widened-out with a little filing if necessary. That is the right way to fit a neck to a body. If the neck is actually a slight press-fit in the body, that is perfect. I already did the bass side of the template.
Come on StewMac, your stuff is generally great, fix this damn thing already !!!
My guess is that they have a warehouse full of these that were simply made wrong, and they're still trying to unload them. They're leaving the door wide open for someone else to make one that's right.
...
The little table-top vise is super useful, and inexpensive. I got this one at Harbor Freight for something like $15. It can suction down onto a smooth surface and be really solid, it is also heavy and stable just standing there. It makes a great nut-filing vise.
I mic'ed a bunch of Strat-style necks, including some very good ones, and came up with an average width of 2.20 inches at the highest fret, with a range from 2.18" to 2.21". My measured neck dimensions already include the finish. Those are real-world numbers. The spec is 2-3/16", or 2.19". Nowadays, these things are made very precisely by CNC machine. A spec is a spec. Either you're on it or you're not. There is nothing worse than out-of-spec tooling, everything it produces will be wrong.
The StewMac Stratocaster neck template is 2.24 inches, too wide. 0.04" doesn't seem like much, but when you consider that the router always seems to cut a bit wide, the StewMac template is way out of spec. While guitar side of the template is pretty bad, the bass side is twice as bad. This is a great tool, the length, transparency, and scribed centerline make aligning neck pockets easy. But they sized it all wrong, and give some malarky about putting tape on the sides to make it fit right.
Bu!!sh!t. That just doesn't work right. The tape comes loose and gets in the router bit, and also ruins the nice flat surface that the template is supposed to make for the router to rest on. If you're lucky you catch it in time and just end up with a gummed-up router bit, otherwise you can ruin the workpiece.
This is what that 0.04" gap looks like. If you subtract the neck finish from my measurements, it would be even wider. My neck finishes are exceedingly thin, especially at the heel, and the inside of the neck pocket gets little more than overspray, if I don't bother to mask it off. There is nothing that is going to fill in that gap, in fact, it is HUGE. This is just sloppy and inexcusable; the cheapest Squire is better than this. I could do much better cutting freehand, in fact I have.
Here you can see how I am fixing my StewMac neck template. I scratched up the sides of the cutout with 80 grit, then covered them with a layer of Super Glue gel, then covered that with a layer of regular Super Glue and let the whole thing flow out. You can see the glue drying in from the edges. Smells good, makes your eyes water.
When it is dry, I will flip it over and do the other side. When everything is good and hard, I'll mic it again, and repeat until I bring it in to something like 2.16". Then I will take a file and file the edges out smooth, square, and straight, finishing at about 2.18", which should then cut a nice snug pocket that can always be widened-out with a little filing if necessary. That is the right way to fit a neck to a body. If the neck is actually a slight press-fit in the body, that is perfect. I already did the bass side of the template.
Come on StewMac, your stuff is generally great, fix this damn thing already !!!
My guess is that they have a warehouse full of these that were simply made wrong, and they're still trying to unload them. They're leaving the door wide open for someone else to make one that's right.
...
The little table-top vise is super useful, and inexpensive. I got this one at Harbor Freight for something like $15. It can suction down onto a smooth surface and be really solid, it is also heavy and stable just standing there. It makes a great nut-filing vise.
Last edited:
Economics of Building Necks & Bodies
I recently got a very nice guitar neck for $45:
I started thinking about what it would cost me to build this neck, and in ballpark figures:
That adds up to $50 for the raw materials alone, using the cheapest non-luthier suppliers. All my materials are as good as the bought neck, some are better. You could probably inflate that $50 to $250 by buying from luthiery supply houses. ( My fretboard wood is basically a piece of hardwood flooring. Works great. ) As you can see, I'm already over the cost of the bought neck, before I even start. I won't try to put a price on my own labor, this is a hobby after all, but it takes several hours and several hundred dollars in tooling to turn the raw materials into a guitar neck.
My point is, you don't build a neck to save money. I have bought three paddle-head guitar necks from Eden for about $50 each, and they have all been perfectly fine. They are hard maple, straight and true, with modern truss rods, 'rosewood' fretboards, decent fret-work, and two of them have block inlays, something I have not yet attempted myself. Two of them I modified into short-short scale bass necks. You really can't beat them for price/quality. I got a similarly-priced bass neck from GFS that needed a little work, but came out perfect in the end, and I've use a number of Mighty-Mite Fender-licensed bass necks, which I highly recommend for around $110. I also once used a quite expensive guitar neck from AllParts, which, while it is an excellent piece, is simply not worth the extra cost.
It is not only easier to modify an off-the-shelf part than to build it yourself, it is generally cheaper as well. That is why I have never built a long-scale bass neck - for a couple of mouse clicks, I can have one delivered to me. The necks I build are oddballs that you can't buy: short-scales, non-Fender imitations, etc. Even then, if I can make a bought paddle-head work, I'll use that. Teach yourself how to silver-braze or weld, and you can make custom-length trussrods by modifying inexpensive ones from China. Just cut the end to length, and re-attach the two pieces. It's not about pride, it's about practicality.
The same argument goes for bodies. I have built a herd of Stratocaster basses, quite varied actually, and every of them started out with a finished body from eBay. I'm not going to go through all the motions of converting a $100 wood blank into something I can buy all finished for $80. That would be stupid. The Strat body turns out to be very flexible for modding into other uses, thanks to the expansive pickguard that covers anything you do from the neck to the bridge. eBay is awash in nice inexpensive Squire Strat bodies.
The Telecaster body on the other hand, comes pre-routed with a bunch of holes that make it pretty much impossible to build anything other than a guitar, unless you use some kludgy cover plates. So when I wanted a Telecaster bass, I started with a nice hunk of Ash that wasn't cheap, and filled the garage with sawdust. That ended up costing more than a nice Squire Tele body, but I couldn't use one. I will only build a body if it is going to be something truly unique that can't be made by modifying something off the shelf.
One way to save a lot on materials is to use a layered/chambered/hollow type of construction. A Danelectro body is built from 2 layers of 3/4" plywood, capped with 3/16" Masonite. This sort of construction can cost literally pennies, and makes a really nice guitar. The plywood sides can be finished smooth with Bondo, or left rough and covered up with Danelectro-style binding tape, which you can make yourself from Tolex. Or teach yourself how to do 'real' bindings ( it's not as hard as you'd think ) and you can substitute 1/4" plywood for the masonite and build beautiful clear finishes. ( Masonite looks pretty cool under a clear finish too. ) You can also substitute 5/4" pine for the inner plywood. Lowes sell it in 8" widths that are clean enough to be edge-glued into guitar blanks.
Once you start thinking 'out of the box', there are lots of ways to build a nice guitar body out of many things, including literally junk. I like plywood from the dumpster. Poplar can sometimes be found at the lumberyard in sizes that are suitable for solid guitar bodies, and prices that are far lower than 'guitar blanks'. Poplar is a very nice wood to work with, not very pretty, but that doesn't matter if you paint or stain it. Some places will also have cherry, which can be very nice.
Hot-rodding is another option to build a custom guitar. Rondo Music sells some ridiculously inexpensive guitars and basses that are surprisingly nice and at the same time not-surprisingly shoddy. The woodwork and finish is very good, much of the hardware sucks. Rebuild one of those with better pickups and decent strings, and do a good setup, and you can have a really nice player for considerably less than the price of a Mexican Fender.
I recently got a very nice guitar neck for $45:
- maple / 'rosewood' fretboard
- angled paddle headstock
- 22 frets, pearl markers, bone nut
- double-acting trussrod
- wipe-on starter poly finish
I started thinking about what it would cost me to build this neck, and in ballpark figures:
- maple - $10 Home Depot
- fretboard - $10 WoodCraft.com
- frets - $10 Fender / eBay
- trussrod - $10 China / eBay
- dots / nut / glue / etc - $5
- sanding belts / misc consumables - $5
That adds up to $50 for the raw materials alone, using the cheapest non-luthier suppliers. All my materials are as good as the bought neck, some are better. You could probably inflate that $50 to $250 by buying from luthiery supply houses. ( My fretboard wood is basically a piece of hardwood flooring. Works great. ) As you can see, I'm already over the cost of the bought neck, before I even start. I won't try to put a price on my own labor, this is a hobby after all, but it takes several hours and several hundred dollars in tooling to turn the raw materials into a guitar neck.
My point is, you don't build a neck to save money. I have bought three paddle-head guitar necks from Eden for about $50 each, and they have all been perfectly fine. They are hard maple, straight and true, with modern truss rods, 'rosewood' fretboards, decent fret-work, and two of them have block inlays, something I have not yet attempted myself. Two of them I modified into short-short scale bass necks. You really can't beat them for price/quality. I got a similarly-priced bass neck from GFS that needed a little work, but came out perfect in the end, and I've use a number of Mighty-Mite Fender-licensed bass necks, which I highly recommend for around $110. I also once used a quite expensive guitar neck from AllParts, which, while it is an excellent piece, is simply not worth the extra cost.
It is not only easier to modify an off-the-shelf part than to build it yourself, it is generally cheaper as well. That is why I have never built a long-scale bass neck - for a couple of mouse clicks, I can have one delivered to me. The necks I build are oddballs that you can't buy: short-scales, non-Fender imitations, etc. Even then, if I can make a bought paddle-head work, I'll use that. Teach yourself how to silver-braze or weld, and you can make custom-length trussrods by modifying inexpensive ones from China. Just cut the end to length, and re-attach the two pieces. It's not about pride, it's about practicality.
The same argument goes for bodies. I have built a herd of Stratocaster basses, quite varied actually, and every of them started out with a finished body from eBay. I'm not going to go through all the motions of converting a $100 wood blank into something I can buy all finished for $80. That would be stupid. The Strat body turns out to be very flexible for modding into other uses, thanks to the expansive pickguard that covers anything you do from the neck to the bridge. eBay is awash in nice inexpensive Squire Strat bodies.
The Telecaster body on the other hand, comes pre-routed with a bunch of holes that make it pretty much impossible to build anything other than a guitar, unless you use some kludgy cover plates. So when I wanted a Telecaster bass, I started with a nice hunk of Ash that wasn't cheap, and filled the garage with sawdust. That ended up costing more than a nice Squire Tele body, but I couldn't use one. I will only build a body if it is going to be something truly unique that can't be made by modifying something off the shelf.
One way to save a lot on materials is to use a layered/chambered/hollow type of construction. A Danelectro body is built from 2 layers of 3/4" plywood, capped with 3/16" Masonite. This sort of construction can cost literally pennies, and makes a really nice guitar. The plywood sides can be finished smooth with Bondo, or left rough and covered up with Danelectro-style binding tape, which you can make yourself from Tolex. Or teach yourself how to do 'real' bindings ( it's not as hard as you'd think ) and you can substitute 1/4" plywood for the masonite and build beautiful clear finishes. ( Masonite looks pretty cool under a clear finish too. ) You can also substitute 5/4" pine for the inner plywood. Lowes sell it in 8" widths that are clean enough to be edge-glued into guitar blanks.
Once you start thinking 'out of the box', there are lots of ways to build a nice guitar body out of many things, including literally junk. I like plywood from the dumpster. Poplar can sometimes be found at the lumberyard in sizes that are suitable for solid guitar bodies, and prices that are far lower than 'guitar blanks'. Poplar is a very nice wood to work with, not very pretty, but that doesn't matter if you paint or stain it. Some places will also have cherry, which can be very nice.
Hot-rodding is another option to build a custom guitar. Rondo Music sells some ridiculously inexpensive guitars and basses that are surprisingly nice and at the same time not-surprisingly shoddy. The woodwork and finish is very good, much of the hardware sucks. Rebuild one of those with better pickups and decent strings, and do a good setup, and you can have a really nice player for considerably less than the price of a Mexican Fender.
Last edited:
Danelectro Binding
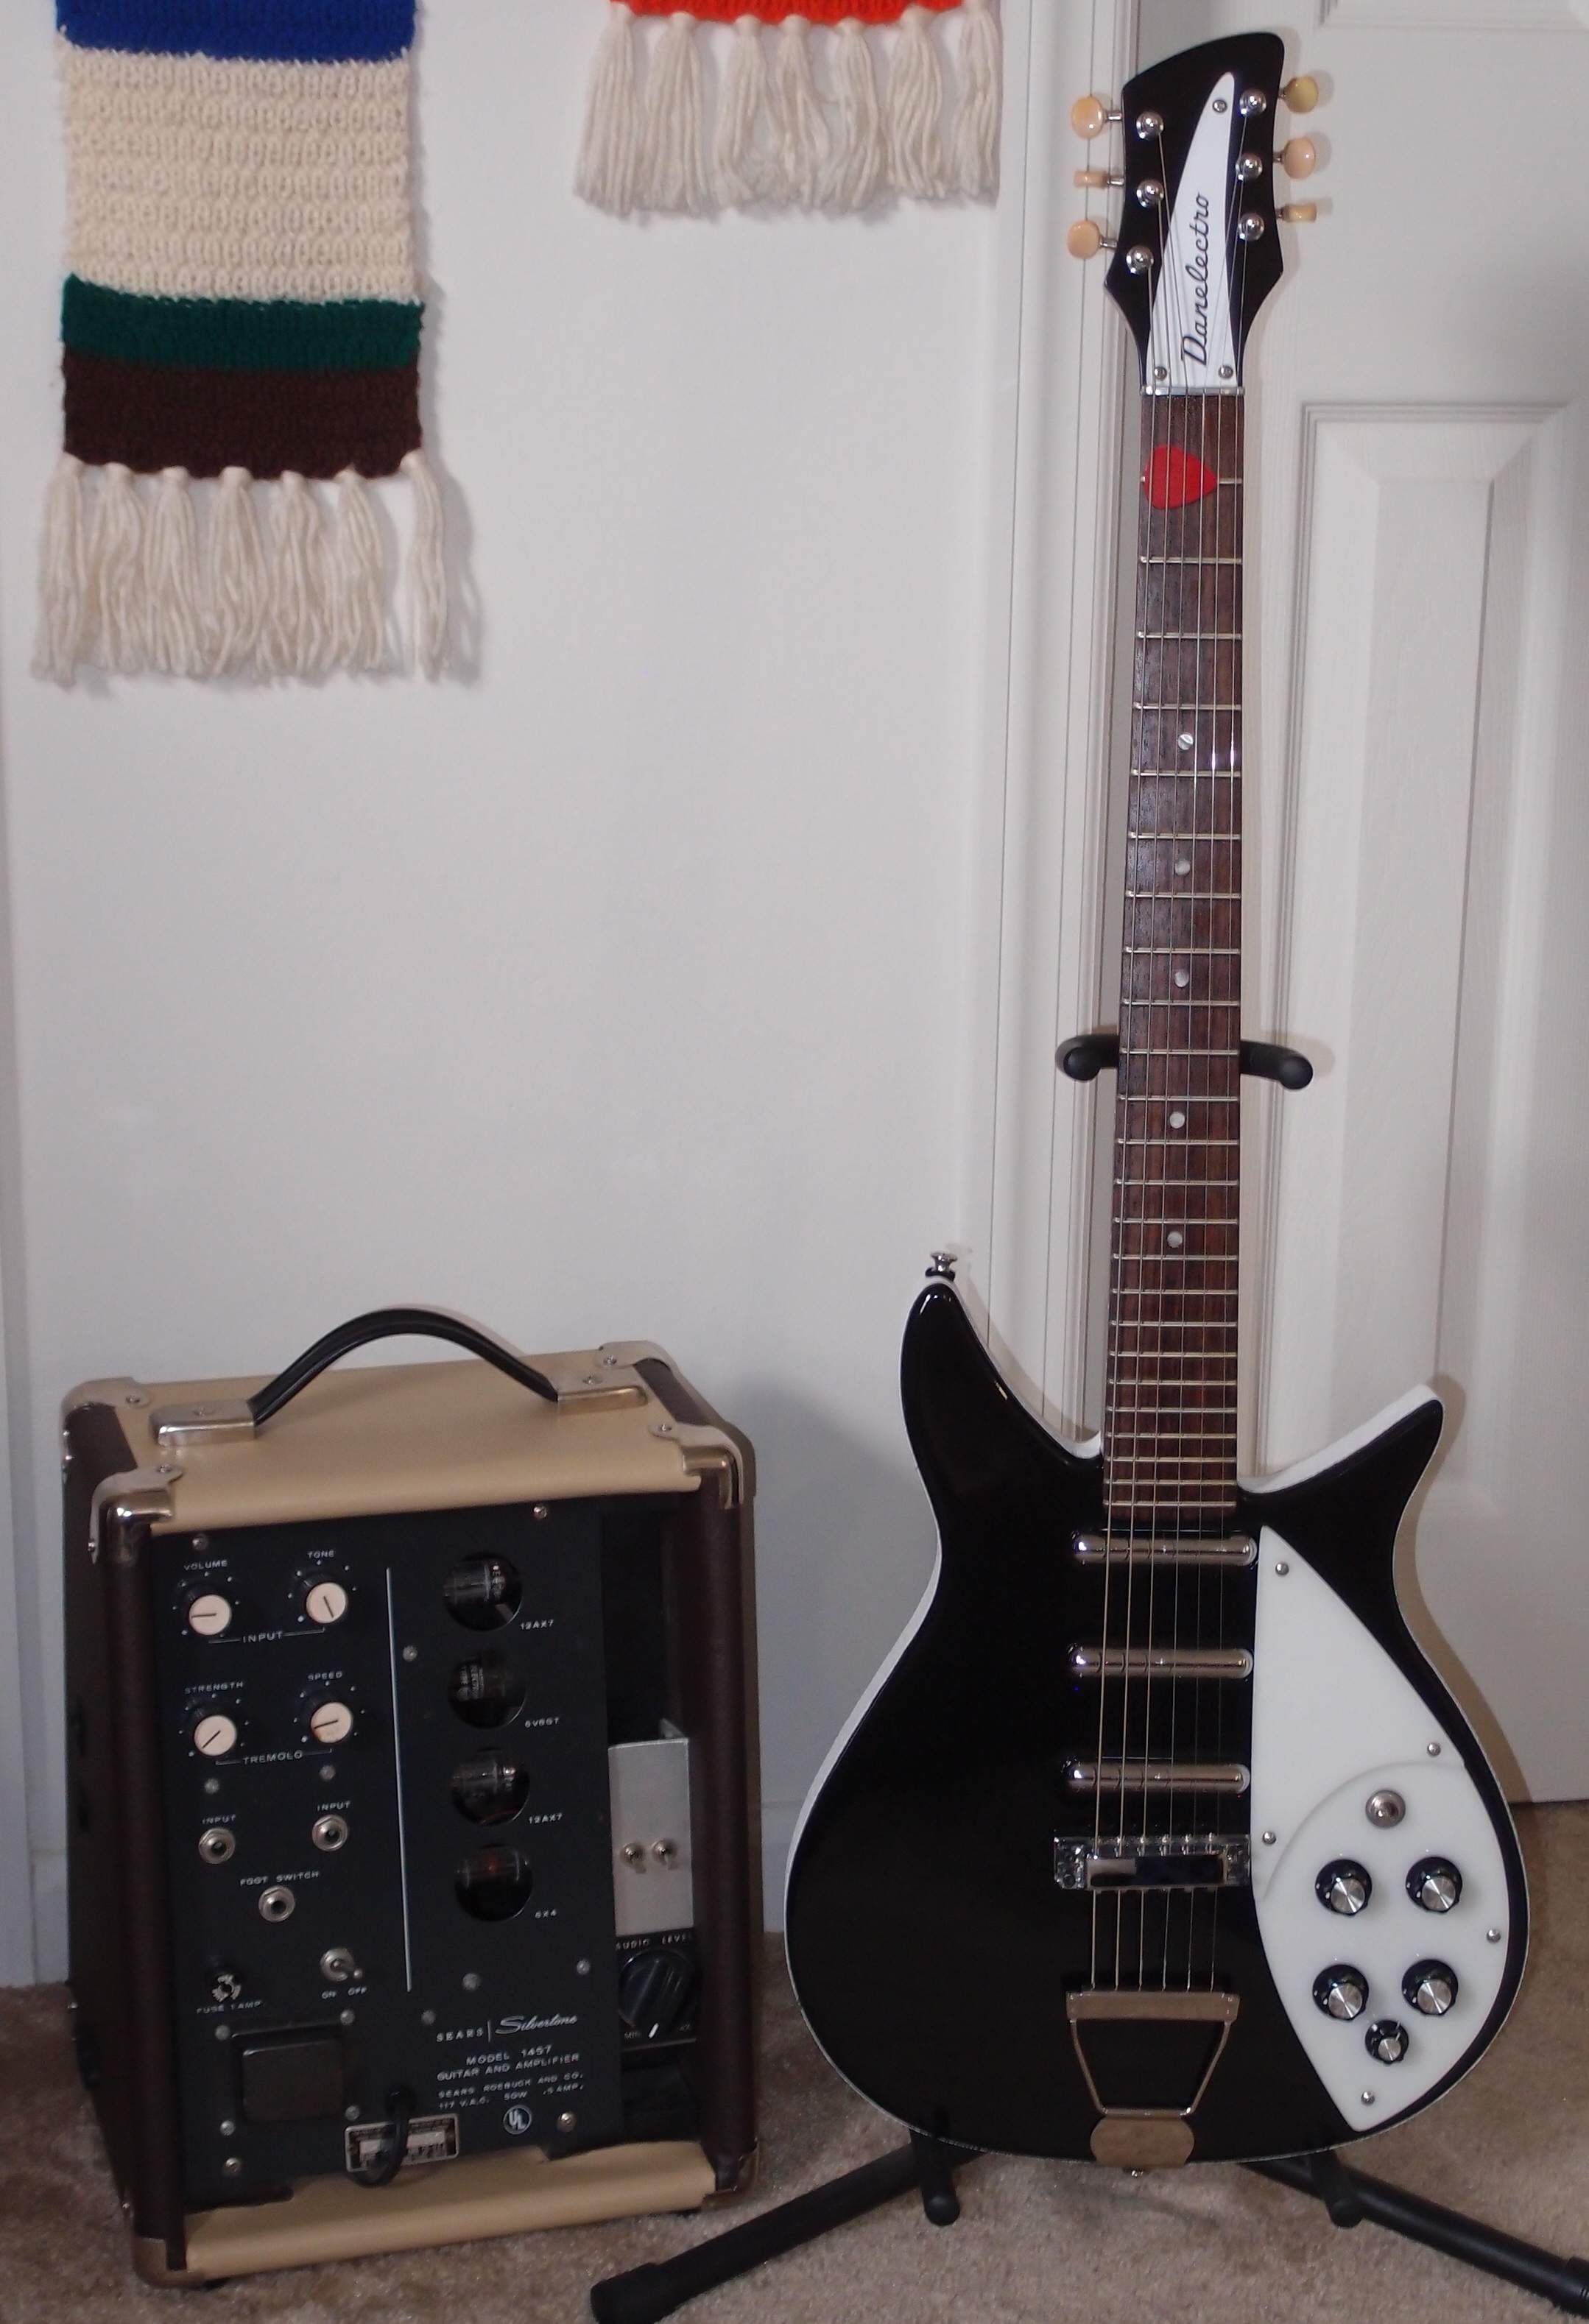
I finally got this thing all back together. On the binding I used an adhesive called E6000 that worked pretty well. It is more sticky than slimy out of the tube, with a nice long open time. The instructions are as for contact cement, but I used it like regular glue, laying down a bead on either side and one down the middle, in 6 inch sections. I pressed it down and rolled it out with a little glass jar, then taped it in place like regular plastic binding. I started out putting the adhesive on the binding, but soon started putting it on the body instead. Squeeze-out cleaned up easily, as the uncured adhesive could just be rolled off the slick poly surface with your fingers. I used extra on the inside curves, where it did soften the vinyl a bit, but it is all hardened now, a day later. It seems very solid, and came out perfect.
Hopefully this will be a permanent job, as affixing these bindings has always been a problem. The aerosol contact cement that is usually recommended attacks the vinyl, eventually causing it to shrink. The contact cement never really hardens or becomes strong enough to hold against the tension, and the inside curves always pull out. The problem is exacerbated on lacquer finishes, where the contact cement also attacks the lacquer. I have a pile of these bindings that I made, and a pile of scrap 3/4" plywood and masonite, so if I can finally lick the binding adhesion problem, there are a lot of other designs that I would like to do as Danelectros.
Also, take a look at this finish:
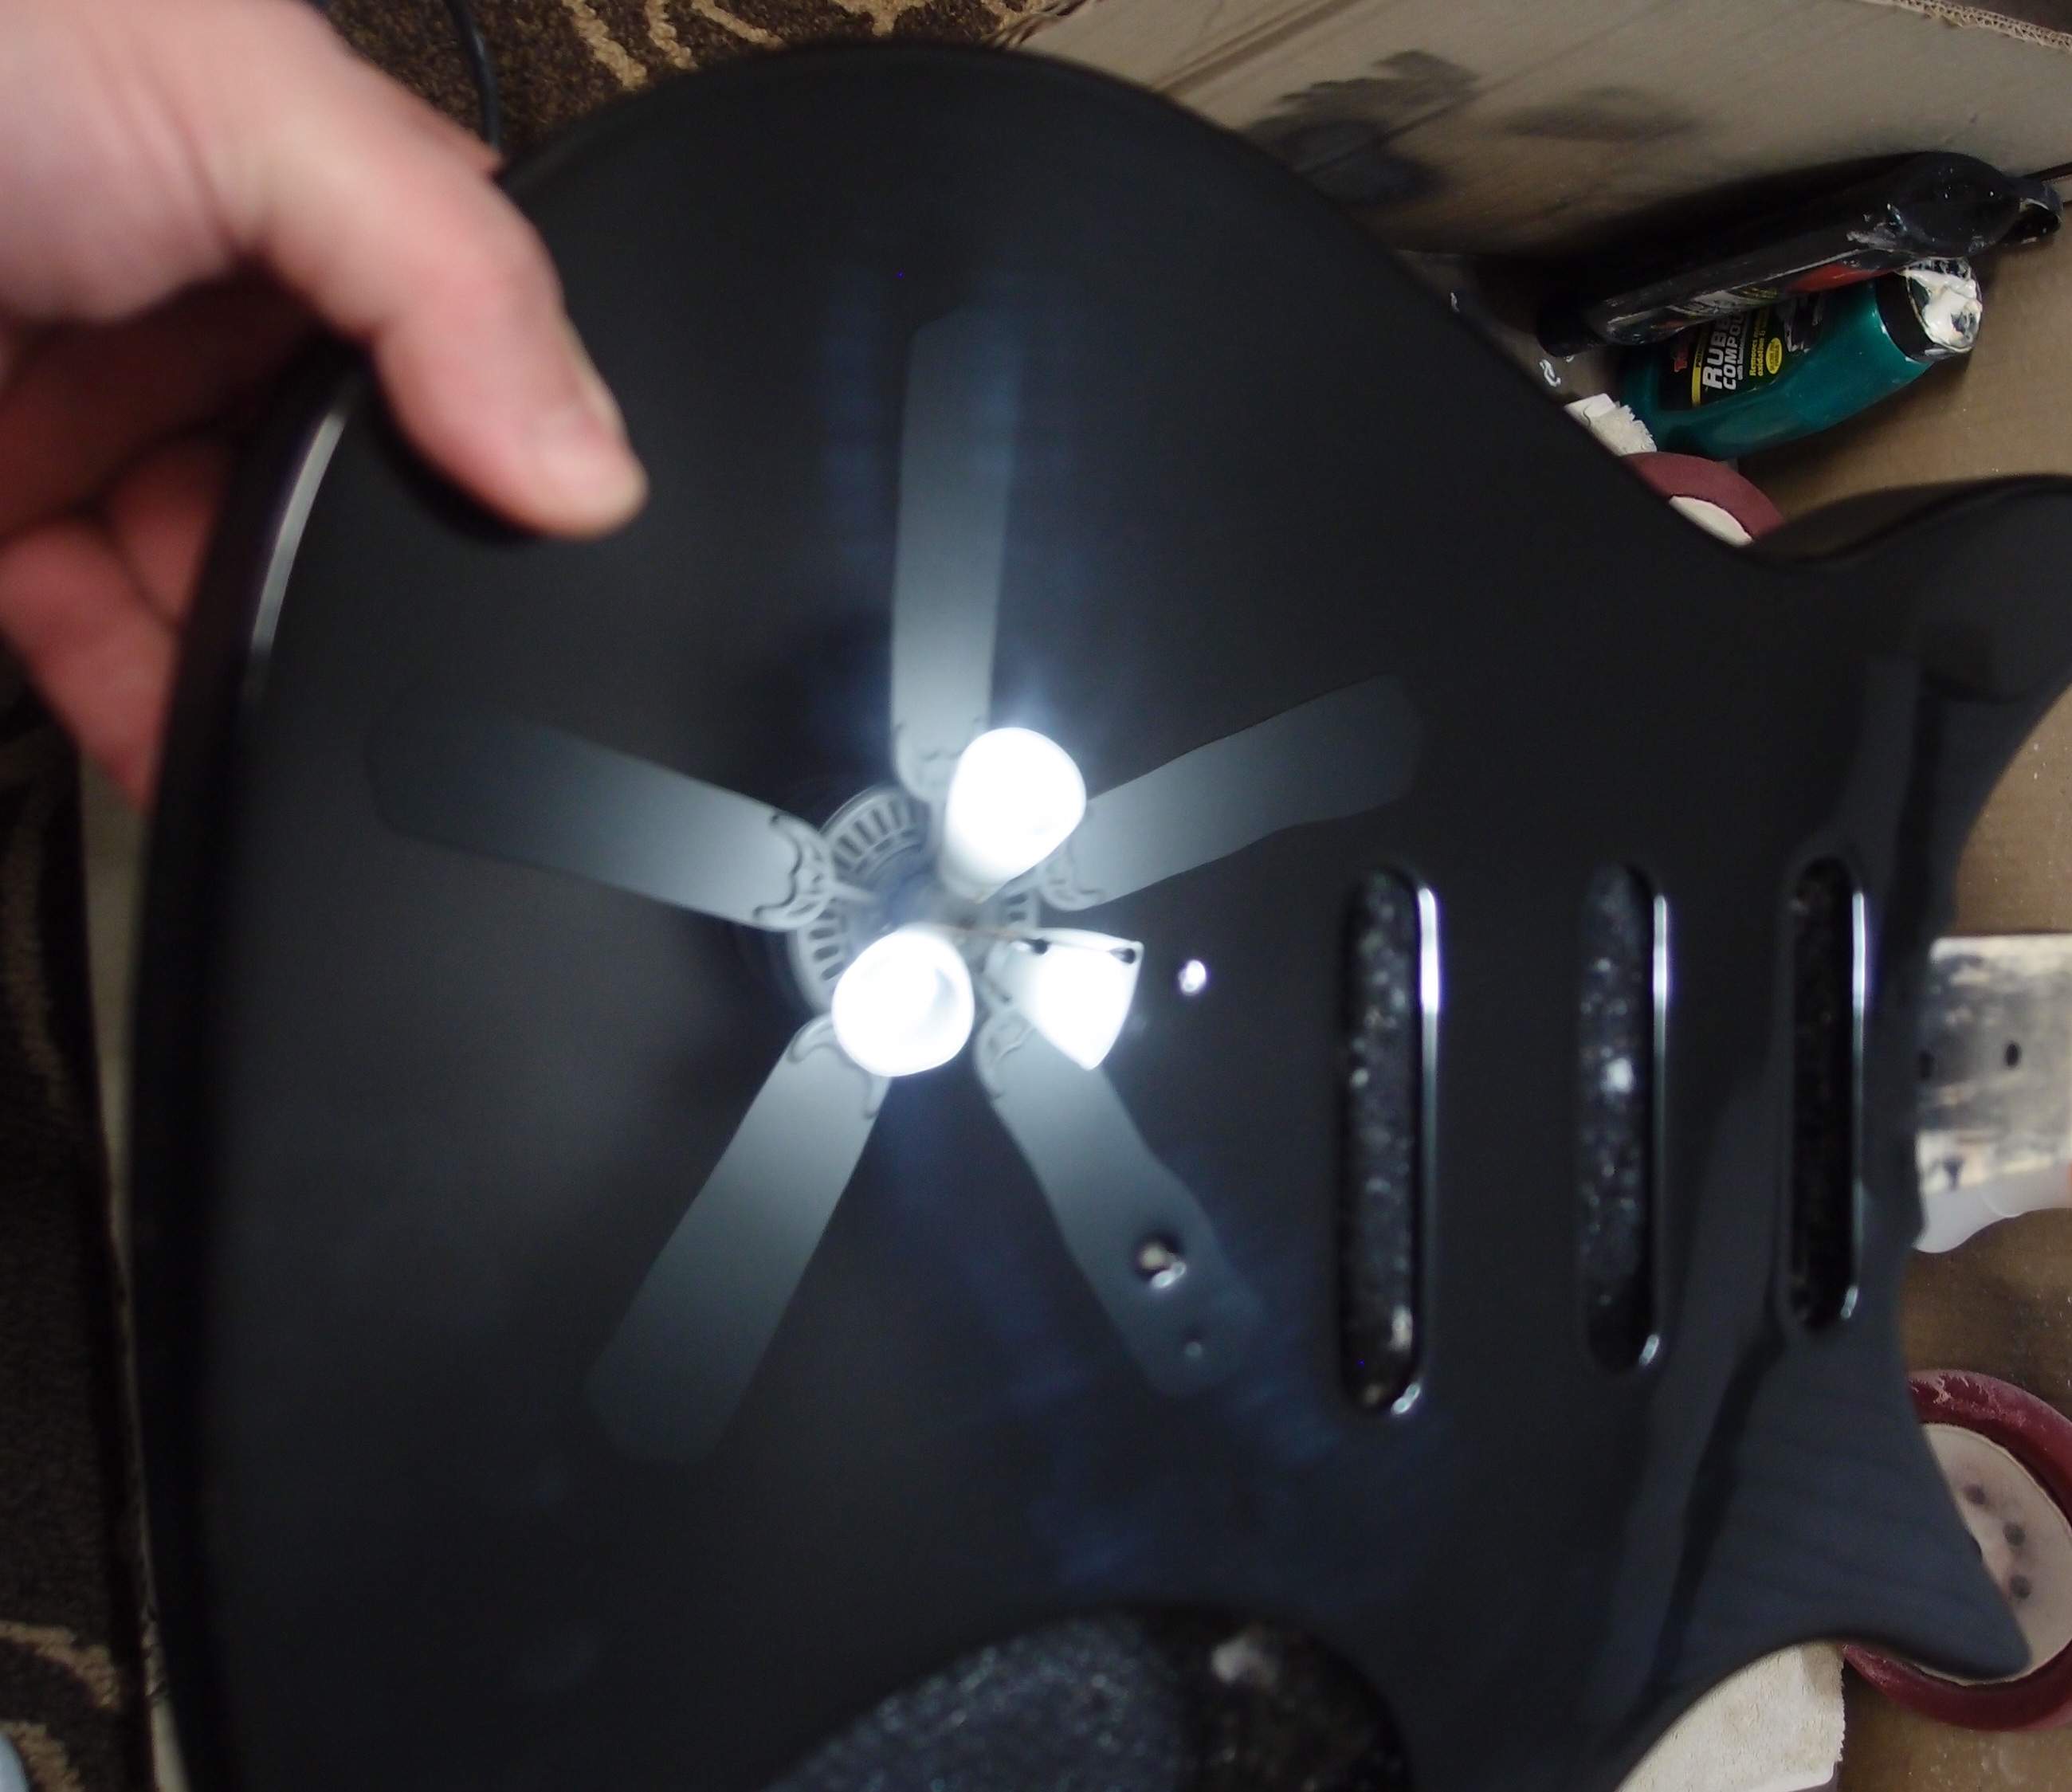
This is during the polishing process, you can see it is not even clean. The front came out like black glass. I smoothed the orange-peel with 1500 grit wet, then 2000 and 3000. Then I switched to the random orbital with a red sponge cutting pad and Turtle Wax rubbing compound that claims to remove 1200 scratches. Shouldn't be any 1200 scratches, since I started with 1500. That came out shiny, but with swirl marks in the light. Then I switched to another red cutting pad with Meguiar's Ultimate compound, and finally a softer yellow pad with the same Meguiar's. At that point, it was pretty much a factory finish. I didn't work as hard on the back, it is nice, but will soon enough encounter a zipper or belt buckle, so the effort would be wasted.
So I'm pretty pleased that I seemed to have figured out how to get the same finish with poly as I have gotten with lacquer. As I've said before, lacquer is for the birds. It comes out beautiful, but it doesn't hold up at all, and there is no reason to use it in the 21st century. This one is going to get the same make-over next:
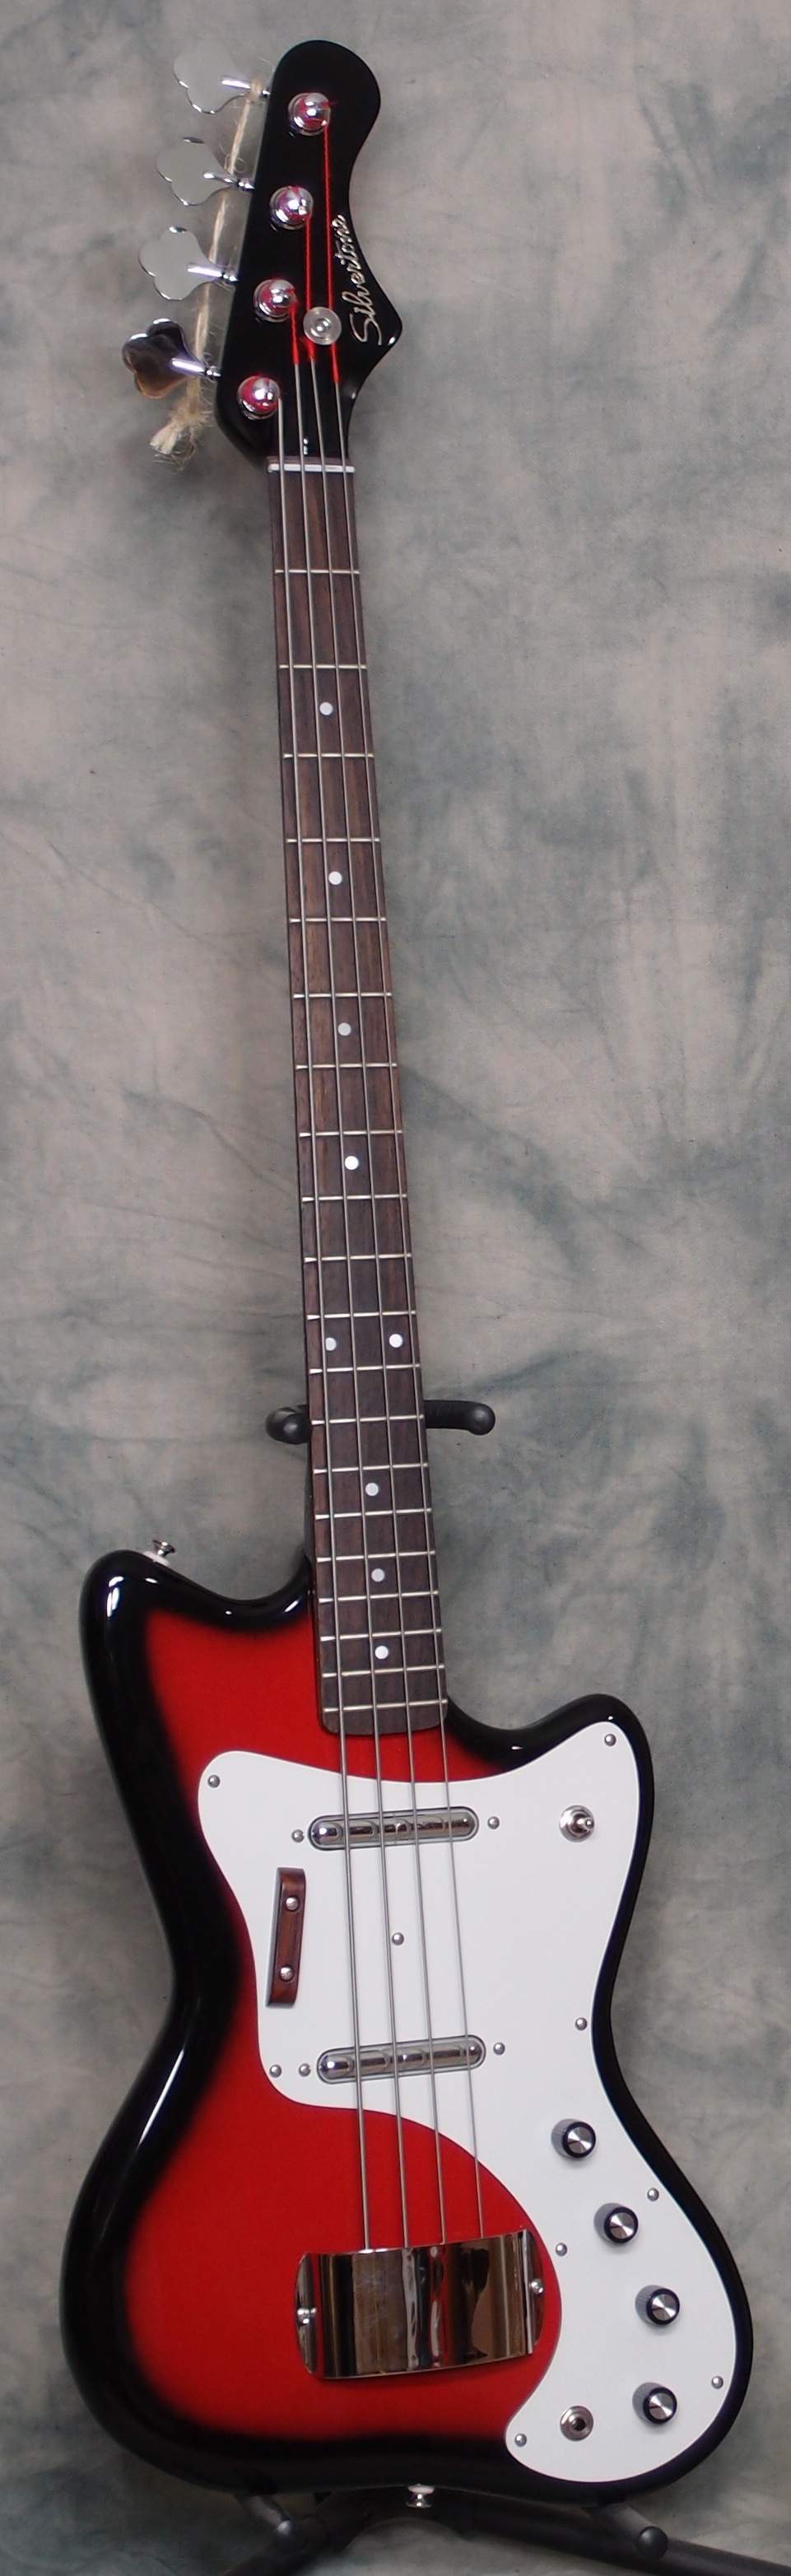
The red burst is on both sides and the back of the neck, but that is no longer any difficulty at all for me. This was all done with aerosol cans of lacquer, but my level of technology has increased dramatically since then. Despite my care in hanging it up by a tuner for years, this guitar still picked up an ugly scar from where it touched a vinyl bench. Didn't rest on it, just accidentally touched it for a few days. It even left a mark on the bench. Lacquer is guitar poison, I can't say this strongly enough.
Nitrocellulose is the worst. I can't believe that it is still touted as a premium finish. What it is, is an easy finish that can be applied quickly with a high profit margin. The only advantage of lacquer is that it is easier to repair than poly, but even that is no advantage when you consider how much more likely it will be to need repair. Guaranteed, really, whereas a thick poly finish is tough as nails, and if necessary can be completely rejuvenated by the same polishing process I described above.
Things you can't do with a lacquered guitar:
And talk about toxic fumes - there is a reason the government has all but outlawed the stuff. Acetone, toluene, aerosol propellants, not just poisonous, but also highly combustible. Very nasty to work with. Toluene = brain damage. The polyurethane I used, driven by compressed air, barely even has an odor, although it does mist a bit.
One more thing that is almost comical is how the awful fragility of old lacquer finishes has spawned an entire industry of 'road worn' guitars, where specialists in accelerated guitar destruction simulate damaged lacquer finishes on new guitars. Funny, they don't actually break the tuners, short out the electronics, grease up the strings, warp the neck, crack the nut, break the corners off the pickguard, lose the knobs, pull out the strap buttons, or grind down the frets, like a real 'road worn' guitar. They just wreck the finish. Oh, and you pay extra for that. I take back what I said, this is totally comical.
This guitar will someday be beautiful and playable, thanks to acetone, rags, and the wonders of modern chemistry.
I finally got this thing all back together. On the binding I used an adhesive called E6000 that worked pretty well. It is more sticky than slimy out of the tube, with a nice long open time. The instructions are as for contact cement, but I used it like regular glue, laying down a bead on either side and one down the middle, in 6 inch sections. I pressed it down and rolled it out with a little glass jar, then taped it in place like regular plastic binding. I started out putting the adhesive on the binding, but soon started putting it on the body instead. Squeeze-out cleaned up easily, as the uncured adhesive could just be rolled off the slick poly surface with your fingers. I used extra on the inside curves, where it did soften the vinyl a bit, but it is all hardened now, a day later. It seems very solid, and came out perfect.
Hopefully this will be a permanent job, as affixing these bindings has always been a problem. The aerosol contact cement that is usually recommended attacks the vinyl, eventually causing it to shrink. The contact cement never really hardens or becomes strong enough to hold against the tension, and the inside curves always pull out. The problem is exacerbated on lacquer finishes, where the contact cement also attacks the lacquer. I have a pile of these bindings that I made, and a pile of scrap 3/4" plywood and masonite, so if I can finally lick the binding adhesion problem, there are a lot of other designs that I would like to do as Danelectros.
Also, take a look at this finish:
This is during the polishing process, you can see it is not even clean. The front came out like black glass. I smoothed the orange-peel with 1500 grit wet, then 2000 and 3000. Then I switched to the random orbital with a red sponge cutting pad and Turtle Wax rubbing compound that claims to remove 1200 scratches. Shouldn't be any 1200 scratches, since I started with 1500. That came out shiny, but with swirl marks in the light. Then I switched to another red cutting pad with Meguiar's Ultimate compound, and finally a softer yellow pad with the same Meguiar's. At that point, it was pretty much a factory finish. I didn't work as hard on the back, it is nice, but will soon enough encounter a zipper or belt buckle, so the effort would be wasted.
So I'm pretty pleased that I seemed to have figured out how to get the same finish with poly as I have gotten with lacquer. As I've said before, lacquer is for the birds. It comes out beautiful, but it doesn't hold up at all, and there is no reason to use it in the 21st century. This one is going to get the same make-over next:
The red burst is on both sides and the back of the neck, but that is no longer any difficulty at all for me. This was all done with aerosol cans of lacquer, but my level of technology has increased dramatically since then. Despite my care in hanging it up by a tuner for years, this guitar still picked up an ugly scar from where it touched a vinyl bench. Didn't rest on it, just accidentally touched it for a few days. It even left a mark on the bench. Lacquer is guitar poison, I can't say this strongly enough.
Nitrocellulose is the worst. I can't believe that it is still touted as a premium finish. What it is, is an easy finish that can be applied quickly with a high profit margin. The only advantage of lacquer is that it is easier to repair than poly, but even that is no advantage when you consider how much more likely it will be to need repair. Guaranteed, really, whereas a thick poly finish is tough as nails, and if necessary can be completely rejuvenated by the same polishing process I described above.
Things you can't do with a lacquered guitar:
- use a capo
- use a clip-on tuner
- put it in a stand
- put it in a wall-hanger
- spill anything harsher than tapwater on it
- let it get hot or cold
- let it get humid or dry
- let it touch anything for more than a few minutes
And talk about toxic fumes - there is a reason the government has all but outlawed the stuff. Acetone, toluene, aerosol propellants, not just poisonous, but also highly combustible. Very nasty to work with. Toluene = brain damage. The polyurethane I used, driven by compressed air, barely even has an odor, although it does mist a bit.
One more thing that is almost comical is how the awful fragility of old lacquer finishes has spawned an entire industry of 'road worn' guitars, where specialists in accelerated guitar destruction simulate damaged lacquer finishes on new guitars. Funny, they don't actually break the tuners, short out the electronics, grease up the strings, warp the neck, crack the nut, break the corners off the pickguard, lose the knobs, pull out the strap buttons, or grind down the frets, like a real 'road worn' guitar. They just wreck the finish. Oh, and you pay extra for that. I take back what I said, this is totally comical.
This guitar will someday be beautiful and playable, thanks to acetone, rags, and the wonders of modern chemistry.
Last edited:
Home Depot - You're the best !!!
Here is my new guitar workbench, gratis, courtesy of Home Depot for me to review.

I added the drawers myself, to make a real nice piece of furniture. I pulled them out of an old desk someone was throwing away last summer, and tossed them in the attic for someday. Well, someday came - it pays not to be too proud on trash day - go price drawers, they're expensive. I made new matching fronts from a piece of floor moulding. I also added the little shelves, vise, and power strip. The old towel makes a nice work surface for guitars. Of course, this bench is rated for 3000 pounds of abuse, but this one will never see that. Thanks, Home Depot !
Here is my new guitar workbench, gratis, courtesy of Home Depot for me to review.
I added the drawers myself, to make a real nice piece of furniture. I pulled them out of an old desk someone was throwing away last summer, and tossed them in the attic for someday. Well, someday came - it pays not to be too proud on trash day - go price drawers, they're expensive. I made new matching fronts from a piece of floor moulding. I also added the little shelves, vise, and power strip. The old towel makes a nice work surface for guitars. Of course, this bench is rated for 3000 pounds of abuse, but this one will never see that. Thanks, Home Depot !
Last edited:


