• TalkBass has been independent since 1998. Add your voice.
    Create a free account to reply to discussions, view embedded media, and browse with fewer display ads.
    Join freeLog in
    Want zero display ads or expanded classifieds tools? Compare plans.

Custom MIDI foot controller

I recently upgraded my digital effects system but didn't have a good way to control it while playing. Looking at a lot of foot controller options out there none was exactly what I was looking for, and all seemed unnecessarily expensive, so I decided to build my own. This one is vaguely like a Tech 21 MIDI Mongoose, but uses text prompts and has 3 more dedicated menu/control buttons to change settings instead of mysterious combinations of the 5 program buttons that you then need to remember.

Since I do most of my work in wood, and happened to have a suitably sized offcut of hard maple from a recent bass build, I decided to use that for the enclosure.

The big difference between this controller and most of the others out there is this one is a USB MIDI device rather than a hardware MIDI device. That means I don't need to use a separate MIDI interface, or a large USB audio interface with an integrated MIDI controller.

To accomplish all this the brains are based on a DFRobot Beetle microcontroller, which has onboard USB, plus an 8-digit 7-segment display. Getting it to all work quick, easy and intuitively was more software work than I was hoping, but I am happy with the outcome.

It all works exactly like I had envisioned: one expression pedal controls the main volume, the other is a CC for whatever adjustment I choose on the current preset, and the foot switches change presets in the effects rack.

Here's a few shots of the finished controller and I can post a few build pics if anyone is curious:
20240414_181623.jpg


The bottom has a clear cover so all the guts are visible:
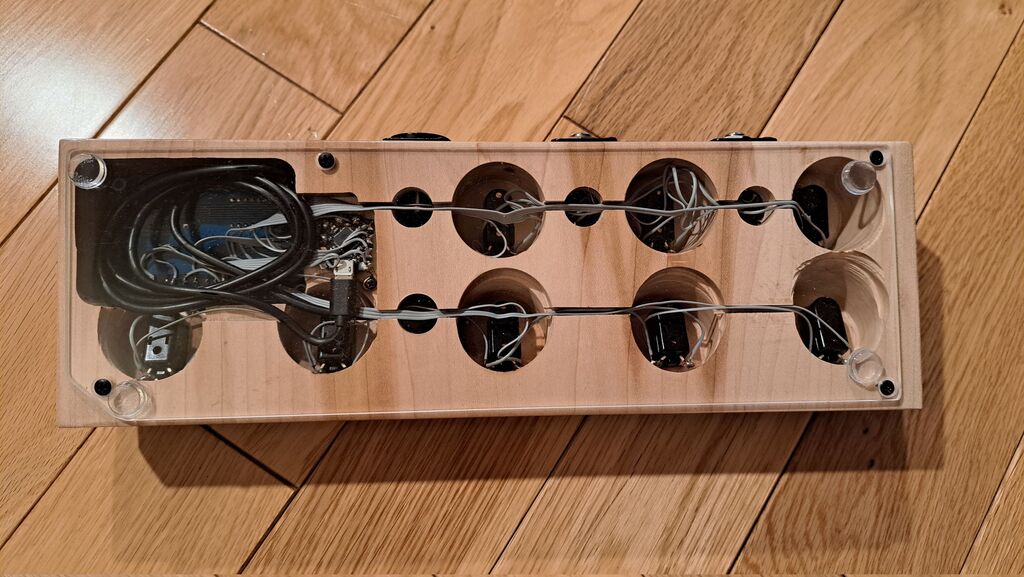
20240414_181632.jpg


USB and expression D-panel jacks are on the back:
20240414_181707.jpg

In "PrESEt" mode when one of the bottom 5 preset select buttons the display shows the bank (b0 in the photo) and preset number (P0 in the photo):
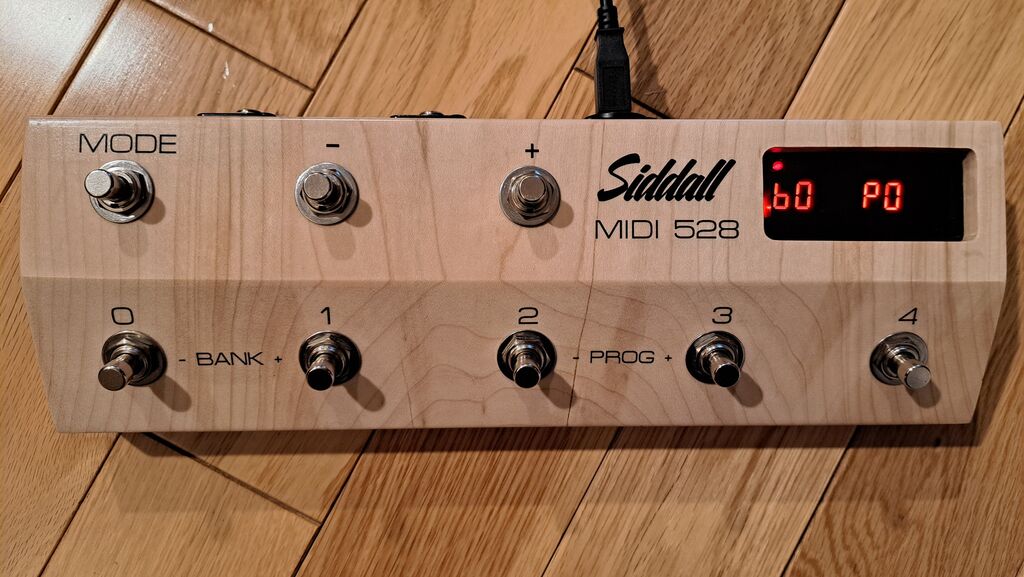
20240414_182145.jpg


And with a couple of cheap expression pedals connected:
20240414_183420.jpg

When the expression pedals move the display briefly shows the CC number and the level (0-127) before reverting back to the previous display.

Here is how the controller looks in QJackCtl (beside the big red arrow). The controller is automatically detected so literally plug and play:
Siddall_MIDI_528_Jack_Graph_With_Highlighting.png
 
Last edited:
Wow, cool!
Very elegant design!

Thanks! This very much follows the aesthetic of all my prior (and ongoing) amp and cabinet builds: maple with a satin clear with black accents and block lettering.

Excellent work :wideyed: Elegant and well thought-out, looks rugged.

Build pics are most welcome, and I'm quite interested in the software part.
The guys over on the Effects sub would certainly love it as well!

I appreciate the kind remarks. Yes, it should be pretty rugged, though even a solid 2" thick piece of hard maple still isn't going to be as strong as a metal cabinet would be. This piece was an offcut because it had a decent size crack through the middle of it. I stabilized it with CA so I am confident it is plenty strong for my level of use. Anyway, below are a bunch of build pics.

The rough sawn maple offcut:
20231027_203255.jpg

Planed flat with a router plane jig:
20231027_214930.jpg


Trimmed to size on the table saw:
20231027_221110.jpg


Front bevel added:
20231027_223601.jpg


Saw marks sanded out on the belt sander:
20231027_224301.jpg


Switch holes marked and drilled on the press with a spade bit:
20231028_200354.jpg


Recess for the switch cavity drilled with a large Forstner bit:
20231028_203152.jpg


Switch test fitted:
20231028_202312.jpg


20231028_202329.jpg


Some blind cuts on the table saw made the wiring channels for the ribbon cable used to connect everything up:
20231104_152118.jpg


I made a couple of templates on the table saw out of 1/4" hardboard (not shown) for the palm router to cut the opening for the display (front):
20231104_190613.jpg


And the electronics cavity in the back:
20231104_194612.jpg


Cut and fitted the smoke acrylic display cover (still with the paper protection cover applied) and the clear rear panel using table saw and disc sander:
20231104_201304.jpg


A bunch of sanding was done (not pictured) to get to the first coats of water-based poly clear. This was done back in November, sprayed in the cold garage, but brought back inside to dry:
20231105_203728.jpg


Then water slide labels were printed and applied before being flooded with more coats of clear:
20231106_233815.jpg


All switches, jacks and electronics were mounted and the cover drilled and countersunk, was installed:
20240414_180048.jpg


And... done!
20240414_181739.jpg
 
Now, software... I'll start by saying I have no formal programming training so this is all very much hacked together. I'll post a few code snips for inspiration though.

Most of the heavy lifting is done by a few libraries:
Code:
// Use USBMIDI to make the controller USB enabled, thus not requiring a physical MIDI port and solving phantom power problems
// For a summary of MIDI messages see: https://www.midi.org/specifications-old/item/table-1-summary-of-midi-message
// For a summary of CC messages see: https://www.midi.org/specifications-old/item/table-3-control-change-messages-data-bytes-2
#include <midi_serialization.h>
#include <usbmidi.h>
// Use responsive reads for the expression pedal(s) for less noisy control
#include <ResponsiveAnalogRead.h>
// Use a TM1638 board for display and keys
#include <TM1638plus.h>
// Store state data in non-volatile memory
#include <EEPROM.h>

The MIDI stuff is actually pretty simple. When a button is pressed this function sends the messages:
Code:
void sendProg(byte channel, byte value) {
  USBMIDI.write(0xC0 | (channel & 0xf));
  USBMIDI.write(value & 0x7f);
}

Similarly, the expression pedals CC messages are sent by this function:
Code:
void sendCC(byte channel, byte control, byte value) {
  USBMIDI.write(0xB0 | (channel & 0xf));
  USBMIDI.write(control & 0x7f);
  USBMIDI.write(value & 0x7f);
}

The rest of the code handles things like the display updates, expression pedal calibration, mode selection, EEPROM reads/writes, channel selection etc. The whole thing is 334 lines of code according to cloc:
Code:
github.com/AlDanial/cloc v 1.90  T=0.02 s (53.4 files/s, 30157.2 lines/s)
-------------------------------------------------------------------------------
Language                     files          blank        comment           code
-------------------------------------------------------------------------------
Arduino Sketch                   1             37            194            334
-------------------------------------------------------------------------------

Let me know if anyone has any other questions.
 
Last edited:
This is very cool. I've been considering some major pedalboard changes, mainly related to vision decline and collapsed spinal discs. I thought about making my pedalboard more of a table height console/configurable rack system with a patch bay for routing options, keeping only the expression pedals and a switch bank on the floor. This is inspiring. Thank you.
 
  • Like
Reactions: Jeff Siddall
Neato! So, apologies if I missed the explanation, but what is it plugged into? (What's your effects system?)

Sounds like the choice of MIDI message/CC# to use for a given button/pedal input basically hardwired into the code that's running on the microcontroller?


Sounds like an underestimate to me!

Thanks! Yes, the CCs are hard coded. At least for my rig it doesn't really seem to matter for the modulation EXP (EXP2 for me):
Code:
// Volume CC value also used for sound muting, typically control 39 (0x27)
#define VOLCC 39
// Expression CC value used is typically control 43 (0x2B)
#define EXPCC 43

From the MIDI CC specs, now available here:

MIDI 1.0 Control Change Messages (Data Bytes) – MIDI.org

39 is "LSB for Control 7 (Channel Volume, formerly Main Volume)" and indeed, Carla (the LADSPA rack app running my headphone EQing plugin) automatically mapped that CC to the level control so that seems to have been the right choice!

43 is "LSB for Control 11 (Expression Controller)", though I could have probably chosen 44 also "LSB for Control 12 (Effect control 1)"

In Guitarix if you just move the pedal when setting a MIDI association for a control it auto populates the CC it sees so I think anything would have worked.

From the MIDI spec now available here:

Summary of MIDI 1.0 Messages – MIDI.org

The buttons are just sent as program changes (the 0xC0 sets that).

Guitarix automatically picks those up so no configuration require there either.

Of course, these could also be made menu configurable.

My rig is a laptop running the excellent AVL MXE (see: AV Linux MX Edition), still at 21.3 for me though I'm interested in trying the latest load with Pipewire, with a Tascam 2x2HR (see: Invalid Link Removed) handling audio in/out duties. Latency is in the sub 10 ms range which is good enough for my ear.

To be clear I am not a big effects user, but sometimes you just need something. For that I generally rely on Guitarix (see: Guitarix - GNU/Linux Virtual Amplifier) for amp and cabinet modelling, overdrive, compressor, EQ, octave, chorus etc., plus it has an excellent, large, and super fast tracking tuner. It works so well I have practised my fretless intonation by watching it while playing.

All the software, AVL and Guitarix plus most other included apps, are free to use so I would highly recommend it for anyone with a good measure of both curiosity and ambition.

Regarding labour, yes, that wasn't tracked and could easily have been double my estimate! :laugh:
 
Last edited:
That looks great! Even though I don't ever use stuff like this I love trying to build it.

What microcontroller did you use for this? Something like a Nano, ESP32, or PiPico?

When are you linking your GitHub for this project? I could definitely see this one being popular.
 
  • Like
Reactions: Jeff Siddall
My rig is a laptop running the excellent AVL MXE (see: AV Linux MX Edition), still at 21.3 for me though I'm interested in trying the latest load with Pipewire, with a Tascam 2x2HR (see: Invalid Link Removed) handling audio in/out duties. Latency is in the sub 10 ms range which is good enough for my ear.

To be clear I am not a big effects user, but sometimes you just need something. For that I generally rely on Guitarix (see: Guitarix - GNU/Linux Virtual Amplifier) for amp and cabinet modelling, overdrive, compressor, EQ, octave, chorus etc., plus it has an excellent, large, and super fast tracking tuner.

Have you played out with that setup? Do you dedicate the one laptop to this, and have qjackctl and guitarix and stuff set up to start on boot? Do you put the laptop on a stand?

Linux user/developer, never tried to use Linux (or a laptop) for live use, but I'd like to, so I'm just very curious how it works in practice!

Seems like a laptop would make a good flexible looper too, but my brief attempts to figure out Superlooper have been failures so far. Now that I look, I see mention of a built-in guitarix looper, maybe I should try that.
 
That looks great! Even though I don't ever use stuff like this I love trying to build it.

What microcontroller did you use for this? Something like a Nano, ESP32, or PiPico?

When are you linking your GitHub for this project? I could definitely see this one being popular.

Thanks! The controller is an ATmega32U4, which is really the only thing that much matters for my application. I happened to have a DFRobot Beetle on hand (which uses that controller), but you could use almost anything that has that chip on it (ex: Leonardo etc.).

Most Arduinos, including Nano, won't work because the USB controller is only a USB serial device and can't be setup as a USB MIDI device.

The code itself isn't nicely structured but if it would be useful to people I could post it.
 
  • Like
Reactions: Hasty and 13ghosts
Have you played out with that setup? Do you dedicate the one laptop to this, and have qjackctl and guitarix and stuff set up to start on boot? Do you put the laptop on a stand?

Linux user/developer, never tried to use Linux (or a laptop) for live use, but I'd like to, so I'm just very curious how it works in practice!

Seems like a laptop would make a good flexible looper too, but my brief attempts to figure out Superlooper have been failures so far. Now that I look, I see mention of a built-in guitarix looper, maybe I should try that.

I have not used this setup (or any other) in a gig because I don't play gigs! But if I did I wouldn't be too worried about using it live. The apps all seem pretty stable. It runs fast on my Dell E6430 from about 10 years ago, so most old laptops should do similarly well. A laptop like that is probably about the price of one pedal, so I would say it is worth a try.

I helped my son setup something similar to this many years back, with a dedicated laptop mounted to a dedicated collapsible stand with a dedicated audio interface with a MIDI foot controller. He used it for live gigs for a few years and didn't have any issues but then he stopped playing gigs too.

Honestly, with AVL, prior knowledge of Linux is largely unnecessary. IME it just boots up and works. You can try it on a bootable USB stick if you are curious but don't have a machine you want to install it on right away.

BTW: I do recall there being a looper in Guitarix, but haven't tried it.

One more point: even though it's called "Guitarix" I have found everything to work just as well for bass -- including the tuner I mentioned earlier which I have tested at least down to a low B, and probably dropped from that too. Bassix also sounds much cooler! :cool:
 
Last edited:
Thanks! The controller is an ATmega32U4, which is really the only thing that much matters for my application. I happened to have a DFRobot Beetle on hand (which uses that controller), but you could use almost anything that has that chip on it (ex: Leonardo etc.).

Most Arduinos, including Nano, won't work because the USB controller is only a USB serial device and can't be setup as a USB MIDI device.

The code itself isn't nicely structured but if it would be useful to people I could post it.
Valid point. For anything involving USB MIDI I generally use Teensy. I've got a few Teensy 2.0's and an old Micro that I could press into service since I'm pretty sure it's based on the Leonardo.

I'm a sucker for a cool DIY MIDI controller.

Thanks so much for posting this. I love the design and the woodworking aspect.
 
  • Like
Reactions: Jeff Siddall
Update: This page:

MIDIUSB - Arduino Reference

Says "This library allows any microcontroller with native USB capabilities (atmega32u4 based boards or ARM boards) to appear as a MIDI peripheral over USB to a connected computer."

It does list compatibility with a much wider range of boards (including Nano) but I think that is a bit misleading because, although it will compile on those boards, it won't actually work! It goes on to say "Note: while the library is supposed to compile correctly on these architectures, it might require specific hardware features that may be available only on some boards."

A Teensy 2.0 should work, and it appears ARM boards should also.
 
I literally have no idea what you were talking about, but that thing looks incredible!!

Haha, well, TL;DR push buttons and MIDI stuff happens! :D

Arduino Micro has the same MC and works with usb-midi natively. I used it myself for that. Actually also under Linux with Guitarix and Jack.

Nice! Yes, Micro would be a good choice. Great to see another Linux audio person! :thumbsup:
 
Have you played out with that setup? Do you dedicate the one laptop to this, and have qjackctl and guitarix and stuff set up to start on boot? Do you put the laptop on a stand?

Linux user/developer, never tried to use Linux (or a laptop) for live use, but I'd like to, so I'm just very curious how it works in practice!

Seems like a laptop would make a good flexible looper too, but my brief attempts to figure out Superlooper have been failures so far. Now that I look, I see mention of a built-in guitarix looper, maybe I should try that.
Linux is great once you master it. It can be setup with minimal GUI and run on a hardware not much better than a calculator. It can be configured to run any config on boot, it can even be used without monitor, just like a box that does things.
Guitarix has a looper In it and can be fairly successfully used with a midi controller such as this one. It also has metronome, and a rather limited drum machine. Any function can be assigned to a midi message, including complex presets. I did not find any usable sims in it. So I use it for effects only.bi use MLD pedal for sim, that works for me.