• TalkBass has been independent since 1998. Add your voice.
    Create a free account to reply to discussions, view embedded media, and browse with fewer display ads.
    Join freeLog in
    Want zero display ads or expanded classifieds tools? Compare plans.

D&R's build thread

Progress over the last week -

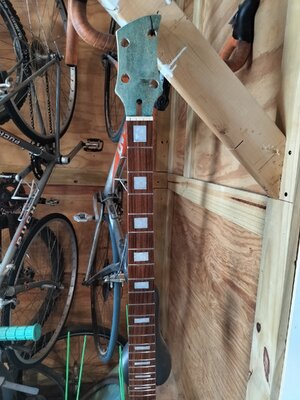
First, I painted the headstock for the First Act black, and added the logo. Then I poly'ed the front of the headstock, and put 3 coats of tru oil on the rest of the neck, including the rest of the headstock. (I'll probably throw on 1 or 2 more.)
fabass18.jpg

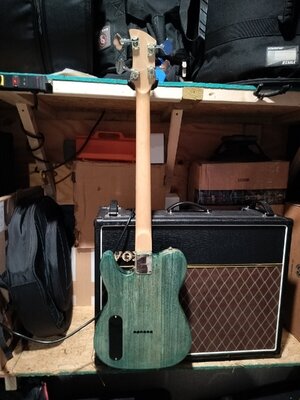
I finished 5 coats of poly on the tele-bass body, so I put it together and finished the wiring.
telebass15.jpg telebass16.jpg

Then, I redesigned the headstock shape -
telebass18.jpg telebass17.jpg

...and cut it out -
telebass19.jpg telebass20.jpg telebass21.jpg

It...was a bit rough before I sanded it all down, but it came out pretty well. Anyway, I stained it the same color as the body, but I didn't like how it came out (not as much depth as the body.) So I sanded out the green, then put on a coat of Varethane walnut -
telebass22.jpg

I sanded that until there was barely any of that left, then put on a coat of Olympic ebony -
telebass23.jpg

I'll sand that back tomorrow, then throw on a coat of the hunter green. I'm trying to leave behind enough of each shade of brown to allow for a similar variation as the body. So...we'll see how that goes, I guess...

Anyway, one last thing. I mentioned that the end goal for these builds is for them to go to a local charity that gives instruments to kids. Well, the first of them has been given away. It actually went to a friend/bandmate's student, which is a nice little bonus.
dano1-final.jpg
(That's the student on the left, and said friend/bandmate on the right. Play it Forward is the charity.)
 
Went down a little different route with the headstock. I sanded back the ebony (mostly), then applied a coat of Minwax true black -
telebass24.jpg

Then I sanded that back, and put on a coat of hunter green -
telebass25.jpg telebass27.jpg

I think I may have to sand that coat off again...then go a littler further. I think I left too much of the true black coat on. Oh well.

Also, today I build the parts drawer I've been meaning to build for a while -
pd1.jpg pd2.jpgpd3.jpg

My benchtop is much cleaner now. Plus my part bins fit in there.

Also also I started on this small foam isolator...shield thing, that's meant to aid in bleed prevention when recording. I mounted a drum tom mount to a piece thin plywood -
iso1.jpg iso2.jpg

I'll stick the foam eggcrate on there, and then it becomes a shield that can be mounted on its own.
 

Attachments

  • pd1.jpg
    pd1.jpg
    1.2 MB · Views: 9
  • iso2.jpg
    iso2.jpg
    1.2 MB · Views: 7
  • iso1.jpg
    iso1.jpg
    867.5 KB · Views: 9
  • telebass27.jpg
    telebass27.jpg
    1.1 MB · Views: 8
Just a small update -

I installed the tuners for the First Act, so its neck is done -
fabass19.jpg

And I sanded back the headstock for the tele-bass. Then I put on 2 coats of the hunter green stain -
telebass28.jpg

I think that's pretty close...I may put on another coat but that won't be until next week at the earliest. Which is good, cause I can look at it with fresh eyes.
 
I haven't had much time over the last several days to get into the workshop, but I took a few minutes this morning to put another coat of stain on the tele headstock, and this evening to sand the whole neck back to 1000.
telebass29.jpg

I think that's gonna work. It's not exactly like the body but it's close, and I think it'll be closer after finishing the neck with tru oil (hopefully this week.)
 
Last edited:
Over the last few days, I've mostly finished the FA and tele basses. Got the tuner holes drilled in the headstock for the tele, and put 5 coats of tru oil on the neck -
telebass30.jpg telebass31.jpg telebass32.jpg

I drilled a little to close to the edge for the D/G side tuners, but I think it'll be okay.

Got the FA bass assembled -
fabass21.jpg fabass22.jpg

...but the action was a touch high -
fabass20.jpg

So I filed down the nut slots some more, and put a small shim under the heel, and adjusted the saddles. After much fanagling, it was a bit more comfortable -
fabass23.jpg

So the next problem was it didn't pass sound. I ended up fully disassembling the electronics just find out that I had wired the volume pot in reverse. (In my defense, these pots are wired the opposite of what I'm used to, with the right side lug being the input instead of the left.) So...instead of having a series/parallel/split switch, it's just a volume control. Oh well, another time.

I also got the tele bass put together -
telebass33.jpg telebass34.jpg

The setup on this one was way easier than the FA, so that was nice. But it also has electronic issues - the pickups are super quiet! Or so I thought until a friend messed with the tone knob, et voila! They're just fine! That's a relief, but it also presents a bit of a mystery. I thought maybe it was just a dirty pot, but it turns out that if the tone pot is all the way up, it cuts the signal almost entirely. If the pot is backed up just a touch (like not even a tenth) the signal comes through loud and clear. Weird!

So these two are very nearly complete. Only problem is that 19mm string spacing is just a bit too wide, and the G string on both is at the very edge of the fretboard by the time it reaches the heel. That's no good. So now the search is on for either a bridge or saddles (or both) with 17-18mm spacing.

Also, frustrated by how rough the parts drawer was (probably owing to the weight of the parts and tools), I turned it into a shelf -
pd4.jpg

I have at least a few more projects in the works, so more soon.
 
After a long wait for parts from Guyker (international shipping, amirite?) I have finished the First Act and Tele basses. Yay.

fabass26.jpg telebass35.jpg

Ironically, I didn't use the bridge from Guyker on the First Act. I found a Bronco/Mustang-style 2 saddle bridge at a local shop that I used instead. It turns out, though, that the 17mm string spacing didn't help...I had to move the bridge ~3mm towards the bass side. That centered the strings pretty perfectly, so that's good. On the Tele, though, I only had about 3mm to play with on the bass side, so I moved the bridge about 1.5mm and a back a little. The strings are centered better, but both the E and G strings are very close to the edge of the fretboard at the heel.

Also, the weird wiring issue with the First Act persists - turns out the volume knob is reversed, IE you gotta turn it counterclockwise to turn the volume up. When I reversed the wiring, it didn't fix the problem...which is weird. So then I had the bright idea to finally revisit how to wire a volume pot, and wiring in that way -
fabass24.jpg

...which got me a big humming of nothing. The knob, wired this way, would produce a loud hum when turned up (clockwise) and nothing when turned down (counterclockwise.) So I wired it back the way it was -
fabass25.jpg

After that, I realized that I only wired in one coil because I had gotten the wires confused. So I redid it for series wiring. The bass sounds better that way. All in all, though, it was a bit of a frustrating wiring experience that made me feel like a big ol' dummy. In any case, though, I think I can call both of these done.
 
On to new things. I recently changed out the pickguard on my franken-Squier with a matte anodize black guard. Now I have a 1-ply black plastic pickguard and a bunch of hunter green stain, so clearly I gotta build a straight up P bass, right? Well...I also have a medium scale neck lying around, so maybe not straight up. I bought a cheap body off the 'Bay, and we're off.

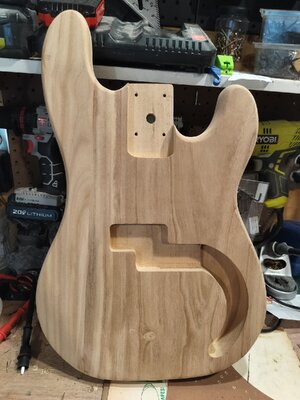
First things first, I sanded the body to 120 -
greenp1.jpg

Then stained it with Olympic "deep ebony" oil based stain -
greenp2.jpg greenp3.jpg

This bass is gonna get a mix of black and gold hardware. The tuners I have are 9/16", and the head is drilled for 11/16" tuners -
greenp4.jpg

So I plugged the holes (which was...a task) -
greenp5.jpg greenp6.jpg

It's not perfect...the smallest dowels I could get that weren't too small were 3/4", so I had to sand one down to fit. Of course, they weren't perfectly round when I was done (and it was hard not to overshoot). So there were gaps that I filled with wood glue.

Next I'll sand off the stain from the body, sand down the front of the head (the plugs are a bit proud) and cut it to shape, drill new holes for the tuners, and start on its finish. Stay tuned...
 
Today, I sanded the body back to 2000 (yeah, getting fancy now) -
greenp7.jpg greenp8.jpg

...and applied the first color coat -
greenp9.jpg greenp10.jpg

I'm digging how much the grain popped from that first coat of "deep ebony." It took a lot of effort to get through that coat but I think it was worth it. I'm probably gonna put on another coat of hunter green so it's not quite so splotchy-looking, then 4 or 5 coats of poly. Hopefully I can at least get the color coat and the headstock done over the weekend.

I'm also trying to get started on the 3x12" cab, but...I guess maybe I should have read up on cab building. It's not quite the same as the bookshelves I've built...
 
Started on the headstock. I didn't really feel like trying to be original with this one, so it's "inspired" (ripped off of) an old Ibanez RS -
greenp11.jpg greenp12.jpg

After shaping, I drilled holes for the tuners and put on a coat of "deep ebony" stain -
greenp13.jpg greenp14.jpg

(Somehow, the drill press managed to vibrate the nut off, and I can't find it. D'oh!)

Next I'll sand off the first coat of stain, and put on the green coats, and poly and such, all in tandem with the body coats.
 
Today, I put the second coat of poly on the body and headstock of the Pea bass (no pics.) I also wired up the controls and pickup -
greenp19.jpg

The leads from the pickup were short, so I gotta redo the black wire, maybe this evening? Also gonna throw on the third coat of poly.

I also started on 2 more projects - a Jazz Ray conversion and a blue Ibby parts build.

For the Jazz Ray, I started with a Squier Contemporary Active Jazz bass. The neck from it went on my P bass. A while back, I cut a piece of wood to fit in the bridge pickup cavity. A week or so ago, I glued it in -
jazzray1.jpg

Today, I sanded it flush, and stripped the color off the front and back -
jazzray2.jpg jazzray3.jpg

I gotta finish stripping the color, then I'll route it for a MM humbucker (😬😬😬)

The blue Ibby build will be the body, bridge, and electronics (minus pickup) from an Ibanez TR50; some kind of generic single coil chrome covered pickup; and the neck from an SX Vintage Series...something -
blueibby1.jpg

I had to widen the neck pocket slightly so the neck heel would fit -
blueibby2.jpg blueibby3.jpg

And I started on a new pickguard for it -
blueibby4.jpg blueibby5.jpg

Next steps on that guy will be cutting out the pickguard, painting the headstock black, and wiring (including figuring out how big a problem it is that the brass plate under the pickup is loose...😬😬😬, again).

There's also a P-Ray in the works, using the body from the OLP that's donating the neck to the Jazz Ray...maybe tomorrow or over the weekend? We'll see...

Also also, at the end of these projects, I'll have 2 kinda goofy looking pickguards - the TR50 one above, and one from an Ibanez Mezzo (our new bass player got one of those, and it came with a white pearloid guard. I bought a black pearloid replacement because I thought it would look better, and he/the rest of the band agreed.) I figure with those two, I can make a couple kinda different looking P-ish basses...
 
P-Ray initial project pic - OLP body, Harley Benton neck, generic split coil pickup. Not sure what I'll be doing for the rest of the hardware, if I'm gonna keep the chrome control plate, etc.
p-ray1.jpg

Also, I just put the 3rd coat of poly on the Pea bass body and head. Also also, not mentioned before, but I recently decided that I want the Franken-Jazz to have nicer parts than just generic stuff. I took the first step in that direction today - putting on a Gotoh 201B bridge. Then, the generic Gotoh copy bridge when on the Franken-Squier P (which had a Fender hi-mass bridge on it...) Next will probably be Gotoh tuners (thinking maybe lollipop instead of clover...but we'll see.)
 
I got a good amount done today -

I put the 4th coat of poly on the Pea Ray today. Hopefully, the 5th coat will go on tonight, sanding will be tomorrow, and maybe start assembly on sunday?

I started refinishing the headstock for the Blue Ibby -
blueibby6.jpg

...and the P Ray -
p-ray2.jpg p-ray3.jpg p-ray4.jpg

I sketched out the pickguard for the P Ray -
p-ray6.jpg

Also, today was Fun With Routers Day in the D&R Workshop. I routed out a little of the cavity of the OLP body to make room for the split coil -
p-ray5.jpg

...and I routed out the cavity for the Jazz Ray's pickup, starting with the general shape -


...then going a little deeper and testing for fit -


...and completion -


Checking depth -


I think that'll work.

More soon.
 

Attachments

  • p-ray3.jpg
    p-ray3.jpg
    1,021 KB · Views: 7
  • p-ray2.jpg
    p-ray2.jpg
    1.1 MB · Views: 8
  • blueibby8.jpg
    blueibby8.jpg
    1.3 MB · Views: 12
  • blueibby7.jpg
    blueibby7.jpg
    1.2 MB · Views: 11
  • blueibby6.jpg
    blueibby6.jpg
    1.5 MB · Views: 12
  • jazzray9.jpg
    jazzray9.jpg
    821.9 KB · Views: 12
  • jazzray8.jpg
    jazzray8.jpg
    649.8 KB · Views: 12
  • p-ray4.jpg
    p-ray4.jpg
    1.3 MB · Views: 11
  • p-ray5.jpg
    p-ray5.jpg
    1.1 MB · Views: 12
  • p-ray6.jpg
    p-ray6.jpg
    1.3 MB · Views: 11
  • jazzray7.jpg
    jazzray7.jpg
    665.3 KB · Views: 12
  • jazzray6.jpg
    jazzray6.jpg
    1.2 MB · Views: 10
  • p-ray2.jpg
    p-ray2.jpg
    1.1 MB · Views: 8
  • p-ray3.jpg
    p-ray3.jpg
    1,021 KB · Views: 9
  • p-ray4.jpg
    p-ray4.jpg
    1.3 MB · Views: 8
  • p-ray5.jpg
    p-ray5.jpg
    1.1 MB · Views: 8
  • p-ray6.jpg
    p-ray6.jpg
    1.3 MB · Views: 9
  • blueibby6.jpg
    blueibby6.jpg
    1.5 MB · Views: 8
  • blueibby7.jpg
    blueibby7.jpg
    1.2 MB · Views: 12
  • blueibby8.jpg
    blueibby8.jpg
    1.3 MB · Views: 11
  • jazzray4.jpg
    jazzray4.jpg
    642.6 KB · Views: 8
  • jazzray5.jpg
    jazzray5.jpg
    831 KB · Views: 15
  • jazzray4.jpg
    jazzray4.jpg
    642.6 KB · Views: 16
  • jazzray9.jpg
    jazzray9.jpg
    821.9 KB · Views: 8
  • jazzray8.jpg
    jazzray8.jpg
    649.8 KB · Views: 11
  • jazzray7.jpg
    jazzray7.jpg
    665.3 KB · Views: 10
  • jazzray6.jpg
    jazzray6.jpg
    1.2 MB · Views: 13
  • jazzray5.jpg
    jazzray5.jpg
    831 KB · Views: 15
Last edited:
So the Pea Bass is assembled -
greenp30.jpg

The theme (so to speak) was green, black and gold, right down to the little details. To whit -
greenp21.jpg greenp22.jpg greenp23.jpg

Unfortunately, assembly didn't go super smoothly. First, the strings were too far to the E/bass side -
greenp24.jpg

That's about a full centimeter off. I moved the bridge 5mm towards the G side.
greenp25.jpg
This looks better.

greenp26.jpg
This doesn't...

Also, I realized that I didn't drill for the bridge ground when I placed the bridge, so I went back and did that with...mixed results
greenp27.jpg
:banghead: :banghead: :banghead:

(That was after I put some stain in the holes so they don't stand out as much)

Also the strings were...um...a little high -
greenp28.jpg

...but after adjusting the truss rod and adding a shim, it's better -
greenp29.jpg

But...still not quite done. There's a weird issue with the nut where the A string kept popping out. I filed the slot but it's still popping out AND there's a nasty buzz now. So...I guess I need a new nut.
 
A small mod on one of my basses today. I bought a set of tuners off ebay because they looked kinda interesting and they were cheap (like $15 shipped.) When they arrived, I decided I wanted to keep them for myself, and they went on my P bass today -
pbasstuner1.jpg pbasstuner2.jpg

I really kinda love the satin finish on these, especially against the matte charcoal of the headstock. So...naturally I gotta get a bridge to match now. I ordered one today.
 
A small mod on one of my basses today. I bought a set of tuners off ebay because they looked kinda interesting and they were cheap (like $15 shipped.) When they arrived, I decided I wanted to keep them for myself, and they went on my P bass today -
View attachment 7301477 View attachment 7301478

I really kinda love the satin finish on these, especially against the matte charcoal of the headstock. So...naturally I gotta get a bridge to match now. I ordered one today.


Ah yes, the classic “save a couple of bucks on tuners by spending a bunch to make the rest of the hardware match.” Done it myself a few times. :smug: :thumbsup:
 
Ah yes, the classic “save a couple of bucks on tuners by spending a bunch to make the rest of the hardware match.” Done it myself a few times. :smug: :thumbsup:
Meh. I didn't need new tuners...or that neck, or that pickguard, or....
allineed.gif

Seriously, though, it's a Squier. I recognize that I'm putting a lot into what is, at the end of the day, a budget instrument. But I also love it, so it gets fancy clothes.