• TalkBass has been independent since 1998. Add your voice.
    Create a free account to reply to discussions, view embedded media, and browse with fewer display ads.
    Join freeLog in
    Want zero display ads or expanded classifieds tools? Compare plans.

D&R's build thread

Cool to see the progress on the Rascal bass especially, since we'd had an earlier conversation about the pickups.

Guys like you and @covermego have some great skills. My Tele build tested every bit of skill, knowledge and patience to complete.

Very cool projects, and even cooler to hear about how you donate them.
I appreciate your kind words!

I haven't really had much time to get out into the shed because of weather and spending time with my wife. She just took a new contract so I'm by my lonesome (mostly) so I'll probably get back to it this week. Remaking the rascal's pickguard is first up. Stay tuned!
 
I got time in the shed today, so I redid the rascal's pickguard -
rascal20.jpg

Seems better centered than before, but the E is still a little weak over the bridge pickup. I may need to raise that side of the pickup a bit.

In any case, I think it's done. Just gotta give it a final cleaning -
rascal21.jpg
 
Today I put the first coat of poly on the JazzRay. The plan is at least another four, then lightly sand with a 1000 grit to hopefully get a nice, smooth finish, then another few coats of poly. I'm hoping I can at least get that accomplished over the next couple of weeks.

As for new projects -

First up, this old Zenon body. First was to check the pickups and huzzah, they appear to work (or at least they passed the tap test.) The switches are weird, though...they don't seem to individually disable the pickups like I was expecting. So now, the problem is finding a neck. At first, I thought this all black job from an old First Act might do the trick -
zenith1.jpg

...but the scale length doesn't work with the bridge, measuring just past the bridge pickup -
zenith3.jpg

Okay so maybe this 25.5" scale neck would work -
zenith2.jpg

Looks real close -
zenith5.jpg

So I took off the pickguard (to which all the electronics are mounted), the bridge and the tremolo, and took another look (after marking the edge of the pickguard) -
zenith6.jpg
Drat.

Well, looks like I'll need to find another neck...maybe same scale length but 21 instead of 22 frets? Either that or chop the last fret or 2 off the neck, but...nah, I decided to use it for this project -
dc1.jpg

This is an old Danelectro Convertible body. I actually posted about this way back when I first started this thread...wasn't sure what I wanted to do with it. I finally decided I wanted to try remaking the top. That meant ripping off the top, which revealed this -
dc2.jpg

Anyway, I traced the body shape onto a sheet of ¼" plywood -
dc3.jpg

...and cut it out -
dc4.jpg

I laid it out on the body to see about the fit. It's pretty spot on (except for one little notch I messed up) but it's arched a bit because so is the plywood -
dc5.jpg

Next steps are to sand the rest of the masonite off the frame and the glue off the outside. I'm also plotting the neck cutout, the sound hole and the control area. Once the neck pocket is cut out, I gotta plot the bridge and reinforce the area beneath it. I'm planning on using a hardtail so probably best to add a block to span the thickness of the body. Not sure about pickups yet, but I'll probably mount them (it?) directly to the wood.

As for the Zenon, I'm looking at two um...very inexpensive 25.5" scale 21 fret necks on ebay. Hopefully one of those will pan out.
 
Today I put the first coat of poly on the JazzRay. The plan is at least another four, then lightly sand with a 1000 grit to hopefully get a nice, smooth finish, then another few coats of poly. I'm hoping I can at least get that accomplished over the next couple of weeks.

As for new projects -

First up, this old Zenon body. First was to check the pickups and huzzah, they appear to work (or at least they passed the tap test.) The switches are weird, though...they don't seem to individually disable the pickups like I was expecting. So now, the problem is finding a neck. At first, I thought this all black job from an old First Act might do the trick -
View attachment 7461258

...but the scale length doesn't work with the bridge, measuring just past the bridge pickup -
View attachment 7461260

Okay so maybe this 25.5" scale neck would work -
View attachment 7461259

Looks real close -
View attachment 7461262

So I took off the pickguard (to which all the electronics are mounted), the bridge and the tremolo, and took another look (after marking the edge of the pickguard) -
View attachment 7461263
Drat.

Well, looks like I'll need to find another neck...maybe same scale length but 21 instead of 22 frets? Either that or chop the last fret or 2 off the neck, but...nah, I decided to use it for this project -
View attachment 7461253

This is an old Danelectro Convertible body. I actually posted about this way back when I first started this thread...wasn't sure what I wanted to do with it. I finally decided I wanted to try remaking the top. That meant ripping off the top, which revealed this -
View attachment 7461254

Anyway, I traced the body shape onto a sheet of ¼" plywood -
View attachment 7461255

...and cut it out -
View attachment 7461256

I laid it out on the body to see about the fit. It's pretty spot on (except for one little notch I messed up) but it's arched a bit because so is the plywood -
View attachment 7461257

Next steps are to sand the rest of the masonite off the frame and the glue off the outside. I'm also plotting the neck cutout, the sound hole and the control area. Once the neck pocket is cut out, I gotta plot the bridge and reinforce the area beneath it. I'm planning on using a hardtail so probably best to add a block to span the thickness of the body. Not sure about pickups yet, but I'll probably mount them (it?) directly to the wood.

As for the Zenon, I'm looking at two um...very inexpensive 25.5" scale 21 fret necks on ebay. Hopefully one of those will pan out.

I don’t know why but I’ve often thought it would be funny to get plywood with a really fancy outer veneer and use that to make a Danelectro top and back.
 
  • Like
Reactions: definenredefine
I don’t know why but I’ve often thought it would be funny to get plywood with a really fancy outer veneer and use that to make a Danelectro top and back.
It'd probably look pretty killer, especially since the masonite (?) stuff Dano used apparently only allowed for solid or sparkle finishes. Suited their aesthetic for sure, but it would be neat to see grain-through finishes on those shapes as well.
 
Today, I sanded the rest of the old top and the residual glue from the frame -
dc6.jpg

Then I cut out the heel area on the new top -
dc7.jpg dc8.jpg

Not perfect, but not bad, especially considering there was a lot of measuring and guess work involved. Fortunately, it doesn't look like I'll need to rout the heel pocket at all; the heel sits pretty close to the top.

From there, I measured the bridge placement on the inside so I could figure out the block placement -
dc9.jpg dc10.jpg

Then I made the bridge block -
dc11.jpg

That'll sit in clamps until at least tomorrow afternoon. Next I cut out the control access and the sound hole -
dc12.jpg

...and made the control plate -
dc13.jpg dc14.jpg

I also plotted everything out this afternoon, before I did the above -
dc15.jpg

That's a Squier wide range humbucker that I picked up on ebay or reverb or something. I liked the tone I heard out of a Squier Starcaster, so I ordered the pickup for myself to use down the road. Well...not sure I'm gonna build a guitar for myself, and the pickup seems to the fit the overall vibe of this guitar, so...good use, I think. I might get a pickup ring for it, but I haven't decided yet. I guess I could always make one out of leftover vinyl (maybe the other half of that 45?)

Next up will be gluing down the bridge block, then gluing down the top. Then I'll sand the top and sides.
 
Today I glued the bridge block into the body. I don't have clamps big enough to span the body, but I think this 15 pound kettlebell did the trick -
dc16.jpg

Then I moved on to the headstock. I decided to use the same shape as the first act neck, only in reverse -
dc17.jpg dc18.jpg

This is after drilling the holes for the tuners, and two coats of Minwax Colonial Maple -
dc19.jpg

Two more coats of poly on the Jazzray, on top of three yesterday.
 
  • Like
Reactions: Matt Liebenau
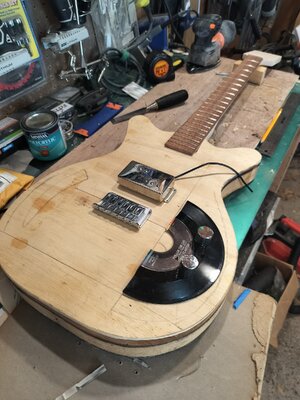
The top is on the Dano hollowbody -
dc21.jpg

Overall looks okay to me. Some parts of it are a little short of the edge -
dc22.jpg dc23.jpg

...and some parts are a little proud -
dc24.jpg

But overall, not bad. Also the neck for the Zenon came today, and it looks like it'll work out -
zenith7.jpg zenith8.jpg

Only problem is that I'm not sure what size allen wrench I need for the truss rod. A 2.5mm was too small, and a 3mm was too big. I took a peak and best I can tell there is no problem with the nut itself, so I guess I gotta find a very specific sized wrench...

Anyway, next steps are - I'll sand down the edges on the Dano that are proud, and fill in the short edges with wood filler. Hopefully it'll look okay. And then I'm gonna try to find paint to match the Zenon body, and use it to paint the headstock.
 
  • Like
Reactions: Matt Liebenau
The top is on the Dano hollowbody -
View attachment 7464628

Overall looks okay to me. Some parts of it are a little short of the edge -
View attachment 7464629 View attachment 7464630

...and some parts are a little proud -
View attachment 7464631

But overall, not bad. Also the neck for the Zenon came today, and it looks like it'll work out -
View attachment 7464633 View attachment 7464635

Only problem is that I'm not sure what size allen wrench I need for the truss rod. A 2.5mm was too small, and a 3mm was too big. I took a peak and best I can tell there is no problem with the nut itself, so I guess I gotta find a very specific sized wrench...

Anyway, next steps are - I'll sand down the edges on the Dano that are proud, and fill in the short edges with wood filler. Hopefully it'll look okay. And then I'm gonna try to find paint to match the Zenon body, and use it to paint the headstock.

7/64” is between those numbers but I’d be surprised if it’s a fractional size, it is an import neck? If possible try some different 3mm or 2.5mm hex keys ideally different brands from what you already have. Not all 3mm hex keys are the same size. Although it’s also surprising to see one that’s smaller than 4mm as that seems to be the standard anymore.

What about binding on the Dano body?
 
Last edited:
  • Like
Reactions: definenredefine
7/64” is between those numbers but I’d be surprised if it’s a fractional size, it is an import neck? If possible try some different 3mm or 2.5mm hex keys ideally different brands from what you already have. Not all 3mm hex keys are the same size. Although it’s also surprising to see one that’s smaller than 4mm as that seems to be the standard anymore.

What about binding on the Dano body?
I'm sure it's an import but I can't be 100% certain since there's basically no markings on it at all - Pardon Our Interruption...
I tried SAE hex wrenches too, but I don't remember which sizes. If I have a 7/64" at home, I'll try that next.

I briefly thought about binding on the Dano...I have no idea how to do that, though. I guess it's worth looking at though, because it would probably look pretty nice if I can pull it off.
 
As an eBay Associate, TalkBass may earn a commission from qualifying purchases.
I decided to make a filler (saw dust and Titebond II) for the edges of the Dano top that were a bit short. Came out pretty good -
dc25.jpg dc26.jpg dc27.jpg

...but I'll probably make some more and fill in some more, just to make absolutely sure it goes past the edge, so I can sand it flush. Also I sanded the Jazzray body with 1000 grit, and put on another coat poly. I'll put on another coat or two, and then I can probably move on to hardware and neck and such. Also also I put the first coat of true oil on the Dano neck.
jazzray16.jpg
 
While I was out on my run this afternoon, I found this -
artcore1.jpg

Without the duct tape -
artcore2.jpg artcore3.jpg

I...don't think this can be repaired, so the question becomes replacement. Not sure how feasible that'll be, but since the price was right, I figure it's a project I can try to undertake. I'd love to convert it to a bolt on neck...

The other challenge is that the bridge pickup doesn't seem to work. I could always replace both of them with a matched pair, but I have no how to access the wiring in a hollow body like this.

So...this is gonna be a fun one...
 
While I was out on my run this afternoon, I found this -
View attachment 7469705

Without the duct tape -
View attachment 7469706 View attachment 7469707

I...don't think this can be repaired, so the question becomes replacement. Not sure how feasible that'll be, but since the price was right, I figure it's a project I can try to undertake. I'd love to convert it to a bolt on neck...

The other challenge is that the bridge pickup doesn't seem to work. I could always replace both of them with a matched pair, but I have no how to access the wiring in a hollow body like this.

So...this is gonna be a fun one...
If it's got a center block... you could go headless. That would be different/weird and interesting.
 
  • Like
Reactions: definenredefine
If it's got a center block... you could go headless. That would be different/weird and interesting.
It does, and I definitely thought about that...just not sure that the center block extends far enough to support the bridge. But definitely a thought.

The pickups come out through the pickup routes then the electronics come out through the pickup routes. There’s a few techniques and tools that make it slightly less trying if you get that far.
I'll be looking into that if/when the time comes.
 
  • Like
Reactions: Mickey666
Based on the pictures you posted I believe it could be repaired. You didn't show us the top of the fingerboard or the sideview of the neck though. If both sides of the crack are still the same shape and there's not lot of wood missing that's not so difficult.

The question is should it be repaired. Those Artcores are not that expensive to buy and a proper repair with a refinish takes a lot of time. I might try to repair it and not worry about the finish too much.
 
  • Like
Reactions: definenredefine
Based on the pictures you posted I believe it could be repaired. You didn't show us the top of the fingerboard or the sideview of the neck though. If both sides of the crack are still the same shape and there's not lot of wood missing that's not so difficult.

The question is should it be repaired. Those Artcores are not that expensive to buy and a proper repair with a refinish takes a lot of time. I might try to repair it and not worry about the finish too much.
It's um...it's pretty bad. I can post more pictures if you like.

Also I'm looking for challenges, especially when they come along like this. Seeing what (if anything) can be done to resurrect even a cheaper instrument like this certainly fits into what I'm trying to do.

Also also, as you may notice from perusing my little collection of horrors here, uglyish repairs are oftentimes the goal as well! 🤪😜
 
  • Like
Reactions: Mickey666
More pictures. I like.

Is the fretboard unharmed? Has it's glue seam opened at the end? Does the truss rod work? Can you dry fit the headstock back in place and if so, how well does it fit? Is there wood missing?

I've not done many headstock repairs. 3? But all went nicely, except for the time I drilled a locator pin through the fretboard. The depth stop Bruce showed in the other repair thread is definitely worth considering.
 
  • Like
Reactions: definenredefine