• TalkBass has been independent since 1998. Add your voice.
    Create a free account to reply to discussions, view embedded media, and browse with fewer display ads.
    Join freeLog in
    Want zero display ads or expanded classifieds tools? Compare plans.

D&R's build thread

I got another 2 coats of tru oil on the neck over the weekend. It's really incredible how much of a difference it made in the look of the neck. Really brought out the richness of the wood.

Anyway, I also finished up most of the electrical work (most because there's a hum so I need to figure the grounding situation.)

This guitar had 2 outputs - effects and dry. I took out the effects board, so I put a bolt in in the effects hole as a grounding point -
dano1-5.jpg

Pickup routs and pickguard placement -
dano1-6.jpg dano1-9.jpg

Shielding paint!
dano1-11.jpg

Everything together!
dano1-15.jpg

I put tuners on the neck and put the neck on yesterday evening, but I got file down the nut and figure out the hum. So no final pics yet. It's really something how much faster you can go when you don't refinish the body...
 

Attachments

  • dano1-14.jpg
    dano1-14.jpg
    3.4 MB · Views: 6
  • dano1-13.jpg
    dano1-13.jpg
    3.3 MB · Views: 9
  • dano1-10.jpg
    dano1-10.jpg
    3.8 MB · Views: 8
  • dano1-8.jpg
    dano1-8.jpg
    3.4 MB · Views: 9
  • dano1-7.jpg
    dano1-7.jpg
    4.9 MB · Views: 8
Last edited:
Final bits -

Made the tremolo...area cover (I made the battery box cover sometime last week) -

dano1-16.jpg

And filed down the nut slots. The action is still a little high, but I have some room on the saddles (and I guess I could file the nut down a bit more...) It needs new strings (I only had and *OLD* set, and even then I think I used 2 D strings for the A and D...) and a setup as well. I think I can call it done, though -

dano1-17.jpg dano1-18.jpg
 
Last edited:
Question -

I have 2 necks I ordered from Allen Eden, one short (30") and one medium (32") scale. They both have rounded (I'll say Fender P/J style) heels. My plan was to flatten the hell to fit the more tele style pockets on a couple of bodies I have. However, I was foolish and didn't confirm the width of the heel or the pockets, so they don't fit (heel is about quarter inch wider than pocket.)

I'm trying to curb my consumerist inclinations and just buy another neck (actually not super easy to find a 30" scale neck with that narrow of a heel anyway, especially when trying to shop domestically.)

All this to say - how difficult is it to reshape the heel to fit? Is that something I should try to do?
 
I'd always be more tempted to cut the pocket to the pre-existing heel rather than vice versa, but that might depend on the specifics of the neck and body in question.

If you can find the actual specs for the dimensions of the heel -- for example, vintage J's (and possibly P's) typically use a compound of ~3/4" circle curves in the corners intersecting with a ~10" main curve (see pic) -- it might give you the starting point to develop an accurate routing template (warning: these values are approximate and the modern ones are slightly different).

vintageJNeck.jpg
 
  • Like
Reactions: definenredefine
I'd always be more tempted to cut the pocket to the pre-existing heel rather than vice versa, but that might depend on the specifics of the neck and body in question.

If you can find the actual specs for the dimensions of the heel -- for example, vintage J's (and possibly P's) typically use a compound of ~3/4" circle curves in the corners intersecting with a ~10" main curve (see pic) -- it might give you the starting point to develop an accurate routing template (warning: these values are approximate and the modern ones are slightly different).

View attachment 7172096
I suppose I could post pics of the bodies in question. They have very minimal neck pockets, which could really cut (no pun intended) either way. Anyway, my thought was that I would create...um... an inverse routing template, and use that to cut the excess material off the heel. Not sure if that would work or not. These were not expensive necks so I don't mind experimenting on them, but then ditto on the bodies, so...
 
  • Like
Reactions: Quills
Are the necks too wide for the string spacing as well? If so you would probably want to trim a sliver off each side, the entire length of the neck.
I haven't gotten that far yet. The bodies are unloaded, so (presumably) the string spacing is up to me and whatever bridge I go with.

Yeah. It didn't occur to me that the protruding heel block itself might be too narrow, in which case trimming the neck is definitely the lesser evil.
This is definitely the case on the Danelectro body.
 
  • Like
Reactions: Quills
Got a good bit done over the last couple of days. First, on the GTX, I made a block to fit into the tremolo cavity -
gtx3.jpg gtx4.jpg

Then, I drilled through the block for the strings to pass through, and through in ferrules. (It's kind of a pain to get them to line up. Fortunately, the old tremolo cavity cover really helped.)
gtx5.jpg gtx6.jpg
Made the tremolo cavity cover -
gtx8.jpg

...and made a bit to fill in the floyd cavity on the front -
gtx9.jpg

I drilled the holes through the vinyl for the strings as well as the bridge ground, then installed the pickups -
gtx10.jpg

I've screwed down the bridge and put in the electronics (volume, 3-way blade switch). Just gotta wire it up and put strings on, then see if it works.
 

Attachments

  • gtx7.jpg
    gtx7.jpg
    3.9 MB · Views: 12
Last edited:
And second, I started working on a cheap tele body I bought recently. The plan is a gold foil tele neck pickup (here) and a gold foil humbucker for the bridge (purchased, hopefully en route soon.) Also I need a 25.5" scale neck with a tele-style heel. In the meantime, I got to work on the control bits, starting with the pickguard. I wanted to use this pickguard -
tele1.jpg

...but that wouldn't work with the control cavity as it is. So I started on making one that would -
tele2.jpg

I'm still using the typical tele-style control plate, so I cut the pickguard around it -
tele3.jpg

This is what I'm going for, more or less.
tele4.jpg

Obviously, I can't attach the bridge until I get a neck. And I gotta route the cavity for the humbucker. And then sanding/finishing (I'm gonna use butcher block oil...I think it'll look pretty good. We'll see.) But never the less, a decent start.
 
Last edited:
Got the neck for the tele, so I made some progress on the build. First, placed the bridge, cut the pickguard to fit, and routed the pickup cavity for the humbucker -
tele5.jpg tele6.jpg

Then, sanded the body to 1000 grit, stained with Watco "gray" butcher block oil, and hit it with several (I think 5 so far) coats of warm semi-gloss oil based poly -
tele7.jpg tele8.jpg

In doing so, I noticed some flaws in the piece of wood the seller used for the body, including several scratches and areas that didn't take stain too well. To whit -
tele9.jpg

I drilled and plugged the old holes on the neck -
tele10.jpg tele12.jpg

...and painted over the logo on the headstock -
tele11.jpg
I think this one is gonna come together nicely. I'm gonna put on another coat or two of poly, then move on to assembly.

I also made the control cavity cover for the GTX -
gtx11.jpg
For some reason, this was more challenging than previous pieces. The first one was a bit small, and the second one cracked when I drilled it for the screws. Usually I can get these right with a minimum of drama but alas... I need a jack plate, but when that arrives I can wire up the pickups and move towards finishing this one up as well.

And I FINALLY mounted the handles to the V4 cabinet, and replaced the amp within it. Then I cut out and painted the front grill -
v4l.jpg v4k.jpg
I'm...not super happy with how this turned out. I made some silly mistakes with the handle placement that were entirely due to me not taking a bit more time. Also, I had masked off the area I was drilling, and the tape took the paint and poly with it in a couple places. Those places are covered by the handles, but it still still sucks. Also also I scratched the top when I put the Music Man head on top. Really considering learning how to tolex now, just to cover my mistakes... But at least it's done, after like a year and a half...
 
Yesterday morning, I finished the tele.
tele13.jpg tele14.jpg

I did a TERRIBLE job with the string-through ferrules. To begin with, I didn't drill the holes straight through from the bridge to the back, so they're all cockeyed (as a friend put it). Then, I drilled out the holes for the ferrules before I actually got the ferrules.

Because I'm a big dummy.

Anyway, it looks like this -

tele15.jpg

Despite how bad it looks, it still strings up properly, so I guess that's something. Never the less, I gotta really think about how to properly drill for string-through if I decide to do it again.

Anyway, the guitar plays and sounds pretty great. I'm pretty impressed with the pickups, especially since they were pretty inexpensive. It needs a setup, and I think there's a slight forward bow that I gotta deal with. Also, the body is really light. This is actually the first time I've dealt with neck dive.
 
  • Like
Reactions: 13ghosts
Today, I finished the front grill for the V4 -
v4m.jpg v4n.jpg

Then I rubbed off those awful sharpie marks -
v4o.jpg v4p.jpg

I guess the next step would be to throw on a rear grill...maybe a metal mesh of some kind? I think Grainger would have that...?

Also I finished the GTX. I went with just a 3 way switch, no volume or tone knobs. Minimalism!

I have a few more project ideas that should hopefully start coming together soon.
 
I recently bought a couple of 30" scale baritone necks with the intent of attempting a couple of guitar to short scale bass conversions. One is using a First Act body -
fabass1.jpg

For this one, I plan to wire the pickup with a 3 way switch for single/series/parallel. For today, though, I expanded the pickup cavity to accommodate the tabs for the pickup screws, and made the control cavity cover.
fabass2.jpg fabass3.jpg

I was gonna use the other neck with the other Dan-o-blaster body (still the plan, eventually), but instead I'm using it with a Squier tele body that a friend gave me. It was a project he had abandoned (a baritone conversion, as it were.) I think he had put ebony stain on it after stripping the original finish.
telebass1.jpg

This one will be pretty straight-forward, control wise - vol/3way/tone. I'm gonna stain it dark green (I hope, anyway...depends on what I can find.) For today, I sanded the whole body with 240 grit. I tried to leave some of the black streaks with the hope that they'll show through the stain.
telebass2.jpg telebass3.jpg

One last thing for today - I swapped the neck on my P bass with the neck from a Squier Contemporary Active Jazz (which I bought for another project, forthcoming.) It was mostly an aesthetic switch since the nut width is the same and neck feels more or less the same.
p-bass-neck-swap.jpg

Now I just gotta put the block "inlay" stickers on in my style, to whit -
cortjbfinal.jpg
 
Last edited:
Got a good bit done yesterday. For the tele bass, I opened up the pickup cavities a bit so the pickups fit. Then I cut out the pickguard and control cavity cover -

telebass4.jpg telebass5.jpg

Then, I placed the neck so I could plot the location for the bridge -
telebass6.jpg

That'll work. Here's what I'm going for after staining/finishing -
telebass7.jpg

...and here's the first coat of stain -
telebass8.jpg telebass9.jpg

I was concerned that my friend didn't quite get through all of the sealer coat (especially on the sides) and the stain wouldn't take, but it turned out okay, I think -
telebass10.jpg telebass11.jpg

The minwax hunter green is a little more blueish than I was going for, but it's also a really pretty color, so I'm happy. I'm gonna throw on one more coat, I think, then move on to poly coats. I'll probably do that today.

On the First Act, I plotted out the bridge location. On this one, I was able to place the bridge just in front of the bridge ground channel, so I didn't have to drill a new one -

fabass4.jpg fabass5.jpg

Since I don't have the original neck plate for this guy, I bought neck bolts with ferrules. I drilled out for the ferrules so they would be flush with the body (more or less) -
fabass6.jpg

Then I moved on to wiring. As I said before, I'm going for series/parallel/split, which...I've never done before. So...a little more forethought was required (which I'm usually too impatient to use). I broke out the multimeter and placed the wires where I thought they should go -
fabass7.jpg

And -
series - fabass8.jpg split - fabass9.jpg
parallel -fabass10.jpg

...so I guess I did it right? Anyway, then I soldered everything up (though I had to desolder from the jack because I forgot to wire in the volume pot... :banghead:)
fabass11.jpg

...cover on -
fabass12.jpg

And together. Fortunately, the knob covers up the butcher job I did expanding the hole for the volume pot
1746978687747.png

fabass13.jpg

Second coat of stain will likely go on the tele body today, but first I gotta design the headstocks for both of these.
 
Last edited:
Digging that swampy green
Well...second coat of stain went on today, and it came out a bit less swampy. Observe -
telebass13.jpg telebass14.jpg

...but I think it still looks pretty great, especially in person. In fact I think that's gonna be it for color, and I'm gonna move on to poly this week (tomorrow?).

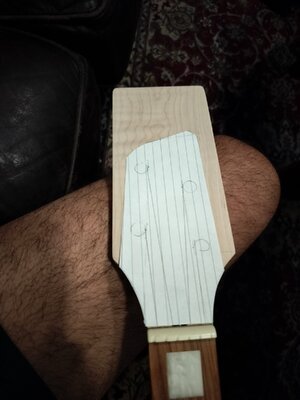
Also today, I designed the headstocks. The 2+2 is for the tele, and the 4-in-line is for the First Act -
telebass12.jpg fabass14.jpg

I cut out the headstock for the First Act -
fabass15.jpgfabass16.jpgfabass17.jpg

Overall, I'm pretty happy with how it came out, considering I've never done this sort of thing before. Only problem was I didn't have the right sized bit for the tuners. As a result, I had to use a file to open up the holes, and that was...a task. Anyway, I also slotted the nut. I'm gonna finish this neck this week. I'll probably also cut the 2+2 headstock out as well.