• TalkBass has been independent since 1998. Add your voice.
    Create a free account to reply to discussions, view embedded media, and browse with fewer display ads.
    Join freeLog in
    Want zero display ads or expanded classifieds tools? Compare plans.

Double Bass Detached bass bar repair question

Hi all,

This is my first post here. Excuse me if this is the wrong place.

A small amount of background before my question.
I have been repairing some student basses free of charge for the local middle school. I'm a pretty experienced wood and metal worker but I had never touched ANY instrument. My son also plays and I started with minor repairs on his basses.
My question is about the 7th bass I've worked on now.

Anyway, the previous school basses where not playable and the repair costs quoted by real shops exceeded the instrument's value. They have all been very broken (end blocks, bent machines, missing laminate, collapsed, etc), They are all student quality laminate basses. I wouldn't feel confident with something expensive but so far they have been happy with what I return.

So, I have a 1955 Kay M-3 (aka H-10) 1/4 size. This is the 4th one of these H-10's I have repaired, the newest and in the best shape. They were actually still playing this one. But I'm stuck. It has a detached bass bar which I had not seen before and I'm not sure how to handle. It was only hanging inside by a few inches at the top.

I had to take the front off (as with the others) to get at it and fix the other lamination problems and I've got the bass bar off and it is not broken. The problem is the front has been pushed in by the bridge foot at least 1/4" and replacing the bar with the current shape would "spring" it probably beyond what I think would hold. The lower end was "out" from the inner face by almost an inch.

The question:

- Should I trim the center of the bass bar to fit the current shape of the front (remove material on the bar under the foot)?
or:
- Make a new bar, trimmed to fit but thicker near the center?
or:
- Is it possible to somehow press the front back into the original shape? Steam and clamp? These are very prone to more lamination problems - judged by the edges and failures near the end block. It may split pressing it hard.

I think the last one is the "right" solution but I don't know how to do that work.

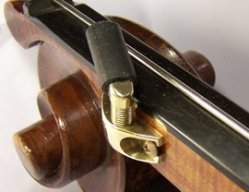
The picture is the lower end of the bass bar as I found it.


Any suggestions would be appreciated.

Thanks much,

S
 

Attachments

  • detached_bass_bar_small.jpg
    detached_bass_bar_small.jpg
    29.2 KB · Views: 346
I can't answer your question with any authority (although Jake's advice seems sound to me), but welcome to the forum! From your post you seem like someone who is sensible and wants to do the right thing. If you stick with us I'm sure much good advice will be provided (certain cranks notwithstanding). I also do repairs on student instruments which the local luthier refuses. I have no aspirations, but I like working with wood, and figure that every instrument saved from the trash bin allows one more kid to learn bass. You've taken on a noble cause...carry on!
 
Thank you for the assistance.

And yes, there have been more bass students at the school than available instruments. I'm happy to have saved a few.

I like the "clamp and see if it relaxes" approach.
It's only time and they don't care when I give it back.

I completed the front veneer repairs today and do have one more uncertain detail about the bass bar (indirect way of asking an ignorant question):

It appears that Kay had glued only the ends of the bass bar (3-4 inches?). There were pretty big globs of thick hide glue that look original near the ends and if there was anything in the center it was very light. It doesn't appear to have ever been modified or repaired so I was surprised by that observation.

Is the bar normally glued the whole length on this type of laminated bass but light/diluted in the center?

-S
 
This is somewhat common in this quality and age of bass. I am surprised to see it was only glued at the ends. A bass bar is installed with some spring in it as to support the pressure of the strings since there is no sound post pillar type support on the E side. It would actually be good for it to spring the top back up that 1/4" you mentioned, since the reason it has done so is because the bass bar has been virtually removed for some time.

Another suggestion is when working with these critical pieces such as bass bars and blocks, basically anything you want to fix that involves taking the top off.. use hare glue instead of the standard hide glue. Hare glue is slightly stronger, but not too strong. Don't use fish glue as it is like concrete. You can find hare hide glue at most violin supply sources such as Howard Core, among others. With the rate you are repairing instruments a 500g bag of kernels will last you a very long time.
 
Clamped it pretty hard from the ends and with some scrap over the center. It is now down to about a 1/32 gap with the clamps on at the ~1/3 points. I think it is going to work. TY

BTW - two more questions

Where to I get proper linen for repairs?
Just a typical fabric store? As in true flax linen?

I experimented on the other Kay H-10 repairs with the finish.
To sort of blend the big pieces of missing veneer, I went with Behlen lacquer with brown TransTint. I tried some black dye first and made a mess. The TransTint was darker even than the original (the edge nitrocellulose? star effect) but seemed to help hide the peeled sections. Someone probably just had heart palpitations. Is this heresy or appropriate finish?
I'm talking cleaning up student carvings, paint, auto body Bondo (I know the smell), and peeled veneer here.
 
yes, typical decent fabric store...unbleached flax. just a small strip,foot long,couple inches wide. it will most likely be free!

for touch up i've had luck sealing the surface before applying color..that way the pigment is not sucked into the wood, and can reverse the action by wiping it off and starting over 'till it's closer to the desired look.
 
I am surprised to see it was only glued at the ends. A bass bar is installed with some spring in it as to support the pressure of the strings since there is no sound post pillar type support on the E side. It would actually be good for it to spring the top back up that 1/4" you mentioned, since the reason it has done so is because the bass bar has been virtually removed for some time.

Esteemed luthier Jeff Bollbach has this to say on bass bars:

http://jeffbollbach.com/JB II/luthier_rant3.htm
 
Esteemed luthier Jeff Bollbach has this to say on bass bars:

http://jeffbollbach.com/JB II/luthier_rant3.htm

Obviously it would not be enough spring to cause any of those issues. I said 'some spring' not enough to launch a catapult. I don't know if his drawing was supposed to be accurate, but it shows a much further spring than I would ever consider doing. Usually you would leave about 2-3mm on each end to spring to the top, which is pretty minor, especially if you are tapering the bar towards the ends.
 
Well, it is still clamped down pretty hard and it has moved back faster than I expected. With the clamps on, now I can't get a 1/32 inch thick sheet under it at the gaps.

It was a bit like figure 5 but with everything except one end of the bar completely detached.

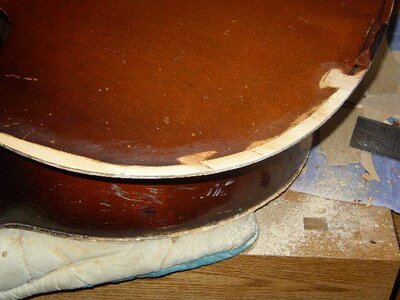
This is what I did to the chewed up bottom edge on the front.
Trimming it smooth at the little pin strip line seemed appropriate except where it was missing even past that point. The right way I hope.
 

Attachments

  • lower_front_repaired_small.jpg
    lower_front_repaired_small.jpg
    43.9 KB · Views: 295
I would spray the inside surface of the ply with some water from time to time, and keep letting it relax into position. Personally I wouldn't put any "spring" in the bar to close the gap. Once you can glue it in position, do so with strong hide glue, leave it to dry well, then thin the end of the bar! I think it gave way because the end of the bar was not flexible where it needs to be. It looks twice as tall as it needs to be. That said, the bass bar is probably crap wood anyway. If you're looking for practice, do a new one.

BTW your edge repair looks OK to me for that kind of bass.
 
I hope success.
It has been sitting glued a few days now and it did not mess up the lamination/layer on the inside center. I did spray it lightly with water a few times where it had pushed inward while it was dry clamped.

Picture shows I was a bit sloppy with glue and the inside edge repair too.

Thanks
 

Attachments

  • bassbar_glued_small.jpg
    bassbar_glued_small.jpg
    26.4 KB · Views: 293
Don't worry about being sloppy with glue inside. You can't see it when the top is on and it won't harm anything. :)

Looks like it should hold up well. I would also encourage you to get the top on as soon as you think it is safe. With basses, once you take the top off, the ribs start moving slightly and can lead to alignment problems when putting the top back on. It's usually nothing serious, but it's a devil of a time pushing and shoving while clamping the top down.
 
Top is back on but I'm not happy with some of the finish.

Not sure on how it sounds yet. I liked the previous ones better.
The strings are trash, not sure if the school has any new ones.

Two questions:

The sound post seemed to have ~1/32 inch gap before putting on the strings. It is in place after tuning (force on the bridge).
I'm thinking that the repaired bass bar pushed the front out and that someone may have previously reduced the length of the post without fixing the bass bar. Is that too loose?
All the others I worked on it would stay put even without the strings.

The whole bass is somewhat darker now which did help cover the scratches and patches. I was just brushing the repairs and scratches. Originally, it looked like trash.
I do have some spray gear but not a good/safe booth.
Is the bottom back in the picture too horrible? Try a small spray gun?

The front is fine but I learned I'm not good at pin striping.

Thanks again
 

Attachments

  • back_mess_crop.jpg
    back_mess_crop.jpg
    49.3 KB · Views: 255
You did a good job for that school! It is acceptable, but if you want to make it look a little better I would just make the bottom ring of the burst wider and more uniform around the bottom bout. You could just hand rub it using some shellac and aniline dye. That's probably what I would do...

I am a school teacher and work on those things too... :crying:

Congrats!
BG