• TalkBass has been independent since 1998. Add your voice.
    Create a free account to reply to discussions, view embedded media, and browse with fewer display ads.
    Join freeLog in
    Want zero display ads or expanded classifieds tools? Compare plans.

DIY Effect Makers (club?)

it's a AUX out jack.
and yeah, I built one of those too. :thumbsup:
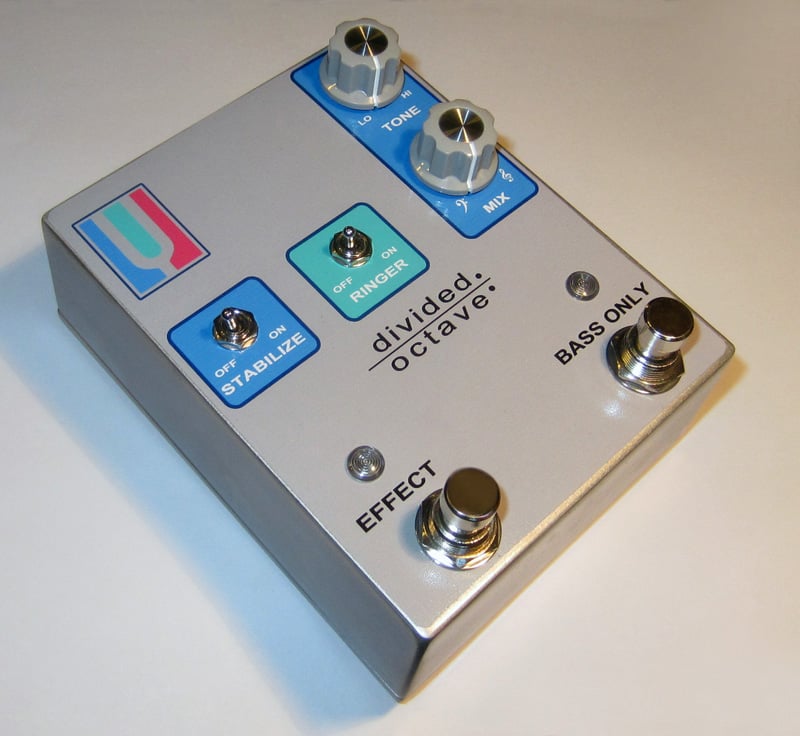
DividedOct-01.jpg
As always, your builds are outstanding.
 
Yeah, I was just checking to see if anybody was on here, started another thread where I asked if there were any diy threads and got this one...
I have 3 bazz fusses, one germanium, one silicone, and one led, and I've been playing around with running them together in parallel, and in series, so that I can use just one of them, or two at the same time, or all three. In one case I simply ran the output wires together and sent them through the out jack, and that was interesting, So I'm thinking a stomp switch for each fuzz unit or a volume control on each unit before they join at the output, or blend for two, switchable to a series connection, switchable to the third, which has the most gain. Mainly I'm concerned about what buffers or resistors would be needed in conjunction with these various alignments. Working on pictures to post on here later today.

 
Yeah, I was just checking to see if anybody was on here, started another thread where I asked if there were any diy threads and got this one...
I have 3 bazz fusses, one germanium, one silicone, and one led, and I've been playing around with running them together in parallel, and in series, so that I can use just one of them, or two at the same time, or all three. In one case I simply ran the output wires together and sent them through the out jack, and that was interesting, So I'm thinking a stomp switch for each fuzz unit or a volume control on each unit before they join at the output, or blend for two, switchable to a series connection, switchable to the third, which has the most gain. Mainly I'm concerned about what buffers or resistors would be needed in conjunction with these various alignments. Working on pictures to post on here later today.
What your talking about is actually decently complicated if you are wanting consistent volume and proper usability. In an ideal sense you are talking about the functionality of a Wounded Paw Blender with fuzz circuits built in, and that type of mixer circuit has to be very well thought through. You can slam something together like a bunch of simple blend/fuzz circuits switched in series, but the result is not as versatile or usable as a properly designed parallel mixer circuit like Wounded Paw or Badger make. I once commissioned a custom parallel looper build like that from a pretty decent builder, and he took the route of chaining together blenders... the result was so limited in the usability I sent it back and he wasn't even interested in making another attempt.

I built a parallel looper (paramix from guitarpcb) that is two channels, so you could pick one fuzz to be in parallel and the other two in series. You'd be looking at a pretty full box at that point.

If you end up going for it keep me updated on how you approached it, your experience, and the results.

Also, you could build a DAM Ezekiel that is switchable with those clipping options and has a master clean blend...
 
When you look at this layout you would need a powered splitter or mixer circuit everywhere you simply have wires connected. You would be losing signal all over the place just trying to hook wires together to create a parallel connection. If you had the goal of simply stacking them in series then this gets much simpler.
 
Exactly, that is what I am seeking suggestions for, fill in the blanks below
for a series connection, parallel connection, Switched, blended, etc...

Fuzz 1 mpsa13 transistor with germanium diode
Fuzz 2 2n5088 transistor with 2 silicone diodes
Fuzz 3 2n5089 transistor with led

would like to blend fuzz 1 and 2 and then blend that with fuzz 3, or switch each fuzz on/off
and parallel to out stomp switch.
Or something similar, what specific components would do one of these things well?
 
Well I received my Pigeon FX kits yesterday, so I decided to put the Fuzz Face together. There are a few solder joints I'm not 100% happy with, and I may go back and do them once I get a new tip or clean this one (couldn't find my scour pad for the life of me). However, overall I'm pretty happy with how it turned out for my first go at it. Just waiting on the last transistor to arrive so I can finish it up.

2015-01-18150703_zps99bee741.jpg
 
I see it has been a few months since this thread was active, but if you are still taking members I'll take a number. I've built a couple Bazz Fuss circuits and three kits (BYOC Mega Chorus/Vibrato, BYOC Phase Royal, and GGG Adamu).

I am planning on building the three circuits in the bass combo pack from GuitarPCB in the near future. I'll post pics/thoughts once they are done.
 
My recently completed PCB clone builds are a Timmy Overdrive and Wampler Ecstasy builds using Fuzzdog's great kits. I wanted to build a Fairfield Barbershop clone, but that can only be built on vero at the moment (which is a good thing). So I built one up and I'm loving it. I'm finding my fav dirt at the moment is the Wampler Ecstasy into the Barbershop. Using the Wamper as a clean boost (with Bass and Treble) or a bit of mild hair into the Barbershop to completely thrash it into a gnarly fuzzy mayhem.
In the next few weeks, I'm hoping to order a DAM Ezekiel and a Blueberry...which will probably be my last dirt boxes for a while....or until I get a further building itch...
 
Well, a few weeks ago I started a couple projects, but due to class and work, the musical, and also biting off more than I could chew, they were put on hiatus.

I was hoping to get a replacement tip for my Radio Shack iron, but all the RS' in town here are closed. Can't find the right tip elsewhere, so I'm currently shopping Amazon for a new, nicer iron. Also going to be ordering some parts to make what I started easier.

I've already determined vero builds aren't quite in my league right now, so I'm going to be looking into different PCB based builds (like Madbean) to make things a little more streamlined.
 
Hello everybody, I got a soldering iron for Christmas (from my stepfather), I'm an absolute beginner with no skills or knowledge about electronics.
I'd like to start with 2 simple projects:
1. Harmonic percolator
Invalid Link Removed (yeah it's sold out but you can still find the PCB on eBay)
2. Modify this footswitch to make it work with my amp (it's mono, it needs to be stereo) and possibly add leds so I don't need to look at the amp.
5934990_1543067971.jpg


Are these suitable as "first project" just to start learning the basics?
What tools do I need to start?
Any advice and help would be welcome :help:
 
Are these suitable as "first project" just to start learning the basics?
What tools do I need to start?
I would not start with a pre-made PCB because there is a good chance you may wreck it with incorrect soldering technique.

Have a look at Bazz Fuss fun it is built on perf board which is dirt cheap if you buy direct from China (use Ebay and select the worldwide location option). If you can get the fibreglass board with plated through holes it is really nice to work with.

For tools as a minimum I would say :-
Soldering Iron (don't skimp on quality).
Stand.
Damp sponge/piece of cotton rag/paper towel for cleaning the tip.
Solder. initially start with good old 60/40, the modern lead free stuff is is ok once you get the hang of soldering but I wouldn't recommend starting with it.
Solder sucker or de-solder braid, for removing excess solder and reworking joints.
Small needle nosed pliers.
Small wire cutters.
Multimeter.
Bright work light.
A "third hand". Fully adjustable crocodile clips on a base, or small table edge mounted vice is always useful for holding your board. I have both but often use a large pair of pliers and a reasonably strong elastic band wound around the handles.

Also useful :-
Tweezers, fine point.
Sharp knife.
Picking tool (a sharp point with a handle).
Medium regular pliers.
(There must be more but I cannot think of them now.)

All joints must be scrupulously clean before you solder them as you cannot solder to dirt, tarnish or oxidisation. I have an old ink eraser and a typist's eraser. Both of these are loaded with fine sand so are abrasive. A fibre glass brush is supposed to be good but i don't own one so cannot comment.

If I am reusing components, using old stock, or they don't look as clean as they should then I clean the leads first. It is better/quicker to clean them first than discover that the solder isn't flowing properly and have to clean it all off and then clean them.

To preserve domestic harmony you need something to protect the dining table top or kitchen counter top from solder splashes. Also be very careful not to drop molten solder on the carpet, it usually has to be cut out and so leaves a hole.

There must be more but this post is already getting a bit long.
 
  • Like
Reactions: neuman and oZZma
@delta7fred
Wow thank you so much for the GREAT tips!!! :thumbsup::)I'll go for perf board for a start then :) I also found a couple of interesting "beginner's" kits (PBC) I could build before the Harmonic Percolator, I read that components for the Percolator are no longer available because they are outdated and you should carefully choose the components to replace them because it could sound different... I will build it later when I am at least skilled enough to choose the right components!
 
I bought a cheap PT2399 based delay kit from China for about $15.

Pros
The PCB was good quality.
Most of the components were good quality (but see below).
It worked first time and sounds quite good.

Cons
One jack socket was faulty and the other the wrong type so I replaced them both.
There was no way it would fit in the supplied box without omitting the battery, moving the jacks into the battery space, and moving the power jack.
There were no instructions (could have been a problem for a beginner).
 
  • Like
Reactions: oZZma
I bought a cheap PT2399 based delay kit from China for about $15.

Pros
The PCB was good quality.
Most of the components were good quality (but see below).
It worked first time and sounds quite good.

Cons
One jack socket was faulty and the other the wrong type so I replaced them both.
There was no way it would fit in the supplied box without omitting the battery, moving the jacks into the battery space, and moving the power jack.
There were no instructions (could have been a problem for a beginner).
Yeah I'm definitely looking for kits with instructions, I have a Craig Anderton's beginner's book to help me identify parts and read schematics (more ore less :D) but I don't feel like I can finish my first builds without instructions...
Honestly it would not bother me much if the first kits I build aren't durable (or usable) or don't sound good to my taste, it's just an exercise for me... So I can start making what I'm really interested to as soon as I'm able to. Crazy/extreme modulation and noise stuff, mostly.
 
Last edited:
I built a few for me. First based on kits, then bought pcb's, then etched some pcb's and boxes, then doings my own layouts and letting pcb's been made. Now anywhere in between. I sold a few pcb's and lately one pedal to a friend.
Here are some examples of what I did:

87A8639C-AF30-45F3-B54D-1CE990532C29.jpeg 48514E4F-A03F-4DF1-BE7D-A7BDEC6B23D1.jpeg F5E8FBA6-2F9C-40B9-81BF-57AA8AE2CA2F.jpeg 181A5F65-E852-4251-8DDC-3E233CAF7DD6.jpeg D8CD5D40-2008-49C3-9300-96AA331D6697.jpeg E95A57B6-8A98-4D0B-811A-6277F7226D52.jpeg 45C86367-A5D3-4861-8B8E-19B27399530A.jpeg FDD1CCDE-405C-446A-A33E-E94AC4FDE2FF.jpeg B3FFE24F-71E3-4A68-9A74-9CD715C41887.jpeg C665B889-9AFB-4E45-9E40-82461727EBED.jpeg 9466AB57-DD7E-435F-B1FB-7CB8EC1AAAD6.jpeg 4AE3E38B-9F3E-4A33-ACF9-5994535055FA.jpeg
 

Attachments

  • 8910C2BC-982D-4466-B370-66CD0D91CC61.jpeg
    8910C2BC-982D-4466-B370-66CD0D91CC61.jpeg
    261.6 KB · Views: 38
  • Like
Reactions: oZZma