• TalkBass has been independent since 1998. Add your voice.
    Create a free account to reply to discussions, view embedded media, and browse with fewer display ads.
    Join freeLog in
    Want zero display ads or expanded classifieds tools? Compare plans.

Double Bass Double Bass snapped at the heel

EAME,

Hmm.. Not entirely sure what's going on here, but it seems you edited/added to your post #74 after I had replied to it. You now ask:
So I glue the threads into the Heel next. I can do this with the Hide glue cant I?
and the answer again is: No, most definitely not. As said before, hide glue does not stick to metal, that is where you use epoxy. Please use epoxy to glue the threaded rods in.
And also, the advice was to drill the holes for the rods after the neck was glued onto the heel (using the central screw & alignment trick) in order to ensure a well fitting & properly aligned hole/channel for the rod. Remember, the advice was: do not screw it in, but feel by hand if you can push it in easily, if not sand some thread of the bar. So if you use M6 rods (as it looks like you do), drill 6mm & take some sandpaper to round the edges of the thread as required. Here it looks like you drilled 7mm or maybe more (8mm?), thus taking away too much wood.

Anyway, if properly mixed @ the right ratio, epoxy is quite strong & filling so it should still work. Make sure the hole & threads are properly filled with epoxy, and that the thing lies on its back when you glue the rods in (or the epoxy will flow out), and best wait a week before loading.

(The hideglue is for the fingerboard.)
 
EAME,

Hmm.. Not entirely sure what's going on here, but it seems you edited/added to your post #74 after I had replied to it. You now ask:
and the answer again is: No, most definitely not. As said before, hide glue does not stick to metal, that is where you use epoxy. Please use epoxy to glue the threaded rods in.
And also, the advice was to drill the holes for the rods after the neck was glued onto the heel (using the central screw & alignment trick) in order to ensure a well fitting & properly aligned hole/channel for the rod. Remember, the advice was: do not screw it in, but feel by hand if you can push it in easily, if not sand some thread of the bar. So if you use M6 rods (as it looks like you do), drill 6mm & take some sandpaper to round the edges of the thread as required. Here it looks like you drilled 7mm or maybe more (8mm?), thus taking away too much wood.

Anyway, if properly mixed @ the right ratio, epoxy is quite strong & filling so it should still work. Make sure the hole & threads are properly filled with epoxy, and that the thing lies on its back when you glue the rods in (or the epoxy will flow out), and best wait a week before loading.

(The hideglue is for the fingerboard.)

I know,dont know why I said that at all.
I also forgot to add that I'm going to use some sleeving on those rods as well,hence the slight increase in diameter.They are actually quite a good fit,and drilling prior is better for me,as any splitting would have mean't removing the neck again,and I'd of lost my patience with it then,to be honest.I can also really do a better reinforcement job with access to the Heel holes first,imho.
I'm also very sure about the placing of the holes,as I'd already sussed the angle as I've done it before with the first effort,and there's not really a big chance of getting those wrong,as It was virtually clamped in the finishing position,a mm or two to go when it is fully tightened:The guide here is it still has all the original pencil markings under and around the neck,so I'm not working completely blind,and it really does sit in there tight,as I mentioned earlier.
Really at a loss as to what or why I said about the glue tho,maybe I lost track of the Q I was asking to do with gluing..It was a long day,so apologies there mate.
 
Ta, no worries & I'm sure it'll work out fine. Looking forward to the result.
insertIMG-20160819-00026.jpg these are how I'm going to do it Ortsom.These are literally now push tight snug [hhh] and just a smear of glue on the sleeve and on the thread is all I need now.
I'm thinking the sleeving I'm using will slow down the threads bite-ing into the wood and wearing over time,and gives me a bit more strength than the glue alone,and keeps it all lined up nicely,and will improve final positioning,the over flow of the tube/sleeving gives me some leverage points as well if needed.
I might even be able to 'hear' it too, and should it fail,it will help absorb some shock.

I've had a look,when I mentioned this earlier,I dont think it posted,my mistake sorry.
Let's see how it goes anyway...!
 
Those look like soft plastic, or rubber hoses. I think those hoses are a very bad idea. I can go into a technical explanation involving the elasticity of the various materials, but I think you'll be much better off just using epoxy alone around your M6 bars. Or bigger threaded bars, now that the holes are the size they are.
 
  • Like
Reactions: DoubleMIDI
Sanity restored.Right,were was I?....IMG-20160823-00031.jpg Good advise Ortsom:Finally got them right. All ready to R'N'R now mate,ready to 'glue screw and clamp' [next album? hhh] and I'm going to get a couple more clamps as I will need them for the Fingerboard.IMG-20160823-00032.jpg Set and clamped now,finally!.....I used the A and D strings loose strung down the middle,taped the Bridge in place and used the nut.With the finger board in place,the strings are clear of it and the clearance seems good all the way down.Difficult to clamp tho.It's not exactly 'seemless',but it's the best I can do to be honest.I'll keep the pressure up every hour or so on the bolt,but it's beginning to sink in so I'll have to be carefull.The clamp is holding on by the skin of it's [sandpaper for grip] teeth..
Wish me luck.9am is 14 hours,but I'm going to leave it for double that,just to be sure.
I dont wish this on anyone,I know that much.I'm wasted!

IMG-20160823-00033.jpg IMG-20160823-00034.jpg
 

Attachments

  • IMG-20160823-00034.jpg
    IMG-20160823-00034.jpg
    299.4 KB · Views: 313
Last edited:
That should work mate - well done!

Leave it for a while. I know they say 14h, but it keeps on hardening much longer.

Next thing: the threaded studs, and then: fingerboard. First have a look what advice you can find on that.
 
Hhhh great film..!
Well Ortsom,I am now a convert to Hide Glue.Amazing stuff.
Here we are, she's back up slowly to string tension.
I've got the angle right [or as near as possible] Fingerboard clearance all the way up is good [I'm sure it's a touch lower which is good,as it was slightly higher so will be a bit easier down there] and it's aligned well on the vertical too.
I will fine tune tomorrow assuming it hold's up.
At least the Soundpost stayed in place.
It's obviously not spotless,but I've done as best as my capabilities allowed and was worth the effort just to have it in some kind of playable condition rather than as a pile of firewood in the corner,and obviously much cheeper than a 'Professional' repair that wouldn't have justified the cost.
So thanks all for the help and putting up with the sometimes ridiculous ideas put forward by me in getting this done.
If anyone else has the misfortune [and it sounds really common] of doing a neck break like this,it really is worth you looking at it as if I can attempt it,then anyone can,for a few quid and help from the Forum,you'll at least have something to practice with until you can afford something better.
Just needs touching up with some Stain and Varnish or a Spray Can,and that will do,although I do like the 'Battered' look.I must admit...
'Distressed' I think, only applies to things of age and serious repute.....
Ortsom,I think you just might be right: 'IT LIVES'!! IMG-20160828-00045.jpg IMG-20160828-00046.jpg IMG-20160828-00047.jpg IMG-20160828-00048.jpg IMG-20160828-00052.jpg IMG-20160828-00053.jpg IMG-20160828-00054.jpg IMG-20160828-00055.jpg IMG-20160828-00056.jpg IMG-20160828-00057.jpg IMG-20160828-00058.jpg IMG-20160828-00059.jpg IMG-20160828-00060.jpg IMG-20160828-00045.jpg IMG-20160828-00046.jpg IMG-20160828-00047.jpg IMG-20160828-00048.jpg IMG-20160828-00052.jpg IMG-20160828-00053.jpg IMG-20160828-00054.jpg IMG-20160828-00055.jpg IMG-20160828-00056.jpg IMG-20160828-00057.jpg IMG-20160828-00058.jpg IMG-20160828-00059.jpg IMG-20160828-00060.jpg
 
Hey EAME, I'm real happy it all worked out! Your last pic shows it's all nice & straight laterally, so that's good. Congratulations!

The HHG went quick, but I would still recommend to wait a few days before tensioning-up.

Varnish: on my beheaded BSO, which appears to have a similar colour, I used PU varnish which I stained to match. But that requires suitable stains. It's not so important.

Enjoy the reborn!
 
Hey EAME, I'm real happy it all worked out! Your last pic shows it's all nice & straight laterally, so that's good. Congratulations!

The HHG went quick, but I would still recommend to wait a few days before tensioning-up.

Varnish: on my beheaded BSO, which appears to have a similar colour, I used PU varnish which I stained to match. But that requires suitable stains. It's not so important.

Enjoy the reborn!
Yes,thank you man, will do.
Thanks to you Ortsom and others here of course for all the encouragement and help you freely gave,and without it,I would never have tried/know to do this properly,so I'm well pleased I got all those comments about my initial attempt at it,and it goes to show that not all forums are here just to take the p,and I've always had good advise in TB,from strings,equipment and anything 'Bass' right in here,first port of call.
I am now going to become [again] a supporting member,because it deserves keeping up and running...
I feel oddly sad now It's all over,you will have to drop me some links to join in the convo!!
But I will keep this going,by sorting out stain and varnish,that's next ok to see if I can do a cunning masking job,again,for the experience,and to add a semblance of finality to the whole sorry affair.
And I do love the smell of Varnish ... .....!

Thanks again Ortsom and friends,really enjoyed doing this but never want to do it ever again !! hhh..
 
Holding up?
IMG-20160916-00083.jpg IMG-20160916-00084.jpg Yes thanks unbrokenchain,hope all's good with you man.I'm chuffed that it's at least playable now,holding tune and no perceivable difference to the action/string height,so I think I've just about gotten away with it !
Stain and varnish next week,I think she'll last this out now .
Cheers for the original criticism by the way,because without it, it would still be in pieces and I mean that sincerely and to all my friends who freely gave their time to put up with my ridiculous 'fixes' and offer some good strong solutions for me to get this as near a cheap homemade repair as possible.
Thanks again!
Enjoy a bassy weekend Unbroken & friends ok
 
  • Like
Reactions: Ortsom and Remyd
Ta for the update EAME & Unbrokenchain, and good it's holding!

Your pic #14 suggests you could improve the end result with some filler, prior to stain/varnish. If you don't have any other filler, you can try some A+B mixed epoxy + wood dust. The wood dust makes it less runny. Cut to shape w/ a knife before it sets too hard, and sand afterwards.

Best!
 
Ta for the update EAME & Unbrokenchain, and good it's holding!

Your pic #14 suggests you could improve the end result with some filler, prior to stain/varnish. If you don't have any other filler, you can try some A+B mixed epoxy + wood dust. The wood dust makes it less runny. Cut to shape w/ a knife before it sets too hard, and sand afterwards.

Best!
Oh Man,yes that's how to go,leave it with me Ortsom,l'll do us proud!
 
Good afternoon Ortsom and friends:
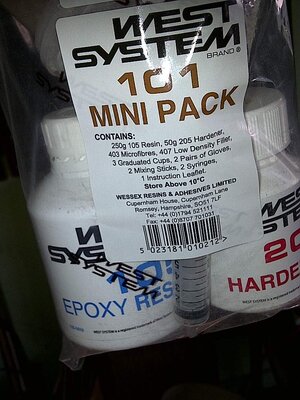
At last,my filler has arrived, 'West System Epoxy' ,IMG-20161018-00112.jpg IMG-20161018-00114.jpg IMG-20161018-00115.jpg as suggested by our very own Bruce Johnson over in 'Luthier's Corner'.
Just to let you know that she plays really well [not my playing!]and is holding tuning remarkably well,and as you can see,the repair is holding up,so I'm chuffed and thankful to everyone who got me at it.
Well,I've prepared the area and 'constitution of Peanut Butter' will be applied at the weekend.
I'll update as I go.

Cheers all!
 
  • Like
Reactions: Ortsom
Well,it's been a while now since this repair began and I'm pleased to let you all know that the bass is at long last ready for staining and varnish.
The epoxy has worked really well,it's almost like the break never happened,quite incredible and well worth the time and cost for a repair of this kind for sureFile_000 (1).jpeg File_000.jpeg File_006.jpeg File_007.jpeg Just looking for a suitable stain now,the one I have is slightly too light.I'm looking to see what I can darken it with.
Anyway thanks again for getting me to do this better than I started out doing it and I'm surprised I even managed to get the fingerboard off to be honest!
I'm also going to re glue the fingerboard,as it is lifting slightly towards the bridge end.
Hope to post the finished this side of Christmas.
Cheers all!