• TalkBass has been independent since 1998. Add your voice.
    Create a free account to reply to discussions, view embedded media, and browse with fewer display ads.
    Join freeLog in
    Want zero display ads or expanded classifieds tools? Compare plans.

Drake single cut 6 string bass, Wenge, Burled Maple, Sapele

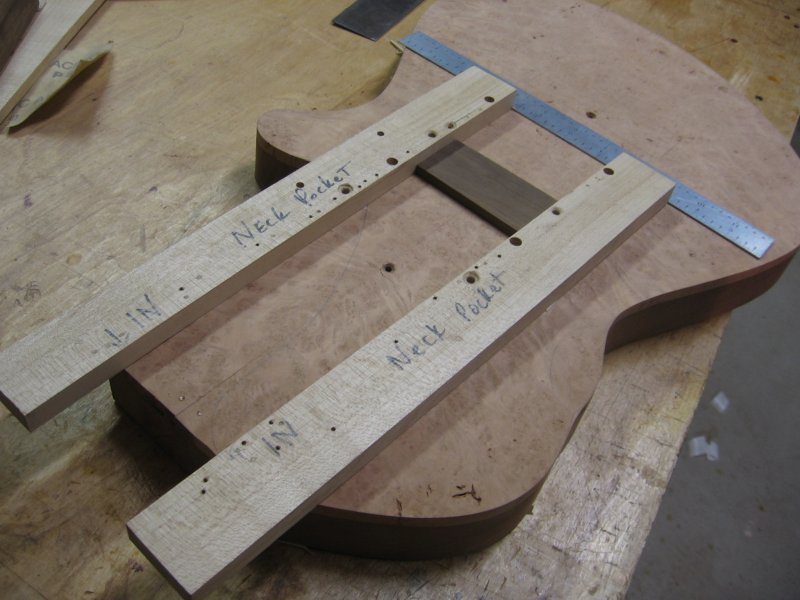
2110-002-2.jpg

This helps me get everything aligned. I placed the neck onto the body to check the alignment first before I fixed the two side pieces of the template on with carpet tape. Then I removed the neck. The side pieces of my template have a slight angle to them to give the pocket an angle. As I route out the pocket I keep checking with the bridge and a straight edge until I get a desired depth that works with the bridge.
Mr. Drake, sir, when you say they are angled, are you referring to following the angled sides of the neck (fretboard taper), or do you mean the "template" pieces are thicker at the bridge end than at the neck end? If so, how much angle do you use?

Another great build thread by the way...these are so helpful and your work is always a pleasure to watch...
 
Beej,
When I said "angle" I did mean that the side blocks of my template do get taller as you move closer to the bridge end. I am not sure the exact degree of angle but it is around 3 or 4 degrees. It is not much more than a simple shim would be under a bolt on neck heel. I hate shims so I angle the whole pocket.

Thanks for the comments.
 
Today is some more carving and some pics after carving and drilling of the tuner holes, string thru holes, along will the bridge mounting holes. My camera is old and I managed to lose a whole section of shots of the pickup cavity routing and drilling. It is nothing Earth shattering as I just used a template for the pickup cavities, much like the control cavity process. In one of my past builds I had a detailed description of the string thru process. I still have that up somewhere in the LC.

Anyway, here are some shots of the carving.

2131-001.jpg

The rear peghead is glued on now and ready to be shaped.
2131-002.jpg

I do the carving before I drill tuner holes as I like to round off the edges. I dislike sharp edges that are prone to chips more so and burning through with the buffer. Plus the look is more organic and less manufactured.
2131-004.jpg

After the edges are carved I now can see how much clearance from the edges I have for tuner hardware.
2131-005.jpg

The rear veneer cap is Sapele from the body billet.
2140-010.jpg

I have drilled the tuner holes here.
2140-009.jpg

This picture was taken before we dropped the inlay idea. You can still see the bulge out near the upper horn area. That will be carved away.

In the next shots you will see the bass after most of the carving is complete. I do a pre-finish assembly so I can address any issues before the finishing stage. This stage I call "clean up". All holes and wiring routes have to be drilled and checked. If the electronics are complicated, I would also install the pickups and preamp to really test the bass before finish. I am using a set up that I have used many times so I don't need to do so this time.

Enjoy.

0700-022.jpg

0700-023.jpg

0700-020.jpg

2014-01-045.jpg

2014-01-044.jpg

2014-01-043.jpg


Thanks for stopping by. I will start the finish stage next time.
 
I did make the in/ out feed table. It mostly eliminates snipe on the work piece as the table is solid all of the way through the machine. I only loose about 3/4 on an inch from the available cutting depth which is more than I would ever need. The calibrations along the side of the machine are no longer usable if ever they were. I don't use them so no problem.
I basically took the tables off and built the new table around the machine. Well, around and through. I would not recommend it if your machine is still under warranty. I pretty much remove the features and components of my machines that do not have anything to do with guitar building. The original feed tables were about useless for precise thickness work. The snipe was screwing up my nice top woods. I had to buy long pieces to allow for snipe. That made several nice pieces too short. There are tricks like gluing strips to the edges of the work piece so that the longer strips absorb the snipe, but it was always a pain to do. This way works better.


Thanks Rip for the comment.
 
Alas, it is time to finish this bass. Before I do, I do a pre-finish assembly to make sure that every thing works and is still in the right place. I actually wired her up for awhile as the customer came to check the neck for fit and to basically hear the electronics we have selected. He approved of the neck shape and thickness. It is always better when the customer can get their hands on the instrument before you go through the finishing stage. That way, changes can be made.

These next three photos are of the bass dry without anything applied to the wood. I have filled any voids in the Burl Maple with epoxy mixed with a little tobacco dye. Then I sanded everything out before I assembled the bass. The first picture shows the ramp the customer wanted me to make for this bass.
0010-010.jpg

0010-011.jpg

0010-014.jpg


These pics are with some naphtha applied to show the colors and grain of the wood. Big difference.
0010-016.jpg

0010-018.jpg

0010-022.jpg


So the next step I took was to disassemble the instrument and sand once again with 320 grit sandpaper. I take care to make sure that all of the trouble spots, like inside the horn, get hit with the sanding. I apply some naphtha to see any scratches that need to be addresses and to remove any skin oil from the handling of the bass.

I then use some of this Seal-A-Cell varnish to coat the instrument. You have seen me applying this after applying some sealer/ pore filler and sanding it back. I have been finding that the finish I use, by itself, builds quick enough, and works well enough, to be the filler and finish. So I have been skipping the filler step and have been having good results. I use water based poly (General Finishes brand in the dark blue can) in the gloss sheen for all of my instruments. Since the finish is water based, it does not make the wood pop and show the nice color like oil or solvent based products do. So to get the wood to pop, I use the General finishes brand Seal-A-Cell you see here...
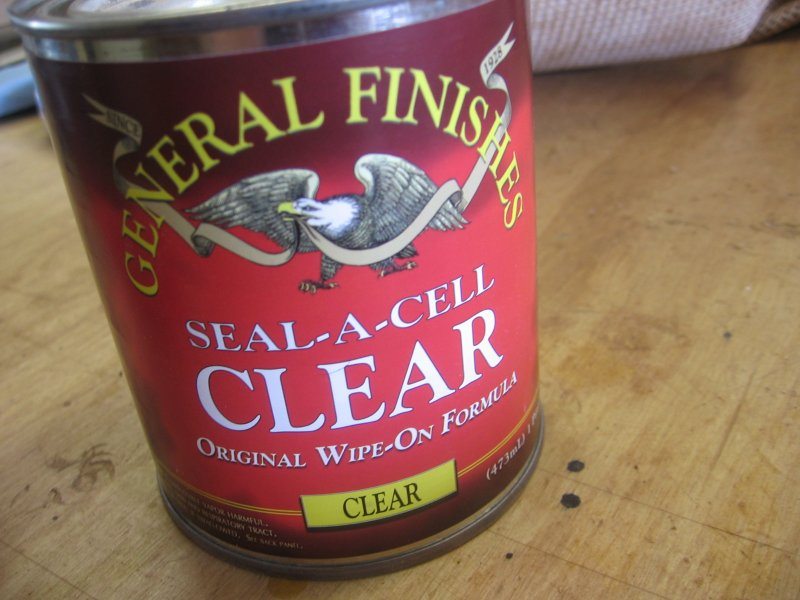
1013-006.jpg

This product is very thin, dries hard, and penetrates deep into the wood to bring out the grain and color. It also keeps the grain from lifting when using the water based product. General Finishes tells me that the Seal-A-Cell, when properly cured, is compatible with the water based poly. So far I have had no issues with it. I apply a good coat keeping the surface wet for a few minutes. I do wipe off any of the Seal-A-Cell that puddles once the wood no longer wants to take any more. I wipe it on with a blue shop towel changing the towels as they start to leave debris.
I let it cure over a few days. The longer the better and as Bob Flexnor says, "What they say the dry time is on the can...double or triple it".
After a couple days I look to see if there is any dry spots that need more sealing. I may then apply one last thin coat and let it dry for a few days more.
0010-025.jpg

Here she is in my drying rack. There is a fresh coat on so it looks shiny. I don't worry too much as I will lightly buff it with an abrasive pad to knock back the sheen. I want it dull so that when I apply coats of finish over top, there are no shiny spots underneath that show.
 
Reminds me of my burled maple single cut dp custom. Simply beautiful.

I really like that the buyer gets to hold and try out the instrument before final finishing. Brilliant. You really cater towards the player. Fantastic work!
 
Thanks Scuzzy. I do enjoy the interaction with my customers. I even try to attend their shows or watch anything they do online. It helps me meet their needs better by seeing how they play and getting to know them as people. I have found that I have built many friendships with my customers over the years.
 
Thanks Scuzzy. I do enjoy the interaction with my customers. I even try to attend their shows or watch anything they do online. It helps me meet their needs better by seeing how they play and getting to know them as people. I have found that I have built many friendships with my customers over the years.

Too true. This man is a master craftsman and a great guy to boot! I own two builds from Andrew with a third in progress, he's a player's builder through and through.
 
Things have really ramped up around here and I have quite a few projects going on at the moment. I was not able to take much time to get more photos of the finishing process which I apologize for. The process essentially was just applying coats of the General Finishes Water Based Poly by dabbing it on with the blue shop towel like you have seen me do before. I did not use a pore filler this time so I let the finish build up deeper and then sanded it back every 4 coats. I think I applied 20-24 coats but 80% ended up as dust on the floor. I like thin finishes if possible. Since this bass was specified as a satin finish, I did not need to build the coats up too thick. For glossy finishes I build up to 30 coats before wet sanding, leveling, and using my buffer. For satin finishes, I just sand with finer grits and then only wet sand using Dr. Ducks Axe wax as a lubricant instead of water. Leaves a buttery soft feeling finish that looks like an oil finish and shows no scratches.

b2100-011.jpg

Here is the back of the bass with just the GF Enduro Poly coats. There are about 20 coats on this bass but every 4 coats I sanded them back quite a bit.
b2100-009.jpg

Here is the front where you can see that I had to improvise my finishing bracket into the pocket as the holes do not line as they do with other body designs.
2100d-007.jpg

I also applied coats to the neck front and back. I will really knock back the finish on the back side of the neck for better feel when playing. I never gloss the backs of necks.
2100d-006.jpg

Here is the only picture I found of the sanding process. A super fine grit 3M sanding pad that I broke in on a piece of wood first, and a foam block. This differs from a gloss finish where I would use a hard rubber block and sanding pad to knock back the finish and then follow it up with a piece of plexiglass as a backer and wet sandpapers of fine grits to do the work. With the satin, I don't need to do all of that.

I wish I had more shots of the finishing but I ran short on time so I do not. My last build shows more of it if you are interested.


And now for some pics of the completed bass.
2200b-001.jpg

2200b-003.jpg

2200b-005.jpg

2200b-004.jpg

2200b-021.jpg

2200b-022.jpg

There are more pictures of the finished bass on the website.
I hope you have enjoyed watching the progress on this bass and I will post another build when I can. Thanks again for looking.
 
  • Like
Reactions: Dark Horse
Thanks guys. The action is very low and buzz free with a medium touch. Heavy attack makes a little bit of buzz but not on the sustain, just the initial strike. Now the neck has had tension on it for all of two days so I don't know if it will remain as perfect as it is now without some adjustment. I like the effect of the two truss rods and feel that has something to do with the great action.

That and the trimming of the fret barbs before gluing them in helped I am certain. Trimming the fret barbs took all of the stress off of neck that results from compression fretting. After tapping in the frets, I did not have any back bow issues. The frets went in smooth an easy. The glue used to glue in the frets formed into any voids around the fret tang thus fitting to the slot without pressure form a tang being forced in. I will keep using this process as the last three instruments have used this method on seem to have more stable necks.
 
Looks sharp. Congrats on your second single-cut -- and on your first single-cut sixer.

I got to meet Andrew a little while back. I was in Des Moines to hear Kenny Barron and Dave Holland (monster player, incidentally) and figured while I was in the area, more or less, I'd take the chance to meet Andrew about some possible work on a couple of basses of mine and check out some of his builds if I could.

This bass wasn't fully assembled at the time, so I couldn't play it but it looked like a solid build.

The bulk of the time we spent together was focused on the instruments I brought, but I did get to spend some time on each of the four Drake basses that Andrew had around: A lined, fretless four-string, a fretted four-string, Andrew's personal bass (the "rainbow" four-string featured on his site) and the five-string build he recently completed (with its own thread here). Each felt solid and looked clean (sharp lines, tight joints) up close. Good fretwork. Clear harmonics on each instrument. I especially dug the fretless -- a nice and versatile instrument and easy to play because it was really easy to hear the pitch center of every note. I also noticed, when tuning it up, that the needle barely wavered -- pitches were really stable.

I was also fooled by Andrew's personal bass -- a 33" scale, but the strings felt tight enough (in a good way) that I didn't notice until he pointed it out. I was sure it was a 34".

Solid work.
 
Wow, stellar work Andrew. Something really different on this build, came out looking great.


I was also fooled by Andrew's personal bass -- a 33" scale, but the strings felt tight enough (in a good way) that I didn't notice until he pointed it out. I was sure it was a 34".

Solid work.

My Drake Custom is the only 33" scale bass I've owned/played and I love it. I told Andrew one of my goals on my build was having something that would be a little easier on my left shoulder, since I have problems with it. The combination of some chambering and the 33" scale makes it really comfortable to play and it never feels "small". It feels so nice to play, kind of bums me out when I have to switch to something else for a different tuning lol. If I had the financial resources, I'd get 2 or 3 more builds from Andrew and just cover all my bases (basses...and guitars) with Drake Customs.