
• TalkBass has been independent since 1998. Add your voice.
    Create a free account to reply to discussions, view embedded media, and browse with fewer display ads.
    Join freeLog in
    Want zero display ads or expanded classifieds tools? Compare plans.

Evening out clearcoat. Any suggestions?

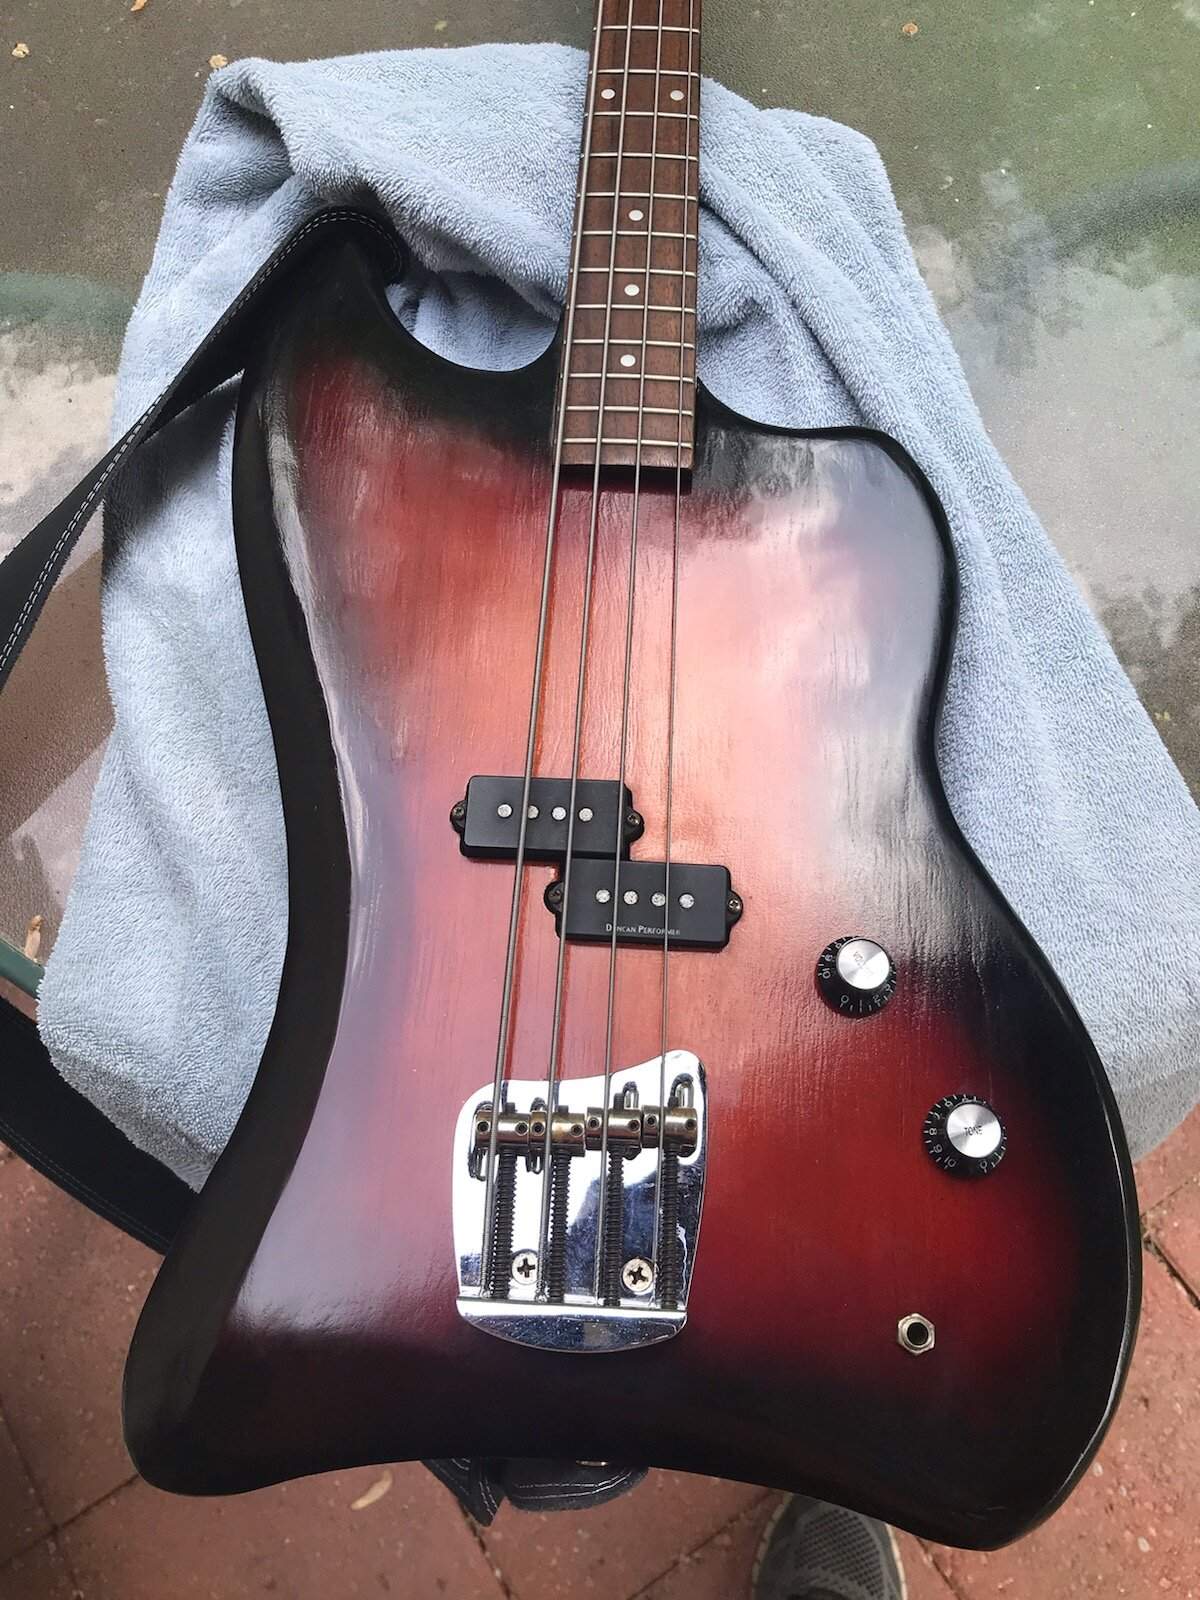
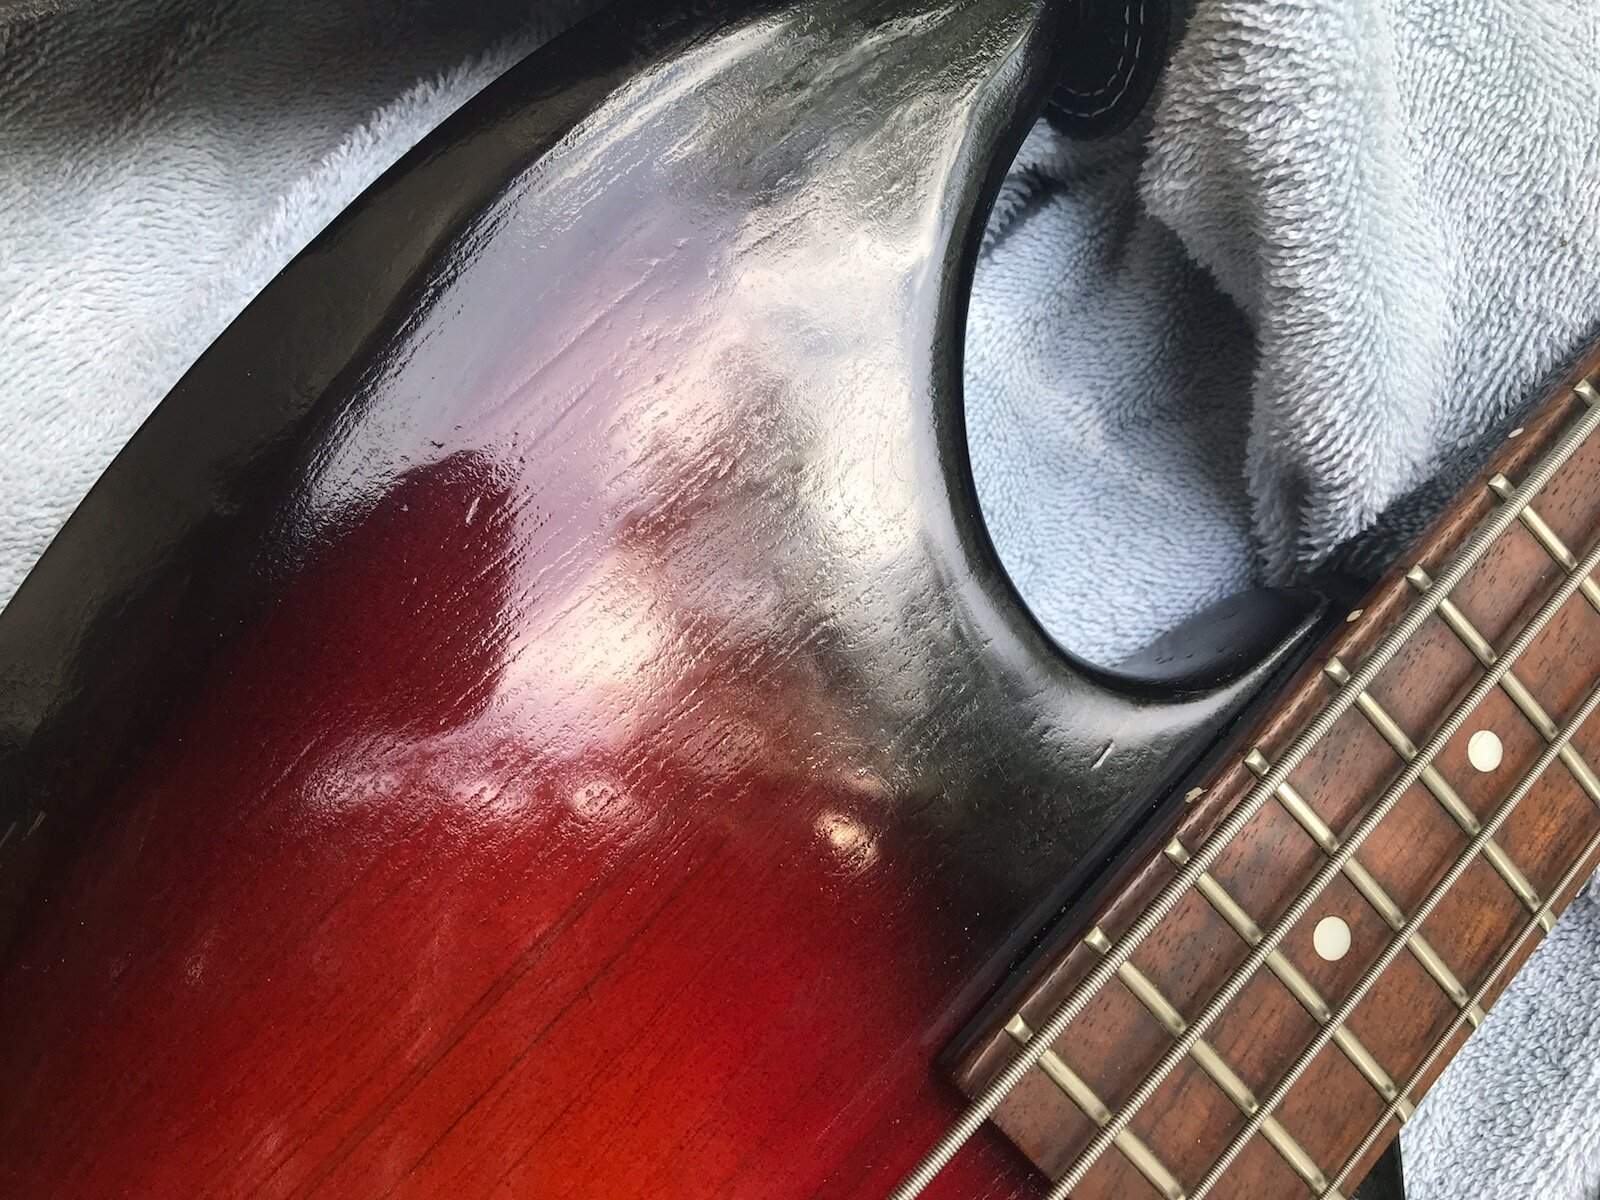
I just refinished (or attempted to refinish) a DeArmond Jet Star bass, and got less than awesome results with aerosol nitro lacquer. The bass had a black paint finish, and I made a real mess of the wood surface, trying to remove it. After a ton of sanding, I THOUGHT I had it smoothed out, so I sprayed 2 coats of E-Z Vinyl sealer (using mostly Mohawk brand products BTW), then applied my tinted lacquers, followed by 2 entire cans of gloss clearcoat. That's when I discovered that the little cracks (fissures) in the surface that I THOUGHT would fill - in with the vinyl sealer weren't going away. I wet - sanded and buffed it. No luck. Any further sanding would result in me sanding the color away. So, obviously I messed up by not getting the grain sealed well enough. But I was surprised that no matter HOW many coats of the clear Mohawk I applied, it didn't even START to fill those lines in!

So my question is - Is there ANY way I can try to get a clearcoat thick enough to start leveling out? Or do I have to strip it ALL the way down to bare wood, and start all over? If there is anything I can try (before stripping it back), it's worth a shot. I can always remove everything and go back to wood. (And yes, I know I shouldn't even attempt to apply a polyurethane over a nitro. I already thought about that option.) Is there any kind of clearcoat that will go on thicker? I attempted to apply "wetter" coats with this stuff, but it runs like crazy when I do . Any suggestions would be greatly appreciated!
IMG_0038.jpg
IMG_0040.jpg
 

Attachments

  • IMG_0038.jpg
    IMG_0038.jpg
    232.7 KB · Views: 24
  • IMG_0040.jpg
    IMG_0040.jpg
    251.4 KB · Views: 30
  • Like
Reactions: Beej
Well, since you're already at this point, there's probably no harm in sanding it flat right now (wetsand) to bring it as flat as it will get without sanding through, and then hit it again with a few more coats. I'd probably just wrap some wet 1000 grit over a small eraser and go over it that way. Poly could probably build enough to cover it from here, but nitro is not as easy to get that coverage.

It's much harder to get that glass smooth surface than I think a lot of people think. :D
 
I'd ask if you used a filler after sealing. I don't know if it would get you to a smooth surface from what I see. Heat guns might get the old finish off easier than sanding. Though I did sand back to bare wood myself once.
I've used water based systems twice with good results. The top coat was General Finishes High Performance Gloss. Applied with a good brush, It flows very nicely
 
It's much harder to get that glass smooth surface than I think a lot of people think. :D[/QUOTE]

You're not kidding! The first refinish I did was much easier. Since the bass was already a natural lacquered factory finish, I just scuffed it up, shot coats of tinted cherry over it, then coats of clear, and Presto! This one... Not so much. Thanks for the recommendation. I used a heatgun to remove most of the paint, then sanded the rest off. It was a bitch to get all of the black paint and gray primer off. Had to get very aggressive to remove it all. Made a lot of bumps and low spots in the wood. And this bass has a very sculpted body, which made things much worse. Lots of edges and angles. Bit off a bit more than my meager refinishing skills could handle, I'm afraid. Now I am just trying to make it the best I possibly can. Thanks again!
 
My feedback - you can't fix a finish when there are flaws at its base such as improper wood sealing. I don't think anything you can do over the finish will correct it.

I would strip it back down, re-sand the body, use a better quality grain filler with more body so it fills better, then sand the sealer, then prime, then sand, then do some color coats, then sand, then do the clear coats, then sand very lightly if needed, then finish with 3M Finesse-It on a buffing wheel. I use a buffing wheel chucked in a variable speed drill, which is messy but works.

In summary, I think the sealing was flawed and you missed some steps in the finish process....mainly sanding with 3000 to 5000 grit wet & dry sandpaper.
 
  • Like
Reactions: tindrum and M0ses
Make sure that wood is flat so that you're only filling grain and not large valleys. Use a large, flat sanding block (I'm assuming you don't have a router planing jig?)
Those bumps and valleys will really stand out with the final gloss on it.
Sand it, blow it off, wipe it down with mineral spirits or something similar every once in awhile to see where low spots and scratches are.
Hold it up to the light now and then.
I like to sand with a a flashlight on from the side, shooting across the surface. Really shows where the high/low spots are.
 
  • Like
Reactions: tindrum and M0ses
My feedback - you can't fix a finish when there are flaws at its base such as improper wood sealing. I don't think anything you can do over the finish will correct it.

I would strip it back down, re-sand the body, use a better quality grain filler with more body so it fills better, then sand the sealer, then prime, then sand, then do some color coats, then sand, then do the clear coats, then sand very lightly if needed, then finish with 3M Finesse-It on a buffing wheel. I use a buffing wheel chucked in a variable speed drill, which is messy but works.

In summary, I think the sealing was flawed and you missed some steps in the finish process....mainly sanding with 3000 to 5000 grit wet & dry sandpaper.


So... What is a good filler for a fairly porous grain with a LOT of cracks that need filling? It has to also be clear, because I am doing a sunburst with tinted spray lacquers, not a solid color (no paint or primers).
 
Hey Mark, another thing to think about is maybe taking it to more of a satin finish? That can look good on a body that might not hold up to a high gloss. You could probably get there from here with a white scotchbrite pad and some elbow grease in little circles. :D It would hopefully look like an oil finish in the end. The colors already look good. :thumbsup:

If you want to take it right back and get it flat, I'd sand it back with a block (I use blocks of 3/4" mdf) spend a bunch of time raising the grain * and block sanding, and then use a grain filler and block it back again. If you're going tinted spray coats, then I'd use epoxy to fill and seal it. If you want to stain or dye the surface, then I'd use a finish-compatible filler like Timbermate. I always test combinations for compatibility before putting into use.

* wipe the whole thing with a damp cloth and then sand back, at least 2x
 
I just refinished (or attempted to refinish) a DeArmond Jet Star bass, and got less than awesome results with aerosol nitro lacquer. The bass had a black paint finish, and I made a real mess of the wood surface, trying to remove it. After a ton of sanding, I THOUGHT I had it smoothed out, so I sprayed 2 coats of E-Z Vinyl sealer (using mostly Mohawk brand products BTW), then applied my tinted lacquers, followed by 2 entire cans of gloss clearcoat. That's when I discovered that the little cracks (fissures) in the surface that I THOUGHT would fill - in with the vinyl sealer weren't going away. I wet - sanded and buffed it. No luck. Any further sanding would result in me sanding the color away. So, obviously I messed up by not getting the grain sealed well enough. But I was surprised that no matter HOW many coats of the clear Mohawk I applied, it didn't even START to fill those lines in!

So my question is - Is there ANY way I can try to get a clearcoat thick enough to start leveling out? Or do I have to strip it ALL the way down to bare wood, and start all over? If there is anything I can try (before stripping it back), it's worth a shot. I can always remove everything and go back to wood. (And yes, I know I shouldn't even attempt to apply a polyurethane over a nitro. I already thought about that option.) Is there any kind of clearcoat that will go on thicker? I attempted to apply "wetter" coats with this stuff, but it runs like crazy when I do . Any suggestions would be greatly appreciated!

View attachment 4276468 View attachment 4276469
You needed to use a grain filler after the initial sealer. But really, you needed to sand the body much better than you did first. Oh well, live and learn. Get some clear "good filla" and go at it.
 
  • Like
Reactions: Pilgrim
So... What is a good filler for a fairly porous grain with a LOT of cracks that need filling? It has to also be clear, because I am doing a sunburst with tinted spray lacquers, not a solid color (no paint or primers).
And don't use a sanding block like that other guy suggested. Use a DA. Orbital pad sander. Start heavey grit, end light. 150 - 320. Then, finish it up by hand. 420, 600, to however high you want it. The better the sand, the better the job. Seal it. Clear good filla. Sand it. Seal it. Sand it. Lacquer it. Buff it. Enjoy it.
 
If you want a flat smooth glossy finish you could first sand the body to get it flat. The paint that is already on the body will help you to see the low spots. A good epoxy will fill the grain better than a nitrocellulose filler and it wont shrink later. I like West Systems epoxy. WEST SYSTEM Epoxy - Marine Grade Resins & Hardeners. A couple of layers of epoxy with sanding in between will give you a good flat base that you can put your finish on.
 
  • Like
Reactions: Beej
If you want a flat smooth glossy finish you could first sand the body to get it flat. The paint that is already on the body will help you to see the low spots. A good epoxy will fill the grain better than a nitrocellulose filler and it wont shrink later. I like West Systems epoxy. WEST SYSTEM Epoxy - Marine Grade Resins & Hardeners. A couple of layers of epoxy with sanding in between will give you a good flat base that you can put your finish on.

What an odd idea. I don't hate it tho. But the OP is working with a bunch of sprays so epoxy probably isn't what he wants to use. Epoxy cannot be sprayed. Also, personally I wouldn't use epoxy even under a tint without a UV stabilizer.
 
With (gloss) lacquer it is easier to just shoot a lot of color, let it completely cure then level sand, wet finish sand, buff, and polish, than it is to try to get a good level, clean, and clear top coat. At least it has always been for me. I’ve done clear coats but only because i was doing it for someone else who insisted they had to have it. It could well be by dislike of working with clear coats that informs this opinion but i much prefer the depth of color i get from lacquer without clear top coats.
 
I still see plenty of wood grain as others have mentioned, take it down to flat and smooth if that's what you're going for.
Never expect paint or clearcoat to fill or fix anything.

Did you step through grits when sanding? It looks like you might have stopped at around 80-100 maybe?
You really would be best to go through to at least 800. For a smooth finish it really requires a lot of work and takes a good bit of time and effort.

In any case it's going to take some work, but it's certainly fixable.
Good luck,
Dirk
 
I used to build and paint show cars back in the 80's, and I can tell you from experience the perfect finish is all in the initial preparation of the surface. You need to invest in a solid rubber sanding block. You can get them from the hardware store or order one online for a few bucks. Sorry to say, but your best bet is to completely disassemble the bass and basically start over.

If you really want a glass like finish, I would wet sand the body with 320 or 400 grit on the sanding block until it is completely smooth with no visible grain or lines in the body. Sand across the grain not with the grain, and never use your bare hand especially your finger tips as that will leave impressions that you do not want. You can sand the edges and corners by hand with the sand paper folded over at least 3 or 4 layers thick. There is no need to strip it back to bare wood, but if you do, DO NOT WET SAND the raw wood. You do not want to get the wood saturated with water, and if you do you will need to wait several weeks before trying to apply any finish. You can put the body in the oven at a very low temperature say 150 degrees for an hour or so to dry it out if you want to rush the drying time. (As a side note, you can do this to help "cure" the finish you have already applied before you sand.)

Once you have the body flat and smooth, start over with your finish. I have never used E-Z Vinyl sealer, but if it is compatible with the lacquer then it should be OK. (I assume that it is clear?) Apply a couple of coats. Let it dry then re-wet sand with 600 or 1000 grit. apply a couple more coats and repeat the sanding until it is as smooth as possible before applying the tinted lacquer. Apply as many coats of clear as you think you need to to form a good thick film over the tinted lacquer. Final sand with 2000 grit using the sanding block and by hand on the edges and sharp corners. Be very careful not to sand through the clear-coat. Again, let it breath for a couple of weeks or do the oven trick to cure the finish before the final sanding. Then polish with auto-body polish or something equivalent and you will have the smooth glossy finish you want.

I know this sounds like a lot of work, but that is what it takes to get that glass like smoothness that you are looking for.

I painted a 1950 Chevy panel truck in 1984 that won best paint in cars shows in Shreveport, LA and in Huston, TX. That paint job took over 3 months of prepping and sanding. It was done in lacquer applied 2 coats at a time then sanded between coatings with 600 grit. The final finish was 4 double coats of color followed by 2 coats of clear mixed with blue pearl. Finally 6 double coats of clear sanded and polished to a mirror finish.
 
as mentioned above..lots of sanding (240-2000 grit) and possibly grain sealer, wood putty and or bondo for any nicks and dings. I am using rustoleum2x rattle can clear coat and i'm up to almost 7 cans of that stuff now. Under the light at a certain angle i can see where it isn't completely flat in spots. Mostly due to not sanding enough in the beginning when i used the putty and bondo, but i'm not looking for perfection as much as getting the experience of what's involved. The body i bought already had several good chunks missing that i hadda fill. Once i let paint and clearcoaat (gassout) and dry, a longtime for rattlecans, i'll sand with 1200 grit and buff out...patience young grasshoppa!.......and lots of it.:thumbsup:
 
Last edited:
Thanks for the suggestions. Believe it or not, I actually DID do a lot of what was recommended - orbital sander (Heatgun alone would not do the job without starting to actually burn the wood!), sanding with grits starting at 80, and working up to 400, then 800, etc... And I though it looked smooth, but apparently I needed to get better lighting and angles to see the imperfections. And then I should have realized it wasn't good enough for a Butterfinger once I applied the vinyl sealer, and could see grain lines in the surface. As a newbie (only 1 other finish project under my belt - which did NOT involve working from bare wood), I thought that perhaps those lines would become less and less visible as I applied subsequent coats of lacquer (tinted and clear).

Lesson learned - nitro spray lacquer has no fill and leveling effect, no matter HOW many coats are applied. I will eventually get the ambition to strip her down, and start over - spending a LOT more time on the sanding, and inspecting the surface from many different light angles. (I have a feeling this bass will lose at least a pound of wood, after all is said and done!) If it turns out decent, I will have to repost a photo or two. (It really is an incredible sounding and playing bass!!!)

Thanks again for all of the suggestions!
 
  • Like
Reactions: WI Short Scaler