
Enjoy the benefits of a premium membership!
Upgrade Account
-
TalkBass has been independent since 1998. Add your voice.
Create a free account to reply to discussions, view embedded media, and browse with fewer display ads.
Join free Log in
Want zero display ads or expanded classifieds tools? Compare plans.
You are using an out of date browser. It may not display this or other websites correctly.
You should upgrade or use an alternative browser.
You should upgrade or use an alternative browser.
More options
Who Replied?

Quite impressive. You’ve gone to greater lengths finishing you cabinet than a lot of amateur luthiers (including me) do with our basses.I finished my polishing regimen on the rack case to test it out. Here is the result compared to the (currently) unpolished cabinet:
View attachment 7303892
Here is the full process from raw wood up to this finish:
I'm blown away by the finish. The wood grain looks incredible and the surface is like glass. I'm pleasently surprised by the edges of the plywood. I thought they would look cheap and tacky but I actually think that the edges look fabulous and have a particular "chatoyance" to them that turns them into a feature instead of a detractor. I'm working on the cabinet now and it's a lot of work. I'm going through a lot of 120 and 220 grit paper leveling out the lacquer. The paper quickly gets clogged with lacquer.
- Sand from 80 to 220 grit
- Clean with tac cloth
- Rub/spray with distilled water to raise the grain
- Re-sand to 220 grit
- Clean with tac cloth
- Two coats sprayed on Transtint walnut dye diluted in distilled water
- Two coats sprayed on Zinsser Sealcoat dewaxed Shellac (absolutely must be dewaxed)
- Rub with something. I used 0000 steel woold but I would NOT recommend it because it left steel bits all over the finish. If I did it again I'd use a scotch brite pad.
- About a dozen or so coats sprayed on Watco clear gloss lacquer to get a thick buildup
- Occasional sanding between coats to keep things flat. I think this is of dubious usefulness and probably just makes things take longer. If I did it again I'd just slap lacquer on as thick and fast as I could without it running.
- Dry hand sand from 120 to 400 grit to level out the lacquer (worst step imo)
- Wet sand from 1000 to 2000 grit with random orbital sander and mineral spirits
- Rub with Maguiar's M105 ultra cutting compound with compounding foam pad with random orbital sander
- After this step it was very shiny and I felt like I could have stopped here. I already had the wax so I applied the wax but it didn't make a lot of difference. The M105 pulled a lot of weight.
- Clean up M105 with microfiber cloth
- Hand apply Maguiar's carnauba wax with foam applicator
- Buff out carnauba wax with random orbital sander with finishing foam pad
- This made minimal difference but it smells and feels nice
- Fingerprints are a problem
Lessons learned:
- Don't use steel wool to smooth out finishes. It leaves little steel bits all over the finish. Use a scotch brite pad.
- Dont press hard when cleaning up dust with tac cloth. It leaves a residue which will interfere with the next layer of finish. Press lightly. If you get residue on the surface you can clean it with mineral spirits as mineral spirits will dissolve the residue but won't affect the lacquer.
- Sanding between lacquer coats has minimal benefit if you're planning to sand it flat later. I would just slap the lacquer on as thick and fast as possible. Applying lacquer was absolutely the most time-consuming part. It took weeks.
- Build a booth if you're worried about debris and insects getting stuck in your finish. I personally didn't care because I figured the dark dye would cover that stuff up and I knew I'd be sanding and polishing anyway. I sprayed outside and wore a lot of PPE and didn't have any issues. Spraying after rain was nice because the rain knocked down the dust.
- Carnauba wax didn't make much difference in the finish. It was easy to apply and remove with the random orbital sander so I don't regret it but if I did it again I'd probably skip it.
I hope a road case, or padded cover is part of the build if your rig is ever going to leave the house. It would be heartbreaking to see that finish dinged and scuffed.

That's exactly right. Lacquer and many finishes have a "cure time" which is much longer than the "dry time." The Watco lacquer I used has dry time in minutes (if sprayed), re-coat after two hours, but the cure time is probably a week or more. I waited a few weeks before I started sanding and polishing not by choice but because life got in the way so I wasn't super concerned about it, But yes the lacquer should be allowed to cure for quite some time fore sanding and polishing.Perhaps it depends on the product but I’ve found that too thick can cause a problem. The top layer can harden and trap solvent underneath. The finish can remain soft for a long time. To resolve this, the manufacturer recommended sanding the top to open up the finish.
I tried to research this but I couldn't find much information on it. I actually almost completely missed damping the mid chamber. The best I had was some other forum posts showing builds with photos of heavy damping so that's what I did but most of those were smaller boxes like the 15/6. I think a lot of these details were probably contained on the Greenboy forum which has been taken down. If it seems like too much absorption I can always remove it. I just figured it would be easier to apply before I assembled the panels so I put a lot in.That looks quite a lot of sound absorption. Ive had good results placing it on one side only..dampens but also allows the the box to breath. Anyway, hows it sound?
I haven't installed the speakers or electronics yet. I'm going to complete the finishing steps before I do that so I don't get goop all over the speakers.
Last edited:
Thank you. I'm planning to make a case from re-purposed moving blankets. This cabinet will inevitably get road wear. My plan is to take a lot of good photos when it's fresh and then accept our fates togetherQuite impressive. You’ve gone to greater lengths finishing you cabinet than a lot of amateur luthiers (including me) do with our basses.
I hope a road case, or padded cover is part of the build if your rig is ever going to leave the house. It would be heartbreaking to see that finish dinged and scuffed.

Last edited:
Thank you. When I got into word working and particularly finishing I was very overwhelmed and confused. After reading a ton of magazine articles and forum posts I've come to understand where my confusion was coming from: there are many paths to many similar destinations and most of them are not wrong. I've mostly chosen to focus on dye, shellac, lacquer, and Maguiar's automotive products but I could have achieved a similar result with stain, polyurethane, and pumice stone polishing. When I first started out I was particularly confused about how to apply dye. Some articles said to mix with distilled water, some said to mix with alcohol, some said to add directly to lacquer or shellac. Which one was right? All of them are right. All of those options work and they all produce slightly different results. It's been a lot of fun and a lot of challenge to learn the different techniques and products available.Wow, old school finish technique, with the wetting the wood for the second sanding and carnauba wax, Something our shop teacher taught us back in the 70s.looking good
I sanded the cabinet last week. I was annoyed at how long it was taking to flatten out the lacquer so I switched from 220 to 120 grit. This was not the move. The 120 is too coarse and left scratches but I didn't see them until after I was done wet sanding up to 2000 grit becasue everything was slathered in mineral spirits. I got some 320 and 600 grit pads for my orbital sander and redid most of the sanding last night. While I was re-sanding the top of the box I accidentally blew through two small spots on the upper back corners and exposed raw birch. It sucks but there's no use crying about it now. Everything else looks good. I"m very excited to get past this part of the project and finish this cabinet.
Lesson learned: don't go any more coarse than 220 grit when flattening lacquer. Be careful when power sanding especially on corners and edges.
Lesson learned: don't go any more coarse than 220 grit when flattening lacquer. Be careful when power sanding especially on corners and edges.
Update time! I finished the rack case. It looks pretty stunning. I used all brass hardware and it was very annoying to find all the parts I wanted. I ended up having to special order 50 #8x1/2" long wood screws after multiple failed trips to Home Depot and Lowes. I used Penn Elcom 4U rack rails with #10-32 threaded holes. I secured the rack rails to the case with four #10-32x1" long brass machine screws with washers and nylock nuts each side. I considered using #8x1/2" long wood screws but I didn't trust mysef to drill pilot holes without blowing through the finish on the outside and I didn't trust the 1/2" length to have enough hold to withstand the absurd weight of the amp. I positioned the rack rails by attaching the rack rails to the amp, positioning the amp where I wanted it to sit in the case, clamping them the rack rails to the case, removing the amp, center punching for hole locations, and drilling from the inside. I struggled to not blow out the glassy exterior while drilling. I had the best luck with drilling a tiny 1/16" pilot from the inside out very slowly and drilling from the outside in with the full size drill. I think I used a 7/32" drill to finish. In the future I would drill all these holes before finishing. The amp hangs out the front of the case but the back where the cables go it pretty nicely recessed which is what I wanted. I didn't want the case to be deeper than the cabinet and the cabinet depth was probably not designed with the intention of placing a huge Crown Macro Tech power amp on top. The handles are Penn Elcom spring handles. The corner guards are Girstner and Sons. The feet are Penn Elcome 1/2" tall iirc. All holes were center punched and drilled by hand. I initially placed the feet 1-1/2" in from each side but they ended up being too close and the corner guards wouldn't fit. I had to remove them and reposition them 1-3/4" from the sides. I thru-drilled the feet since the interior of the box is hidden by the amps.
It's really heavy. I'm guessing 70lbs. It was very difficult to lift it onto the cabinet but the cabinet was on top of a rolling dolly so that made it worse. If I didn't lift weights regularly it would be a no-go. It's so heavh that I'm worried about the structural integrity of the case and the wood screws holding the handles in. If I have problems with the handle screws I'll thru-bolt them.
Lessons learned:
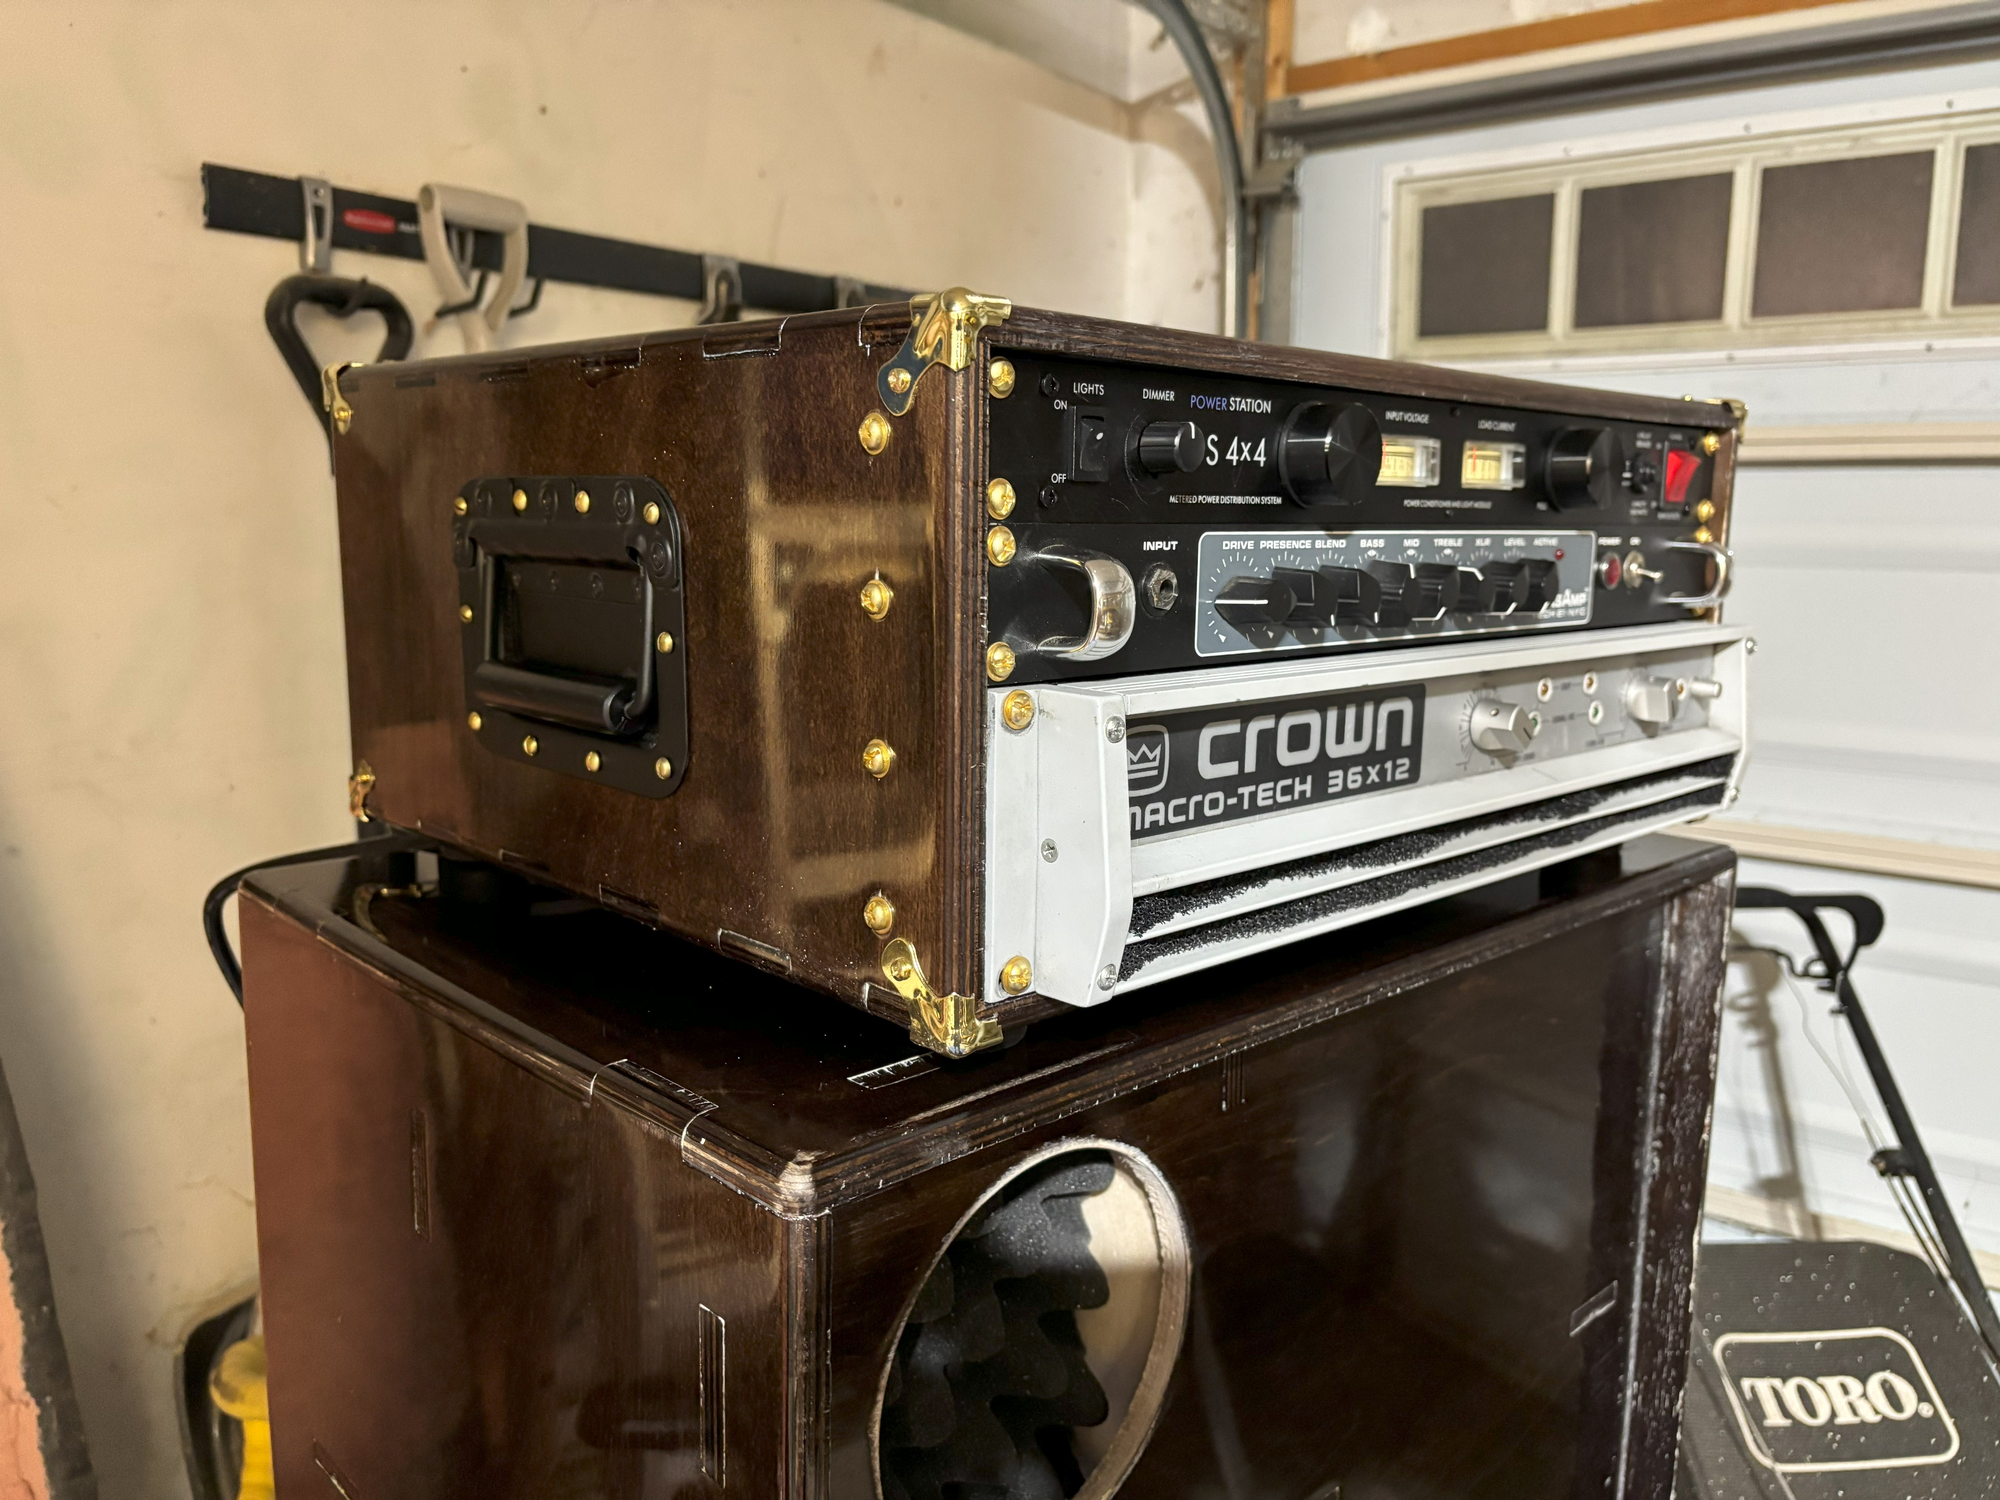
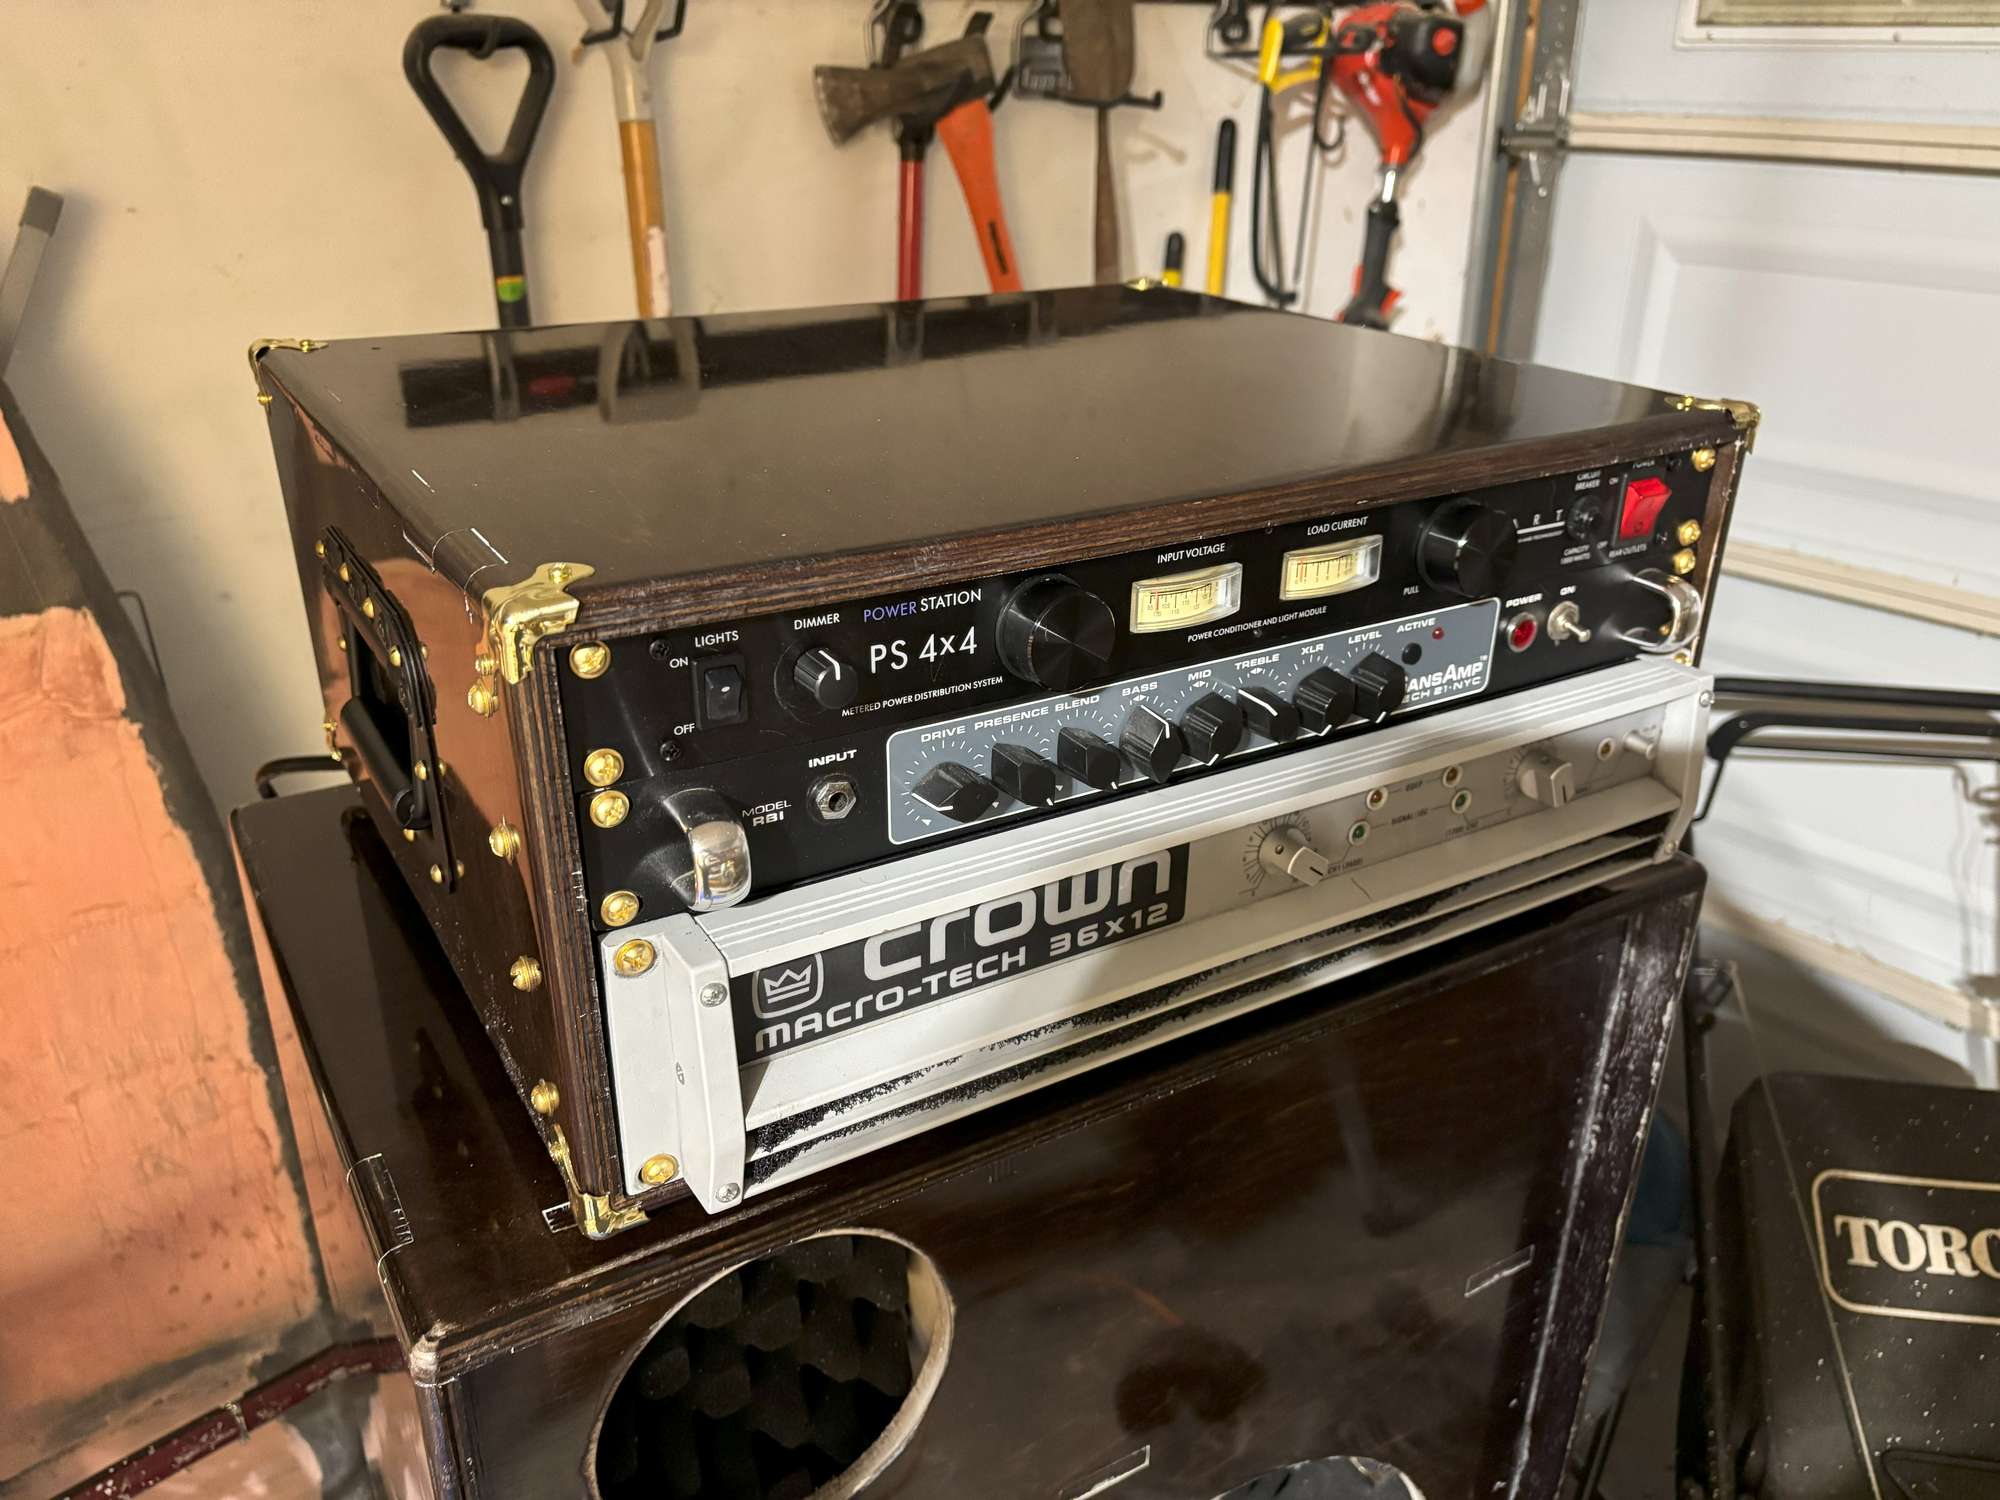
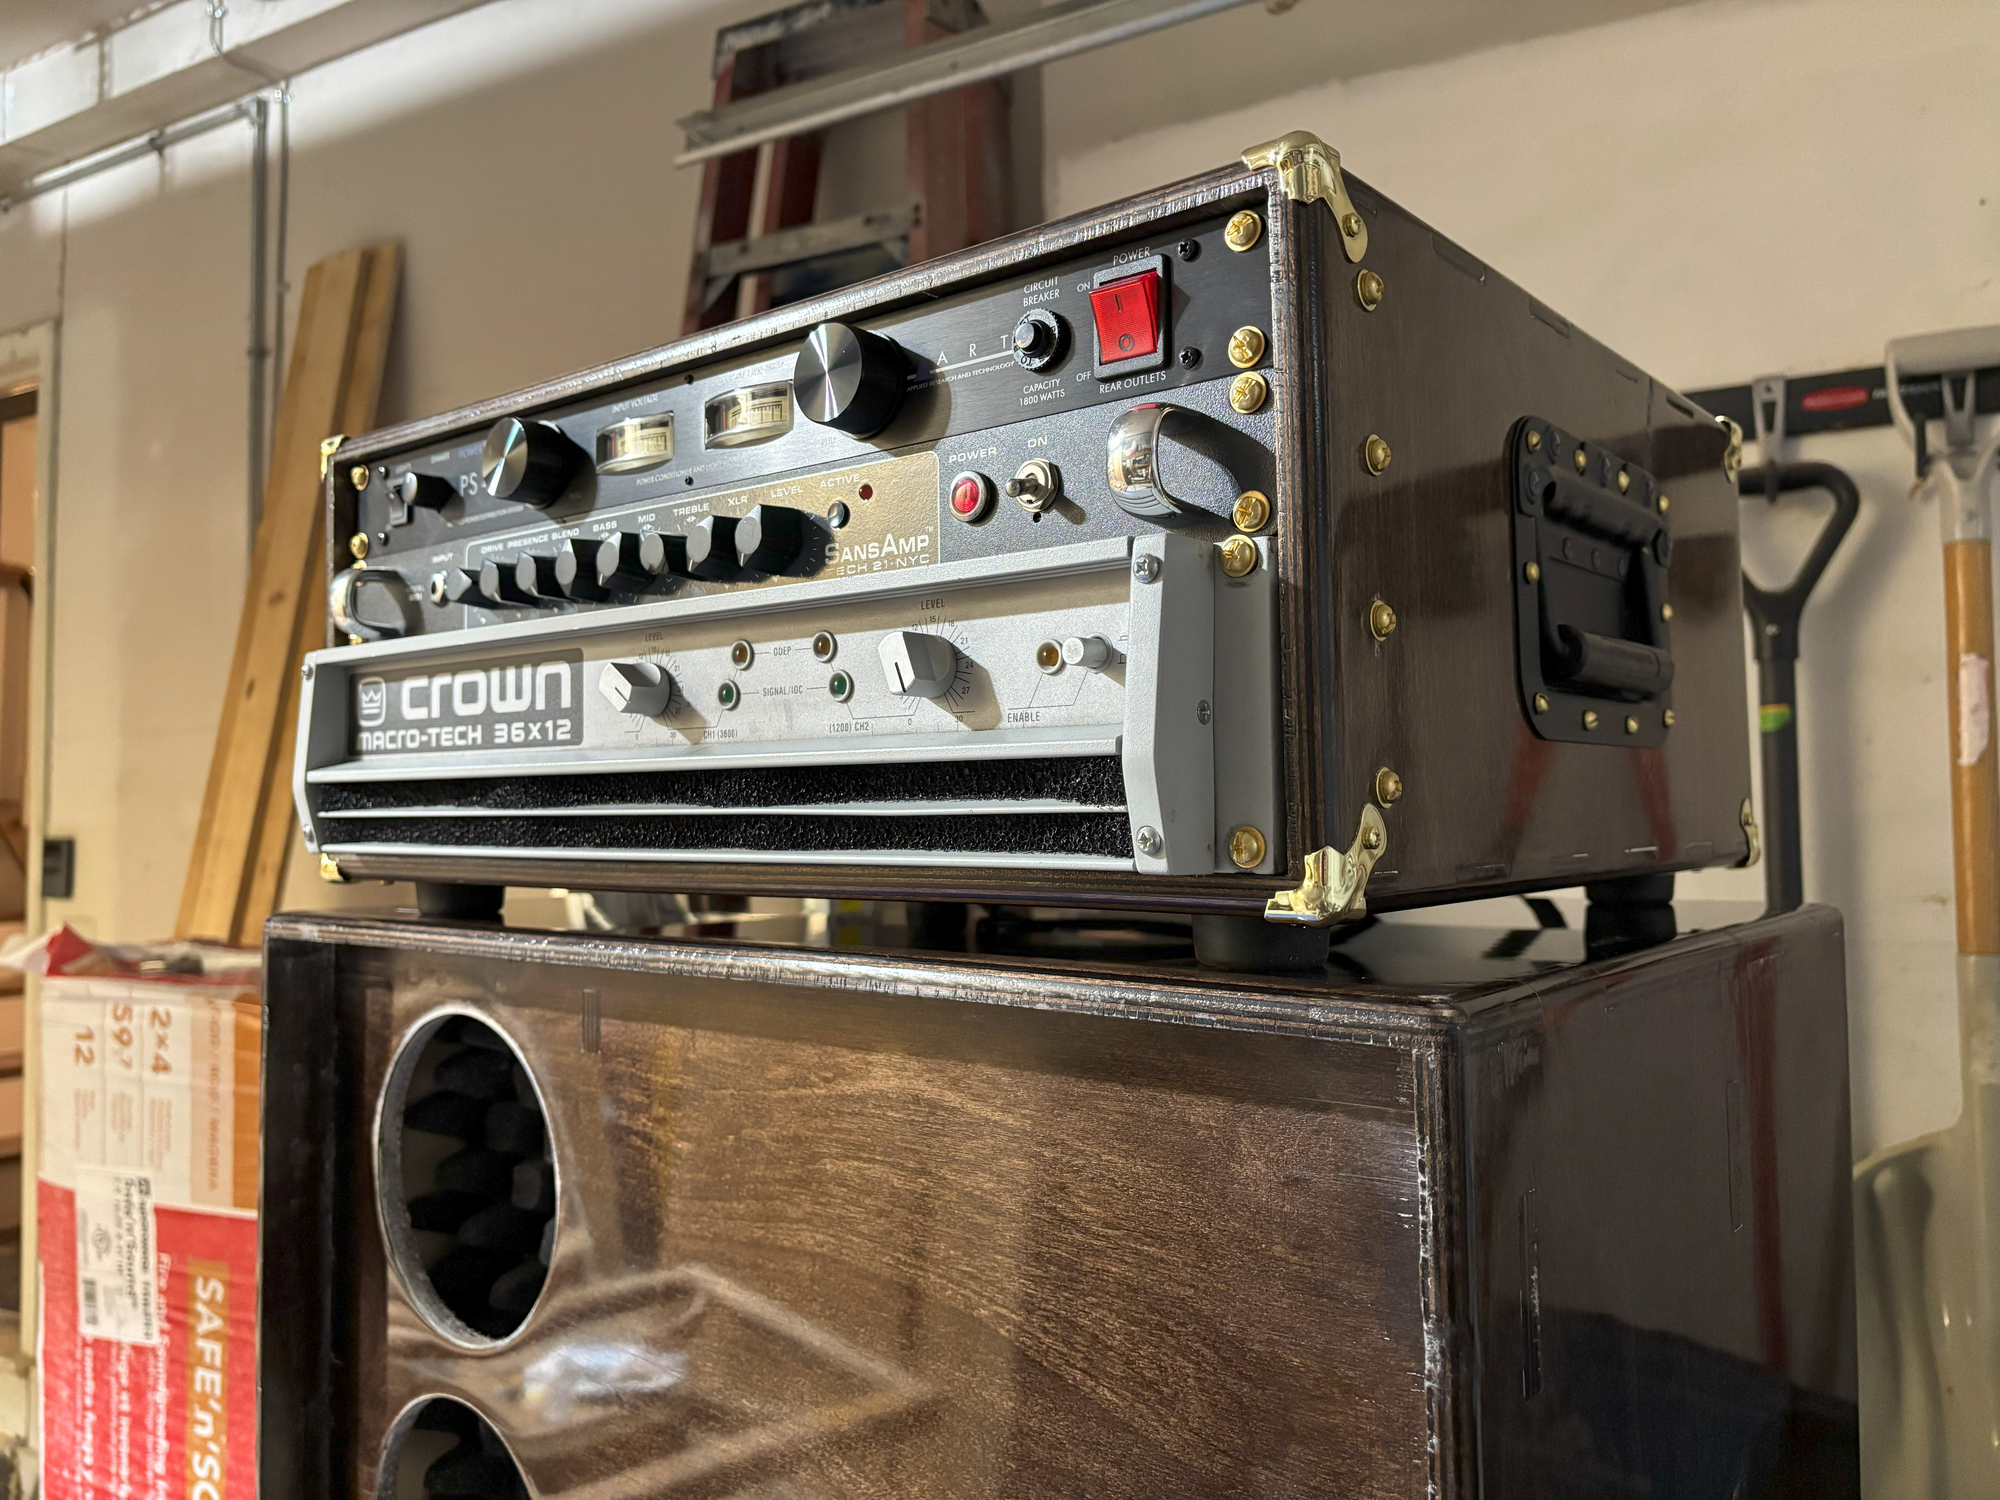
It's really heavy. I'm guessing 70lbs. It was very difficult to lift it onto the cabinet but the cabinet was on top of a rolling dolly so that made it worse. If I didn't lift weights regularly it would be a no-go. It's so heavh that I'm worried about the structural integrity of the case and the wood screws holding the handles in. If I have problems with the handle screws I'll thru-bolt them.
Lessons learned:
- Lay out hardware and drill mounting holes before finishing
- Buy a class D amp
Last edited:

Looks pretty nifty, although I might find getting used to those brass rack screws would take a bit of time. Is it safe to presume you're not powering the Crown amp from that 'Power Station'?
No I am not powering the amp from the station I just like the lights. The cable on the amp is huge and sticks really far out the back side. I'm considering hard wiring all the power supplies into a junction box inside the case with a big IEC on the back panel.Looks pretty nifty, although I might find getting used to those brass rack screws would take a bit of time. Is it safe to presume you're not powering the Crown amp from that 'Power Station'?
Last night I assembled my speaker cable and started soldering up my interconnect cable to connect the Sansamp to the Crown using Rean right angle XLR and Rean TRS with Mogami W2534 quad cable. The cable is annoying but that's all they had at the shop I went to. I'm really struggling with soldering. It seems like I just sit there forever waiting for the wires to got hot enough to tin, wait forever for the solder cups to heat up enough to tin, etc. I'm using a Weller adjustable temp station with a big tip and flux core solder. Do I need to use different solder? I really struggle to make good solder joints and every time I watch a tutorial it seems like they do it effortlessly and when I do all the same things I struggle.

At the risk of insulting you, and acknowledging that techniques are grouped into fields (woodworking, sailing, audio electronics):
Are you properly cleaning and tinning your iron’s tip? If not NOTHING ever works correctly…
Are you properly cleaning and tinning your iron’s tip? If not NOTHING ever works correctly…
I'm certainly not insulted and any advice is welcome! After some reading I am indeed not cleaning or tinning correctly and frankly didn't know it was part of the process. All my electronics knowledge is self-taught and there is a lot to learn. I'll do some maintenance the next time I work on it.
I'm hoping you mean rosin core solder, yes?...flux core solder...
Last edited:

- Feb 12, 2006
- 61,066
- 5
- 221,113
- Disclosures
- Development Engineer-Mesa Boogie, Development Engineer-Genzler (pedals), Product Support-Genz Benz

Does the station have a sponge or something else to clean the tip? It is important to keep the tip of the iron clean and tinned with a small amount of fresh solder, which helps to transfer heat into the part being soldered. You can add just a little extra to the tip for difficult parts that sink a lot of heat, though it is best to apply the flux-core solder to the heated part once it is above the melting point, not the iron. I usually wipe the tip on the sponge after every joint or two. A small amount of flux on the part can help too.Last night I assembled my speaker cable and started soldering up my interconnect cable to connect the Sansamp to the Crown using Rean right angle XLR and Rean TRS with Mogami W2534 quad cable. The cable is annoying but that's all they had at the shop I went to. I'm really struggling with soldering. It seems like I just sit there forever waiting for the wires to got hot enough to tin, wait forever for the solder cups to heat up enough to tin, etc. I'm using a Weller adjustable temp station with a big tip and flux core solder. Do I need to use different solder? I really struggle to make good solder joints and every time I watch a tutorial it seems like they do it effortlessly and when I do all the same things I struggle.
Large speaker connections can take a lot of heat, so flux and technique are important, so that you don't overheat surrounding plastic parts. Want to get enough heat in there quickly and get it done before anything melts. Practice on the bench using some thick wires or whatever until you are confident in the reliability of the joints. Had a bad solder joint in a fEARful crossover that I built for a friend, so it can happen even after some experience. Cold solder joints can lead to all sorts of weird problems/noises, so it is a good idea to ensure they are solid, shiny, and reliable.
Yes I did. My bad.I'm hoping you mean rosin core solder, yes?
Yeah it has a sponge. The tip I'm using looks pretty oxidized so I'll clean it off with a wire wheel or something. I try to avoid solder connections where possible and use crimps and screw terminals but obviously it can't always be avoided. Most of my experience is with circuit boards and fine tips and that was easier for me.Does the station have a sponge or something else to clean the tip? It is important to keep the tip of the iron clean and tinned with a small amount of fresh solder, which helps to transfer heat into the part being soldered. You can add just a little extra to the tip for difficult parts that sink a lot of heat, though it is best to apply the flux-core solder to the heated part once it is above the melting point, not the iron. I usually wipe the tip on the sponge after every joint or two. A small amount of flux on the part can help too.
Large speaker connections can take a lot of heat, so flux and technique are important, so that you don't overheat surrounding plastic parts. Want to get enough heat in there quickly and get it done before anything melts. Practice on the bench using some thick wires or whatever until you are confident in the reliability of the joints. Had a bad solder joint in a fEARful crossover that I built for a friend, so it can happen even after some experience. Cold solder joints can lead to all sorts of weird problems/noises, so it is a good idea to ensure they are solid, shiny, and reliable.
Should I get a spool of non rosin core to tin the tip with? Is the Harris solder okay or should I order something else? Should I clean the tip with flux?
Thank you for the tips.
Yeah it has a sponge. The tip I'm using looks pretty oxidized so I'll clean it off with a wire wheel or something. I try to avoid solder connections where possible and use crimps and screw terminals but obviously it can't always be avoided. Most of my experience is with circuit boards and fine tips and that was easier for me.
Should I get a spool of non rosin core to tin the tip with? Is the Harris solder okay or should I order something else? Should I clean the tip with flux?
Removing oxidization from the tip is critical and it should have a nice coating of freshly tinned solder to ensure best heat transfer. A light touch with a wire wheel or brush should suffice, after which it can be tinned with fresh solder. Not sure which Harris solder you are using. Generally I use 60/40 or 63/37 tin/lead flux-core electrical/electronic solder, not 50/50 plumbing solder or lead-free varieties. A bit of flux on the tip might help, once the bare metal surface is exposed, though the flux in the solder will probably be sufficient if it is clean.
Basically, soldering is a matter of turning metal with a low melting point into liquid and using that liquid metal to bridge metal connections. Doing this well requires attention to the effective transfer of heat, a clean, tinned, iron, and clean parts. People who work on SMT often use a lot of flux to ensure that the solder makes a good connection on those tiny contact points.
There may be some good soldering tutorials on the web... guessing NASA and the military know their stuff, as it needs to be as reliable and robust as possible.
Also, lead-free solder has a higher melting point and requires more heat and potentially longer contact with larger metal parts. Although lead-free solder has improved and is used in almost everything mass produced these days, it has some drawbacks and I would generally recommend that hobbyists stick to reliable tin/lead formulations. It also looks dull when it solidifies, making it more difficult to diagnose shoddy joints, while tin/lead solder provides nice, shiny joints. Additionally, it is important to keep the parts still when cooling to ensure a good joint. Ventilation is important too, given the lead content, though probably not an issue if only soldering a few joints on rare occasions... different for a workplace environment.
- Feb 12, 2006
- 61,066
- 5
- 221,113
- Disclosures
- Development Engineer-Mesa Boogie, Development Engineer-Genzler (pedals), Product Support-Genz Benz
Don’t use a wire wheel or any abrasives. They are coated.Yeah it has a sponge. The tip I'm using looks pretty oxidized so I'll clean it off with a wire wheel or something. I try to avoid solder connections where possible and use crimps and screw terminals but obviously it can't always be avoided. Most of my experience is with circuit boards and fine tips and that was easier for me.
Should I get a spool of non rosin core to tin the tip with? Is the Harris solder okay or should I order something else? Should I clean the tip with flux?
Thank you for the tips.
When they go bad they need to be replaced.


