• TalkBass has been independent since 1998. Add your voice.
    Create a free account to reply to discussions, view embedded media, and browse with fewer display ads.
    Join freeLog in
    Want zero display ads or expanded classifieds tools? Compare plans.

First build bass for my daughter

I've dressed the frets, and threw a few more coats of nitro on.

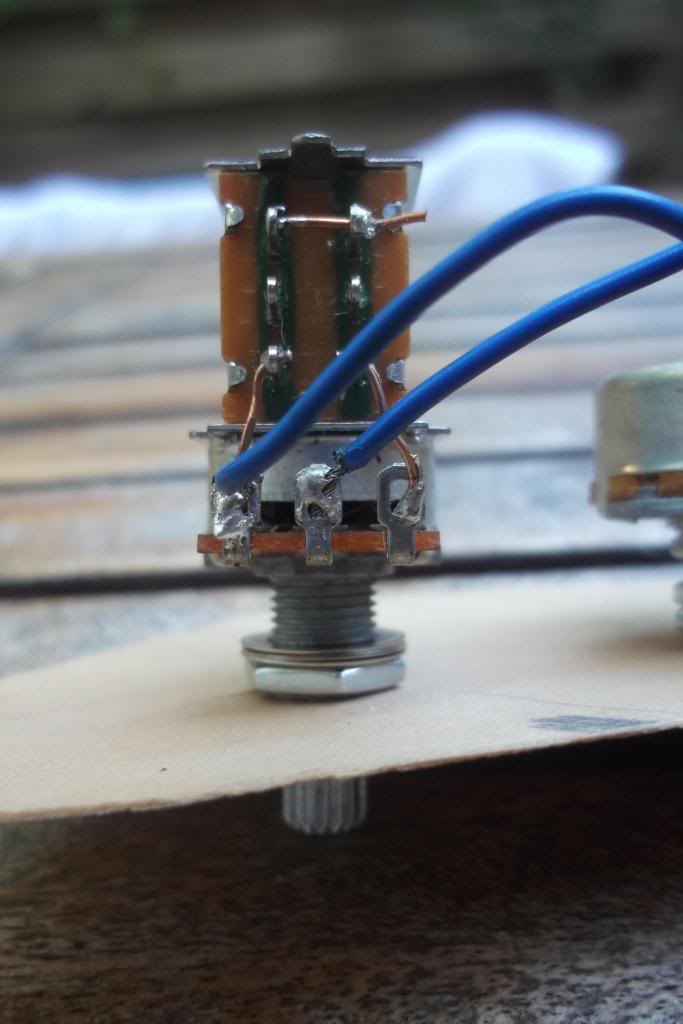
I've also started trying out my soldering skills... been soldering as much as I can before ahving to solder the pickup:
005-6.jpg


I'm wiring the p-46 precision pickup with a series-parallel switch.

I hope I'm doing this right. First time I ever solder anything... I have no idea how to tell if parallel is push and series is pull or viceversa...
If anyone can tell me I'll be very thankfull. I also have no idea if wiring the pots upside down changes anything... :hiding:

 
I've been working on the bridge... I'm using a leftover from the fretboard, though the grain will not match the fretboard's orientation beacuase it wouldn't be wide enough.


007.jpg


routed four channels for the saddles so that I can adjust intonation. I'm hoping they'll hold with just string tension, otherwise I might have to glue them.

saddles made out of brass:
020-3.jpg


I'm shaping them in pairs, out of the brass I had at hand. First I tried with a small piece to shape a single saddle, but this was really tricky, I then realized that a longer piece of brass was easier to handle, plus when I cut that to the final size the saddles would already be shaped similar to each other. Didn't have a long enought piece to make the 4 saddles, but I think it worked.
Still need to sand them on the sides a bit so they fit in the channels, file a groove and adjust final height. this is how they look so far:
008.jpg


Still need to work on the final shape of both the bridge and saddles. At this point I need to be really careful with final measurements. Fortunately, my daughter is helping me out.

010.jpg
 
Nice shape. And it looks like you built some height adjustment into the depths of the grooves, very cool.

Did I!? how so?

my plan was to file the grooves for each string width, but then adjust final height by sanding down the bottom of the saddle, do you think it would be safer to fine tune height by sanding down the groove?

The idea was to have the area of contact between the string and saddle as small as possible, i figure this helps with the final adjustment of intonation and lets the string vibrate "freer", if it makes any sense, though I really have no idea if this is correct.
 
Did I!? how so?

my plan was to file the grooves for each string width, but then adjust final height by sanding down the bottom of the saddle, do you think it would be safer to fine tune height by sanding down the groove?

The idea was to have the area of contact between the string and saddle as small as possible, i figure this helps with the final adjustment of intonation and lets the string vibrate "freer", if it makes any sense, though I really have no idea if this is correct.
Maybe it is an illusion, but in the the last pic of the bridge held by your beautiful assistant, it looks like the groove at the near (pointy) end of the bridge plate is shallower than the others - which would make send if that is supporting a B-string, which needs more height.


I'd keep the width of the saddles very close to the width of the groove. If the fit is not snug enough, you can get a clicking each time you pluck a string, and the plucking finger comes to rest on the next string over.
 
Maybe it is an illusion, but in the the last pic of the bridge held by your beautiful assistant, it looks like the groove at the near (pointy) end of the bridge plate is shallower than the others - which would make send if that is supporting a B-string, which needs more height.


I'd keep the width of the saddles very close to the width of the groove. If the fit is not snug enough, you can get a clicking each time you pluck a string, and the plucking finger comes to rest on the next string over.

Ok I see now! (since I'm planning to have some grooves on the saddles themselves for the strings, I thought you were talking about those, and not the grooves on the bridge itself)
yes, it's no optical illusion, the deepest groove is the E string, shallower is G.
To be honest it wasn't really planned, but then I thought it might be useful for later adjustment as you say.
I did try to get the saddles to fit "snugily", fitting each one to its correspondent groove.

Sadly, I was trying it out yesterday, and it seems that the string spacing on this bridge is off... I'm not sure I'll be able to use it :bawl: It's actually narrower than it's supposed to. I think i might be able to use it, but it would show behind the bridge that the strings are not straight, and I think this might be a potential hazard for the string to come off the saddle when pluck too hard...
off to make a new one...
 
Ok, this time out, I actually measured the correct string spacing prior to making a new bridge. It looks a bit better now I think. The original looks sort of "chubby", because I was actually trying to fit the design into a left over piece of wood from the fretboard. And it would have work had I measured the spacing...

Anyway, so I made a new one out of ebony. And had a problem while routing the channel for the E string saddle, so I glued a piece of ebony in there to make it right, then filled with ca and ebony dust:

036.jpg


I'm almost done with it, will post pictures later.

I've also buffed up the headstock, and put the tuners on.

045.jpg


I did this because I wanted to make sure of the correct bridge's placing, and I thought I might just leave the tuners on, and not risk messing around with the finish in the headstock.

If all goes according to plan, this weekend I'll be buffing the rest of the body, wiring the pickup... and I'll be almost done...
 
At last I finished buffing the body! it's not perfect, but I'm quite happy with it. It was not as easy as it looked at first, and of course all the previous mistakes left unfixed are easy to spot.

039.jpg


037-1.jpg


Finished shaping the bridge. The fix doesn't look too bad:

004-8.jpg


When done with the shaping I rubbed some tung oil on it:

027-4.jpg


Then I also put some tung oil on the fretboard:

012-5.jpg


015-4.jpg


bridge on place:

042-1.jpg


Well, I definitely must have this set up by next sunday!
 
+1, that looks really, really good.
Your daughter should be quite proud of you.

wraub

thank you wraub!!!


I think I'm done with the oil now. I also oiled a couple of test knobs I had done with spare wood from the body, though I'm not sure if oil was a good choice, it made the wood quite darker. For now they'll have to do, I'm anxious to have this finished. I can have new knobs done later and try different finishes.

003.jpg
 
Pickups and bridge in place (sort of...) I really like how the bridge turned out.

019.jpg


messed up the back of the bass... ferrules in place and I don't like them...
007-1.jpg

and HUGE mistake when drilling for the mic screws... the bass' body is thinner than I remembered while drilling...:hmm:
don't have pictures of the disaster. Already fixed it, in a fast and uncarefull manner. from a distance it sort of looks like small knots on the wood. Close up looks... well... I'd better get the bass done and roadworn fast so that all the finish mistakes go sort of unnoticed...

Couldn't finish the wiring... hope to finish it by next week.
 
Looks very rickenbacker-ish. I like it!

Please tell me you have sat down with a soldering iron by now and finished this amazing bass!

Hopefully we can hear some sound files soon.

Thank you very much!!!

I had a friend that works with metal bend me a piece of brass to hold the jack. I finished shaping it, and polished it. Don't have pics of the process, but here it is on the bass: ( I need to get smaller screws I think)
001-8_zps396881de.jpg


It doesn't follow the curve perfectly, since my friend took the brass to his shop to shape. He looked at the bass, draw the curve of the body on a piece of paper, then took it to the shop, where he heats the metal and hammers it to shape. He didn't have the bass to fit it perfectly. Still, I think it looks guite good.

028-4_zps50b382e7.jpg


004-9_zps1dbc7d62.jpg


013-6_zpsf5782f28.jpg


(that screw looks so bad on closeup!! definitely need to do something about them... )

here you can see the fix of the screw holes on the back:
015-5_zpseae0e53f.jpg


depending on the angle, they look as knots in the wood:

019-6_zpse7fe6e15.jpg


Or you can tell on closeup there's something wrong there:

018-5_zps0c27185b.jpg


In the future I might redo the finish on the back.
I also put the strap bottons on:

022-4_zpsd5d5c22b.jpg


025-6_zps6efebd0c.jpg


Bass balances great! no neck dive at all.

Finally, I have finished soldering. Not a perfect soldering job to be honest, it started quite well, and then suddenly there were so many cables that had to go to the same place! It's working for now, so I'll leave it at that and tidy it up in the future. Right now, I need to play this bass and start building something new!
No soundclips though, hope to have some done this week. I'm quite pleased with the sound and feel of the bass! I have a push pull pot for series/parallel, and though parallel has a lot less output, I find the sound quite usable, and when playing live with a volume pedal this can be sorted out quite easily.

So, I hope to have knobs on it next week... and some soundclips for you to enjoy!!!
 
Man, it's incredible looking!

Thank you Darkstrike!!
I never posted finished pics... and still have no soundclips... I'm really pleased with the sound of the Wilde bill lawrence pickup, and with the overall feel and balance of the instrument.

so here's a full body shot with knobs on. The knobs I might change in the future, this were finished with shellac and look a lot darker than the body, which is nitro. I'm starting a new build now, so when I get to the knobs I might make new ones for this bass and finish them in nitro, and see what fits best. For now this will do.
I also changed the screws on the jack plate.

primerbajofrontentero_zpsb5a06f96.jpg


perillas_zps07998ef1.jpg


I'll come back and post soundclips when I have them, and maybe some more detailed pictures.
Thanks for looking!